
Vinsælir flokkar
Ertu að leita að garni?


Athugasemdir / Spurningar (57)
![]() Michelle skrifaði:
Michelle skrifaði:
Bonjour. Ce modèle m interesse... j aimerais savoir si dans le dos vu qu il n y a pas de photo du dos. il y a de la dentelle ou est ce du jersey? merci 😁😁
25.09.2020 - 13:13DROPS Design svaraði:
Bonjour Michelle, le point fantaisie ajouré est le même dans le dos que devant. Bon tricot!
25.09.2020 - 14:38
![]() Richard skrifaði:
Richard skrifaði:
HELP! I am in need of 3 x 50g balls of 'Drops Cotton Merino' - Colour 17- Dye Lot 52848. Any help or suggestions, gratefully received. Also, If I make a hat using Cotton Merino, but the pattern calls for 'Fingering Merino' will it make much difference?? Thank you. Richard.
27.01.2020 - 13:12DROPS Design svaraði:
Dear Richard, please contact your DROPS store (and more stores if necessary) or even our DROPS Workshop - CottonMerino is a 8 ply/Dk/Worsted yarn - see shadecard - see here all patterns you can use for Cotton Merino. Happy knitting!
27.01.2020 - 14:24
![]() Richard skrifaði:
Richard skrifaði:
Sorry, the last comment should read with "I placed the marker to the side (on my RIGHT)!" Thanks.
24.01.2020 - 15:28
![]() Richard skrifaði:
Richard skrifaði:
Hi, Thanks for your replies & I've mastered the difficult start - as you say, with double-pointed needles. The raglan decreasing is another matter. As I look at the sleeve (to my left), I have placed a marker on the stitch nearest to the side. I have then placed another marker on the 1st stitch of the side (which is to my left). Now, you say to start 3 stitches before this marker- yes? Where to I start on the sleeve decrease, please.
24.01.2020 - 15:25DROPS Design svaraði:
Dear Richard, you should have 1 marker between each piece; so if you look at the sleeve, there is 1 marker at the end of body (either back or front piece) = before the first stitch on sleeve and 1 marker at the end of sleeve, after the last stitch on sleeve = before the first stitch on front/back piece. Start 3 sts before the first of these 2 markers, K2 tog, = 1 stitch remain before marker, work this stitch + the next st (= first after marker) and dec = there are 2 sts decreased at the marker and K2 between the dec (with marker in the middle of these K2). Repeat at each marker. Happy knitting!
24.01.2020 - 16:04
![]() Richard skrifaði:
Richard skrifaði:
Hi, once more. I've placed markers at the sleeves & sides & now trying to knit the raglan decreases! I understand the pattern for instructions for the sides, but starting 3 stitches before the marker (does this include the marker), I end up, after the decrease, taking the first stitch of the sleeve. Your assistance once again would be very much appreciated. Thank you. Richard.
24.01.2020 - 12:29DROPS Design svaraði:
Dear Richard, there should be 1 stitch on each side of marker on each piece between the raglan decreases, ie you will work at each transition: K2 tog (1 dec), K2 (= Knit the stitch before marker + the stitch after marker), slip 1 as if to K, K1, psso. So starting at the transition between back and one sleeve, you will start (and end) round with K1, Hope it helps, Happy knitting!
24.01.2020 - 14:23
![]() Richard skrifaði:
Richard skrifaði:
Good morning. I have completed the body & both sleeves. But now that I have joined them on one needle, I find that when trying to knit the sleeves, the stitches are stretched (almost impossible to do)! I've had to use double-pointed needles to help me out! I don't remember having this trouble when I made the first one of this pattern (in size medium). Please can you help. Thanks. Richard.
24.01.2020 - 10:15DROPS Design svaraði:
Dear Richard, that's right, the first few rounds at the beginning of yoke can be somewhat tricky, you can use the double pointed needles or circular needles if you like to, after few rounds, all stitches will have enough place on the circular needle to work them on the round. Happy knitting!
24.01.2020 - 14:08
![]() Richard skrifaði:
Richard skrifaði:
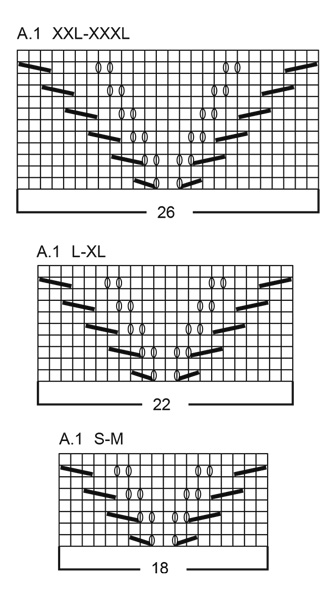
Thank you for the reply to my question. I sent a sketch via email, showing how I was knitting the round. So, from what you are saying, I have to knit A1 (1st row), (only for the complete round)! Then for the next round, I have to knit A1 (2nd row), for the complete round! Then 3rd row, 4th row & so on.... This makes sense. Please can you confirm this for me.. Thanks a million. Richard.
13.01.2020 - 20:17DROPS Design svaraði:
Dear Richard, that's how you should work the diagrams (row 1 in A.1 on all diagrams, then row 2 in A.1 on all diagrams and so on). Happy knitting!
14.01.2020 - 07:50
![]() Richard skrifaði:
Richard skrifaði:
Good morning, again. Continuing from the two Ridge rows, I began the round, as per your instructions. But, I find that the *A1* pattern, repeats 3 times (2 with odd row numbers, 1 even row number. in the first half, up to 124 stitches. But for the continuing *A1* pattern, there is only 1 odd number row! But, there are 2 even row numbers! Is this so? Please. Richard. I have made a drawing which explains better. If I may upload it.
13.01.2020 - 11:03DROPS Design svaraði:
Dear Richard, not sure I'm getting this properly, when working A.1 in the round, you should work same round in each diagram all the round = round 1 A.1 when working round 1 on yoke, then work round 2 in A.1 and so on. What do I misunderstand?
13.01.2020 - 11:34
![]() Richard skrifaði:
Richard skrifaði:
Sadly, (Hi again). I'm still struggling after completing the two ridges! It is written that I knit 20, purl 3 (23 stitches), then *A1 (22 stitches, purl 6! (A1 = 10 rows @22 stitches) = 220 stitches. But adding the first 23 stitches to the 220 stitches = 243 stitches? Yet it is written, that I then purl 6! Doing this gives a total of 249 stitches! What am I doing wrong please? Forgive me, I am nearly 78 years old. Have a good day.
09.01.2020 - 12:22DROPS Design svaraði:
Dear Richard, you should work the 248 sts in size L as follows: knit 20, purl 3, *A.1 (= 22 sts), purl 6*, repeat from *-* a total of 2 times (= 28 sts x 2= 56 sts), A.1 (= 22 sts), purl 3, knit 40 , purl 3, repeat from *-* (= 56 sts), A.1 (= 22 sts), purl 3, knit 20 = 20+3 + 56+22 + 3+40+3 + 56+22 +3+20=248 sts. Try to add markers between each section, it can help you to check the number of stitches. Happy knitting!
09.01.2020 - 14:07
![]() Richard skrifaði:
Richard skrifaði:
Hi (once again). This should be the last for awhile. I understand the A1 block now, working from the bottom up! But, please tell me: Do I follow the pattern from left to right or right to left?? I ask this, because, I am reading the block from right to left! I don't believe it makes much difference (but, there again, you are the Expert). Thank you. Richard.
07.01.2020 - 22:07DROPS Design svaraði:
Dear Richard, diagrams are read bottom up starting from the right corner to the left, ie you will read every row in diagrams from the right towards the left (since you are working in the round) - read more about diagrams here (link is now working). Happy knitting!
08.01.2020 - 09:04
|
|||||||||||||||||||
Lemon Parfait#lemonparfaitsweater |
|||||||||||||||||||
 |
 |
||||||||||||||||||
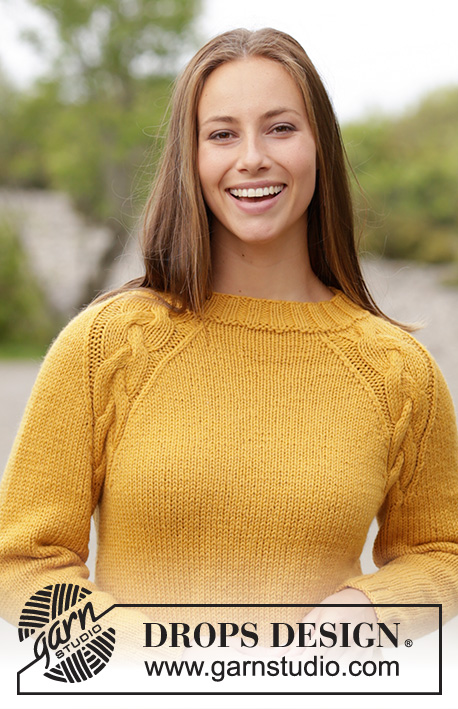
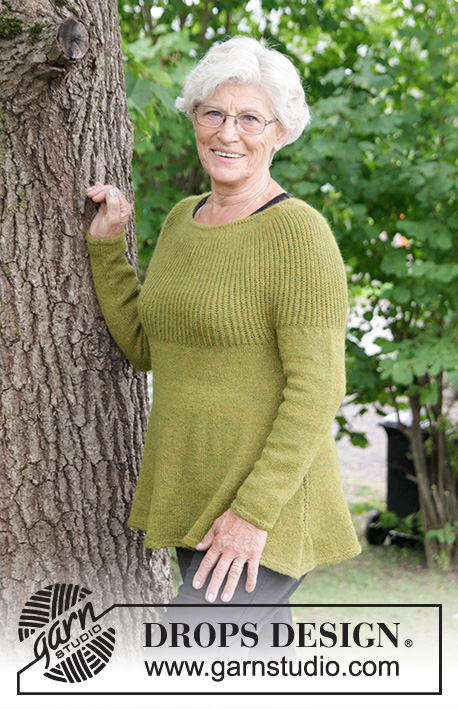
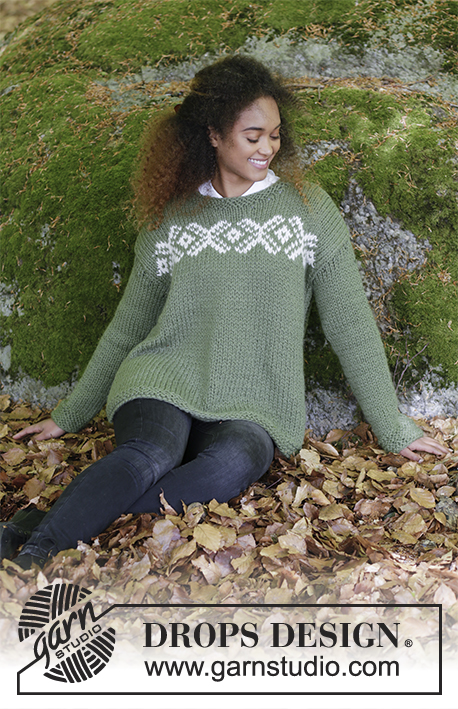
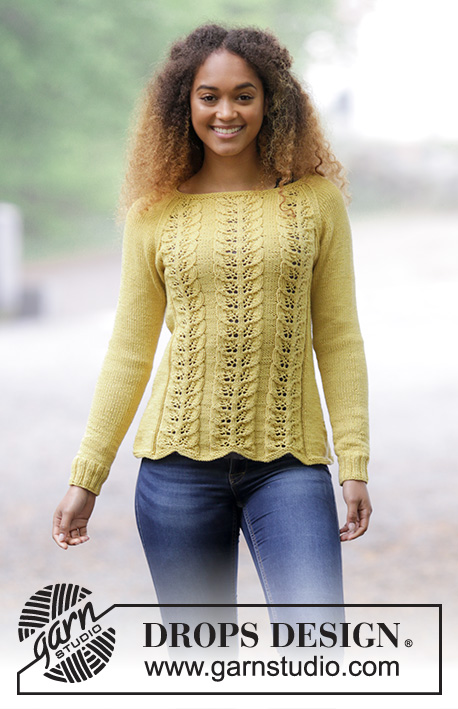
Prjónuð peysa með blaðamynstri og laskalínu. Stærð S - XXXL. Stykkið er prjónað úr DROPS Cotton Merino.
DROPS 180-1 |
|||||||||||||||||||
|
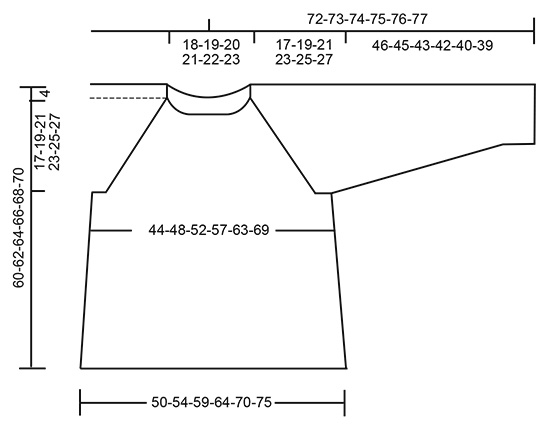
------------------------------------------------------- UPPLÝSINGAR FYRIR MYNSTUR: ------------------------------------------------------- GARÐAPRJÓN (prjónað í hring): *1 umferð slétt og 1 umferð brugðið*, endurtakið frá *-*. MYNSTUR: Sjá mynsturteikningu A.1. Veljið mynstur fyrir rétta stærð. ÚRTAKA (á við um í hlið): Byrjið 3 lykkjum á undan prjónamerki í hlið: Prjónið 2 lykkjur slétt saman, prjónið 2 lykkjur slétt (prjónamerki er staðsett mitt á milli þessa lykkja), takið 1 lykkju óprjónaða, prjónið 1 lykkju slétt, steypið óprjónuðu lykkjunni yfir lykkjuna sem var prjónuð. ÚTAUKNING: Aukið út undir ermi – byrjið 1 lykkju á undan prjónamerki þannig: Sláið 1 sinni uppá prjóninn, prjónið 2 lykkjur slétt (prjónamerki er staðsett mitt á milli þessa 2 lykkja), sláið 1 sinni uppá prjóninn. Í næstu umferð er uppslátturinn prjónaður snúinn slétt svo að ekki myndist gat. LASKALÍNA: Fækkað er um 2 lykkjur í hverri skiptingu á milli fram- og bakstykkis og erma. Byrjið 3 lykkjum á undan prjónamerki: Prjónið 2 lykkjur slétt saman, 2 lykkjur slétt (prjónamerki er staðsett mitt á milli þessa lykkja), takið 1 lykkju óprjónaða eins og prjóna eigi hana slétt, 1 lykkja slétt, steypið óprjónuðu lykkjunni yfir lykkjuna sem var prjónuð. LEIÐBEININGAR: Ef prjónfestan passar ekki á hæðina og prjónað er of fast, kemur berustykkið til með að verða of stutt og handvegur of lítill. Þetta er hægt að jafna út með því að prjóna 1 auka umferð án úrtöku með jöfnu millibili á milli úrtöku. ------------------------------------------------------- BYRJIÐ Á STYKKI HÉR: ------------------------------------------------------- PEYSA - STUTT ÚTSKÝRING Á STYKKI: Stykkið er prjónað í hring á hringprjón, neðan frá og upp. FRAM- OG BAKSTYKKI: Fitjið upp 212-228-248-268-292-316 lykkjur á hringprjón 4 með Cotton Merino. Prjónið 4 umferðir GARÐAPRJÓN – sjá útskýringu að ofan. Prjónið síðan þannig: 17-21-20-25-25-31 lykkjur slétt, 3 lykkjur brugðið, *A.1 (= 18-18-22-22-26-26 lykkjur), 6 lykkjur brugðið *, prjónið frá *-* alls 2 sinnum, A.1, 3 lykkjur brugðið, 34-42-40-50-50-62 lykkjur slétt, 3 lykkjur brugðið, *A.1, 6 lykkjur brugðið *, prjónið frá *-* alls 2 sinnum, A.1, 3 lykkjur brugðið, 17-21-20-25-25-31 lykkjur slétt. Setjið 1 prjónamerki í byrjun umferðar og 1 prjónamerki eftir 106-114-124-134-146-158 lykkjur = í hliðum. Haldið áfram með þetta mynstur. ATHUGIÐ PRJÓNFESTUNA! Þegar stykkið mælist 8 cm er fækkað um 1 lykkju hvoru megin við prjónamerkin í hlið (= 4 lykkjur færri) – LESIÐ ÚRTAKA! Fækkið lykkjum með 4½ cm millibili alls 7 sinnum í öllum stærðum = 184-200-220-240-264-288 lykkjur. Þegar stykkið mælist 39-39-39-39-39-39 cm fellið af 8-8-10-10-12-14 lykkjur í hvorri hlið (= 4-4-5-5-6-7 lykkjur hvoru megin við prjónamerkin). Nú eru 84-92-100-110-120-130 lykkjur á bakstykki og á framstykki. Geymið stykkið og prjónið ermar. ERMI: Stykkið er prjónað í hring á sokkaprjóna, skiptið yfir á stutta hringprjóna þegar aukið hefur verið nægilega út með lykkjum. Fitjið upp 48-52-56-56-60-64 lykkjur á sokkaprjón 3,5 með Cotton Merino. Prjónið 1 umferð slétt, prjónið síðan stroff 2 lykkjur slétt, 2 lykkjur brugðið. Þegar stykkið mælist 6 cm er skipt yfir á sokkaprjón 4. Prjónið 1 umferð þar sem fækkað er um 4-6-8-6-8-10 lykkjur jafnt yfir = 44-46-48-50-52-54 lykkjur. Setjið 1 prjónamerki í byrjun umferðar (= mitt undir ermi). Haldið áfram í sléttprjóni. Þegar stykkið mælist 10-7-7-10-7-7 cm er aukið út um 2 lykkjur mitt undir ermi – LESIÐ ÚTAUKNING. Aukið út með 3-2½-2-1½-1½-1½ cm millibili alls 12-15-18-19-20-21 sinnum = 68-76-84-88-92-96 lykkjur. Þegar stykkið mælist 46-45-43-42-40-39 cm (styttra mál í stærri stærðum vegna lengra berustykkis) fellið af miðju 8-8-10-10-12-14 lykkjur undir ermi = 60-68-74-78-80-82 lykkjur. Geymið stykkið og prjónið aðra ermi á sama hátt. BERUSTYKKI: Setjið inn ermar á sama hringprjón og fram- og bakstykki þar sem felldar voru af lykkjur fyrir handveg = 288-320-348-376-400-424 lykkjur. Setjið eitt prjónamerki í hverja skiptingu á milli fram- og bakstykkis og erma (= 4 prjónamerki). Haldið áfram með mynstur eins og áður og fækkið lykkjum fyrir LASKALÍNA – sjá útskýringu að ofan. Fækkið lykkjum í 4. hverri umferð 5-5-6-6-6-7 sinnum, síðan í annarri hverri umferð 14-16-18-21-23-24 sinnum = alls 19-21-24-27-29-31 sinnum – þær lykkjur í A.1 sem ekki ganga upp í mynsturteikningu í úrtöku, eru prjónaðar í sléttprjóni. Eftir allar úrtöku eru 136-152-156-160-168-176 lykkjur í umferð. Prjónið 4 umferðir garðaprjóni yfir allar lykkjur, en í fyrstu umferð eru prjónaðar 22-26-26-24-22-20 lykkjur yfir hvorri ermi slétt saman 2 og 2, að auki er fækkað um 18-28-26-28-34-40 lykkjur jafnt yfir = 96-98-104-108-112-116 lykkjur. Fellið af með sléttum lykkjum. FRÁGANGUR: Saumið saman op undir ermum. |
|||||||||||||||||||
Skýringar á teikningu |
|||||||||||||||||||
|
|||||||||||||||||||
 |
|||||||||||||||||||
 |
|||||||||||||||||||
Ertu búin að klára þetta mynstur?Merktu myndirnar þínar með #dropspattern #lemonparfaitsweater eða sendu þær inn í #dropsfan gallery. Vantar þig aðstoð með þetta mynstur?Þú finnur 27 kennslumyndbönd, dálk með athugasemdum/spruningum og fleira með því að skoða mynstrið á garnstudio.com © 1982-2026 DROPS Design A/S. Við áskiljum okkur öll réttindi. Þetta skjal ásamt öllum undirhlutum þess, hefur höfundarétt. Lestu meira varðandi hvað þú mátt gera við mynstrin okkar neðst á hverju mynstri á síðunni okkar. |
|||||||||||||||||||


Með yfir 40 ára prjón- og hekl hönnun, býður DROPS Design uppá eitt umfangsmesta vöruúrval af mynstrum án endurgjalds á netinu – þýdd á 17 tungumálum. Í dag þá erum við komin í 324 vörulista og 12290 mynstur - 7890 mynstur sem eru þýdd á [íslensku].
Við vinnum hörðum höndum við að færa þér það besta sem prjón og hekl hefur uppá að bjóða, innblástur, ráðgjöf og auðvitað frábært gæða garn á ótrúlegu verði! Langar þig að nota mynstrin okkar fyrir annað en til einkanota? Þú getur lesið hér ákvæði hvað leyfilegt er að gera í textanum Copyright sem er neðst á öllum mynstrunum okkar.
Skrifaðu athugasemd um DROPS 180-1
Við myndum gjarna vilja fá að heyra hvað þér finnst um þetta mynstur!
Ef þig langar að skifa inn spurningu, vertu þá viss um að velja réttan dálk að neðan, til þess að við getum svarað sem fyrst. Það verður að merkja við svæði merktri með *.