
Vinsælir flokkar
Ertu að leita að garni?


Athugasemdir / Spurningar (53)
![]() Michaela skrifaði:
Michaela skrifaði:
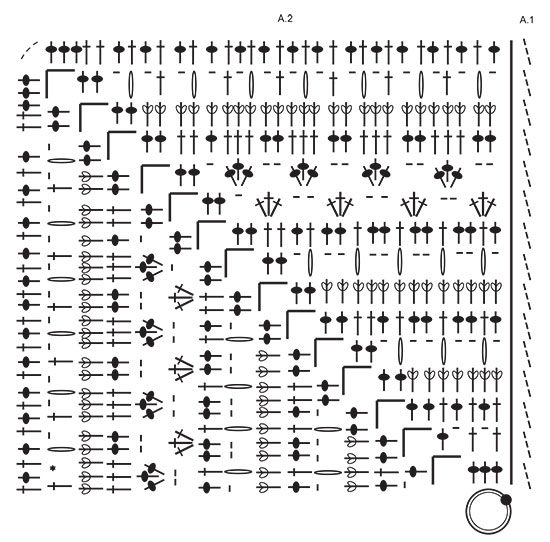
Tut mir leid, vielleicht war die Frage vorher unklar. Wenn man im Diagramm A2 z.B. die 4. und 5. Reihe von unten ansieht, dann sind in der 4. Reihe 9 Stäbchen dargestellt. In der 5. Reihe sollen dann jeweils 4 Stäbchen zusammengehäkelt werden, und dass insgesamt dreimal. Das geht sich aber nicht aus - dazu bräuchte ich in der 4. Reihe 12 Stäbchen und nicht 9. Daher meine Frage, ob man hier nicht immer 3 Stäbchen zusammenhäkelt anstatt 4? Vielen Dank!
27.05.2024 - 10:18DROPS Design svaraði:
Liebe Michaela, die 4 Stäbchen zusammen sind als nur 1 Stäbchen gezählt und werden so gehäket (Anfang der 5. Reihe: 1 Lm, 1 M überpsringen, 4 Stb zs in das nächste Stb, 2 Lm, 2 M überspringen, 4 Stb zs in das nächste Stb, 2 Lm, 2 M überspringen, 4 Stb zs in das nächste Stb, 1 Lm, 1 Stäbchen überspringen (= 1+1+2+1+2+1+1= 9 Maschen), dann 2 Stäbchen in nächsten Luftmaschenbogen, usw... Viel Spaß beim Häkeln!
27.05.2024 - 12:59
![]() Michaela skrifaði:
Michaela skrifaði:
In der Anleitung steht bei einem Symbol: "4 STÄBCHEN ZU 1 STÄBCHEN ZUSAMMENHÄKELN." Wenn man aber das Diagramm A2 ansieht und dort die Maschen zählt, sieht es eher so aus, als würden nur 3 Stäbchen zusammengehäkelt? Habe ich etwas übersehen? Vielen Dank!
26.05.2024 - 13:37DROPS Design svaraði:
Liebe Michaela, hier wird man 4 Stäbchen zusammen häkeln, so zählt jedes als 1 Stäbchen (wie für 1 Noppe z.B.). Viel Spaß beim Häkeln!
27.05.2024 - 08:46
![]() Gunvor skrifaði:
Gunvor skrifaði:
Jag blir galen på varv 4! Hur jag än gör får jag 2 stolpar över vid hörnet. Om jag tolkat diagramet rätt, är det sammanlagt 11 relief stolpar i varvet innan. Hoppar över 2m, en stolpgrupp i nästa, hoppas över 2m, en stolpgrupp i nästa. Hoppas över 2m 1 stolpgrupp i nästa, hoppa över 1m. Då är jag framme vid hörnet och har 2 st kvar. Det funkar ju inte? Tänker jag fel? Mönstret är jättevackert, men diagrammet är svårt att följa. Hade föredragit en beskrivning i text.
24.05.2024 - 08:56DROPS Design svaraði:
Hej Gunvor, du starter med at hoppe over 1m, 1 stolpgrupp i nästa, hoppa över 2, 1 stolpgrupp i nästa, hoppa över 2, 1 stolpgrupp i nästa, hoppa över 1, 2 stolpar i lm-bågen, 5lm, 2 stolpar i samma lm-båge, hoppa över 1 osv :)
24.05.2024 - 10:25
![]() Hennie Verhees skrifaði:
Hennie Verhees skrifaði:
Bij dit patroon voel ik mij misleid, jullie geven 1200 gram aan en ik heb nld 4 gebruikt de afmeting is hetzelfde ,maar ik houd ruim 4 bollen garen over. Hoe kan dit? 1 bol dat snap ik , maar niet 4 volle bollen . ook lijkt dit patroon op een luchtige omslagdoek , terwijl het een best zware deken is. Graag hier uw antwoord op . Met vriendelijke groet , Hennie Verhees
02.04.2024 - 11:06
![]() Kathleen A Dougherty skrifaði:
Kathleen A Dougherty skrifaði:
This is a beautiful blanket. I am going to start it. Thank You for the pattern.
05.02.2024 - 21:23
![]() Mattea skrifaði:
Mattea skrifaði:
Buongiorno, volevo una precisazione. Nella riga 6 devo lavorare una maglia alta sul gruppo di 4 maglie sottostante ma non so dove devo inserire l'uncinetto. C'è per caso un video esplicativo? grazie
23.12.2023 - 10:17DROPS Design svaraði:
Buongiorno Mattea, deve lavorare la maglia alta attorno al gruppo di maglie sotto. Provi a vedere se questo video può esserle di aiuto. Buon lavoro!
30.12.2023 - 10:51
![]() Agnieszka skrifaði:
Agnieszka skrifaði:
Not clear for me second row. I start wt chain 3, wich counts as first DC. Then directly I make second DC. Shouldn't I start with chain 4, which counts as first DC plus chain 1 space? Otherwise I have two DCs, without chain space in the begining of the row.
23.11.2023 - 10:25DROPS Design svaraði:
Dear Agnieszka, in this pattern, the 3 chains to start rounds are not replacing the first dc, this means A.1 is worked extra: you first work A.1 then repeat A.2 a total of 4 times in the round. Happy crocheting!
23.11.2023 - 15:36
![]() Connie Sahagun skrifaði:
Connie Sahagun skrifaði:
I already did all the squares but I started too crochet the sides together with the single stich but what I I don’t understand what to do in the corners.
27.07.2023 - 21:11DROPS Design svaraði:
Dear Mrs Sahagun, for the edge you will crochet 3 double crochets (US-crochet terminology) in each corner (and. 1 double crochet in each stitch along the sides of each square + 1 double crochet in the transition between 2 squares). Happy crocheting!
28.07.2023 - 07:39
![]() Gabi skrifaði:
Gabi skrifaði:
Guten Tag Werden nur vordere Reliefstäbchen gehäkelt oder abwechselnd vordere und hintere ? Herzlichen Dank
10.07.2023 - 06:43DROPS Design svaraði:
Liebe Gabi, Diagram wird in Runde gehäkelt, so die Reliefstäbchen werden immer so gehäkelt. Viel Spaß beim häkeln!
28.07.2023 - 09:08
![]() Linda Mcsweeney skrifaði:
Linda Mcsweeney skrifaði:
The graph is confusing for the last round. How many stitches should you have on one side? The graph does not line up with the stiches below on the left side. Thanks.
12.06.2023 - 19:57DROPS Design svaraði:
Dear Mrs Mcsweeney, on the last round you will have 32 dc (US-English) on the last half side on the square (A.2) and 3 chains in the corner, then 29 dc on the first half part on next side, this means you should have 32+29= 61 dc along each side of the square. Happy crocheting!
13.06.2023 - 08:14
|
||||||||||||||||||||||||||||
Day By The Sea#daybytheseablanket |
||||||||||||||||||||||||||||
 |
 |
|||||||||||||||||||||||||||
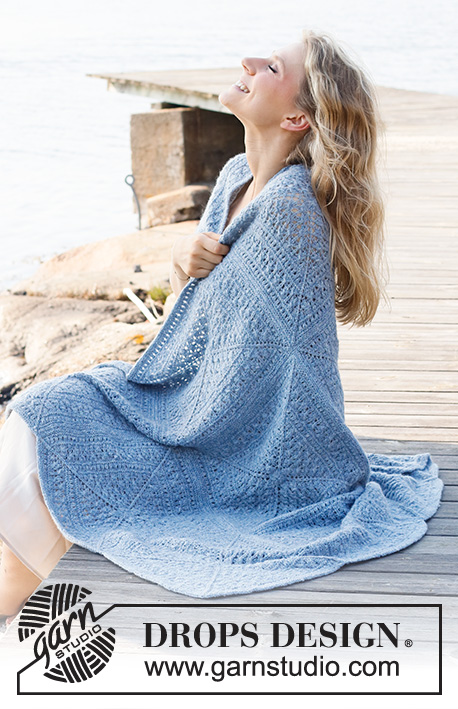
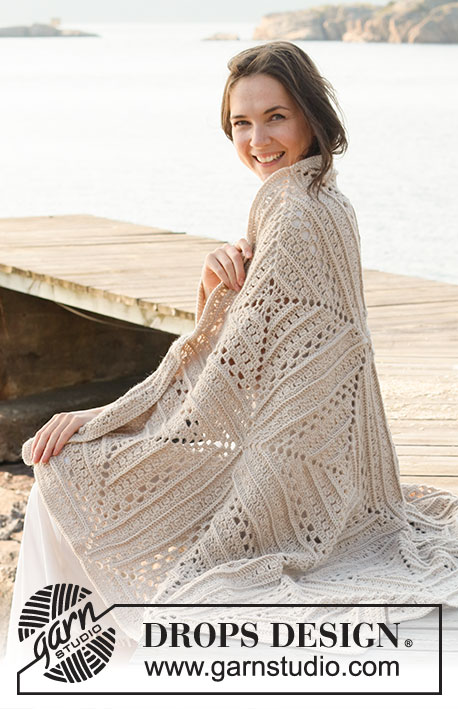
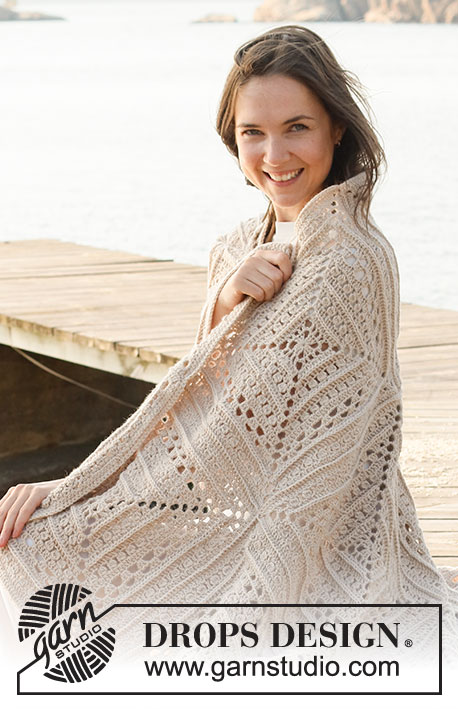
Heklað teppi með ferningum úr DROPS Lima.
DROPS 221-2 |
||||||||||||||||||||||||||||
|
------------------------------------------------------- UPPLÝSINGAR FYRIR MYNSTUR: ------------------------------------------------------- MYNSTUR: Sjá mynsturteikningu A.1 og A.2. Mynsturteikning A.1 sýnir hvernig umferðin byrjar og endar. HEKLLEIÐBEININGAR: Ef þú heklar yst á heklunálinni þá kemur loftlykkjan oft til með að verða of stíf. 1 loftlykkja á að vera álíka löng og breiddin á 1 stuðli. ------------------------------------------------------- BYRJIÐ Á STYKKI HÉR: ------------------------------------------------------- TEPPI – STUTT ÚTSKÝRING Á STYKKI: Stykkið samanstendur af 12 alveg eins ferningum sem heklaðir eru eftir mynsturteikningu. Ferningarnir eru heklaðir saman og að lokum er heklaður 1 kantur í kringum allt teppið. FERNINGUR: Byrjið með heklunál 4 og Lima. Sjá HEKLLEIÐBEININGAR í útskýringu að ofan. Heklið mynsturteikningu A.2 alls 4 sinnum í kringum loftlykkjuhringinn – A.1 sýnir hvernig umferðin byrjar og endar. ATHUGIÐ HEKLFESTUNA! Heklið alls 12 ferninga. FRÁGANGUR: Leggið ferningana þannig að þeir liggi með 3 ferninga á breidd og 4 ferninga á lengd. Passið uppá að allir liggi með réttuna upp. Notið Lima og heklið ferningana saman fyrsta á breiddina, síðan á lengdina þannig: Leggið 2 ferninga saman, röngu á móti röngu og heklið ferningana saman frá réttu og í gegnum bæði lögin þannig: Festið þráðinn með 1 fastalykkju um loftlykkjubogana í horni, * heklið 1 fastalykkju í hverja lykkju fram að næsta horni (= 3 loftlykkjur), heklið 1 fastalykkju um hornið, heklið 2 loftlykkjur og 1 fastalykkju um næsta horn (= 3 loftlykkjur). Heklið frá *-* þar til allir ferningarnir hafa verið heklaðir saman, en á síðasta ferningi þá er endað eftir 1 fastalykkju í síðasta horni (= loftlykkjur). Endurtakið meðfram hverri og einni af þeim röðum sem eftir eru á breiddina. Heklið síðan ferningana saman alveg eins á breiddina. KANTUR: Notið Lima og heklunál 4. Byrjið á að festa þráðinn með 1 keðjulykkju í 1. horni, síðan er heklað þannig: Heklið 3 loftlykkjur og 2 stuðla um fyrsta hornið. * Heklið 1 stuðul í hverja lykkju fram að horni á milli ferninga, heklið 1 stuðul um hvert horn *, heklið frá *-* að síðasta horni meðfram þessari hlið á teppi. Um 2. hornið eru heklaðir 3 stuðlar, heklið frá *-* fram að næsta horni meðfram þessari hlið á teppi. Um 3. hornið eru heklaðir 3 stuðlar, heklið frá *-* fram að næsta horni meðfram þessari hlið á teppi. Um 4. hornið eru heklaðir 3 stuðlar, heklið frá *-* fram að 1. horni og endið með 1 keðjulykkju í 3. loftlykkju í byrjun á umferð. Klippið þráðinn frá og festið. |
||||||||||||||||||||||||||||
Skýringar á teikningu |
||||||||||||||||||||||||||||
|
||||||||||||||||||||||||||||
 |
||||||||||||||||||||||||||||
Ertu búin að klára þetta mynstur?Merktu myndirnar þínar með #dropspattern #daybytheseablanket eða sendu þær inn í #dropsfan gallery. Vantar þig aðstoð með þetta mynstur?Þú finnur 9 kennslumyndbönd, dálk með athugasemdum/spruningum og fleira með því að skoða mynstrið á garnstudio.com © 1982-2026 DROPS Design A/S. Við áskiljum okkur öll réttindi. Þetta skjal ásamt öllum undirhlutum þess, hefur höfundarétt. Lestu meira varðandi hvað þú mátt gera við mynstrin okkar neðst á hverju mynstri á síðunni okkar. |
||||||||||||||||||||||||||||


Með yfir 40 ára prjón- og hekl hönnun, býður DROPS Design uppá eitt umfangsmesta vöruúrval af mynstrum án endurgjalds á netinu – þýdd á 17 tungumálum. Í dag þá erum við komin í 324 vörulista og 12290 mynstur - 7890 mynstur sem eru þýdd á [íslensku].
Við vinnum hörðum höndum við að færa þér það besta sem prjón og hekl hefur uppá að bjóða, innblástur, ráðgjöf og auðvitað frábært gæða garn á ótrúlegu verði! Langar þig að nota mynstrin okkar fyrir annað en til einkanota? Þú getur lesið hér ákvæði hvað leyfilegt er að gera í textanum Copyright sem er neðst á öllum mynstrunum okkar.
Skrifaðu athugasemd um DROPS 221-2
Við myndum gjarna vilja fá að heyra hvað þér finnst um þetta mynstur!
Ef þig langar að skifa inn spurningu, vertu þá viss um að velja réttan dálk að neðan, til þess að við getum svarað sem fyrst. Það verður að merkja við svæði merktri með *.