
Categorías populares
¿Buscas un hilo?


Comentarios / Preguntas (41)
![]() Monique escribió:
Monique escribió:
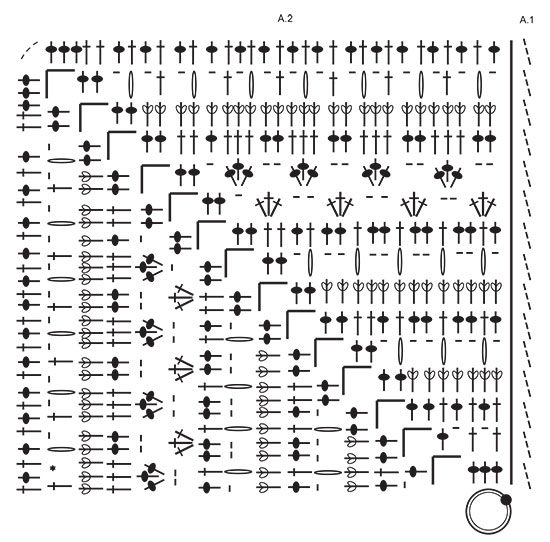
Bonjour, Je suis en train de réaliser cet ouvrage et personnellement la première bride en début de rangs je la remplace par 2 mailles en l'air au lieu de 3. Cela correspond mieux à une hauteur de bride. Bonne journée à tous.
20.06.2025 - 13:09
![]() Agathe B escribió:
Agathe B escribió:
Bonjour, J’ai du mal à comprendre le diagramme A1, est-ce que les 3 mailles en l’air remplacent la première bride de A2? Ou bien c’est en plus? Le résultat est bizarre pour les rangs 5/8/10/12/14 non? Cela créé une barre de 3 mailles au milieu du motif. Comment démarre-t-on ces rangs exactement (le texte n’est pas clair)? Merci beaucoup!
04.05.2025 - 21:55DROPS Design respondió:
Bonjour Agathe, les 3 premières mailles en l'air remplacent la 1ère maille de A.1 (cf légende 2ème symbole); aux rangs cités, vous pouvez considérer ces 3 mailles en l'air comme la dernière maille du tour, ainsi, vous n'aurez pas de décalage, ou bien faire ces 3 mailles en l'air en plus (sans qu'elles ne remplacent la 1ère maille) si vous le préférez. Bon crochet!
05.05.2025 - 08:44
![]() Sandra Gonzaga escribió:
Sandra Gonzaga escribió:
Existe algum video a explicar como unir os quadrados? Obrigada
08.03.2025 - 23:27DROPS Design respondió:
Bom dia, Existe, sim. No separador geral "Dicas e Ajuda" encontra vários vídeos separados por categorias. No link abaixo, encontra os tutoriais em vídeo relacionados com a montagem de quadrados em croché: https://www.garnstudio.com/videos.php?c=assembly&lang=pt Bons crochés!
11.03.2025 - 10:32
![]() Aline Jacquey escribió:
Aline Jacquey escribió:
Les trois mailles en l'air du début de chaque rang doivent-elles être rajouté sur le diagramme
31.12.2024 - 10:37DROPS Design respondió:
Bonjour Mme Jacquey, les 3 mailles en l'air de A.1 remplacent la 1ère maille/bride du tour - cf légende du 2ème symbole. Bon crochet!
02.01.2025 - 15:23
![]() CARYL escribió:
CARYL escribió:
CAN THE COMMENTS BE TRANSLATED INTO ENGLISH?
19.11.2024 - 13:41DROPS Design respondió:
Dear Caryl, you can try to use any online translator to see all previous comments & questions, but please feel free to ask your question here so that we can try to help you.
19.11.2024 - 15:59
![]() Sara escribió:
Sara escribió:
Varv nr. 10 vad innebär det? har försökt söka efter den symbolen tre kors tillsammans för att förstå hur den är gjord men hittar ingenting? sen undrar jag också om man ska lägga ihop dem för på diagonalen är det 4x2 st kors tillsammans och lodrät är det bara 3x2 st? ska det inte vara lika många på varje varv? och på varv nr.9 så visas det en utputande kant på bilden som på varv nr.7 men enligt diagrammet så blir det inte någon sån kant?
13.10.2024 - 23:32DROPS Design respondió:
Hej Sara. Symbolen 3 kors betyder att du virkar 3 stolpar i maskan under (dvs 5e symbolförklaringen, och så gör man den 3 gånger). Mvh DROPS Design
14.10.2024 - 09:14
![]() Michaela escribió:
Michaela escribió:
Ja, danke! Also doch in der 5. Reihe 3 Stäbchen je Gruppe in der 5. Reihe, und nicht 4 wie es in der Anleitung steht. Nochmals danke!
29.05.2024 - 11:19
![]() Michaela escribió:
Michaela escribió:
Das Problem ist die 4. Reihe, dort habe ich zu wenig Sstäbchen zum Zusammenhäkeln? 4 Stäbchen aus der 4. Reihe werden zu einem zusammengehäkelt, die nächsten 4 Stäbchen der 4. Reihe ebenfalls - damit sind 8 Stäbchen aus der 4. Reihe abgemascht, und es ist nur noch ein Stäbchen aus der 4. Reihe übrig - es sollten aber nochmal 4 Stäbchen zusammengehäkelt werden. Tut mir leid, wenn die Lösung offensichtlich ist, aber als Anfänger sehe ich sie einfach nicht.
27.05.2024 - 13:51DROPS Design respondió:
Liebe Michaela, in das 1. Teil von A.2 (vor der Ecke) haben Sie bei der 1. Reihe 3 Stächen, bei der 2. Reihe (1 Stb, 1 Lm) x 3, bei der 3. Reihe (1 Stb in das Stb, 1 Stb um die Lm) x 2 + 1 Stb in das letzte Stb + 2 Stb um die Lm = 7 Stb. bei der 4. Reihe: 1 Stb (relief Stb) in je die 7 Stb + 2 Stb um die Luftmaschenbogen; bei der 5. Reihe wie zuvor beschrieben =3 Stb-Gruppe/Noppe + 2 Stb um die Luftmaschenbogen, usw.. kann das Ihnen helfen?
27.05.2024 - 16:32
![]() Michaela escribió:
Michaela escribió:
Tut mir leid, vielleicht war die Frage vorher unklar. Wenn man im Diagramm A2 z.B. die 4. und 5. Reihe von unten ansieht, dann sind in der 4. Reihe 9 Stäbchen dargestellt. In der 5. Reihe sollen dann jeweils 4 Stäbchen zusammengehäkelt werden, und dass insgesamt dreimal. Das geht sich aber nicht aus - dazu bräuchte ich in der 4. Reihe 12 Stäbchen und nicht 9. Daher meine Frage, ob man hier nicht immer 3 Stäbchen zusammenhäkelt anstatt 4? Vielen Dank!
27.05.2024 - 10:18DROPS Design respondió:
Liebe Michaela, die 4 Stäbchen zusammen sind als nur 1 Stäbchen gezählt und werden so gehäket (Anfang der 5. Reihe: 1 Lm, 1 M überpsringen, 4 Stb zs in das nächste Stb, 2 Lm, 2 M überspringen, 4 Stb zs in das nächste Stb, 2 Lm, 2 M überspringen, 4 Stb zs in das nächste Stb, 1 Lm, 1 Stäbchen überspringen (= 1+1+2+1+2+1+1= 9 Maschen), dann 2 Stäbchen in nächsten Luftmaschenbogen, usw... Viel Spaß beim Häkeln!
27.05.2024 - 12:59
![]() Michaela escribió:
Michaela escribió:
In der Anleitung steht bei einem Symbol: "4 STÄBCHEN ZU 1 STÄBCHEN ZUSAMMENHÄKELN." Wenn man aber das Diagramm A2 ansieht und dort die Maschen zählt, sieht es eher so aus, als würden nur 3 Stäbchen zusammengehäkelt? Habe ich etwas übersehen? Vielen Dank!
26.05.2024 - 13:37DROPS Design respondió:
Liebe Michaela, hier wird man 4 Stäbchen zusammen häkeln, so zählt jedes als 1 Stäbchen (wie für 1 Noppe z.B.). Viel Spaß beim Häkeln!
27.05.2024 - 08:46
|
||||||||||||||||||||||||||||
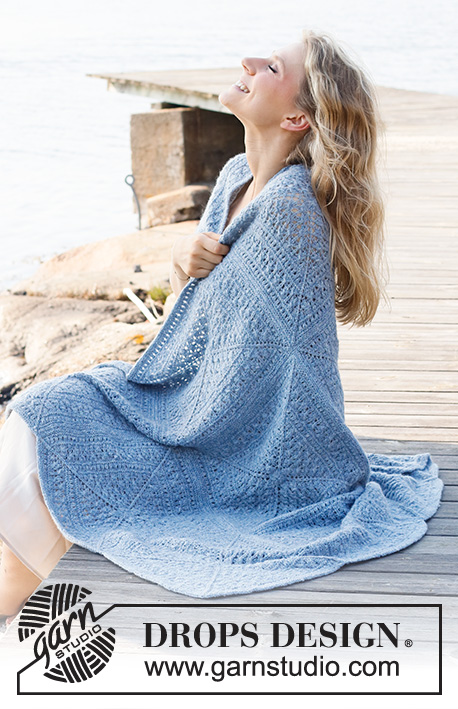
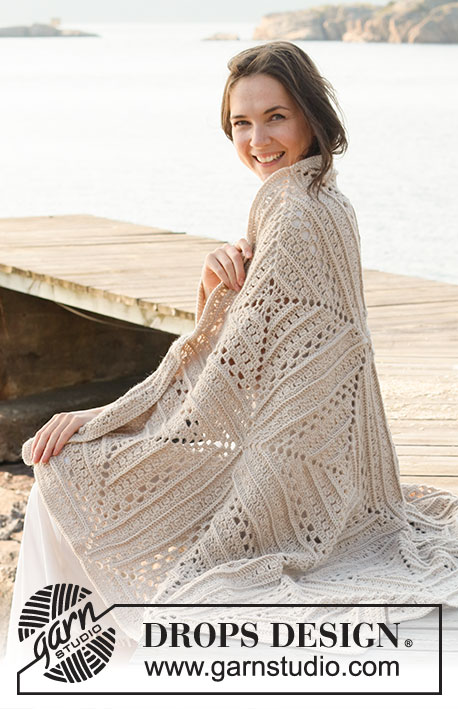
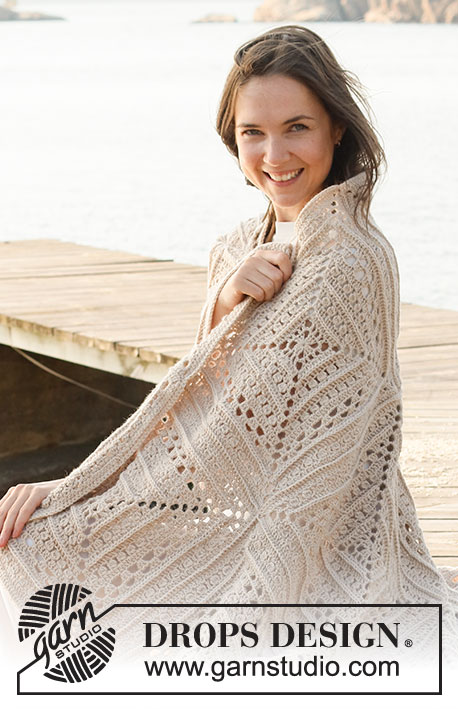
Day By The Sea#daybytheseablanket |
||||||||||||||||||||||||||||
 |
 |
|||||||||||||||||||||||||||
Manta a ganchillo en DROPS Lima.
DROPS 221-2 |
||||||||||||||||||||||||||||
|
EXPLICACIONES PARA REALIZAR EL PATRÓN: ------------------------------------------------ PATRÓN: Ver diagramas A.1 y A.2. El diagrama A.1 muestra cómo comienzan y terminan las vueltas. PUNTO DE CADENA: Si se trabaja en la punta de la aguja de ganchillo, el punto de cadena quedará demasiado apretado. 1 punto de cadena debe ser tan largo como el ancho de 1 punto alto. ------------------------------------------------ COMENZAR LA PIEZA AQUÍ: ------------------------------------------------ MANTA – RESUMEN DE LA PIEZA: La manta consiste de 12 cuadrados que son elaborados de acuerdo a los diagramas. Los cuadrados son unidos entre sí y, para terminar, se trabaja una orilla alrededor de la manta. CUADRADO: Usar aguja de ganchillo tamaño 4 mm y Lima. Leer PUNTO DE CADENA en las explicaciones arriba. Trabajar el diagrama A.2 un total de 4 veces alrededor del anillo de puntos de cadena – A.1 muestra cómo comienza y termina la vuelta. ¡RECORDAR MANTENER LA MISMA TENSIÓN DE LA MUESTRA! Trabajar un total de 12 cuadrados. ENSAMBLAJE: Colocar los cuadrados con 3 a lo ancho y 4 a lo largo. Asegurarse que todos los cuadrados tengan el lado derecho hacia arriba. Usar Lima y unir los cuadrados entre sí, primero a lo ancho y después a lo largo. Colocar 2 cuadrados juntos, lado revés contra lado revés, y trabajar a través de ambas capas por el lado derecho de la manera siguiente: Fijar el hilo con 1 punto bajo alrededor de los arcos de cadena en la esquina, * trabajar 1 punto bajo en cada punto hasta la esquina siguiente (= 3 puntos de cadena), trabajar 1 punto bajo alrededor de la esquina, 2 puntos de cadena y 1 punto bajo alrededor de la esquina siguiente (= 3 puntos de cadena). Trabajar de *a* hasta haber unido todos los cuadrados entre sí, pero en el último cuadrado terminar con 1 punto bajo en la última esquina (= 3 puntos de cadena). Repetir a lo largo de las otras bandas a lo ancho. Unir las bandas entre sí longitudinalmente de la misma manera. ORILLA: Usar Lima y aguja de ganchillo tamaño 4 mm. Comenzar fijando el hilo con 1 punto bajísimo en la primera esquina, después trabajar de la manera siguiente: Trabajar 3 puntos de cadena y 2 puntos altos alrededor de la primera esquina. * Trabajar 1 punto alto en cada punto hasta las esquinas entre los cuadrados, trabajar 1 punto alto alrededor de cada esquina *, trabajar de *a* hasta la última esquina en este lado de la manta. Alrededor de la esquina 2 trabajar 3 puntos altos, trabajar de *a* hasta la última esquina en este lado de la manta. Alrededor de la esquina 3 trabajar 3 puntos altos, trabajar de *a* hasta la última esquina en este lado de la manta. Alrededor de la esquina 4 trabajar 3 puntos altos, trabajar de *a* hasta la primera esquina y terminar con 1 punto bajísimo en el 3er punto de cadena al principio de la vuelta. Cortar y asegurar el hilo. |
||||||||||||||||||||||||||||
Explicaciones del diagrama |
||||||||||||||||||||||||||||
|
||||||||||||||||||||||||||||
|
||||||||||||||||||||||||||||
¿Terminaste este patrón?Entonces, etiqueta tus fotos con #dropspattern #daybytheseablanket o envíalas a la galería #dropsfan. ¿Necesitas ayuda con este patrón?Encontrarás 9 videos tutoriales, un espacio para comentarios/preguntas y más visitando la página del patrón en garnstudio.com © 1982-2025 DROPS Design A/S. Todos los derechos reservados. Este documento, incluyendo todas sus sub-secciones, está protegido por los derechos de autor (copyright). Lee más acerca de lo que puedes hacer con nuestros patrones en la parte de abajo de cada patrón de nuestro sitio. |
||||||||||||||||||||||||||||


Con más de 40 años en el diseño de modelos de punto y de ganchillo, DROPS Design ofrece una de las más vastas colecciones de patrones gratuitos en el internet - traducidos en 17 idiomas. Al día de hoy, contamos con 314 catálogos y 11822 patrones - de los cuales 11158 están traducidos en español.
Nosotros trabajamos con mucho esmero para brindarte lo mejor que las labores de punto y ganchillo tienen para ofrecer,inspiración y consejos, así como hilos de magnífica calidad a precios increíbles! Te gustaría usar nuestros patrones para otro fin además del uso personal? Puedes leer acerca de lo que estás permitida a hacer en el texto de Copyright en la parte de abajo de todos nuestros patrones. Felices labores!
Escribe un comentario sobre DROPS 221-2
¡Nos encantaría saber qué piensas acerca de este patrón!
Si quieres escribir una pregunta referente al patrón, por favor asegúrate de elegir la categoría correcta en el formulario debajo, para acelerar el proceso de respuesta. Los campos obligatorios están marcados con un *.