
Catégories populaires
Vous cherchez un fil?


Commentaires / Questions (41)
![]() Monique a écrit:
Monique a écrit:
Bonjour, Je suis en train de réaliser cet ouvrage et personnellement la première bride en début de rangs je la remplace par 2 mailles en l'air au lieu de 3. Cela correspond mieux à une hauteur de bride. Bonne journée à tous.
20.06.2025 - 13:09
![]() Agathe B a écrit:
Agathe B a écrit:
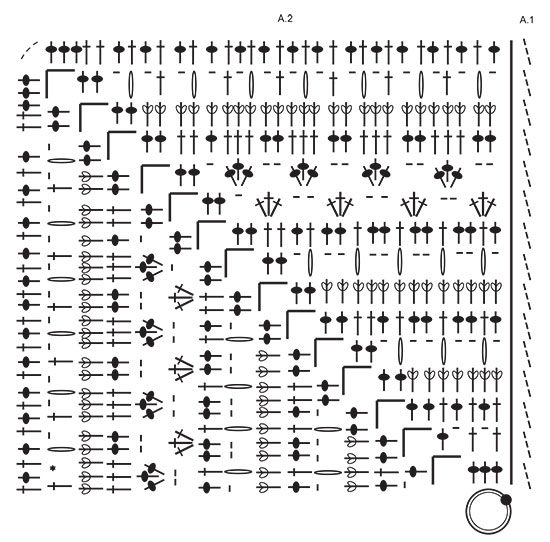
Bonjour, J’ai du mal à comprendre le diagramme A1, est-ce que les 3 mailles en l’air remplacent la première bride de A2? Ou bien c’est en plus? Le résultat est bizarre pour les rangs 5/8/10/12/14 non? Cela créé une barre de 3 mailles au milieu du motif. Comment démarre-t-on ces rangs exactement (le texte n’est pas clair)? Merci beaucoup!
04.05.2025 - 21:55DROPS Design a répondu:
Bonjour Agathe, les 3 premières mailles en l'air remplacent la 1ère maille de A.1 (cf légende 2ème symbole); aux rangs cités, vous pouvez considérer ces 3 mailles en l'air comme la dernière maille du tour, ainsi, vous n'aurez pas de décalage, ou bien faire ces 3 mailles en l'air en plus (sans qu'elles ne remplacent la 1ère maille) si vous le préférez. Bon crochet!
05.05.2025 - 08:44
![]() Sandra Gonzaga a écrit:
Sandra Gonzaga a écrit:
Existe algum video a explicar como unir os quadrados? Obrigada
08.03.2025 - 23:27DROPS Design a répondu:
Bom dia, Existe, sim. No separador geral "Dicas e Ajuda" encontra vários vídeos separados por categorias. No link abaixo, encontra os tutoriais em vídeo relacionados com a montagem de quadrados em croché: https://www.garnstudio.com/videos.php?c=assembly&lang=pt Bons crochés!
11.03.2025 - 10:32
![]() Aline Jacquey a écrit:
Aline Jacquey a écrit:
Les trois mailles en l'air du début de chaque rang doivent-elles être rajouté sur le diagramme
31.12.2024 - 10:37DROPS Design a répondu:
Bonjour Mme Jacquey, les 3 mailles en l'air de A.1 remplacent la 1ère maille/bride du tour - cf légende du 2ème symbole. Bon crochet!
02.01.2025 - 15:23
![]() CARYL a écrit:
CARYL a écrit:
CAN THE COMMENTS BE TRANSLATED INTO ENGLISH?
19.11.2024 - 13:41DROPS Design a répondu:
Dear Caryl, you can try to use any online translator to see all previous comments & questions, but please feel free to ask your question here so that we can try to help you.
19.11.2024 - 15:59
![]() Sara a écrit:
Sara a écrit:
Varv nr. 10 vad innebär det? har försökt söka efter den symbolen tre kors tillsammans för att förstå hur den är gjord men hittar ingenting? sen undrar jag också om man ska lägga ihop dem för på diagonalen är det 4x2 st kors tillsammans och lodrät är det bara 3x2 st? ska det inte vara lika många på varje varv? och på varv nr.9 så visas det en utputande kant på bilden som på varv nr.7 men enligt diagrammet så blir det inte någon sån kant?
13.10.2024 - 23:32DROPS Design a répondu:
Hej Sara. Symbolen 3 kors betyder att du virkar 3 stolpar i maskan under (dvs 5e symbolförklaringen, och så gör man den 3 gånger). Mvh DROPS Design
14.10.2024 - 09:14
![]() Michaela a écrit:
Michaela a écrit:
Ja, danke! Also doch in der 5. Reihe 3 Stäbchen je Gruppe in der 5. Reihe, und nicht 4 wie es in der Anleitung steht. Nochmals danke!
29.05.2024 - 11:19
![]() Michaela a écrit:
Michaela a écrit:
Das Problem ist die 4. Reihe, dort habe ich zu wenig Sstäbchen zum Zusammenhäkeln? 4 Stäbchen aus der 4. Reihe werden zu einem zusammengehäkelt, die nächsten 4 Stäbchen der 4. Reihe ebenfalls - damit sind 8 Stäbchen aus der 4. Reihe abgemascht, und es ist nur noch ein Stäbchen aus der 4. Reihe übrig - es sollten aber nochmal 4 Stäbchen zusammengehäkelt werden. Tut mir leid, wenn die Lösung offensichtlich ist, aber als Anfänger sehe ich sie einfach nicht.
27.05.2024 - 13:51DROPS Design a répondu:
Liebe Michaela, in das 1. Teil von A.2 (vor der Ecke) haben Sie bei der 1. Reihe 3 Stächen, bei der 2. Reihe (1 Stb, 1 Lm) x 3, bei der 3. Reihe (1 Stb in das Stb, 1 Stb um die Lm) x 2 + 1 Stb in das letzte Stb + 2 Stb um die Lm = 7 Stb. bei der 4. Reihe: 1 Stb (relief Stb) in je die 7 Stb + 2 Stb um die Luftmaschenbogen; bei der 5. Reihe wie zuvor beschrieben =3 Stb-Gruppe/Noppe + 2 Stb um die Luftmaschenbogen, usw.. kann das Ihnen helfen?
27.05.2024 - 16:32
![]() Michaela a écrit:
Michaela a écrit:
Tut mir leid, vielleicht war die Frage vorher unklar. Wenn man im Diagramm A2 z.B. die 4. und 5. Reihe von unten ansieht, dann sind in der 4. Reihe 9 Stäbchen dargestellt. In der 5. Reihe sollen dann jeweils 4 Stäbchen zusammengehäkelt werden, und dass insgesamt dreimal. Das geht sich aber nicht aus - dazu bräuchte ich in der 4. Reihe 12 Stäbchen und nicht 9. Daher meine Frage, ob man hier nicht immer 3 Stäbchen zusammenhäkelt anstatt 4? Vielen Dank!
27.05.2024 - 10:18DROPS Design a répondu:
Liebe Michaela, die 4 Stäbchen zusammen sind als nur 1 Stäbchen gezählt und werden so gehäket (Anfang der 5. Reihe: 1 Lm, 1 M überpsringen, 4 Stb zs in das nächste Stb, 2 Lm, 2 M überspringen, 4 Stb zs in das nächste Stb, 2 Lm, 2 M überspringen, 4 Stb zs in das nächste Stb, 1 Lm, 1 Stäbchen überspringen (= 1+1+2+1+2+1+1= 9 Maschen), dann 2 Stäbchen in nächsten Luftmaschenbogen, usw... Viel Spaß beim Häkeln!
27.05.2024 - 12:59
![]() Michaela a écrit:
Michaela a écrit:
In der Anleitung steht bei einem Symbol: "4 STÄBCHEN ZU 1 STÄBCHEN ZUSAMMENHÄKELN." Wenn man aber das Diagramm A2 ansieht und dort die Maschen zählt, sieht es eher so aus, als würden nur 3 Stäbchen zusammengehäkelt? Habe ich etwas übersehen? Vielen Dank!
26.05.2024 - 13:37DROPS Design a répondu:
Liebe Michaela, hier wird man 4 Stäbchen zusammen häkeln, so zählt jedes als 1 Stäbchen (wie für 1 Noppe z.B.). Viel Spaß beim Häkeln!
27.05.2024 - 08:46
|
||||||||||||||||||||||||||||
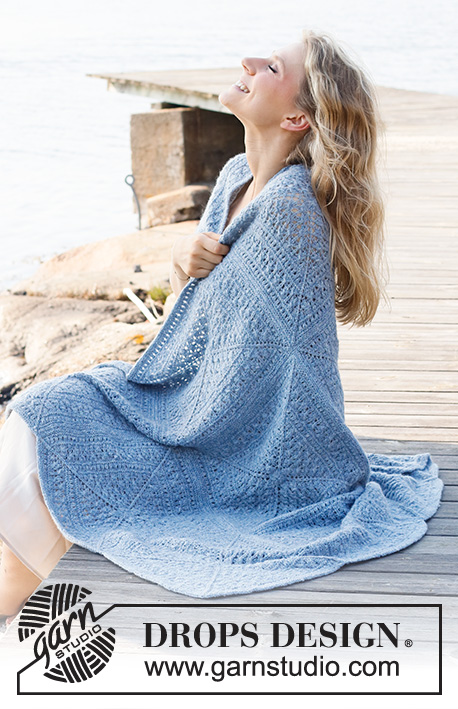
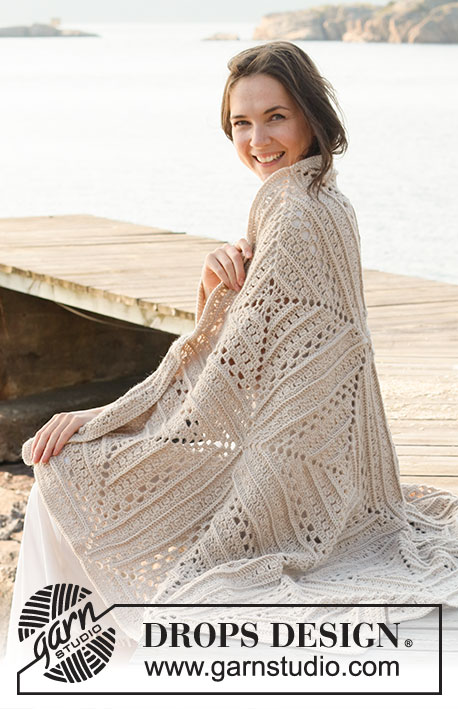
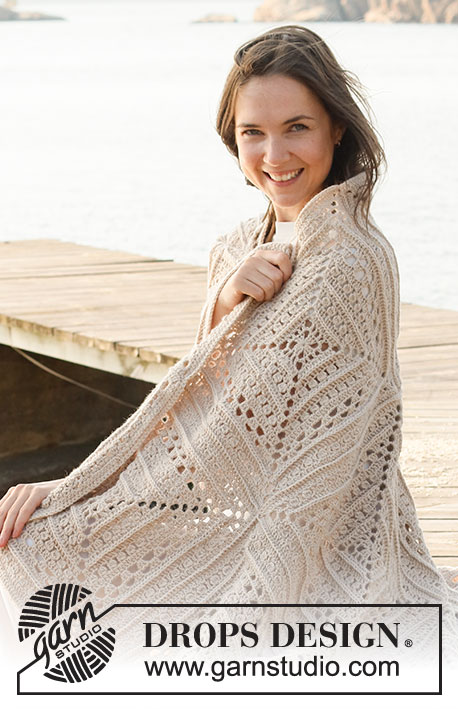
Day By The Sea#daybytheseablanket |
||||||||||||||||||||||||||||
 |
 |
|||||||||||||||||||||||||||
Couverture crochetée en DROPS Lima.
DROPS 221-2 |
||||||||||||||||||||||||||||
|
------------------------------------------------------- TECHNIQUES EMPLOYÉES ------------------------------------------------------- POINT FANTAISIE: Voir diagrammes A.1 et A.2. Le diagramme A.1 montre comment les tours commencent et se terminent. MAILLES EN L'AIR: Si on crochète sur le bout du crochet seulement, les mailles en l'air seront souvent trop serrées; 1 maille en l'air doit être aussi longue qu'1 bride est large. ------------------------------------------------------- L'OUVRAGE COMMENCE ICI: ------------------------------------------------------- COUVERTURE – PETIT APERÇU DE L'OUVRAGE: Se compose de 12 carrés crochetés en suivant les diagrammes. Les carrés sont ensuite crochetés ensemble et on termine par une bordure tout autour de la couverture. CARRÉ: Se crochète avec le crochet 4 en Lima. Voir MAILLES EN L'AIR ci-dessus. Crocheter 4 fois le diagramme A.2 au total autour du rond de mailles en l'air – A.1 montre comment les tours commencent et se terminent. PENSER À BIEN CONSERVER LA MÊME TENSION QUE POUR L'ÉCHANTILLON! Réaliser ainsi un total de 12 carrés. ASSEMBLAGE: Poser les carrés à raison de 3 en largeur et 4 en longueur. Bien veiller à ce que l'endroit soit visible. Crocheter les carrés ensemble en Lima, d'abord dans le sens de la largeur, puis en longueur. Poser 2 carrés ensemble, envers contre envers, et, en piquant dans les 2 épaisseurs sur l'endroit, crocheter ainsi: Joindre le fil avec 1 maille serrée autour des arceaux du coin, *1 maille serrée dans chaque maille jusqu'au coin suivant (= 3 mailles en l'air), 1 maille serrée autour du coin, 2 mailles en l'air et 1 maille serrée autour du coin suivant (= 3 mailles en l'air). Répéter de *-* jusqu'à ce que tous les carrés aient été crochetés ensemble, mais au dernier carré, terminer par 1 maille serrée dans le dernier coin (= 3 mailles en l'air).Répéter ainsi pour toutes les bandes en largeur. Crocheter ensuite les bandes ensemble, dans le sens de la longueur, de la même façon. BORDURE: Avec le crochet 4 en Lima, commencer en joignant le fil avec 1 maille coulée dans le premier coin, crocheter ensuite ainsi: 3 mailles en l'air et 2 brides autour du premier coin, *1 bride dans chaque maille jusqu'au coin entre les carrés, 1 bride autour de chaque coin*, répéter de *-* jusqu'au coin suivant de ce côté de la couverture. Crocheter autour du 2ème coin: crocheter 3 brides, répéter de *-* jusqu'au dernier coin de ce côté de la couverture. Autour du 3ème coin, crocheter 3 brides, répéter de *-* jusqu'au dernier coin de ce côté de la couverture. Autour du 4ème coin, crocheter 3 brides, répéter de *-* jusqu'au premier coin et terminer par 1 maille coulée dans la 3ème maille en l'air du début du tour. Couper et rentrer le fil. |
||||||||||||||||||||||||||||
Légende diagramme(s) |
||||||||||||||||||||||||||||
|
||||||||||||||||||||||||||||
|
||||||||||||||||||||||||||||
Vous avez terminé ce modèle?Alors taguez vos photos avec #dropspattern #daybytheseablanket ou bien présentez-les dans la galerie #dropsfan Vous avez besoin d'aide pour ce modèle ?Vous trouverez 9 tutoriels vidéo, une rubrique commentaires/questions et plus encore en vous rendant sur la page du modèle sur garnstudio.com © 1982-2025 DROPS Design A/S. Tous droits réservés. Ce document, y compris ces sous-sections, est protégé par les droits d'auteur (copyright). Apprenez-en davantage sur ce que vous pouvez faire avec nos modèles en bas de chacune des pages de notre site. |
||||||||||||||||||||||||||||


Avec plus de 40 ans dans la conception de modèles tricot et crochet, DROPS Design offre l'une des plus vastes collections de modèles gratuits sur internet - traduits dans 17 langues. À ce jour, on compte 314 catalogues et 11822 modèles en français.
Nous nous efforçons de vous apporter le meilleur de ce que le tricot et le crochet peuvent vous offrir, inspiration et conseils mais également des fils de haute qualité à des prix incroyables! Vous souhaiteriez utiliser nos modèles autrement que pour un usage personnel? Vous pouvez lire ce que vous êtes autorisés à faire dans le Copyright en bas de page de chacun de nos modèles. Bon tricot!
Poster un commentaire sur le modèle DROPS 221-2
Nous aimerions connaître votre avis sur ce modèle !
Si vous souhaitez poser une question, merci de bien vouloir vérifier que vous avez choisi la bonne catégorie dans le formulaire ci-dessous afin d'accélérer la réponse. Les champs obligatoires sont indiqués par une *.