
Vinsælir flokkar
Ertu að leita að garni?


Athugasemdir / Spurningar (18)
![]() Michaela Lindahl skrifaði:
Michaela Lindahl skrifaði:
Hej! Jag förstår inte hur jag ska maska av när jag är färdig med öglan. Dvs jag förstår inte ” Nu stickas m från fram- och baksidan räta tills 2 och 2 SAMTIDIGT som de maskas av.” Och jag hittar tyvärr inte någon video som förklarar. Tack för att ni alltid hjälper till!
12.01.2025 - 21:20DROPS Design svaraði:
Hej Michaela, du stikker højre pind ind i første maske på den ene pind og ind i første maske på den anden pind, strikker maskerne sammen og lukker af efterhånden :)
14.01.2025 - 14:35
![]() Etta Otten skrifaði:
Etta Otten skrifaði:
Bovenstaand tel patroon hoort niet bij bovenstaande foto, maar bij Mandoline 1987’s Kitted Potholder #1. De foto staat hieronder.
04.04.2023 - 16:12
![]() Etta Otten skrifaði:
Etta Otten skrifaði:
Graag wil ik de pannenlappen DROPS 159-25 DROPS design: Model nr. r-683 breien, maar als ik naar de foto kijk, mis ik een paar telpatronen in de werkbeschrijving. Alleen A.1 is te zien. Moet ik de rest op een andere plek zoeken? Graag hoor ik van u. Vriendelijke groet.
03.04.2023 - 22:08DROPS Design svaraði:
Dag Etta,
Er is ook maar 1 patroon, alleen A.1. Alle kabels e.d. zijn hierin verwerkt.
05.04.2023 - 07:45
![]() Antje Konopka skrifaði:
Antje Konopka skrifaði:
Ich verstehe leider das Diagramm nicht. Wie stricke ich denn A1 in der Mitte? Also in den ersten 4 Reihen?
18.04.2022 - 23:55DROPS Design svaraði:
Liebe Frau Konopka, die Zöpfe und das Lochmuster werden nicht genauso in der Höhe wiederholt, dh das Lochmuster in der Mitte wiederholen Sie wenn die ersten 8 Reihen fertig sind, aber die Zöpfe beidseitig stricken Sie wie zuvor (= in jede 6. Runde). Viel Spaß beim stricken!
19.04.2022 - 11:53
![]() Claudia Mackenzie skrifaði:
Claudia Mackenzie skrifaði:
Well I have started the Pattern A1 but noticed that where the marker was at the first start of round 1 by the time I did the 56 stitchs it did not reach the marker(where we increased 9 on the knit 1-49ers) so I thought just do the 56 sts so I went to the next round and noticed that the same thing happened. I guess what confusing me is are the 56st in pattern A1 suppose to reach the marker each time? Or do we just knit the pattern A1 and when the stitches end we knit to the marker then due P
15.01.2022 - 03:36DROPS Design svaraði:
Dear Mrs Mackenzie, after you have increased between 1st and 2nd marker the 2nd marker is now in the 58th stitch (not in the 49th anymore because of the increases), and you work: K1, A.1 (= 56 sts), K1, P2, K43, P2 - there are more sts on front piece because of the cable but width will be the same on front and back. Hope it will help. Happy knitting!
19.01.2022 - 10:18
![]() Claudia Mackenzie skrifaði:
Claudia Mackenzie skrifaði:
Thank you for your response.it is helpful and I looked at the lesson .I know each square is a stitch so when you have the lines going through 2 of the square does that mean when do it twice or just one time. Example 1st round in A1: purl ,purl (slip1st as if to knit,K1,Psso) do we do it twice?Then you do a 1Yo,K2 tog ,purl,purl.This is how I’m reading the pattern. Now 2nd round in pattern A1: purl,purl,knit,knit,purl,knit 6,purl,knit2,purl2,knit9,purl,purl,knit,knit,
13.01.2022 - 00:42DROPS Design svaraði:
Hi Claudia, If you mean the 2 squares side by side with a diagonal line through, then this means the explanation covers 2 stitches (you do not do it twice). !st row in A.1 is : P2, psso, 1 yarn over, P1, K6, P1, 1 yarn over, K2 together, P2 and so on. You are correct in your reading of row 2. Happy knitting!
13.01.2022 - 07:54
![]() Claudia Mackenzie skrifaði:
Claudia Mackenzie skrifaði:
In the pattern for this pot holder in the 56 stitch. you in the first row purl twice then you slip one as if to knit then do your 6 cables then purl then knit2 together.then the next row purl2,Knit 2,Purl1 then do you do a cable or knit?after that you Purl 1 then K2 or do you knit 2together.In other words do you only do the cables or slip 1 or knit togeather where the vertical lines are? I see that in the middle of the 56 stitches you have some vertical lines and can see that it is in di
12.01.2022 - 09:43DROPS Design svaraði:
Dear Mrs Mackenzie, in diagram A.1 you will have decreases and yarn over (see 4th and 5th symbol for decreases) and at the same time you will work cables (as shown in next to last + last symbol). When the lace pattern in the middle of A.1 is done, repeat from first row, while continuing the cables on each side, ie the middle panel is worked over 8 round but the cables are worked over every 6th round (and the small lace pattern on each side on every other round). This lesson might help you understanding how to read diagrams. Happy knitting!
12.01.2022 - 15:55
![]() Claudia Mackenzie skrifaði:
Claudia Mackenzie skrifaði:
So when do you start the pattern in A1?Do you do the purl 1 round then knit 1 round first then when you get to the 5th round is that when you start the increases of 9 sts. Or do you start the increases at each knit 1 round?
08.01.2022 - 04:18DROPS Design svaraði:
Dear Mrs Mackenzie, cast on the stitches, then purl 1 round, knit 1 round, purl 1 round, knit 1 round and purl 1 round. Insert the 2 markers without working the stitches, on next round, knit all stitches increasing between 1st and 2nd marker. On next round, start working A.1 between first 2 markers. Happy knitting!
10.01.2022 - 07:43
![]() MJ skrifaði:
MJ skrifaði:
Hei! Så nydelige grytekluter! Men jeg trenger litt hjelp med diagrammet. Hvorfor er det tegnet flere omganger på sidene?? Hva gjør man da med maskene i midten?
26.07.2019 - 00:50DROPS Design svaraði:
Hej, ja vist er de fine :) du fortsætter bare de midterste masker fra starten igen. Det er fordi de yderste snoninger i hver side skal strikkes på hver 6.pind. God fornøjelse!
02.08.2019 - 09:37
![]() Maria skrifaði:
Maria skrifaði:
Hei! Blir disse tykke og trygge grytekluter som beskytter hendene, eller vil hullmønsteret gjøre at de først og fremst er dekorative? Jeg står mellom å strikke disse eller strikke "sun-baked" en gang til.
10.04.2018 - 21:02DROPS Design svaraði:
Hei Maria. Disse gryteklutene strikkes rundt så de blir dobble. Du kan derfor helt fint bruke dem. God fornøyelse
12.04.2018 - 15:50
|
||||||||||||||||||||||
Helping Hand#helpinghandpotholder |
||||||||||||||||||||||
|
|
||||||||||||||||||||||
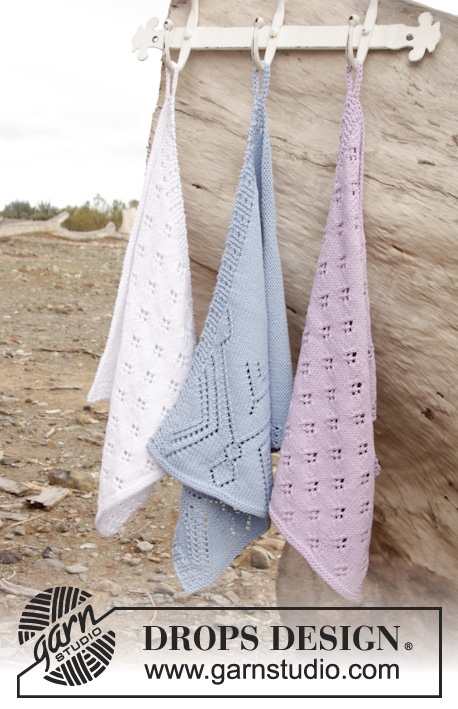
Prjónaðir pottaleppar úr DROPS Muskat með gatamynstri.
DROPS 159-25 |
||||||||||||||||||||||
|
------------------------------------------------------- UPPLÝSINGAR FYRIR MYNSTUR: ------------------------------------------------------- MYNSTUR: Sjá mynsturteikningu A.1. ------------------------------------------------------- BYRJIÐ Á STYKKI HÉR: ------------------------------------------------------- POTTALEPPAR - STUTT ÚTSKÝRING Á STYKKI: Stykkið er prjónað í hring á hringprjóna. POTTALEPPUR: Fitjið upp 96 l á hringprjóna nr 3 með Muskat. Prjónið 1 umf br, 1 umf sl, 1 umf br, 1 umf sl og 1 umf br. Setjið 1 prjónamerki í 1. l í byrjun umf og 1 prjónamerki í 49. l (= miðju l í hvorri hlið). Prjónið 1 umf sl JAFNFRAMT er aukið út um 9 l jafnt yfir á milli 1. og 2. prjónamerkis (vegna gatamynsturs sem dregst saman eru fleiri l á framstykki en á bakstykki) = 105 l á prjóni. Fyrsta umf er prjónuð þannig: 1 l sl (= l með prjónamerki í), prjónið mynstur eftir mynsturteikningu A.1 (= 56 l), 1 l sl (= l með prjónamerki í), 2 l br, 43 l sléttprjón og 2 l br. Haldið áfram með mynstur þar til stykkið mælist ca 19 cm – stillið af að prjónuð sé heil mynstureining á hæðina við miðjueiningu í A.1. Prjónið nú 1 umf slétt JAFNFRAMT er fækkað um 9 l jafnt yfir á milli 1. og 2. prjónamerkis þannig að það verði jafn margar l á fram- og bakstykki = 96 l. Prjónið 1 umf br, 1 umf sl og 1 umf br. Prjónið síðan 1 umf slétt JAFNFRAMT í lok umf eru fitjaðar upp 20 nýjar l á prjóninn fyrir lykkju hanka. Snúið við, fellið af 20 l sem fitjaðar voru upp, leggið síðan pottaleppinn saman tvöfaldan þannig að prjónamerkin verði í hvorri hlið. Prjónið nú l frá fram- og bakstykki slétt saman 2 og 2 JAFNFRAMT er fellt af. Saumið pottaleppinn saman í botninn með smáu spori – saumið innan við uppfitjunarkant. Saumið enda á lykkju í hornið á pottaleppnum. Prjónið annan pottalepp á sama hátt. |
||||||||||||||||||||||
Skýringar á teikningu |
||||||||||||||||||||||
|
||||||||||||||||||||||
 |
||||||||||||||||||||||
Ertu búin að klára þetta mynstur?Merktu myndirnar þínar með #dropspattern #helpinghandpotholder eða sendu þær inn í #dropsfan gallery. Vantar þig aðstoð með þetta mynstur?Þú finnur 15 kennslumyndbönd, dálk með athugasemdum/spruningum og fleira með því að skoða mynstrið á garnstudio.com © 1982-2026 DROPS Design A/S. Við áskiljum okkur öll réttindi. Þetta skjal ásamt öllum undirhlutum þess, hefur höfundarétt. Lestu meira varðandi hvað þú mátt gera við mynstrin okkar neðst á hverju mynstri á síðunni okkar. |
||||||||||||||||||||||


Með yfir 40 ára prjón- og hekl hönnun, býður DROPS Design uppá eitt umfangsmesta vöruúrval af mynstrum án endurgjalds á netinu – þýdd á 17 tungumálum. Í dag þá erum við komin í 324 vörulista og 12290 mynstur - 7890 mynstur sem eru þýdd á [íslensku].
Við vinnum hörðum höndum við að færa þér það besta sem prjón og hekl hefur uppá að bjóða, innblástur, ráðgjöf og auðvitað frábært gæða garn á ótrúlegu verði! Langar þig að nota mynstrin okkar fyrir annað en til einkanota? Þú getur lesið hér ákvæði hvað leyfilegt er að gera í textanum Copyright sem er neðst á öllum mynstrunum okkar.
Skrifaðu athugasemd um DROPS 159-25
Við myndum gjarna vilja fá að heyra hvað þér finnst um þetta mynstur!
Ef þig langar að skifa inn spurningu, vertu þá viss um að velja réttan dálk að neðan, til þess að við getum svarað sem fyrst. Það verður að merkja við svæði merktri með *.