
Vinsælir flokkar
Ertu að leita að garni?


Hvernig á að auka út og fækka lykkjum í barnahúfu
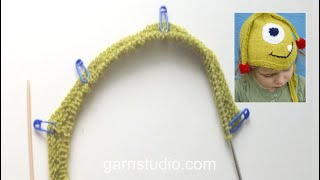
Endurtakið útaukningu/uppslátt við 3. 5. og 7. prjónamerki og endurtakið úrtöku við 4. og 6. prjónamerki. Prjónið slétt frá réttu á milli prjónamerkja og endið á kantlykkju.
Frá röngu er prjónað brugðið og allur uppsláttur er prjónaður brugðinn snúinn (þ.e.a.s. prjónið aftan í lykkjubogann í stað framan) til þess að koma í veg fyrir göt.
Fylgja þarf uppskrift til þess að geta fylgt myndbandinu eftir.
Þú finnur mynstur þar sem þessi aðferð er notuð með því að smella á myndirnar að neðan.
Mynstur þar sem þessi aðferð er notuð

Myndband #401, skráð í: Mynstur kennslumyndbönd, Ungabörn & Börn, Prjónuð mynstur kennslumyndbönd
Myndböndin okkar hafa ekkert hljóð. Við erum alþjóðlegt fyrirtæki og fólk sem skoðar myndböndin okkar talar mörg mismunandi tungumál og margir skilja ekki ensku. Þar sem það er ekkert gefið tungumál fyrir okkur að nota, höfum við í staðinn skrifaðar leiðbeiningar fyrir myndböndin og ekkert hljóð sem truflar þegar þú horfir.
Þú getur breytt hraðanum á þessu myndbandi með því að smella á táknið á spilastikunni.
Skrifaðu athugasemdir eða spurningar fyrir þetta myndband
Netfangið þitt verður ekki birt. Það verður að merkja við svæði merktri með *.
Þú gætir líka haft gaman af...


Með yfir 40 ára prjón- og hekl hönnun, býður DROPS Design uppá eitt umfangsmesta vöruúrval af mynstrum án endurgjalds á netinu – þýdd á 17 tungumálum. Í dag þá erum við komin í 325 vörulista og 12298 mynstur - 7899 mynstur sem eru þýdd á [íslensku].
Við vinnum hörðum höndum við að færa þér það besta sem prjón og hekl hefur uppá að bjóða, innblástur, ráðgjöf og auðvitað frábært gæða garn á ótrúlegu verði! Langar þig að nota mynstrin okkar fyrir annað en til einkanota? Þú getur lesið hér ákvæði hvað leyfilegt er að gera í textanum Copyright sem er neðst á öllum mynstrunum okkar.
Is the decrease stitch worked with a third needle called Central Double Decrease? (CDD)
20.06.2021 - 02:56DROPS Design :
Dear Sophia, the decrease is worked here as follows: starting 1 stitch before the stitch with marker, slip 1 stitch on cable needle behind piece, slip 1 st (= st with marker), knit together next stitch and st on cable needle, pass slipped stitch over. Hope this will help. Happy knitting!
21.06.2021 - 09:05Hi - hope you can help I am up to where I am decreasing on RS and it states to decrease at 25th stitch then 59th stitch then 93rd stitch (2nd,4th and 6th marker)so I gather then when I have less than 93 stitches I then only decrease twice in row then when I have less than 59 stitches I decrease only once in row so how do I get down to 15 stitches when I am supposed to decrease on 25th stitch. Thanking You in anticipation. Regards Ann
23.08.2020 - 04:00DROPS Design :
Dear Mrs Plummer, you have to insert the markers between stitches as stated, ie in first size in the 2nd st, then in the 25th st, 48th st etc.. leave the marker in place and decrease/increase before/after markers as explained, the number of stitches between markers will then vary. Happy knitting!
24.08.2020 - 09:27Wie unvorteilhaft, dass hier so dünne Wolle genommen wurde zum Zeigen. Ich kann es nicht erkennen.
23.09.2019 - 19:03The video shows one increase or decrease at each marker only while the directions state 'on each SIDE of the marker'. That would suggest TWO increases/decreases at each marker (one on EACH side of the marker). Have I missed something?
06.10.2018 - 12:41DROPS Design :
Dear Mrs Clifford-Rosengren, the video shows how to increase and decrease in this pattern, ie you inc 1 st after 1st marker and before 7th marker, and then dec 1 st on each side of 2nd, 4th and 6th marker = 2 sts in total at these markers (as under DECREASE TIP) and inc 1 st on each side of 3rd and 5th marker (= 2 sts in total at these markers). Happy knitting!
09.10.2018 - 10:06Tusind tak for tippet, Anne Marie. Og tak til Garnstudio for alle de gode hjælpe videoer.
08.10.2014 - 08:00Det er meget nemmere at strikke Indtagningerne sådan: masken før OG midtermasken tages løs af (som vrangmaske), strik næste ret, træk begge de løse masker over. Voila, resultatet er helt det samme uden ekstrapind mm!
09.08.2014 - 12:09Es fehlt der Ton, Schade :-(
11.11.2013 - 10:16Renate :
Hallo Yvonne, diese Video-Anleitungen sind "stumm" damit jede(r) sie ohne Sprachbarriere verstehen kann. Einfach nur durch sehen bzw. schauen. Man kann sie anhalten oder immer wieder anschauen. Das ist der "Trick" :-)
23.11.2013 - 14:02Leider fehlt die Lautstärke.
11.11.2013 - 10:16Super strona bardzo często z niej korzystam Jadzia
29.09.2013 - 16:50