
Categorias populares
Procura um fio?


Como aumentar e diminuir num gorro de bebé
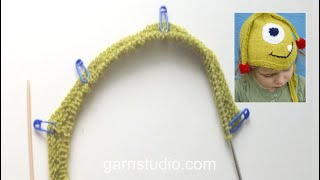
Montar o número de malhas indicado, incluindo 1 malha ourela de cada lado - estas malhas ourela são tricotadas em ponto jarreteira (= todas as carreiras em meia).
Já tricotámos 12 carreiras, incluindo o ponto jarreteira, e colocámos 7 marcadores.
Começamos o vídeo mostrando, pelo direito da peça, como se aumenta no 1.º marcador com 1 laçada, depois, no 2.º marcador, diminuímos 1 malha de cada lado do marcador da seguinte maneira : começar 1 malha antes da malha com o marcador, deslizar 1 malha para uma agulha auxiliar, colocada atrás da peça, deslizar 1 malha (= a malha com o marcador), tricotar juntamente em meia a malha seguinte e a malha que está na agulha auxiliar e passar a malha deslizada por cima.
Repetir os aumentos com 1 laçada no 3.º, no 5.º e no 7.º marcador e repetir as diminuições no 4.º e no 6.º marcador. Tricotar em meia as malhas entre os marcadores, e terminar a carreira com 1 malha ourela em meia.
Pelo avesso, tricotar 1 malha ourela em meia de cada lado, tricotar as outras malhas em liga/tricô, e as laçadas torcidas em liga/tricô (enfiando a agulha na alça de trás e não na alça da frente das laçadas) para evitar buracos.
Deverá ler as explicações e ver os diagramas para poder seguir devidamente este vídeo. Encontrará as explicações de modelos que utilizam esta técnica ao clicar nas fotografias abaixo.
Modelos que utilizam esta técnica


Vídeo #401, listado em: Tutoriais de modelos, Baby & Children, Tutoriais em Vídeo de Modelos em Tricô
Os nossos vídeos não têm som. Somos uma empresa internacional e os nossos vídeos são vistos por essoas que falam diferentes línguas e muitas delas não compreendem o português. Por isso, como não podemos usar uma determinada língua, temos instruções escritas para acompanhar o vídeo, e não há quaisquer sons intrusivos enquanto vê o vídeo.
Pode alterar a velocidade do vídeo ao clicar no ícone na barra do play.
Deixar um comentário ou uma pergunta acerca deste vídeo
O seu email não será publicado. Os campos obrigatórios estão assinalados com um *.
Também poderá gostar...


Com mais de 40 anos no design de modelos de tricô e de croché, a DROPS Design oferece uma das mais vastas colecções demodelos gratuitos na Internet - traduzidos em 17 línguas. Neste dia de hoje, temos 325 catálogos e 12298 modelos - dos quais 12279 estão traduzidos em português.
Trabalhamos com muito empenho para lhe proporcionar o melhor que o tricô e o croché têm para oferecer, para lhe fornecer inspiração e conselhos bem como fios da mais elevada qualidade a preços incríveis! Gostaria de usar os nossos modelos para outros fins que não uso pessoal? Pode ler o que lhe é permitido fazer no Copyright texto que se encontra na parte de baixo de todos os nossos modelos. Bom tricô! Bom croché!
Is the decrease stitch worked with a third needle called Central Double Decrease? (CDD)
20.06.2021 - 02:56DROPS Design :
Dear Sophia, the decrease is worked here as follows: starting 1 stitch before the stitch with marker, slip 1 stitch on cable needle behind piece, slip 1 st (= st with marker), knit together next stitch and st on cable needle, pass slipped stitch over. Hope this will help. Happy knitting!
21.06.2021 - 09:05Hi - hope you can help I am up to where I am decreasing on RS and it states to decrease at 25th stitch then 59th stitch then 93rd stitch (2nd,4th and 6th marker)so I gather then when I have less than 93 stitches I then only decrease twice in row then when I have less than 59 stitches I decrease only once in row so how do I get down to 15 stitches when I am supposed to decrease on 25th stitch. Thanking You in anticipation. Regards Ann
23.08.2020 - 04:00DROPS Design :
Dear Mrs Plummer, you have to insert the markers between stitches as stated, ie in first size in the 2nd st, then in the 25th st, 48th st etc.. leave the marker in place and decrease/increase before/after markers as explained, the number of stitches between markers will then vary. Happy knitting!
24.08.2020 - 09:27Wie unvorteilhaft, dass hier so dünne Wolle genommen wurde zum Zeigen. Ich kann es nicht erkennen.
23.09.2019 - 19:03The video shows one increase or decrease at each marker only while the directions state 'on each SIDE of the marker'. That would suggest TWO increases/decreases at each marker (one on EACH side of the marker). Have I missed something?
06.10.2018 - 12:41DROPS Design :
Dear Mrs Clifford-Rosengren, the video shows how to increase and decrease in this pattern, ie you inc 1 st after 1st marker and before 7th marker, and then dec 1 st on each side of 2nd, 4th and 6th marker = 2 sts in total at these markers (as under DECREASE TIP) and inc 1 st on each side of 3rd and 5th marker (= 2 sts in total at these markers). Happy knitting!
09.10.2018 - 10:06Tusind tak for tippet, Anne Marie. Og tak til Garnstudio for alle de gode hjælpe videoer.
08.10.2014 - 08:00Det er meget nemmere at strikke Indtagningerne sådan: masken før OG midtermasken tages løs af (som vrangmaske), strik næste ret, træk begge de løse masker over. Voila, resultatet er helt det samme uden ekstrapind mm!
09.08.2014 - 12:09Es fehlt der Ton, Schade :-(
11.11.2013 - 10:16Renate :
Hallo Yvonne, diese Video-Anleitungen sind "stumm" damit jede(r) sie ohne Sprachbarriere verstehen kann. Einfach nur durch sehen bzw. schauen. Man kann sie anhalten oder immer wieder anschauen. Das ist der "Trick" :-)
23.11.2013 - 14:02Leider fehlt die Lautstärke.
11.11.2013 - 10:16Super strona bardzo często z niej korzystam Jadzia
29.09.2013 - 16:50