
Catégories populaires
Vous cherchez un fil?


Comment augmenter et diminuer, bonnet bébé
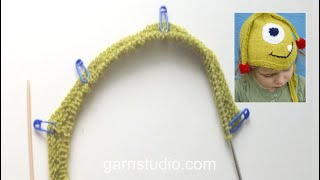
Le bonnet que nous réalisons dans la vidéo se tricote en allers et retours.
Montez le nombre de mailles indiqué, y compris 1 m lis de chaque côté, ces m lis sont tricotées au point mousse (= tous les rangs à l'endroit).
Nous avons déjà tricoté 12 rangs, y compris le point mousse, et avons placé 7 marqueurs.
Nous commençons la vidéo en montrant sur l'endroit comment on augmente au 1er marqueur avec 1 jeté, puis, au 2ème marqueur , nous diminuons 1 m de chaque côté du marqueur ainsi : commencez 1 m avant la m avec le marqueur, glissez 1 m sur une aiguille auxiliaire derrière l'ouvrage, glissez 1 m (= celle avec le marqueur), tricotez ens à l'end la m suivante et celle sur l'aiguille auxiliaire et passez la m glissée par-dessus.
Répétez les augmentations avec 1 jeté au 3ème, au 5ème et au 7ème marqueur et répétez les diminutions au 4ème et 6ème marqueur. Tricotez à l'endroit les mailles entre les marqueurs, et terminez le rang par 1 m lis à l'end.
Sur l'envers, tricotez 1 m lis à l'end de chaque côté, tricotez les autres mailles à l'envers, et les jetés, torse à l'envers (en piquant le brin arrière au lieu du brin avant) pour éviter les trous.
Il vous faudra également lire les explications pour pouvoir suivre la vidéo. Vous trouverez des modèles utilisant cette technique en cliquant sur une des photos ci-dessous.
Modèles utilisant cette technique


Vidéo #401, classé dans: Tutoriels Modèles, Bébé & Enfant, Tutoriels vidéo, modèles tricot
Nos vidéos n'ont pas de son. Nous sommes une entreprise internationale et nos vidéos sont regardées par des personnes parlant différentes langues et beaucoup d'entre elles ne comprennent pas le français. Comme on ne peut utiliser aucune langue déterminée, nous avons des instructions écrites pour accompagner la vidéo, et il n'y a pas de son perturbant lorsque vous regardez la vidéo.
Vous pouvez ajuster la vitesse de la vidéo en cliquant sur l'icône sur la barre de lecture.
Écrire un commentaire ou une question à propos de cette vidéo
Votre adresse mail ne sera pas publiée. Les champs obligatoires sont indiqués par une *.
Vous pourriez aussi aimer...


Avec plus de 40 ans dans la conception de modèles tricot et crochet, DROPS Design offre l'une des plus vastes collections de modèles gratuits sur internet - traduits dans 17 langues. À ce jour, on compte 325 catalogues et 12298 modèles en français.
Nous nous efforçons de vous apporter le meilleur de ce que le tricot et le crochet peuvent vous offrir, inspiration et conseils mais également des fils de haute qualité à des prix incroyables! Vous souhaiteriez utiliser nos modèles autrement que pour un usage personnel? Vous pouvez lire ce que vous êtes autorisés à faire dans le Copyright en bas de page de chacun de nos modèles. Bon tricot!
Is the decrease stitch worked with a third needle called Central Double Decrease? (CDD)
20.06.2021 - 02:56DROPS Design :
Dear Sophia, the decrease is worked here as follows: starting 1 stitch before the stitch with marker, slip 1 stitch on cable needle behind piece, slip 1 st (= st with marker), knit together next stitch and st on cable needle, pass slipped stitch over. Hope this will help. Happy knitting!
21.06.2021 - 09:05Hi - hope you can help I am up to where I am decreasing on RS and it states to decrease at 25th stitch then 59th stitch then 93rd stitch (2nd,4th and 6th marker)so I gather then when I have less than 93 stitches I then only decrease twice in row then when I have less than 59 stitches I decrease only once in row so how do I get down to 15 stitches when I am supposed to decrease on 25th stitch. Thanking You in anticipation. Regards Ann
23.08.2020 - 04:00DROPS Design :
Dear Mrs Plummer, you have to insert the markers between stitches as stated, ie in first size in the 2nd st, then in the 25th st, 48th st etc.. leave the marker in place and decrease/increase before/after markers as explained, the number of stitches between markers will then vary. Happy knitting!
24.08.2020 - 09:27Wie unvorteilhaft, dass hier so dünne Wolle genommen wurde zum Zeigen. Ich kann es nicht erkennen.
23.09.2019 - 19:03The video shows one increase or decrease at each marker only while the directions state 'on each SIDE of the marker'. That would suggest TWO increases/decreases at each marker (one on EACH side of the marker). Have I missed something?
06.10.2018 - 12:41DROPS Design :
Dear Mrs Clifford-Rosengren, the video shows how to increase and decrease in this pattern, ie you inc 1 st after 1st marker and before 7th marker, and then dec 1 st on each side of 2nd, 4th and 6th marker = 2 sts in total at these markers (as under DECREASE TIP) and inc 1 st on each side of 3rd and 5th marker (= 2 sts in total at these markers). Happy knitting!
09.10.2018 - 10:06Tusind tak for tippet, Anne Marie. Og tak til Garnstudio for alle de gode hjælpe videoer.
08.10.2014 - 08:00Det er meget nemmere at strikke Indtagningerne sådan: masken før OG midtermasken tages løs af (som vrangmaske), strik næste ret, træk begge de løse masker over. Voila, resultatet er helt det samme uden ekstrapind mm!
09.08.2014 - 12:09Es fehlt der Ton, Schade :-(
11.11.2013 - 10:16Renate :
Hallo Yvonne, diese Video-Anleitungen sind "stumm" damit jede(r) sie ohne Sprachbarriere verstehen kann. Einfach nur durch sehen bzw. schauen. Man kann sie anhalten oder immer wieder anschauen. Das ist der "Trick" :-)
23.11.2013 - 14:02Leider fehlt die Lautstärke.
11.11.2013 - 10:16Super strona bardzo często z niej korzystam Jadzia
29.09.2013 - 16:50