
Looking for a yarn?


Megjegyzések / Kérdések (32)
![]() Johanna írta:
Johanna írta:
Jeg forstår ikke det her: “Næste række hækles således (= fra vrangen): Hækl 1 fastmaske i hver af de første 21-23-27-29 fastmasker, 3 fastmasker i næste fastmaske, 1 fastmaske om hver af de næste 21-23-27-29 rækker = 45-49-57-61 fastmasker.”
22.05.2025 - 15:24
![]() Alicia írta:
Alicia írta:
Hi, i am working the panties first and I dont understand how many time should I work the Pattern 1 ?
29.04.2025 - 21:27A DROPS Design válasza:
Hi Alicia, You work Pattern-1, described at the top of the page under Explanations, to the correct length for your size. At the same time you start to decrease each side as described in the text. You work until the piece measures 18-20-22-cm. Hope this helps. Regards Drops Team.
30.04.2025 - 07:18
![]() Irene írta:
Irene írta:
Hola, no entiendo los diagramas A1, habría alguna manera de verlos en vídeo o explicados por escrito? Muchas gracias!
01.04.2024 - 01:20A DROPS Design válasza:
Hola Irene, todas los videos relevantes para este patrón están en la sección vídeos en la parte superior del patrón. Para más información sobre cómo leer nuestros diagramas de ganchillo puedes leer la siguiente lección: https://www.garnstudio.com/lesson.php?id=69&cid=23
07.04.2024 - 22:28
![]() Sonja írta:
Sonja írta:
What are the final measures of the bikini? How should I know which size to make?
16.03.2024 - 09:52A DROPS Design válasza:
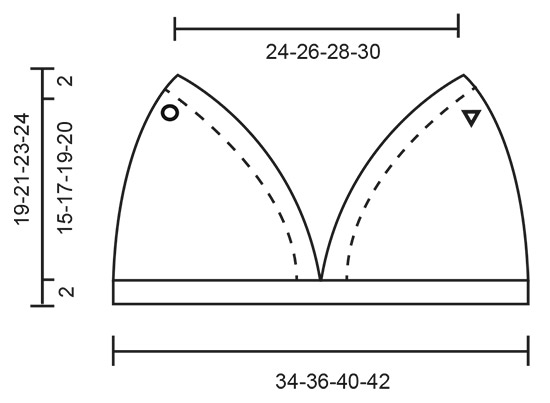
Dear Sonja, please take a look at the schematic drawing at the bottom of the pattern, and compare the measurments there to an existing piece that fits the intended wearer. Happy Knitting!
17.03.2024 - 10:41
![]() Esther írta:
Esther írta:
Hola, al terminar el cuadrado y cuando tenemos 51 puntos bajos, donde dice trabajar un punto bajo en cada uno de los 26 puntos, 0 en el siguiente y uno en los 25 siguientes significa que dejemos uno sin tejer? Si lo hago así al final de la vuelta tengo 50 puntos en lugar de 51....
26.02.2023 - 22:08A DROPS Design válasza:
Hola Esther, no, no lo dejas sin tejer, sino que pasas a la siguiente instrucción, en este caso, directamente 1 punto bajo en los 25 siguientes. Trabajas sobre 26+25 = 51 pts.
26.02.2023 - 23:21
![]() Clara írta:
Clara írta:
I am doing the bikini panties right now and i don't know why only one side of them is wavy (i did the chain before every row and didn't use it as a replacement for the first crochet in a row) or is it supposed to be like that. I also struggle with this the first part on the edge. It says that i should work 1 single crochet in each single crochet but didn't i end with a row of double crochets? I am not that experienced with crocheting so i struggle a little. Thanks in advance.
13.02.2023 - 16:36A DROPS Design válasza:
Dear Clara, this should be "double crochet" instead, pattern will be edited, thanks for noticing. Happy crocheting!
10.05.2023 - 14:56
![]() Sara írta:
Sara írta:
Non capisco nei diagrammi A1a-A1d come interpretare la riga più bassa indicata con X e stellina. La stellina corrisponde a \"questa riga è già stata lavorata - Iniziare dalla riga successiva !\" ma a me pare la la stellina si riferisca ad una maglia, non ad una riga. Dalla risposta ad Angela (in inglese) capisco che si deve cominciare dai simboli sopra questa riga (catenella, catenella, saltare una maglia, maglia doppia ecc) ma quindi non capisco il significato della stellina. Grazie
15.05.2022 - 22:23A DROPS Design válasza:
Buonasera Sara, la stellina indica la prima riga di tutti i diagrammi indicati: si inizia a lavorare dalla riga sopra quella con le stelline. Buon lavoro!
17.05.2022 - 19:12
![]() Angela írta:
Angela írta:
I am quite an experienced crocheter but am struggling with the instructions here “ The next row is worked as follows (= from the wrong side): Work A.1a, A.1b a total of 8-9-11-12 times in width, A.1c and A.1d. Continue until A.1 has been completed in height”. I understand the symbols but not the order of stitches. Please can you give instructions for this in writing without a chart, just for this part? Then I will be able to work out the rest of the pattern from this. Many thanks.
29.03.2022 - 00:25A DROPS Design válasza:
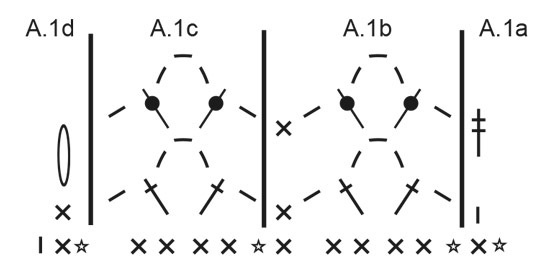
Dear Angela, you start the row from RS with A.1a (= 1 chain on first row), then repeat 8 to 12 times (see size) A.1b (= *1 chain, skip 1 st, 1 tr in next st, 3 ch, 1 tr in next st, 1 ch, skip 1 st, 1 dc in next st*, repeat from *-*), then work A.1c (=1 chain, skip 1 st, 1 tr in next st, 3 ch, 1 tr in next st, 1 ch, skip 1 st) and end with A.1d (= 1 dc in last stitch). From WS read now from left towards the right: A.1d, work A.1c, repeat A.1b and finish with A.1a. Read more about diagrams here. Happy crocheting!
29.03.2022 - 09:15
![]() Lilia írta:
Lilia írta:
Zweite Frage: (sorry bin häkel-ungeübt, ich stricke mehr) wie soll ich das gegengleich häkeln für den zweiten brustcup verstehen? muss man da jeweils eine reihe mehr oder weniger häkeln damit man das richtig hinbekommt?
30.06.2021 - 19:45A DROPS Design válasza:
Liebe Lilia, die Hin-Reihen beim rechten Quadrat/Cup sollen Rückreihen beim linken Quadrat/Cup sein, und die Rückreihen beim rechten Quadrat/Cup sollen Hinreihen beim linken Quadrat/Cup sein, so werden Sie beide spiegelverkehr. Viel Spaß beim häkeln!
01.07.2021 - 08:56
![]() Lilia írta:
Lilia írta:
Beim quadrat und oberteil, " Insgesamt 21-23-27-29 Reihen häkeln." und "Hin und zurück weiterhäkeln, mit 1 festen Masche in jede feste Masche. Insgesamt 14-16-18-20 Reihen häkeln.": ist hier jeweils gemeint, insgesamt mitsamt den zuvor in der art gehäkelten reihen? oder soll man nach der ersten reihe feste maschen bzw. den beschriebenen reihen die um die ecke gehen neu zählen?
30.06.2021 - 19:42A DROPS Design válasza:
Liebe Lilia, die 21-23-27-29 Reihen sind von der Luftmaschenkette gezählt und die 14-16-18-20 Reihen sind ab 1. Reihe vom OBERTEIL gezählt. Viel Spaß beim häkeln!
01.07.2021 - 08:54
|
||||||||||||||||||||||
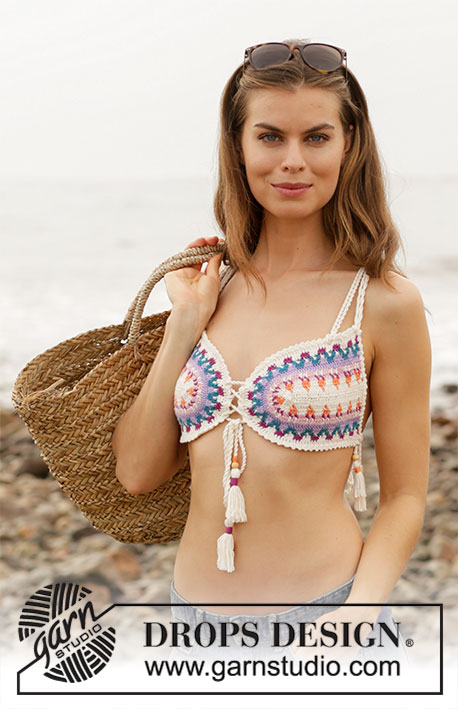
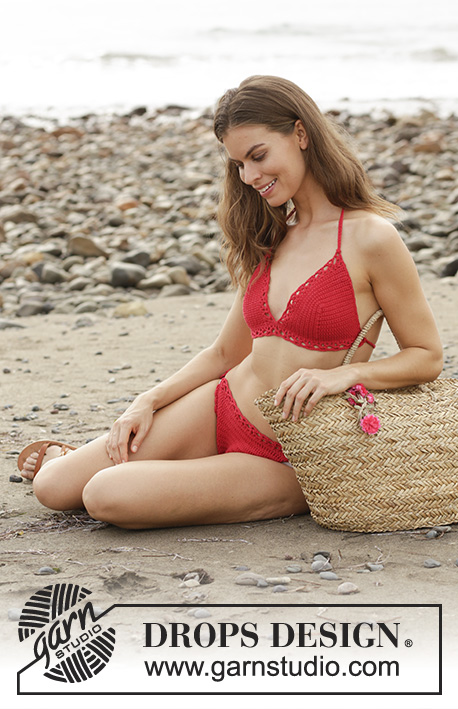
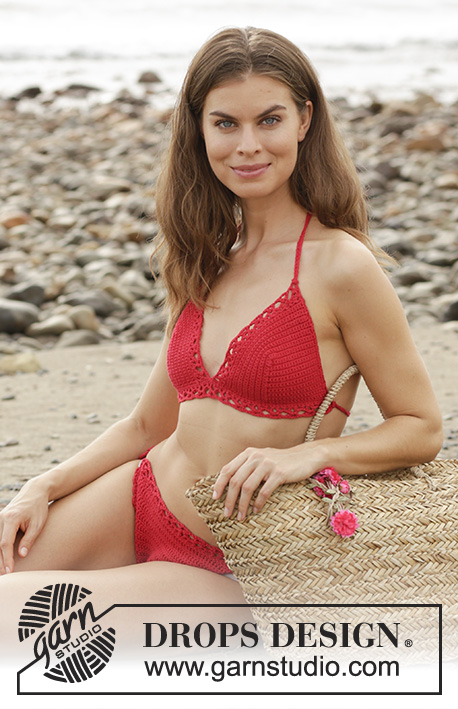
Waterfront Bikini#waterfrontbikini |
||||||||||||||||||||||
 |
 |
|||||||||||||||||||||
DROPS / 190/ 6 DROPS design: e-278 jelű minta A fonalcsoport
DROPS 190-6 |
||||||||||||||||||||||
|
Mintaleírás MAGYARÁZATOK A MINTÁHOZ MINTA: Lásd az A.1 jelű diagramot. TANÁCSOK A HORGOLÁSHOZ: Minden rp kört / sort 1 lsz-mel kezdünk, (ez nem helyettesíti az 1. rp-t). Minden erp kört / sort 3 lsz-mel kezdünk, (ez nem helyettesíti az 1. erp-t). 1. MINTA (AZ ALSÓHOZ) * Horgoljunk 1 sort rövidpálcákkal. 1 sor erp-kkal. * Ism a *-* közötti részt a teljes darabon. TANÁCS A FOGYASZTÁSHOZ (az alsóhoz): Az erp-kal horgolt sorokban fogyasztunk, a köv módon: * 1 erp-t horgolunk a köv 2 szem mindegyikébe, de az utolsó rh-sal és az áthúzással várunk minden szemnél, 1 erp a következő szembe, és az utolsó áthúzásnál a horgolótűn lévő mind a 3 hurkon húzzuk át a szemet *, horgoljunk, 1-1 erp-t minden rp-ba, amíg 2 szem marad a sorban, ism a *-* közötti részt (= 2 erp-t fogyasztottunk). A rp-kal horgolt sorokban fogyasztunk, a köv módon: *1 rp-t horgolunk a köv 2 szem mindegyikébe de az utolsó rh-sal és az áthúzással várunk minden szemnél, 1 rp a következő szembe, és az utolsó áthúzásnál a horgolótűn lévő mind a 3 hurkon húzzuk át a szemet.*, horgoljunk, 1-1 rp-t minden erp-ba, amíg 2 szem marad a sorban, ism a *-* közötti részt (= 2 rp-t fogyasztottunk) TANÁCS A SZAPORÍTÁSHOZ (az alsóhoz): A sor mindkét oldalán a következő módon szaporítunk 2 szemet: Horgoljunk 3 erp-t az 1. rp-ba, horgoljunk 1-1 erp-t minden rp-ba, amíg 1 rp maradt a sorban, 3 erp az utolsó rp-ba. A sor mindkét oldalán a következő módon szaporítunk 1 szemet: Horgoljunk 2 erp-t az 1. rp-ba, horgoljunk 1-1 erp-t minden rp-ba, amíg 1 rp maradt a sorban, 2 erp az utolsó rp-ba. ---------------------------------------------------------- BIKINI FELSŐ: Először a 2 kosarat készítjük el. Ekkor dolgozzuk össze a felsőrész két kosarát. JOBB KOSÁR: Először egy négyzetet készítünk, majd a négyzet két oldalán oda-vissza haladva folytatjuk. NÉGYZET: 23-25-29-31 lsz-et készítünk a 3 mm vastag horgolótűvel a Safran fonallal. Fordítsuk meg a munkát,1 rp a horgolótűtől a 2. lsz-be, 1 rp a megmaradt lsz mindegyikébe = 22-24-28-30 rp. Folytassuk, oda-vissza haladva, 1 rp-t horgolva, minden erp-ba. OLVASSUK EL A FENTI MAGYARÁZATOT A HORGOLÁSHOZ! Horgoljunk összesen 21-23-27-29 sort. A következő sorban így haladjunk a FO felől: 1 rp az első 21-23-27-29 rp mindegyikébe, 3 rp a következő rp mindegyikébe, 1 rp a 21-23-27-29 sor széle köré = 45-49-57-61 rp. FELSŐ: A következő sorban így haladjunk a SZO felől: 1 rp az rövidpálca az első 22-24-28-30 rp mindegyikébe, 2-3-3-3 rp a következő rp-ba, 1 rp a következő 22-24-28-30 szem mindegyikébe le, az oldalán = 46-51-59-63 rp. A következő sorban így haladjunk a FO felől: 1 rp az első 23-26-29-31 rp mindegyikébe, 0-0-3-3 rp a következő rp-ba, 1 rp a következő 23-25-29-31 szem mindegyikébe = 46-51-61-65 rp. A következő sorban így haladjunk a SZO felől: 1 rp az első 23-26-31-32 rp mindegyikébe, 0-0-0-2 rp a következő rp-be, 1 rp a következő 23-25-30-32 szem mindegyikébe = 46-51-61-66 rp. Folytassuk, oda-vissza haladva, 1 rp-t horgolva, minden rp-ba. Horgoljunk összesen 14-16-18-20 sort. A következő sorban így haladjunk a FO felől: Horgoljuk az A.1a mintát, az A.1b mintát, összesen 8-9-11-12 alkalommal egymás mellett, az A.1c jelű mintát és az A.1d jelű mintát. Folytassuk a mintával, a fentiek szerint, amíg az A.1 jelű minta minden sorát elkészítettük. Vágjuk el a fonalat, és dolgozzuk el a szálat. BAL KOSÁR: Ugyanígy haladjunk a jobb kosárral, de minden SZO sor = FO sor, és minden FO sort a SZO felől horgolunk. SZEGÉLY: Ekkor dolgozzuk össze a felsőrész 2 kosarát. MEGJEGYZÉS: Ügyeljünk arra, hogy mind a két kosáron a SZO felől horgolunk tovább. A jobb kosár sarkában kezdünk - figyeljük meg a kört a diagramon. Horgoljunk 1 rp-t az első sor körül, *3 lsz, hagyjunk ki 3 sort, 1 rp a köv sor köré. * Ism a *-* közötti részt, a teljes oldal mellett, folytassuk a kosár aljánál, és horgoljunk 1-1 rp-t a 22-24-28-30 rp mindegyikébe, 1 rp a 14-16-18-20 sor mindegyike köré, 4 rp a csipkeminta legszélső sora köré. Ezután folytassuk a bal kosáron, horgoljunk 4 rp-t a csipkeminta legszélső sora körül, horgoljunk 1-1 rp-t a 14-16-18-20 sor mindegyike köré,1-1 rp a 22-24-28-30 rp mindegyikébe, tegyünk ide 1 jelölőt, folytassuk a kosár oldalán, és 1 rp az első sor köré. * 3 lsz, 3 sort kihagyunk, 1 rp a köv sor köré. * Ism a *-* közötti részt, a teljes oldal mellett, folytassuk fel a bal kosár sarkáig, figyeljük meg a háromszöget a rajzon. Vágjuk el a fonalat, és dolgozzuk el a szálat. Most horgoljunk a két jelölő közötti rp-kon (= 80-88-100-108 rp), és haladjunk a köv módon a FO felől: Horgoljunk 1-1 rp-t minden rp-be, UGYANAKKOR, annyi szemet szap vagy fogy, hogy a szemek száma 81-86-96-101 rp legyen. Fordítsuk meg a darabot és horgoljunk minden rp-ba 1 rp-t. A következő sorban így haladjunk a FO felől: Horgoljuk az A.1a mintát, az A.1b mintát, összesen 15-16-18-19 alkalommal egymás mellett, és az A.1d jelű mintát. Folytassuk, amíg a teljes A.1 jelű diagram mintájának minden sorát elkészítettük, vágjuk el a fonalat, és rögzítsük a szálat. ZSINÓR: Horgoljunk kb 120-130-150-160 cm hosszú lsz-sort. Hajtsuk félbe a zsinórt és fűzzük a kosár felső sarkába, és húzzuk át a zsinórt a hurkon. Ugyanilyen módon készítsünk egy másik zsinórt, és fűzzük a másik kosárba. oldalába. Horgoljunk kb 90-100-120-130 cm hosszú lsz-sort. Hajtsuk félbe a zsinórt és fűzzük a kosár alsó sarkába, és húzzuk át a zsinórt a hurkon. Ugyanilyen módon készítsünk egy másik zsinórt, és fűzzük a másik kosárba. oldalába. ---------------------------------------------------------- BIKINI ALSÓ: A bikini alsót erp-kal és rp-kal horgoljuk, az eleje és a háta felső szélén szegéllyel, és a két oldalán megkötőkkel. Az eleje felső szélénél kezdjük, és a darabot egybe horgoljuk meg. 78- 90-95-113 laza lsz-et készítünk a 3 mm vastag horgolótűvel a Safran fonallal. Fordítsuk meg a darabot. Horgoljunk 1 erp-t a horgolótűtől lévő 4. lsz.be, erp, majd 1 erp a következő 4-1-1-4 lsz mindegyikébe. *Hagyjunk ki 1 lsz-t, 1 erp a következő 4 lsz mindegyikébe. * Ismételjük meg a *-* közötti részt a teljes sorban, összesen 14-17-18-21 alkalommal = 61-70-74-89 erp. OLVASSUK EL A FENTI HORGOLÁSI TANÁCSOT! Ezután horgoljuk az 1. mintát- olvassuk el a fenti magyarázatot, és a köv sorban fogy mindkét oldalon 1-1 szemet - olvassuk el a fenti tanácsot a szemek fogyasztásához. Fogyasszunk a fentiek szerint, minden erp-kal horgolt sorban, összesen 16-18-19-21 alkalommal, és minden 3.-3.-2.-2- rp sorban, összesen 5-6-7-11 alkalommal = 19-22-22-25 rp / erp. A darabunk most kb 18- 20- 22 cm hosszú. NE FELEDKEZZÜNK MEG A MEGFELELŐ HORGOLÁSPRÓBA BETARTÁSÁRÓL! Folytassuk az 1. mintával, szaporítások nélkül, amíg a darabunk 22-25-27-29 cm-es lesz. A következő erp-kel horgolt sorban mindkét oldalon szaporítsunk egy-egy erp-t. OLVASSUK EL A FENTI TANÁCSOT A SZAPORÍTÁSHOZ. Szaporítsunk a fentiek szerint, minden erp-kal horgolt sorban, összesen 11-14-19-17 alkalommal, és szaporítsunk 1 erp-t minden erp-kal horgolt sorban, összesen 9-6-5-4 alkalommal = 81-90-96-101 erp. Folytassuk az 1. mintával a fentiek szerint, amíg a darabunk 45-49-51-54 cm-es lesz, és az utolsó sort erp-kal horgoljuk. SZEGÉLY: Horgoljunk 1-1 rp-t minden rp-be, UGYANAKKOR, annyi szemet szap vagy fogy, hogy a szemek száma 81-91-96-101 rp legyen. A következő sorban így haladjunk: Horgoljuk az A.1a mintát, az A.1b mintát, összesen 16-18-19-20 alkalommal egymás mellett, az A.1c jelű mintát és az A.1d jelű mintát. Folytassuk a mintával, a fentiek szerint, amíg az A.1 jelű minta minden sorát elkészítettük. Vágjuk el a fonalat, és dolgozzuk el a szálat. Ugyanilyen módon készítsünk szegélyt az elejére. MEGJEGYZÉS: Azokat a lsz-meket, amikbe nem horgoltunk, kihagyjuk. ZSINÓR: Horgoljunk kb 70-90-100-110 cm hosszú lsz-sort. Hajtsuk félbe a zsinórt és fűzzük a fürdőruha alsó felső sarkába, és húzzuk át a zsinórt a hurkon. Készítsünk összesen 4 zsinórt és minden sarokba hurkoljunk egy-egy zsinórt. Diagram |
||||||||||||||||||||||
Diagram magyarázatok |
||||||||||||||||||||||
|
||||||||||||||||||||||
|
||||||||||||||||||||||
|
||||||||||||||||||||||
Elkészítette ezt a mintát?Akkor adja a képeihez a #dropspattern #waterfrontbikini tageket, vagy küldje be a képet a #dropsfan galériába. Segítségre van szüksége a modell elkészítéséhez? 6 tutorial videót találhat, és egy kérdés/felelek részt, és még többet, ha a mintát megkeresi a garnstudio.com oldalán. © 1982-2025 DROPS Design A/S. Minden jog fenntartca. Ez a documentim, az összes részével védelem alatt áll. A weboldalunkon többet olvashat arról, hogy mit tehet és mit nem a mintáinkkal. |
||||||||||||||||||||||


Több mint 40 év tapasztalattal a kötés és horgolásminták tervezésében a DROPS Design az ingyenes minták egyik legszélesebb körű gyűjtemnyét kínálja az Interneten, 17 nyelvre fordítva. A mai nappal 314 katalógust 11821 mintát tudunk számon tartani a mintákból 11803 -t fordítottunk le magyarra (európai mértékegységekkel).
keményen dolgozunk azon, hogy a kötés és a horgolás világából a legjobbat hozzuk el, remek fonalakkal, hihetetlen árakon. Ha mintáinkat nemcsak személyes használatra szeretné használni, minden minta alján a Copyright szövegben olvashat arról, mit tehet s mit nem. Sikeres kézimunkázást!
Post a comment to pattern DROPS 190-6
Szívesen vesszük, ha megosztja velünk gondolatait erről a mintáról.
Ha kérdést szeretne feltenni, ügyeljen arra, hogy a megfelelő kategóriát válassza ki, így fegyorsíthatja a válaszadás folyamatát. Það verður að merkja við svæði merktri með *.