
Looking for a yarn?


Megjegyzések / Kérdések (22)
![]() Giulia írta:
Giulia írta:
Buongiorno. Ho usato un uncinetto 4,5 come indicato, ma la coppa mi sta risultando con tanti spazi vuoti che lasciano intravedere il seno sotto. Per rendere il top indossabile sto pensando di sostituire le maglie alte doppie in solo maglie basse. Avete riscontrato anche voi questo problema?
02.05.2025 - 21:28A DROPS Design válasza:
Buongiorno Giulia, il suo campione corrisponde a quello indicato? Buon lavoro!
03.05.2025 - 10:01
![]() Susanne Nielsen írta:
Susanne Nielsen írta:
Hvorfor kan man ikke printe fra jeres hjemmeside mere
11.02.2025 - 18:55A DROPS Design válasza:
Hej Susanne, jo det kan du, prøv fra en anden weblæser :)
12.02.2025 - 11:21
![]() Lisa írta:
Lisa írta:
Salve io ho un problema quando arrivi a un totale di 120-136-144-168-184-200 giri il lavoro fai le maglie alte doppie e poi lasci 6 catenella , qui io non ho capito per dove devi legare queste catenelle le chiudi ? Sostanzialmente non ho capito come fare gli occhilielli
03.02.2024 - 13:47A DROPS Design válasza:
Buonasera Lisa, gli occhielli servono per i bottoni sul dietro del lavoro. Buon lavoro!
17.03.2024 - 18:34
![]() Sarah Foltier írta:
Sarah Foltier írta:
Hi! I've done the two cups but they are not symmetrical, one side has a steeper slope so if I work them together on the wrong side, the piece looks uneven. Where did I go wrong?
22.07.2023 - 11:13A DROPS Design válasza:
Dear Sarah, the two cups should be symmetrical. There could be multiple reasons: a difference in gauge between both cups, that the chain stitches were worked more tightly or loosely than the treble/ double treble crochet, changing the inclination. Hope this helps. Happy crochetting!
23.07.2023 - 19:24
![]() Loredana írta:
Loredana írta:
Ciao, gli aumenti per le coppe vanno fatti sul dritto del lavoro? Grazie
10.07.2023 - 11:49A DROPS Design válasza:
Buongiorno Loredana, gli aumenti vanno lavorati su tutte le righe. Buon lavoro!
16.07.2023 - 13:33
![]() Loredana írta:
Loredana írta:
Ciao, gli aumenti per le coppe vanno fatti sul dritto del lavoro? Grazie
10.07.2023 - 11:45A DROPS Design válasza:
Buongiorno Loredana, gli aumenti vanno lavorati su tutte le righe. Buon lavoro!
16.07.2023 - 13:33
![]() Lisa-Marlen írta:
Lisa-Marlen írta:
Hallo! Ich bin bei dem ersten Körbchen stutzig geworden. Ich häkle in der Größe M und da müsste die Arbeit nach 13x zunehmen eine Länge von ca. 14cm haben. Die Maschenprobe besagt 9 Reihen Muster-2 ergeben 10cm in der Höhe. Die Gesamtlänge der Arbeit wäre rein rechnerisch schon länger als die angegebenen 14cm. Wenn die Gesamtlänge von Muster-2 gemeint ist, ergibt es Sinn. Zählen die ersten Reihen bei der Messung mit,die nicht zu Muster-2 gehören?
22.04.2023 - 14:33
![]() Pascale írta:
Pascale írta:
Bonjour, En vrai votre ajout expliquant qu’il faut augmenter chaque rang devrait être précisé dans l’explication de départ : soit double bride, soit maille serrée. Par ailleurs, considérerez vous les 4 mailles en l’air comme la première double bride?
18.08.2022 - 12:06A DROPS Design válasza:
Bonjour Pascale, en fait l'échantillon en hauteur est indiqué dans le point fantaisie-2, soit alternativement 1 rang de mailles serrées/1 rang de double-brides (en largeur 1 double-bride et 1 maille serrée doivent avoir la même largeur) - les mailles en l'air remplacent la 1ère maille, cf INFO CROCHET:. Bon crochet!
18.08.2022 - 15:28
![]() Joe5 írta:
Joe5 írta:
Bonjour. Après plusieurs tentatives infructueuses j'ai remplacé les doubles brides par des brides, et "ho miracle" la jauge tombe juste. Donc je pense que le problème signalé par plusieurs personnes réside dans le fait qu'il faut crocheter des brides et non des doubles brides Merci à toute l'équipe
13.06.2022 - 12:50A DROPS Design válasza:
Bonjour Joe5, les mesures indiquées pour l'échantillon sont justes, vous devez crocheter alternativement *1 rang de mailles serrées, 1 rang de double-brides* (cf POINT FANTAISIE-2:), maintenant, nous avons effectivement toutes une façon différente de crocheter, si vous "tirez" vos brides en hauteur, il vous faut effectivement adapter, soit le crochet (plus simple pour que les explications tombent justes) soit le modèle. Bon crochet!
13.06.2022 - 16:35
![]() Daniela Romeo írta:
Daniela Romeo írta:
Buongiorno, sono una principiante. Quanti gomitoli devo acquistare per realizzare questo capo?
07.02.2022 - 10:51A DROPS Design válasza:
Buongiorno Daniela, la quantità di filato per le diverse taglie è indicata di fianco alla foto se sta utilizzando un PC oppure sotto la foto se sta utilizzando un cellulare. Buon lavoro!
07.02.2022 - 11:11
|
|||||||||||||||||||
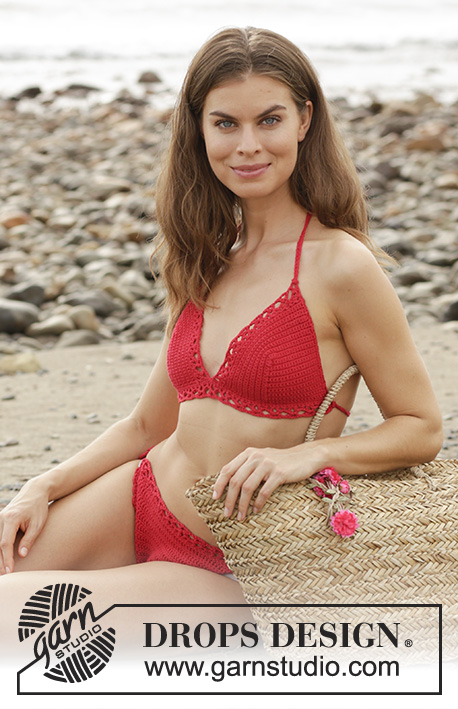
Seashore Memories#seashorememoriestop |
|||||||||||||||||||
 |
 |
||||||||||||||||||
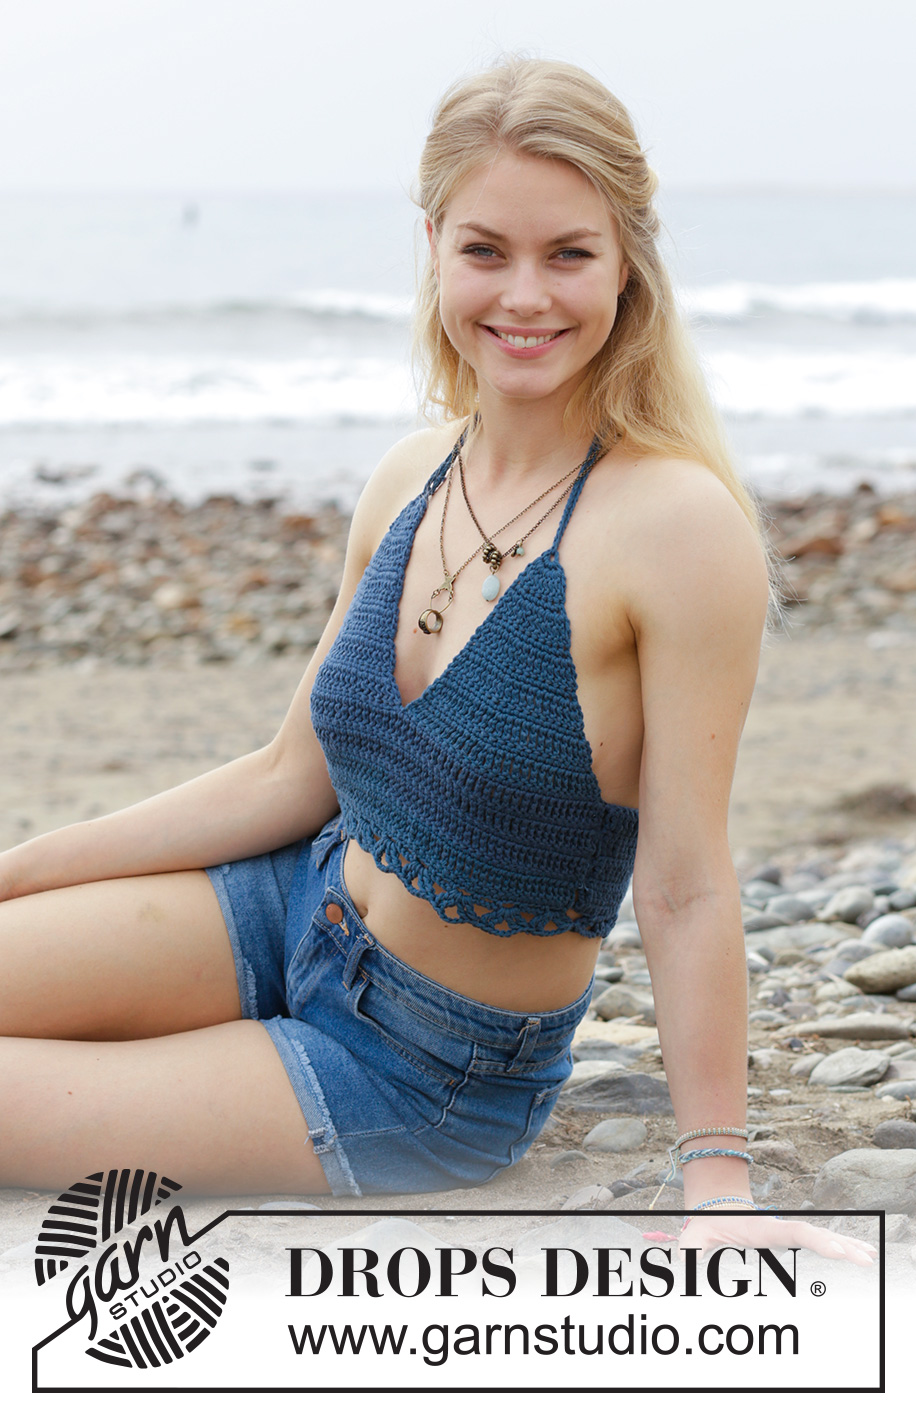
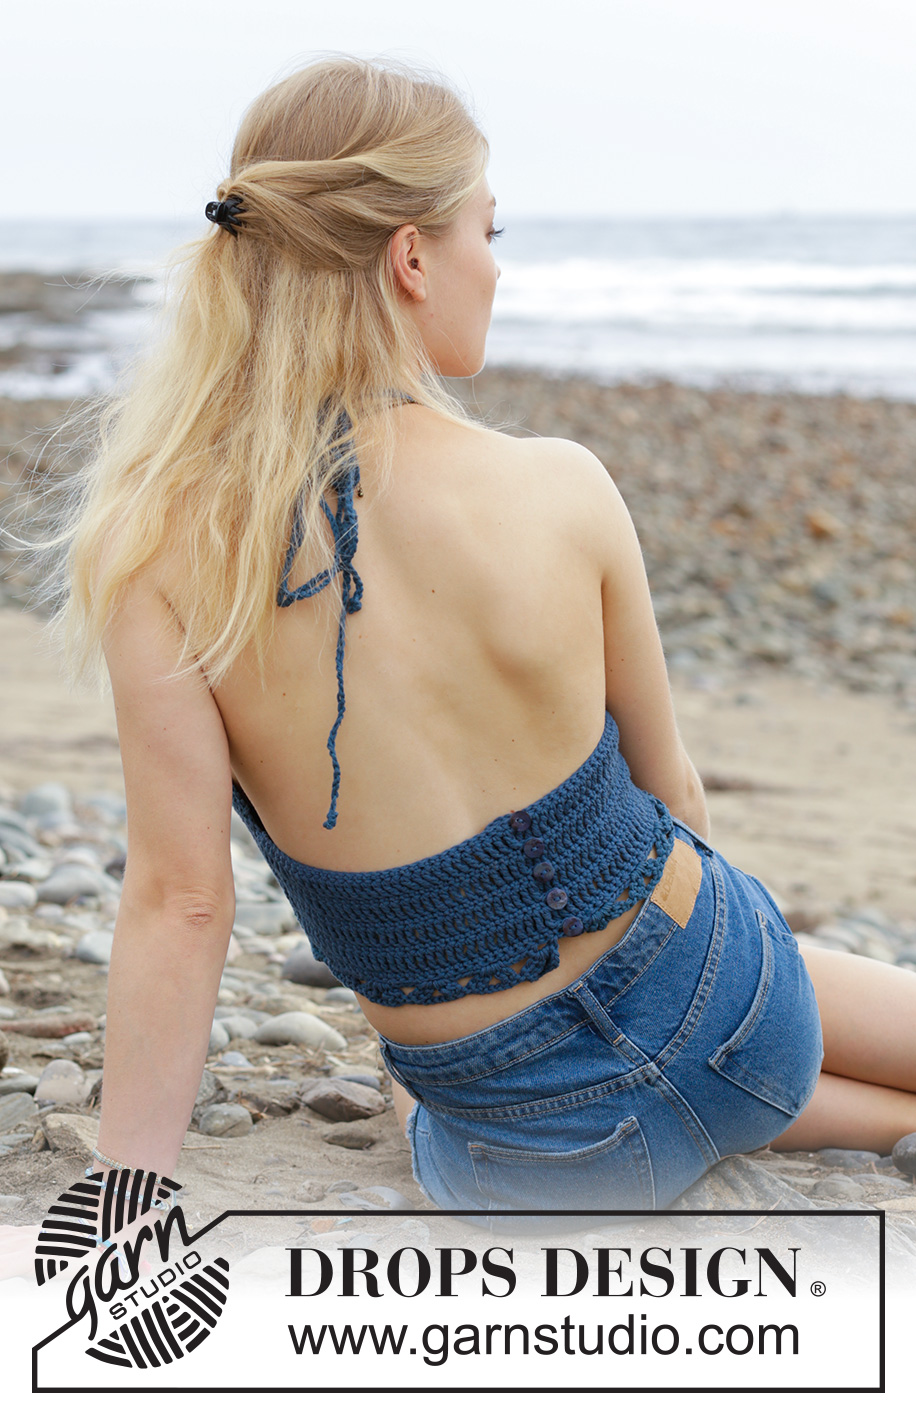
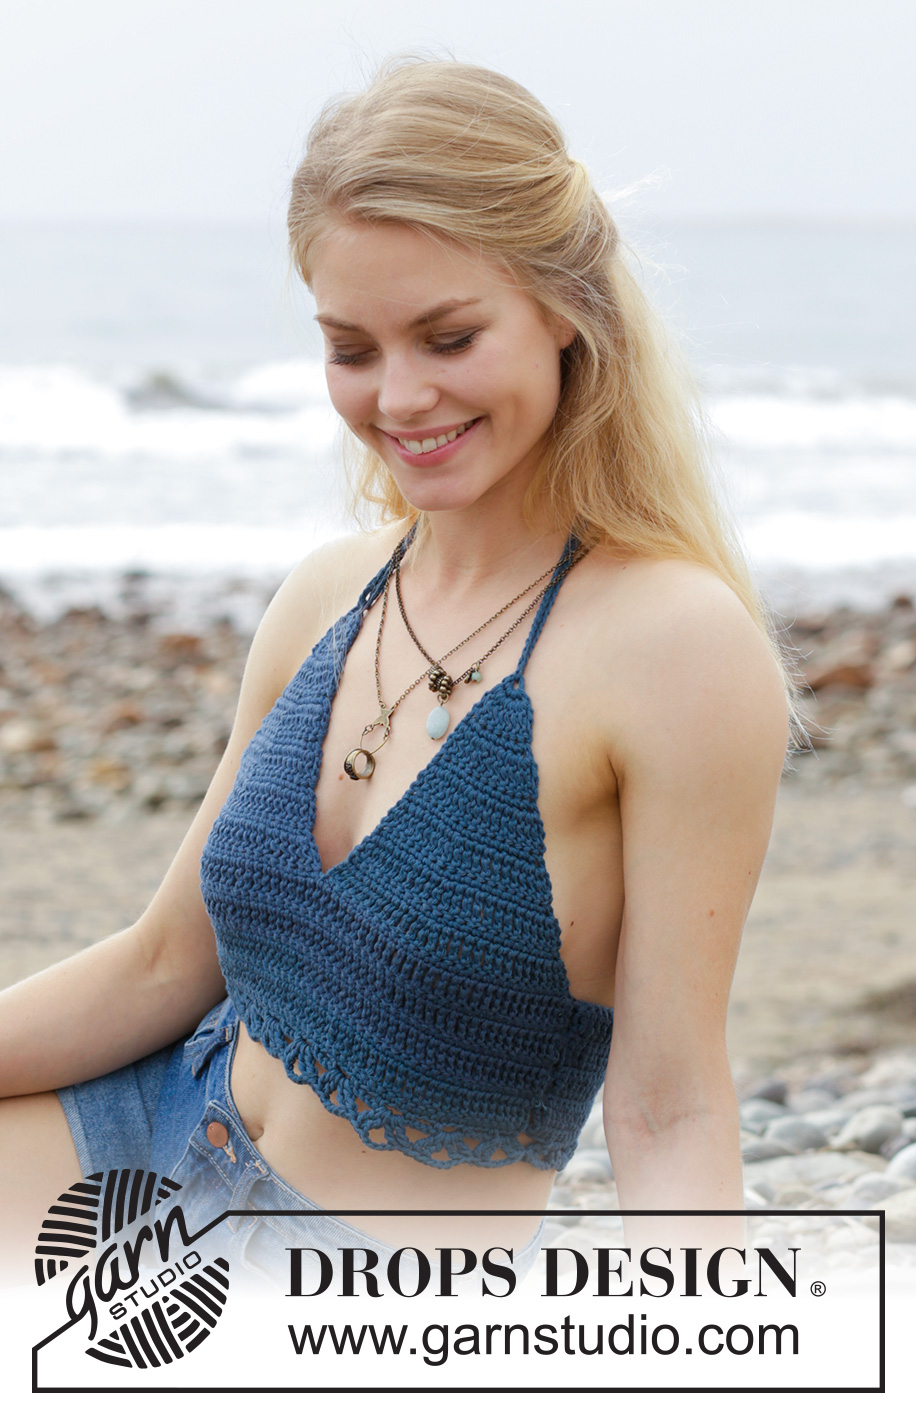
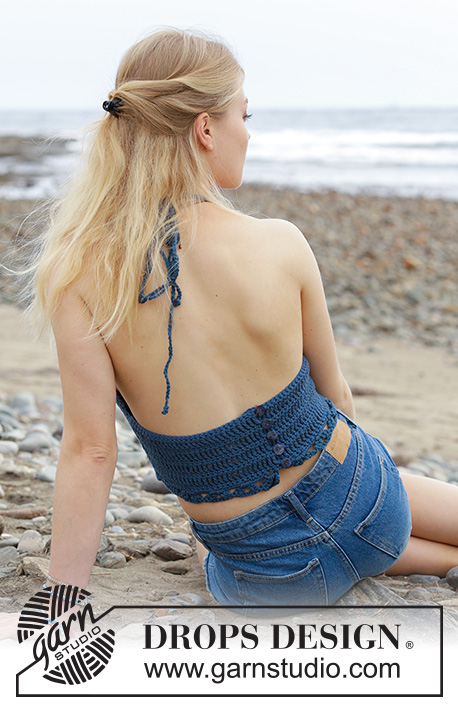
Horgolt bikini-felső legyezőmintával, fentről lefelé horgolva. S - XXXL méretekben, A darabot DROPS Paris fonalból készítjük.
DROPS 190-23 |
|||||||||||||||||||
|
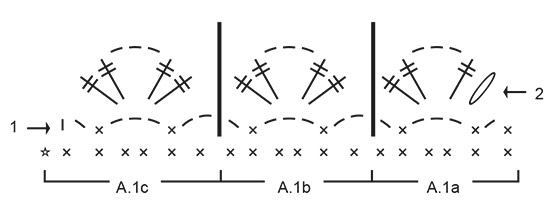
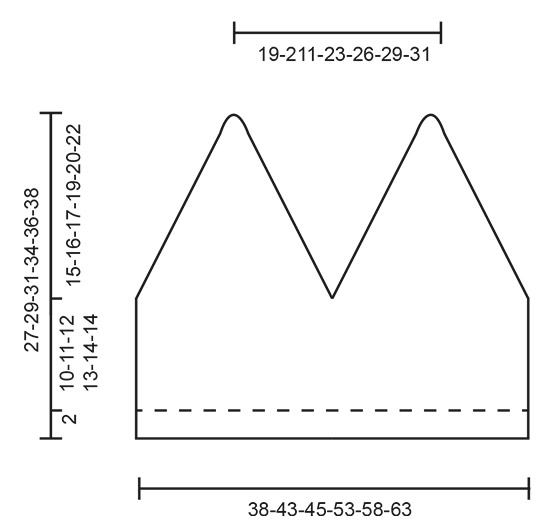
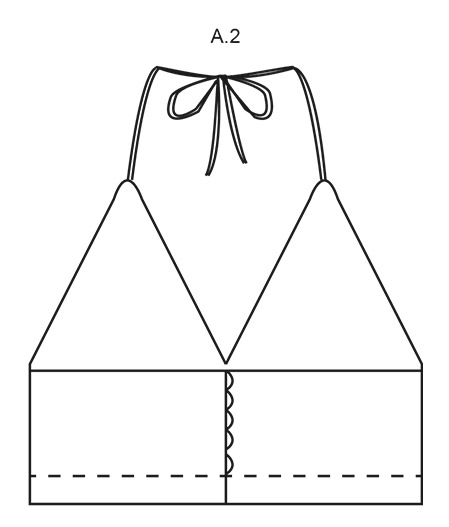
TANÁCSOK A MINTA ELKÉSZÍTÉSÉHEZ: MINTA: Lásd az A.1 és A.2 jelű ábrát Az A.2 jelű minta azt mutatja, hogyan viseljük a darabot. 2-ES MINTA 1. sor (= FO): Minden krp.ba 1 rp-t horgolunk. 2. sor (= SZO): Minden rp.ba 1 krp-t horgolunk. Ismételjük meg a 1. és a 2. sort. TANÁCSOK A HORGOLÁSHOZ: Minden rp sor elején az 1. rp-t 1 lsz-mel helyettesítjük. Minden krp sor elején az 1. krp-t 4 lsz-mel helyettesítjük. TANÁCS A SZAPORÍTÁSHOZ: 1 krp szaporításához ugyanabba a szembe / szem köré 2 krp-t horgolunk. 1 rp szaporításához ugyanabba a szembe / szem köré 2 rp-t horgolunk. ---------------------------------------------------------- BIKINI FELSŐ: A kardigánt oda-vissza haladva készítjük, fentről lefelé. Először a 2 kosarat készítjük el. Ekkor dolgozzuk össze ezt a felsőrész 2 kosarát. A felsőt a háta közepén zárjuk - figyeljük meg az A.2 jelű mintát. KOSÁR: A kezdéshez készítsünk 4 lsz hosszú lsz-sort, a 4,5 mm-es horgolótűvel a Paris fonallal majd az 1. lsz-be öltött kúszószemmel zárjuk a kört. 4-4-4-5-5-5 ep a lsz-gyűrűbe. OLVASSUK EL A FENTI TANÁCSOT A HORGOLÁSHOZ! Fordítsuk meg a munkát, és horgoljunk 2 krp-t minden krp-ba = 8-8-8-10-10-10 krp. Folytassuk a 2. sz. minta horgolásával, UGYANAKKOR, mindkét oldalon szaporítsunk 1-1 szemet - olvassuk el a fenti magyarázatot a szaporításhoz. Ismételjük meg a szaporítást a fentiek szerint, minden sorban, összesen 11-13-14-16-18-20 alkalommal = 30-34-36-42-46-50 szem marad a sorban. NE FELEDKEZZÜNK MEG A MEGFELELŐ HORGOLÁSPRÓBA BETARTÁSÁRÓL A darabunk most körülbelül 12-14-16-18-20-22 cm-es. Folytassuk a munkát oda-vissza haladva további szaporítások nélkül, amíg a darabunk15-16-17-19-20-22 cm -es lesz, és 1 FO felől horgolt rp sor után járunk. Vágjuk el a fonalat, és dolgozzuk el a szálat. Ugyanilyen módon készítsünk egy másik kosarat. Ekkor dolgozzuk össze a felsőrész 2 kosarát. MEGJEGYZÉS: Ügyeljünk arra, hogy mind a két kosáron a SZO felől horgolunk tovább. Horgoljunk 30-34-36-42-46-50 laza lsz-t, majd horgoljunk 1-1 rp-t a kosár alsó szélén mind a 30-34-36-42-46-50 krp-ba, Horgoljunk 1-1 rp-t a másik kosár alján mind a 30-34-36-42-46-50 krp-ba, majd horgoljunk 30-34-36-42-46-50 laza lsz-t a sor végén = 120-136-144-168-184-200 szem a sorban. Fordítsuk meg a munkát, és horgoljunk 1-1 krp-t minden szembe, a sort 6 lsz-mel fejezzük be (= hurok a gomboláshoz) = 120-136-144-168-184-200 krp. Folytassuk a 2. mintával, a korábbiak szerint, de minden krp-sort 6 lsz-mel fejezzünk be (a hurkokhoz), amíg összesen 4-4-4-5-5-6 hurkot készítettünk). Amikor minden hurkot elkészítettünk, horgoljunk 1 sort rp-kal, UGYANAKKOR, a sorban egyenletesen elosztva szaporítsunk 0-2-0-0-2-4 szemet = 120-138-144-168-186-204 rp lesz a sorban. Vágjuk el a szálat, és kezdjünk új sort a FO felől. A következő sorban így haladjunk a FO felől: Horgoljuk az A.1c és A.1b jelű mintát egymás mellett 18-21-22-24-29-32 alkalommal, majd horgoljuk az A.1a jelű mintát. Folytassuk a mintával, a fentiek szerint, amíg az A.1 jelű minta minden sorát elkészítettük. Vágjuk el a fonalat, és dolgozzuk el a szálat. Ezután a háta mindkét oldalára készítsünk szegélyt (a háta felső szélére). A hurkokkal készített oldalon így haladjunk: Rögzítsük a szálat az 1. lsz-be 1 ksz-mel. Horgoljunk 6 lsz-t (= hurok). Horgoljunk 1 rp-t ugyanabba a lsz-be. Folytassuk 1-1 rp-t horgolva a megmaradt 29-33-35-41-45-49 szem mindegyikébe. Vágjuk el a fonalat, és dolgozzuk el a szálat. Horgoljunk 1-1 rp-t a háta másik oldalán a 30-34-36-42-46-50 lsz mindegyikébe. Vágjuk el a fonalat, és dolgozzuk el a szálat. VÁLLPÁNT: Horgoljunk lsz-mekkel, amíg kb 100 cm hosszú zsinórunk lesz. Vágjuk el és rögzítsük a szálat, kössünk a végére csomót. Fűzzük ezt a zsinórt a darab elején készített lsz-gyűrűbe. Készítsünk egy másik zsinórt ugyanígy, és fűzzük a felső másik oldalába. Varrjunk fel a gombokat a darabunk bal oldalára. |
|||||||||||||||||||
Diagram magyarázatok |
|||||||||||||||||||
|
|||||||||||||||||||
|
|||||||||||||||||||
|
|||||||||||||||||||
|
|||||||||||||||||||
Elkészítette ezt a mintát?Akkor adja a képeihez a #dropspattern #seashorememoriestop tageket, vagy küldje be a képet a #dropsfan galériába. Segítségre van szüksége a modell elkészítéséhez? 7 tutorial videót találhat, és egy kérdés/felelek részt, és még többet, ha a mintát megkeresi a garnstudio.com oldalán. © 1982-2025 DROPS Design A/S. Minden jog fenntartca. Ez a documentim, az összes részével védelem alatt áll. A weboldalunkon többet olvashat arról, hogy mit tehet és mit nem a mintáinkkal. |
|||||||||||||||||||


Több mint 40 év tapasztalattal a kötés és horgolásminták tervezésében a DROPS Design az ingyenes minták egyik legszélesebb körű gyűjtemnyét kínálja az Interneten, 17 nyelvre fordítva. A mai nappal 314 katalógust 11822 mintát tudunk számon tartani a mintákból 11804 -t fordítottunk le magyarra (európai mértékegységekkel).
keményen dolgozunk azon, hogy a kötés és a horgolás világából a legjobbat hozzuk el, remek fonalakkal, hihetetlen árakon. Ha mintáinkat nemcsak személyes használatra szeretné használni, minden minta alján a Copyright szövegben olvashat arról, mit tehet s mit nem. Sikeres kézimunkázást!
Post a comment to pattern DROPS 190-23
Szívesen vesszük, ha megosztja velünk gondolatait erről a mintáról.
Ha kérdést szeretne feltenni, ügyeljen arra, hogy a megfelelő kategóriát válassza ki, így fegyorsíthatja a válaszadás folyamatát. Það verður að merkja við svæði merktri með *.