
Looking for a yarn?


Megjegyzések / Kérdések (8)
![]() Maria Jose Rocha írta:
Maria Jose Rocha írta:
Por favor. enviem me uma melhor explicação deste modelo. Podem mandar em ingles talvez a tradução complique
12.09.2024 - 13:04A DROPS Design válasza:
Bom dia, Na página das explicações há um link para mudar de língua, ao pé do link para imprimir o modelo. Atenção que este modelo está disponível em inglês do UK e inglês dos USA e os termos em croché são diferentes. Bons crochés!
19.09.2024 - 12:04
![]() Maria Jose Rocha írta:
Maria Jose Rocha írta:
Summer Ride É possivel enviar me explicação mais facil de entender deste modelo Muito obrigada
22.08.2024 - 13:29A DROPS Design válasza:
Bom dia, Não existe outra explicação.
20.09.2024 - 12:58
![]() Ana61 írta:
Ana61 írta:
I just bought the cotton fir that pattern but the pattern in french is not understandable. i am very disappointed
07.09.2019 - 17:36
![]() Sharan Stanwood írta:
Sharan Stanwood írta:
Well, the answer to my previous comment stating there are problems with this pattern was only defense. I have made some suggestions for this pattern on my R account, which is my 1st name with 555, if anyone else is confused. To begin with, start with 33-33-39 chain stitches, and dc in the 4th ch from hook.
28.08.2019 - 23:43
![]() Sharan Stanwood írta:
Sharan Stanwood írta:
Your diagrams A.1a thru A.etc, along with the written explanations, are impossible to understand. The A charts are not numbered, so there is confusion as to where to start; the * makes no sense, it does not say which size is relevant; and more, make this pattern utterly impossible! And I am an Advanced crocheter!! I could create the bikini top just by looking at it; however a pattern should make sense in ALL languages it\'s translated into, with internationally recognized symbols.
12.08.2019 - 21:01A DROPS Design válasza:
Der Mrs Stanwood, The DROPS patterns are knitted and crocheted by thousands and thousands of people around the world. We understand however that in certain countries, with different knitting/crochet traditions than Scandinavia, our patterns might be written in a way that differs from what some are used to. But of course we want everyone to understand our patterns, so that’s why we have created an extensive library of tutorial videos as well as step by step lessons that explain how to follow the techniques we use and how to read the diagrams in our patterns. Give them a try!
13.08.2019 - 08:45
![]() Cristina írta:
Cristina írta:
Se realiza con aguja de 2.5mm o de 35mm? no me queda claro
07.08.2018 - 20:16A DROPS Design válasza:
Hola Cristina, el patrón se realiza con aguja de 2.5 mm. Se trataba de una errata, ya está corregido.
07.08.2018 - 21:24Toby írta:
This is very confusing. Plus it says there’s not a USA translation.
29.06.2018 - 23:11A DROPS Design válasza:
Dear Toby, our translators work continiously to get the patterns in every language as fast as possible. This pattern is already available in US version. Happy Crafting!
01.07.2018 - 03:32Jing írta:
Dear, I really love the above bikini pattern, but I can't understand the diagram and the words explanation. they confused me. Would you please write to me more details, like how to start with, and where's the beginning etc? And does this bra cup crochet directly or need to crochet different parts and then sew them together to make one piece of bra? Appreciate if more information, thank you. Sincerely, Jing
27.06.2018 - 06:46A DROPS Design válasza:
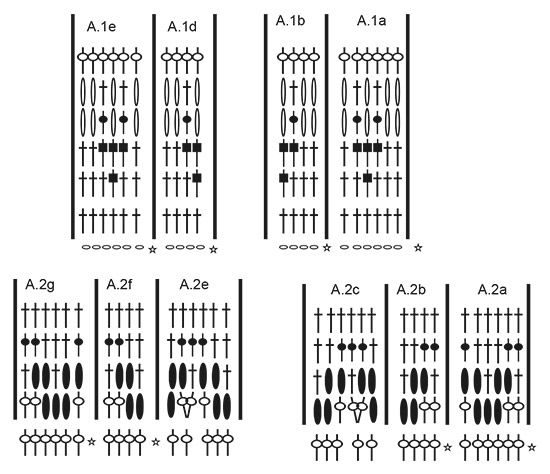
Dear Jing, each bra cup will be worked separately starting in the middle of piece and crocheting back and forth on each side of the fundation chain, and increasing on one end of the chain to create the rounded edge towards mid front (the side where you will turn at the end of each row will be straight - see measurement chart. Follow then diagrams starting on row after the one with the star and reading from RS right to left and from WS left to right. Happy crocheting!
27.06.2018 - 08:29
|
||||||||||||||||||||||||||||
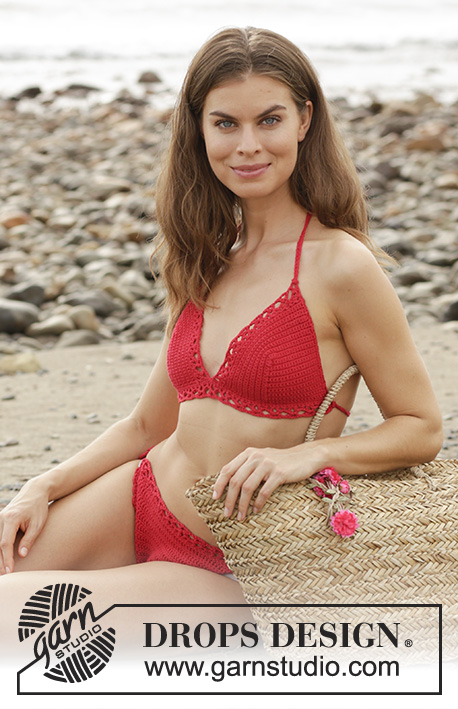
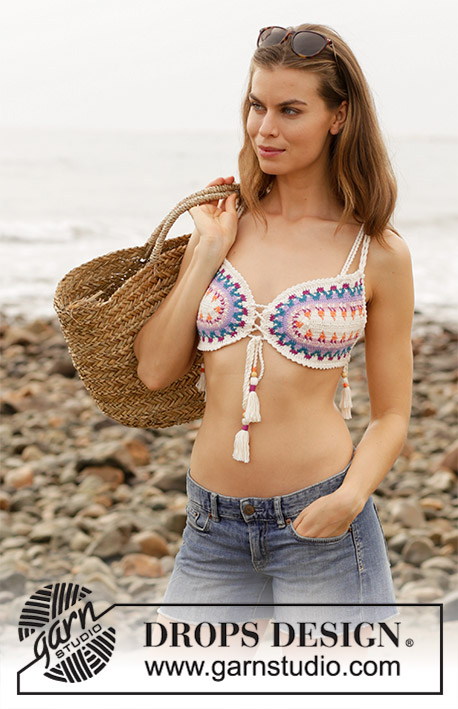
Summer Ride#summerridebikini |
||||||||||||||||||||||||||||
 |
 |
|||||||||||||||||||||||||||
Horgolt bikini felső, színes mintával és megkötőkkel Méret: S - XXXL méretekben. A darabot DROPS Paris fonalból kötjük.
DROPS 190-4 |
||||||||||||||||||||||||||||
|
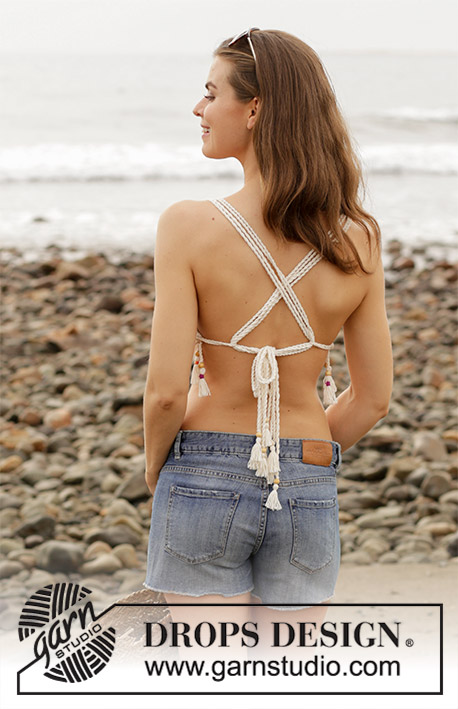
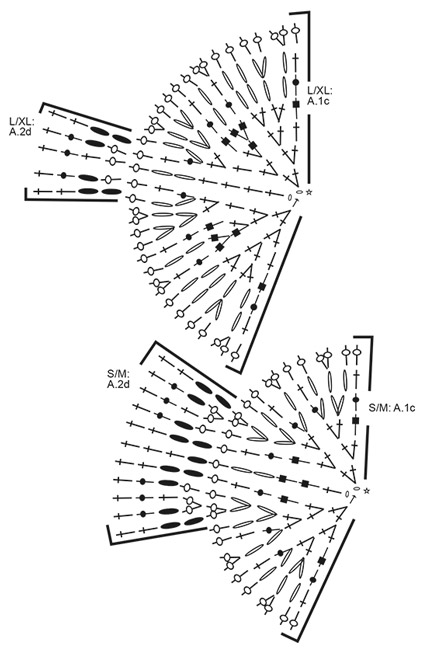
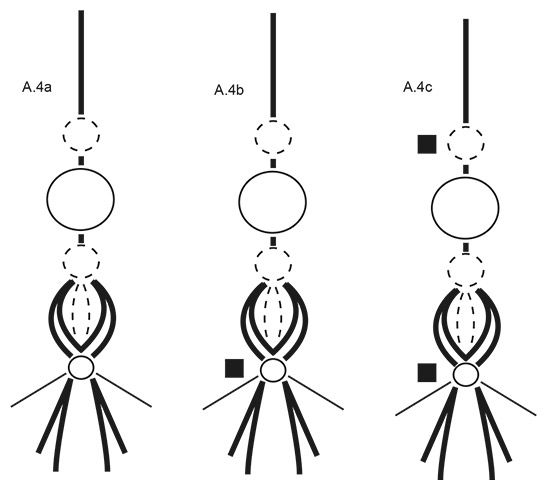
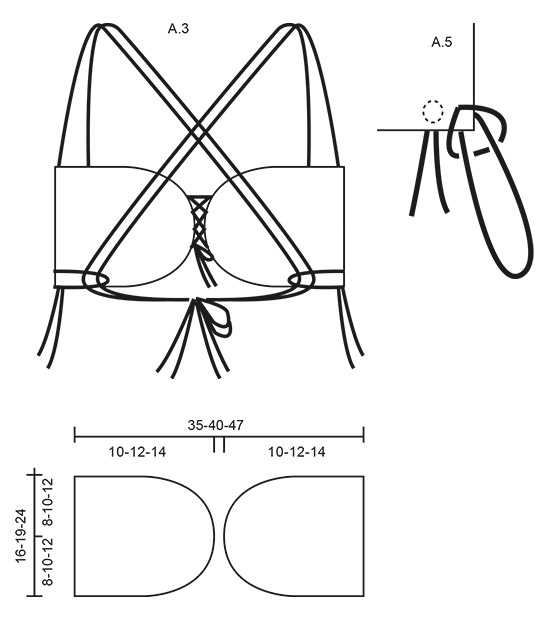
---------------------------------------------------------- TANÁCSOK A MINTA ELKÉSZÍTÉSÉHEZ: MINTA: Lásd az A.1 - A.5 jelű diagramokat Válasszuk a megfelelő méretű a diagramot. Az A.3 jelű diagram azt mutatja, hogyan állítjuk össze a bikinit. Az A.4 jelű ábra azt mutatja, hogyan készítjük el a rojtokat. Az A.5-ös ábra azt mutatja, hogyan rögzítjük a pántokat. TANÁCSOK A HORGOLÁSHOZ: Felváltva dolgozunk a SZO és a FO felől is. Minden erp sort 3 lsz-el kezdünk (=1. erp), és a sor elején 3. szembe öltött kúszószemmel fejezünk be, majd megfordítjuk a darabot. SZÍNES MINTA Amikor a sor elején váltunk színt, a következő módon haladjunk: Horgoljuk az utolsó erp-t ez első színnel, de az utolsó áthúzással várjunk. Váltsunk az új színre, és az utolsó áthúzást az új színnel készítsük. A kört a kör kezdeténél a 3. lsz-be öltött 1 kúszószemmel fejezzük be. Fordítsuk meg a darabot, és horgoljunk 3 lsz-t (= az új sor elején) A soron belül színváltásokat a köv módon készítsük el: Horgoljuk az utolsó erp-t ez első színnel, de az utolsó áthúzással várjunk. Váltsunk az új színre, és az utolsó áthúzást az új színnel készítsük. Amikor 2 színnel dolgozunk a nem használt előző sor szemei fölött (mögött) vezetjük el. Úgy horgoljunk a szálat körül, hogy a SZO felől ne látszon, és az kör követve halad. Ügyeljünk arra, hogy a fonalat ne vezessük túl szorosan, amikor az előző sorból felvesszük. ---------------------------------------------------------- BIKINI FELSŐ: Először a 2 kosarat készítjük el. Ezeket az eleje közepén megkötővel rögzítjük. Készítsünk egy-egy hurkot mindkét oldalon, vezessük át a megkötőket a hurkokon, és keresztben kössük meg a hátán. BIKINI KOSÁR: 30-30-36 laza lsz-et készítünk a 2,5 mm vastag horgolótűvel a törtfehér színű fonallal. Ezután horgoljuk az A.1 jelű minta 1. sorát (válasszuk a méretünknek megfelelő diagramot. OLVASSUK EL A FENTI TANÁCSOKAT A HORGOLÁSHOZ, ÉS A SZÍNVÁLTÁSHOZ! NE FELEDKEZZÜNK MEG A MEGFELELŐ HORGOLÁSPRÓBA BETARTÁSÁRÓL! Folytassuk a következő módon: Horgoljuk az A.1a jelű mintát az első 24-24-30 lsz-men (= 4-4-5 ism egymás mellett). Az A.1b jelű minta a köv 4 szemen, horgoljuk az A.1c jelű minta az utolsó 2 lsz-men, majd folyt a kört a 2 lsz-mel ellentétes oldalon (=29-29-35 lsz), és horgoljuk az A.1c jelű minta utolsó 2 erp-ját ezek közül a lsz-mek közül a 2.-ba (figyeljük meg a nyilat a diagramon), majd horgoljuk az A.1d jelű mintát a köv 4 lsz.n, és az A.1e jelű mintát az utolsó 24-24-30 szemen (= 4-4-5 ism). S-M méretekben: Folytassuk a mintát a fentiek szerint, amíg az A.1c jelű minta minden sorát elkészítettük egymás fölött = 85 erp az ut sorban. L/XL méretben: Ism az A.1a/b/d/e jelű minta 1. sorát még 1 alkalommal (vagyis 1 kört a törtfehér színnel), mielőtt ezeket a diagramokat horgolnánk, UGYANAKKOR, folytassuk az A.1c jelű minta 2. sorával. Folytassuk a mintát a fentiek szerint, a míg az A.1c jelű minta minden sorát elkészítettük egymás fölött = 91 erp az ut sorban. XXL/XXXL méretben: Ism az A.1a/b/d/e jelű minta 3. sorát még 1 alkalommal (vagyis 1 kört a törtfehér színnel), mielőtt ezeket a diagramokat horgolnánk, UGYANAKKOR, folytassuk az A.1c jelű minta 2. sorával. Folytassuk a mintát a fentiek szerint, amíg az A.1c jelű minta minden sorát elkészítettük egymás fölött = 113 erp az ut sorban. MINDEN MÉRETBEN: Horgoljuk az A.2a jelű mintát az első 24-24-30 erp-n (= 4-4-5 ism), az A.2b jelű minta a köv 4 erp-n, horgoljuk az A.2c jelű mintát a köv 10-15-15 erp-n, az A.2d jelű minta a köv 9-5-15 erp-n. Az A.2e jelű minta a köv 10-15-15 t erp-n, az A.2f jelű minta a köv 4 erp-n, az A.2g jelű minta az utolsó 24-24-30 erp-n (= 4-4-5 ism). Folytassuk a mintát a fentiek szerint, amíg az A.2 jelű minta minden sorát elkészítettük egymás fölött = 91-97-121 erp az ut sorban. A törtfehér fonallal a következő módon haladunk a köv sorban: 1 lsz, 1 erp-t kihagyunk. * 1 rp a köv erp-ba, 2 lsz, 1 rp uabba az erp-ba, 1erp-t kihagyunk. * Ismételjük a *-* közötti részt, amíg 2 erp marad, horgoljunk 1 lsz-t. 1 erp-t kihagyunk, 1 rp az it erp-ba. A FO-n ögzítsük a szálat. Készítsünk ugyanilyen módon egy másik bikini kosarat. PÁNTOK: Lásd az A.3 jelű diagramot. Vágjunk le összesen 4 darab, egyenként 6 méteres szálat a fonalból A két végét ellentétes irányban csavarjuk, amíg tudjuk, hajtsuk félbe, hogy újra összecsavarodjon. Kb 10 cm-re mindkét végétől kössünk csomót a fonatra. Hajtsuk félbe, fűzzük át a keletkezett hurkot 2 erp szem között a melltartó egyik kosarának a felső sarkában. Majd a hurkon húzzuk át a szál két végét. Szorosan húzzuk össze. Ugyanilyen módon készítsünk egy másik megkötőt, és húzzuk át 2 erp között a saroktól kb 5-5-6 cm-re. A másik kosár szélén ugyanígy készítjük el a megkötőt. Mindkét végét húzzuk át 1 db fagyöngyön, és kössük csomóra- figyeljük meg az A.4a jelű diagramot. Vágjunk le 8 szál törtfehér, egyenként 10 cm hosszú szálat, és kössünk még egy csomót - ezt a szálak közepére. Így a bojtunk tömörebb lesz. Kössünk 1 szál törtfehér fonalat kb 1 cm-re a gyöngytől lefelé. Vágjuk el a fonalat. HURKOK: Vágjunk le összesen 4 darab, egyenként 1 méteres szálat a fonalból A két végét ellentétes irányban csavarjuk, amíg tudjuk, hajtsuk félbe, hogy újra összecsavarodjon. Kb 10 cm-re mindkét végétől kössünk csomót a fonatra. Hajtsuk félbe, fűzzük át a keletkezett hurkot 2 erp szem között a melltartó egyik kosarának alsó sarkában. Húzzuk át a fonalvégeket az elején a fonalhurkokon- hagyjunk kb 10 cm-es hurkot - figyeljük meg az A.5 jelű diagramot. Óvatosan húzzuk meg hátul és kössük csomóra. Az egyik végét húzzuk át 1 db fagyöngyön, és kössük csomóra- figyeljük meg az A.4b jelű diagramot. Vágjunk le 8 szál törtfehér, egyenként 10 cm hosszú szálat, és kössünk még egy csomót - ezt a szálak közepére. Így a bojtunk tömörebb lesz. Tekerjünk 1 szál sötét hanga színű fonalat kb 8-szor körbe, kb 1 cm-re a gyöngy alatt (lásd az alsó fekete négyzetet.) Vágjuk el a fonalat. A másik oldalon ugyanígy dolgozunk a narancs színű fonallal. A másik kosár szélén ugyanígy készítjük el a megkötőt. MEGKÖTŐ AZ ELEJE KÖZEPÉN. Vágjunk le összesen 4 darab, egyenként 4 méteres szálat a fonalból A két végét ellentétes irányban csavarjuk, amíg tudjuk, hajtsuk félbe, hogy újra összecsavarodjon. Kb 10 cm-re mindkét végétől kössünk csomót a fonatra. Húzzuk a megkötőt (az alsó részével felfelé) 2 erp között az egyik melltartó kosártól a másikig, oda-vissza haladva, cikk-cakk vonalban, összesen 3 alkalommal, majd fűzzük a másik kosártól fentről lefelé ugyanígy. Az eleje közepén kössük masnira. Az egyik végét húzzuk át 1 db fagyöngyön, és kössük csomóra- figyeljük meg az A.4a jelű diagramot. Vágjunk le 20 szál törtfehér, egyenként 15 cm hosszú szálat, és kössünk még egy csomót - ezt a szálak közepére. Így a bojtunk tömörebb lesz. Tekerjünk 1 szál sötét hanga színű fonalat kb 16-szor körbe, kb 1 cm-re a gyöngy alatt (lásd az alsó fekete négyzetet.) Tekerjünk 1 szál narancs színű fonalat kb 8-szor körbe, kb 1 cm-re a gyöngy fölött (lásd a felső fekete négyzetet.) Vágjuk el a fonalat. A másik oldalon ugyanígy dolgozunk. |
||||||||||||||||||||||||||||
Diagram magyarázatok |
||||||||||||||||||||||||||||
|
||||||||||||||||||||||||||||
|
||||||||||||||||||||||||||||
|
||||||||||||||||||||||||||||

|
||||||||||||||||||||||||||||
|
||||||||||||||||||||||||||||
|
||||||||||||||||||||||||||||
Elkészítette ezt a mintát?Akkor adja a képeihez a #dropspattern #summerridebikini tageket, vagy küldje be a képet a #dropsfan galériába. Segítségre van szüksége a modell elkészítéséhez? 8 tutorial videót találhat, és egy kérdés/felelek részt, és még többet, ha a mintát megkeresi a garnstudio.com oldalán. © 1982-2025 DROPS Design A/S. Minden jog fenntartca. Ez a documentim, az összes részével védelem alatt áll. A weboldalunkon többet olvashat arról, hogy mit tehet és mit nem a mintáinkkal. |
||||||||||||||||||||||||||||


Több mint 40 év tapasztalattal a kötés és horgolásminták tervezésében a DROPS Design az ingyenes minták egyik legszélesebb körű gyűjtemnyét kínálja az Interneten, 17 nyelvre fordítva. A mai nappal 314 katalógust 11822 mintát tudunk számon tartani a mintákból 11804 -t fordítottunk le magyarra (európai mértékegységekkel).
keményen dolgozunk azon, hogy a kötés és a horgolás világából a legjobbat hozzuk el, remek fonalakkal, hihetetlen árakon. Ha mintáinkat nemcsak személyes használatra szeretné használni, minden minta alján a Copyright szövegben olvashat arról, mit tehet s mit nem. Sikeres kézimunkázást!
Post a comment to pattern DROPS 190-4
Szívesen vesszük, ha megosztja velünk gondolatait erről a mintáról.
Ha kérdést szeretne feltenni, ügyeljen arra, hogy a megfelelő kategóriát válassza ki, így fegyorsíthatja a válaszadás folyamatát. Það verður að merkja við svæði merktri með *.