
Populaire categorieën
Op zoek naar garen?


Opmerkingen / Vragen (57)
![]() Michelle schreef:
Michelle schreef:
Bonjour. Ce modèle m interesse... j aimerais savoir si dans le dos vu qu il n y a pas de photo du dos. il y a de la dentelle ou est ce du jersey? merci 😁😁
25.09.2020 - 13:13DROPS Design antwoorde:
Bonjour Michelle, le point fantaisie ajouré est le même dans le dos que devant. Bon tricot!
25.09.2020 - 14:38
![]() Richard schreef:
Richard schreef:
HELP! I am in need of 3 x 50g balls of 'Drops Cotton Merino' - Colour 17- Dye Lot 52848. Any help or suggestions, gratefully received. Also, If I make a hat using Cotton Merino, but the pattern calls for 'Fingering Merino' will it make much difference?? Thank you. Richard.
27.01.2020 - 13:12DROPS Design antwoorde:
Dear Richard, please contact your DROPS store (and more stores if necessary) or even our DROPS Workshop - CottonMerino is a 8 ply/Dk/Worsted yarn - see shadecard - see here all patterns you can use for Cotton Merino. Happy knitting!
27.01.2020 - 14:24
![]() Richard schreef:
Richard schreef:
Sorry, the last comment should read with "I placed the marker to the side (on my RIGHT)!" Thanks.
24.01.2020 - 15:28
![]() Richard schreef:
Richard schreef:
Hi, Thanks for your replies & I've mastered the difficult start - as you say, with double-pointed needles. The raglan decreasing is another matter. As I look at the sleeve (to my left), I have placed a marker on the stitch nearest to the side. I have then placed another marker on the 1st stitch of the side (which is to my left). Now, you say to start 3 stitches before this marker- yes? Where to I start on the sleeve decrease, please.
24.01.2020 - 15:25DROPS Design antwoorde:
Dear Richard, you should have 1 marker between each piece; so if you look at the sleeve, there is 1 marker at the end of body (either back or front piece) = before the first stitch on sleeve and 1 marker at the end of sleeve, after the last stitch on sleeve = before the first stitch on front/back piece. Start 3 sts before the first of these 2 markers, K2 tog, = 1 stitch remain before marker, work this stitch + the next st (= first after marker) and dec = there are 2 sts decreased at the marker and K2 between the dec (with marker in the middle of these K2). Repeat at each marker. Happy knitting!
24.01.2020 - 16:04
![]() Richard schreef:
Richard schreef:
Hi, once more. I've placed markers at the sleeves & sides & now trying to knit the raglan decreases! I understand the pattern for instructions for the sides, but starting 3 stitches before the marker (does this include the marker), I end up, after the decrease, taking the first stitch of the sleeve. Your assistance once again would be very much appreciated. Thank you. Richard.
24.01.2020 - 12:29DROPS Design antwoorde:
Dear Richard, there should be 1 stitch on each side of marker on each piece between the raglan decreases, ie you will work at each transition: K2 tog (1 dec), K2 (= Knit the stitch before marker + the stitch after marker), slip 1 as if to K, K1, psso. So starting at the transition between back and one sleeve, you will start (and end) round with K1, Hope it helps, Happy knitting!
24.01.2020 - 14:23
![]() Richard schreef:
Richard schreef:
Good morning. I have completed the body & both sleeves. But now that I have joined them on one needle, I find that when trying to knit the sleeves, the stitches are stretched (almost impossible to do)! I've had to use double-pointed needles to help me out! I don't remember having this trouble when I made the first one of this pattern (in size medium). Please can you help. Thanks. Richard.
24.01.2020 - 10:15DROPS Design antwoorde:
Dear Richard, that's right, the first few rounds at the beginning of yoke can be somewhat tricky, you can use the double pointed needles or circular needles if you like to, after few rounds, all stitches will have enough place on the circular needle to work them on the round. Happy knitting!
24.01.2020 - 14:08
![]() Richard schreef:
Richard schreef:
Thank you for the reply to my question. I sent a sketch via email, showing how I was knitting the round. So, from what you are saying, I have to knit A1 (1st row), (only for the complete round)! Then for the next round, I have to knit A1 (2nd row), for the complete round! Then 3rd row, 4th row & so on.... This makes sense. Please can you confirm this for me.. Thanks a million. Richard.
13.01.2020 - 20:17DROPS Design antwoorde:
Dear Richard, that's how you should work the diagrams (row 1 in A.1 on all diagrams, then row 2 in A.1 on all diagrams and so on). Happy knitting!
14.01.2020 - 07:50
![]() Richard schreef:
Richard schreef:
Good morning, again. Continuing from the two Ridge rows, I began the round, as per your instructions. But, I find that the *A1* pattern, repeats 3 times (2 with odd row numbers, 1 even row number. in the first half, up to 124 stitches. But for the continuing *A1* pattern, there is only 1 odd number row! But, there are 2 even row numbers! Is this so? Please. Richard. I have made a drawing which explains better. If I may upload it.
13.01.2020 - 11:03DROPS Design antwoorde:
Dear Richard, not sure I'm getting this properly, when working A.1 in the round, you should work same round in each diagram all the round = round 1 A.1 when working round 1 on yoke, then work round 2 in A.1 and so on. What do I misunderstand?
13.01.2020 - 11:34
![]() Richard schreef:
Richard schreef:
Sadly, (Hi again). I'm still struggling after completing the two ridges! It is written that I knit 20, purl 3 (23 stitches), then *A1 (22 stitches, purl 6! (A1 = 10 rows @22 stitches) = 220 stitches. But adding the first 23 stitches to the 220 stitches = 243 stitches? Yet it is written, that I then purl 6! Doing this gives a total of 249 stitches! What am I doing wrong please? Forgive me, I am nearly 78 years old. Have a good day.
09.01.2020 - 12:22DROPS Design antwoorde:
Dear Richard, you should work the 248 sts in size L as follows: knit 20, purl 3, *A.1 (= 22 sts), purl 6*, repeat from *-* a total of 2 times (= 28 sts x 2= 56 sts), A.1 (= 22 sts), purl 3, knit 40 , purl 3, repeat from *-* (= 56 sts), A.1 (= 22 sts), purl 3, knit 20 = 20+3 + 56+22 + 3+40+3 + 56+22 +3+20=248 sts. Try to add markers between each section, it can help you to check the number of stitches. Happy knitting!
09.01.2020 - 14:07
![]() Richard schreef:
Richard schreef:
Hi (once again). This should be the last for awhile. I understand the A1 block now, working from the bottom up! But, please tell me: Do I follow the pattern from left to right or right to left?? I ask this, because, I am reading the block from right to left! I don't believe it makes much difference (but, there again, you are the Expert). Thank you. Richard.
07.01.2020 - 22:07DROPS Design antwoorde:
Dear Richard, diagrams are read bottom up starting from the right corner to the left, ie you will read every row in diagrams from the right towards the left (since you are working in the round) - read more about diagrams here (link is now working). Happy knitting!
08.01.2020 - 09:04
|
|||||||||||||||||||
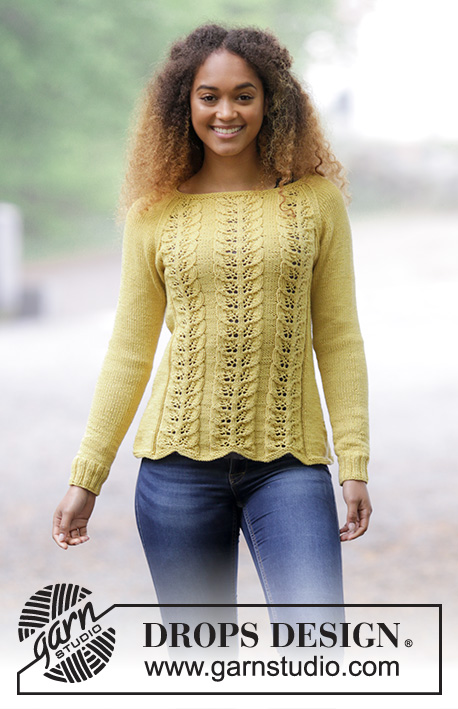
Lemon Parfait#lemonparfaitsweater |
|||||||||||||||||||
 |
 |
||||||||||||||||||
Gebreide trui met blaadjespatroon en minderingen in de raglan. Maten S - XXXL. Het werk wordt gebreid in DROPS Cotton Merino.
DROPS 180-1 |
|||||||||||||||||||
|
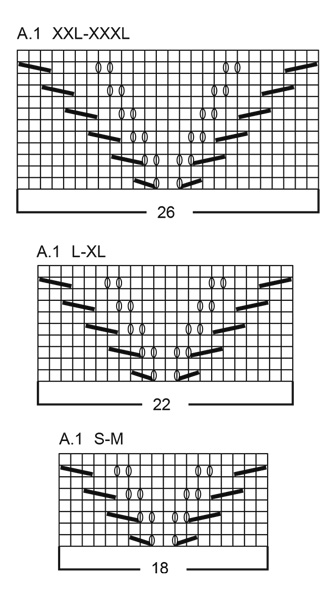
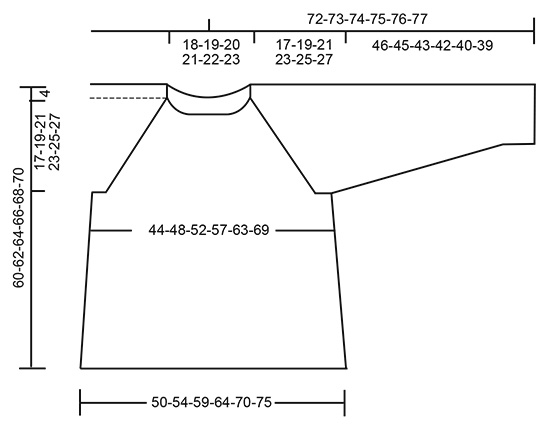
INFORMATIE VOOR HET PATROON: RIBBEL/RIBBELSTEEK (gebreid in de rondte): 1 ribbel = 2 naalden. Brei 1 naald recht en 1 naald averecht. PATROON: Zie telpatroon A.1. Kies het telpatroon voor uw maat. TIP VOOR HET MINDEREN (voor de zijkant): Begin 3 steken voor de markeerdraad in de zijkant: brei 2 steken recht samen, 2 steken recht (de markeerdraad zit tussen deze 2 steken), 1 steek afhalen, 1 steek recht, haal de afgehaalde steek over de gebreide steek. TIP VOOR HET MEERDEREN: Meerder als volgt midden onder de mouw – begin 1 steek voor de markeerdraad: Maak 1 omslag, 2 steken recht (de markeerdraad zit tussen deze 2 steken), 1 omslag. Brei op de volgende naald de omslagen gedraaid recht om gaatjes te voorkomen. RAGLAN: U mindert 2 steken in elke overgang tussen het lijf en de mouwen. Begin 3 steken voor de markeerdraad: brei 2 recht samen, 2 recht (de markeerdraad zit tussen deze 2 steken), 1 steek recht afhalen, 1 recht, haal de afgehaalde steek over de gebreide steek. TIP VOOR HET BREIEN: Als de stekenverhouding niet klopt in de hoogte en uw breisel is te strak, dan zal de pas te kort zijn en het armsgat te klein.. Dit kan aangepast worden door regelmatig een extra naald te breien zonder minderingen ---------------------------------------------------------- LIJF: Het werk wordt in de rondte gebreid met de rondbreinaald, van onder naar boven. Zet 212-228-248-268-292-316 steken op met rondbreinaald 4 mm en Cotton Merino. Brei 2 RIBBELS – zie uitleg hierboven. Ga verder met breien als volgt: 17-21-20-25-25-31 recht, 3 averecht, *A.1 (= 18-18-22-22-26-26 steken), 6 averecht *, brei van *-* 2 keer in totaal, A.1, 3 averecht, 34-42-40-50-50-62 recht, 3 averecht, *A.1, 6 averecht *, brei van *-* 2 keer in totaal, A.1, 3 averecht, 17-21-20-25-25-31 recht. Voeg 1 markeerdraad in op het begin van de naald en 1 na 106-114-124-134-146-158 steken = aan de zijkanten. Ga verder met dit patroon in de hoogte. DENK OM DE STEKENVERHOUDING! Als het werk 8 cm meet minder dan 1 steek aan elke kant van de markeerdraden in de zijkanten (= 4 steken geminderd) – LEES TIP VOOR HET MINDEREN! Minder iedere 4½ cm in totaal 7 keer in alle maten = 184-200-220-240-264-288 steken. Als het werk 39-39-39-39-39-39 cm meet, kant dan 8-8-10-10-12-14 steken af aan elke kant (= 4-4-5-5-6-7 steken aan elke kant van de markeerdraden). Er zijn nu 84-92-100-110-120-130 steken op het achterpand en het voorpand. Laat het werk rusten en brei de mouwen. MOUW: Het werk wordt in de rondte gebreid met breinaalden zonder knop, ga verder met de korte rondbreinaald als u genoeg steken heeft gemeerderd. Zet 48-52-56-56-60-64 steken op met breinaalden zonder knop maat 3.5 mm en Cotton Merino. Brei 1 naald recht, brei dan boordsteek, 2 recht/ 2 averecht. Als het werk 6 cm meet ga dan verder met breinaalden zonder knop maat 4 mm. Brei 1 naald recht terwijl u 4-6-8-6-8-10 steken verdeeld op de naald mindert = 44-46-48-50-52-54 steken. Voeg 1 markeerdraad in op het begin van de naald (= midden onder de mouw). Ga verder met tricotsteek. Als het werk 10-7-7-10-7-7 cm meet, meerder dan 2 steken midden onder de mouw – LEES TIP VOOR HET MEERDEREN. Meerder iedere 3-2½-2-1½-1½-1½ cm in totaal 12-15-18-19-20-21 keer = 68-76-84-88-92-96 steken. Als het werk 46-45-43-42-40-39 cm meet (kortere afmetingen in de grotere maten vanwege de langere pas) kant dan de middelste 8-8-10-10-12-14 steken onder de mouw af = 60-68-74-78-80-82 steken. Laat het werk rusten en brei nog 1 mouw. PAS: Plaats de mouwen op dezelfde rondbreinaald als het lijf waar u steken voor de armsgaten heeft afgekant = 288-320-348-376-400-424 steken. Voeg een markeerdraad in elke overgang tussen het lijf en de mouwen (= 4 markeerdraden). Ga verder in patroon zoals hiervoor en minder voor de raglan – zie uitleg hierboven. Minder elke 4e naald 5-5-6-6-6-7 keer, dan elke 2e naald 14-16-18-21-23-24 keer = totaal 19-21-24-27-29-31 keer - de steken in A.1 die niet in het telpatroon passen bij het minderen worden in tricotsteek gebreid... Na alle minderingen zijn er 136-152-156-160-168-176 steken op de naald. Brei 2 ribbels over alle steken, maar brei op de eerste naald, de 22-26-26-24-22-20 steken over elke mouw 2 aan 2 recht samen, minder daarnaast 18-28-26-28-34-40 steken verdeeld op de naald = 96-98-104-108-112-116 steken. Kant af met recht. AFWERKING: Naai de openingen onder de mouwen dicht. |
|||||||||||||||||||
Uitleg van het telpatroon |
|||||||||||||||||||
|
|||||||||||||||||||
 |
|||||||||||||||||||
 |
|||||||||||||||||||
Heeft u dit patroon gemaakt?Tag dan uw afbeeldingen met #dropspattern #lemonparfaitsweater of stuur ze naar de #dropsfan galerij. Heeft u hulp nodig voor dit patroon?U vind 27 instructievideo's, een commentaar/vragengedeelte en nog veel meer, als u naar het patroon gaat op garnstudio.com © 1982-2026 DROPS Design A/S. Alle rechten voorbehouden. Op dit document, inclusief alle subdocumenten, rust copyright. Lees meer over wat u kunt doen met onze patronen onderaan elk patroon op onze site |
|||||||||||||||||||


Met meer dan 40 jaar ervaring in brei- en haakdesign biedt DROPS Design één van de meest uitgebreide collecties van gratis patronen aan op internet vertaald in 324 talen. Tot en met vandaag hebben wij 12290 boeken en 11997 patronen gepubliceerd.
Wij werken hard om u het beste van haken en breien te bieden; patronen, inspiratie, advies en natuurlijk garens van uitstekende kwaliteit voor de allerbeste prijzen! Wilt u onze patronen gebruiken voor meer dan privégebruik? U kunt lezen wat wel en niet is toegestaan is in de Copyright tekst, die u onderaan elk patroon kunt vinden. Veel handwerkplezier!
Laat een opmerking achter voor DROPS 180-1
Wij horen graag wat u vindt van dit patroon!
Wilt u een vraag stellen, kies dan de juiste categorie in het formulier hieronder om sneller een antwoord te krijgen. Verplichte velden zijn gemarkeerd met een *.