
Populaire categorieën
Op zoek naar garen?


Opmerkingen / Vragen (238)
![]() Andrea schreef:
Andrea schreef:
Hallo, eine Frage: Wenn ich mit den verkürzten Reihen fertig bin, muss ich dann direkt wieder über alle 124M (Gr.xxl) stricken, oder nach dem selben Schema wie beim verkürzen die Reihen wieder verlängern? LG
23.02.2026 - 16:37DROPS Design antwoorde:
Liebe Andrea, Sie beginnen erneut mit den verkürzten Reihen (die ersten 2 Runden stricken Sie über alle Maschen) , um den Kreis weiter zu erweitern. Viel Spaß beim Stricken!
24.02.2026 - 09:02
![]() Lotta schreef:
Lotta schreef:
Äh glöm min fråga, repar upp & använder ett för mig mer begripligt mönster.
27.11.2025 - 17:23
![]() Lotta schreef:
Lotta schreef:
Hej igen! Storlek XL/XXL totalt antal maskor 124 st och märktråden sitter på maska 73. Just nu är stickningen bananformad, maska 73 sitter närmare innercirkeln och fattar att det är från den jag ska mäta. Men hur ska jag mäta, mot vad? Ska fortsätta med att minska med 8 maskor för första gången. Vi hörs!
25.11.2025 - 16:04DROPS Design antwoorde:
Hei Lotta. Da har vi "glemt" ditt spørsmål og ønsker deg lykke til på ditt neste prosjekt :) mvh DROPS Design
01.12.2025 - 11:27
![]() Lotta schreef:
Lotta schreef:
Begriper inte hur jag ska mäta från märktråden för ärmhål!? Skickar gärna en bild men det går ju inte i detta formulär. Kontakta gärna mig via e-post. Tack på förhand!
24.11.2025 - 18:29DROPS Design antwoorde:
Hej Lotta, skriv hvilken størrelse du strikker. Skriv hvor mange masker og cm du har og skriv den sætning du ikke forstår, så skal vi prøve at hjælpe dig her :)
25.11.2025 - 13:58
![]() Lisa schreef:
Lisa schreef:
Hi, Just trying to clarify; on the second row, do I leave 2 stitches on needle and turn, work 14 stitches then turn and work 16 stitches? Then repeat row 1 and do I leave 4 stitches unworked or just 2 again?
11.11.2025 - 19:16
![]() Lisa schreef:
Lisa schreef:
Pattern instructions far too difficult. I love the jacket and I love a challenge but this? What happened to row 1 all the way through to last row with specific instructions such as ask or dec or s1k1. Etc? I give up😞
27.07.2025 - 20:09
![]() Lisa schreef:
Lisa schreef:
So, am I leaving the the uncorked stitches on the needle or just not knitting them?
27.07.2025 - 19:38DROPS Design antwoorde:
Dear Lisa, work the first 2 rows over all 112 stitches. In the 3rd row work only over the first 16 sts of the row. Now, start working the next row over all stitches but turn when you have worked 110 stitches. Work the next row back over all stitches, but turn when you have worked 108; so you work 2 less stitches on each side. Repeat rows 3 and 4 exactly as before. Continue working 2 less stitches on each side on the "long" rows 9 more times, then 4 less stitches 9 times and 8 less stitches 5 times. The stitches are simply left unworked until we "start at the beginning" the short rows technique. Happy knitting!
27.07.2025 - 20:36
![]() Lisa schreef:
Lisa schreef:
Where do I start the pattern? At the top of page or where it says circle? Also, what does it mean under the short row section to start again from beginning over all stitches? How many sections is this piece? I’m reading cast on 112 sts. Twice and under short row section start over from beginning? So, cast on another 112sts?
27.07.2025 - 19:06DROPS Design antwoorde:
Dear Lisa, yes, the written instructions start at "Circle"; all of the instructions above are tips for when you are crochetting. In the short rows you work by turning the piece (but not decreasing) in order to get the correct circle shape. After reaching the remaining 18-16-20-20 outermost sts of circle, you will now work over all stitches again (not the pattern from the beginning); they were not decreased, just left behind. You work a single circle: you cast on 112 stitches, over which you will work the chart and short rows. Then you work the armholes, and continue working the other half-circle on the other side. Then you work the sleeves. Happy knitting!
27.07.2025 - 19:25
![]() Lisa schreef:
Lisa schreef:
Is there a row by row instruction for this pattern (ie, row 1, row 2 etc)? I find this really confusing
27.07.2025 - 15:44DROPS Design antwoorde:
Dear Lisa, this is the only version of the pattern available, with both charts and written instructions. If you have any doubts as you read and work the pattern you can write us a comment here and we will try to answer all of your questions as clearly as possible. Happy knitting!
27.07.2025 - 18:59
![]() Patricia Alexandra Caruso Reis schreef:
Patricia Alexandra Caruso Reis schreef:
Caros, os diagramas M1 já não estão nítidos. Existe alguma nova versão desses diagramas que possam ser melhor vistos? Está tudo opaco, talvez pelo tempo. Grata
07.06.2024 - 03:36DROPS Design antwoorde:
Bom dia, Vamos comunicar à equipa de web design. Obrigado!
07.06.2024 - 09:17
|
||||||||||||||||
Blue Moon |
||||||||||||||||
 |
 |
|||||||||||||||
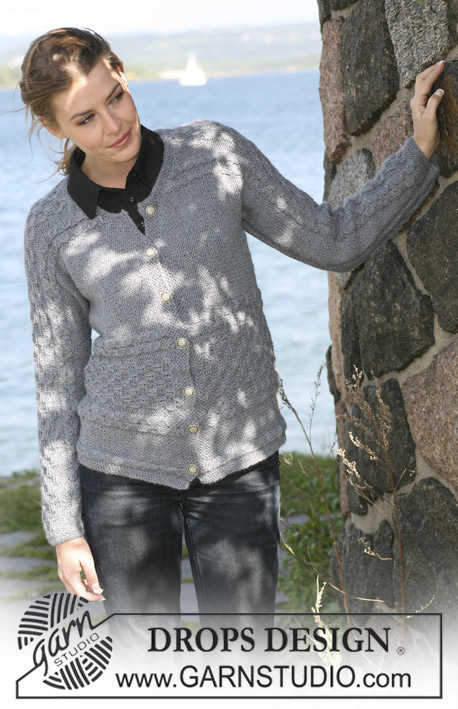
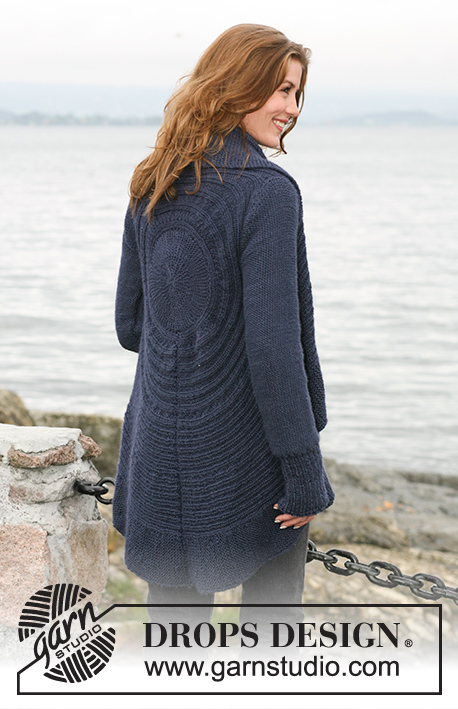
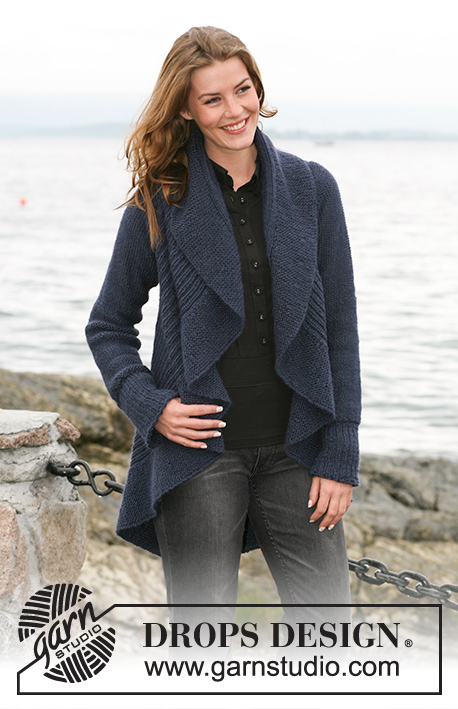
DROPS Cirkelvest met structuurmotief van DROPS Silke-Alpaca. Maat S t/m XXXL.
DROPS 102-6 |
||||||||||||||||
|
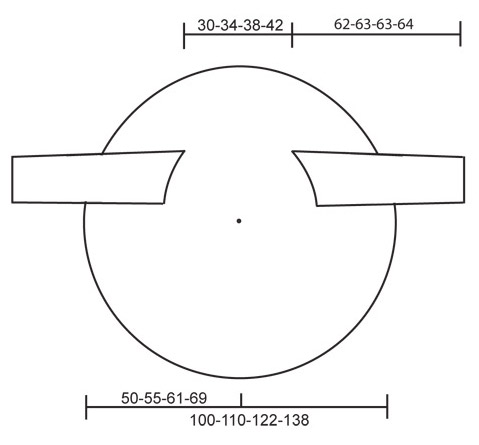
Motief: Zie teltekening M.1. De teltekening geeft het motief weer op de goede kant. NB! Elke maat heeft zijn eigen teltekening! Verkorte naalden: Brei verkorte nld om de cirkel te maken. Brei de verkorte nld als volgt: 1e/2e nld: Brei 102-112-124-140 st, keer het werk en brei terug. 3e/4e nld: Brei heen en weer over de eerste 18-16-20-20 st – lees Tips Breien. Herhaal de 1e t/m 4e nld, maar brei in elke van de 1e/2e nld 10-10-12-12 x 2 st minder voor het keren, 6-9-8-12 x 4 st minder en 5-5-6-6 x 8 st minder totdat er nog 18-16-20-20 st aan het begin van de cirkel over zijn. Begin nu de cyclus weer vooraan met nld 1/2 over alle st. Tips Breien: Haal steeds de 1e st r af bij het keren. Trek de draad na de afgeh st goed aan en brei terug. Op deze manier krijgt u geen gaatjes en een nette overgang in het breiwerk. Tips Meten: Meet alleen dit breiwerk als het plat op bijvoorbeeld een tafel ligt. Meet niet overdwars. De afmetingen volgen de ronding bij de 63e-69e-73e-81e st. Cirkel: Vanwege het grote aantal st wordt dit vest heen en weer gebreid op de rondbreinld. Zet 102-112-124-140 st op met rondbreinld 4,5 mm en Air. Plaats 1 merkdraad na 63-69-73-81 st, en meet het werk vanaf deze merkdraad. Brei volgens teltekening M.1 (gebruik de teltekening voor uw maat) van rechts naar links (dwz van de rand tot aan het midden van de cirkel) 1e nld = goede kant. Brei tegelijkertijd behallve M.1 ook de verkorte nld – lees de instructie hierboven – om de cirkel te maken. Kant bij een hoogte van 37-40-49-57 cm vanaf de merkdraad – lees Tips Meten – het armsgat. Armsgat: Plaats de eerste 63-69-73-81 st op een extra rondbreinld 4,5 mm (vanwege het aantal st). Kant de volgende 2 st af (= armsgat). Houd de resterende st op de breinld. De 2 delen (de st voor en na het armsgat) worden afzonderlijk verder gebreid op afzonderlijke rondbreinld en met afzonderlijke bollen. Dit is bedoeld om de verkorte nld gelijk te krijgen aan weerskanten van het armsgat. Brei nu door volgens het motief en de verkorte nld. Zet als het armsgat een hoogte van 18-21-23-25 cm heeft, 2 nieuwe st op boven het armsgat (dwz tussen de 2 delen). Brei nu door over alle st op dezelfde nld = 102-112-124-140 st. Plaats 1 merkdraad na 63-69-73-81 st. Meet het werk verder vanaf hier. Brei door volgens teltekening M.1 en met verkorte nld over alle st. Brei door tot een hoogte van ca 15-17-19-21 cm, dat is ca ½ cirkel. Brei door tot een hoogte van ca 30-34-38-42 cm van de merkdraad – lees Tips Meten. Maak nu nog een armsgat op dezelfde manier. Plaats als alle st weer op 1 breinld staan nog 1 merkdraad na 63-69-73-81 st. Meet het werk vanaf hier. Brei door volgens teltekening M.1 met verkorte nld tot een hoogte van ca 37-40-49-57 cm van de merkdraad (na 1 complete herhaling van de verkorte nld – dwz na een nld 4). Kant losjes af. Mouwen: Zet 56-59-65-68 st (incl. 1 kantst aan weerskanten) op met breinld 4,5 mm en Air. Brei 1 nld av (1e nld = verkeerde kant). Brei door met Boordst 2 r/1 av met 1 kantst aan weerskanten. Brei bij een hoogte van 14 cm 1 nld r op de verkeerde kant en minder tegelijkertijd gelijkmatig verdeeld 10-11-13-14 st in deze nld = 46-48-52-54 st. Brei vervolgens door in averechte tricotst (dwz av op de goede kant en r op de verkeerde kant) tot de vereiste afmetingen. Meerder vanaf een hoogte van 16 cm 5-9-11-13 x 1 st aan weerskanten op elke 9-4½-3½-3 cm = 56-66-74-80 st. Kant bij een hoogte van 56 cm af voor de mouwkop aan weerskanten in elke 2e nld: 1-2-2-2 x 4 st. Kant daarna steeds 2 st af aan weerskanten tot een hoogte van ca 61-62-62-63 cm. Kant dan nog 1 x 4 st af aan weerskanten. De mouw heeft nu een hoogte van ca 62-65-65-68 cm. Kant de resterende st af. Afwerken: Sluit de naad van de cirkel met de randen op elkaar = opzetnld aan de afkantnld. Sluit de mouwnaden. Naai de mouwen in het vest zodat de mouwnaad samenvalt met de merkdraad onderin het armsgat en het midden van de bovenmouw met de merkdraad aan de bovenkant van het armsgat. |
||||||||||||||||
Uitleg van het telpatroon |
||||||||||||||||
|
||||||||||||||||
 |
||||||||||||||||
 |
||||||||||||||||
Heeft u dit patroon gemaakt?Tag dan uw afbeeldingen met #dropspattern of stuur ze naar de #dropsfan galerij. Heeft u hulp nodig voor dit patroon?U vind 15 instructievideo's, een commentaar/vragengedeelte en nog veel meer, als u naar het patroon gaat op garnstudio.com © 1982-2026 DROPS Design A/S. Alle rechten voorbehouden. Op dit document, inclusief alle subdocumenten, rust copyright. Lees meer over wat u kunt doen met onze patronen onderaan elk patroon op onze site |
||||||||||||||||


Met meer dan 40 jaar ervaring in brei- en haakdesign biedt DROPS Design één van de meest uitgebreide collecties van gratis patronen aan op internet vertaald in 324 talen. Tot en met vandaag hebben wij 12290 boeken en 11997 patronen gepubliceerd.
Wij werken hard om u het beste van haken en breien te bieden; patronen, inspiratie, advies en natuurlijk garens van uitstekende kwaliteit voor de allerbeste prijzen! Wilt u onze patronen gebruiken voor meer dan privégebruik? U kunt lezen wat wel en niet is toegestaan is in de Copyright tekst, die u onderaan elk patroon kunt vinden. Veel handwerkplezier!
Laat een opmerking achter voor DROPS 102-6
Wij horen graag wat u vindt van dit patroon!
Wilt u een vraag stellen, kies dan de juiste categorie in het formulier hieronder om sneller een antwoord te krijgen. Verplichte velden zijn gemarkeerd met een *.