
Populaire categorieën
Op zoek naar garen?


Opmerkingen / Vragen (75)
![]() Ana schreef:
Ana schreef:
I've just finished knitting the 10cm on the mid back, but I fear I may have done it wrong, as now there's a 10 cm height difference between one side of the work and the other, which doesn't make sense as we're not casting off just yet. Should I have been knitting all the stitches and not just the 28+62?
22.10.2022 - 15:28DROPS Design antwoorde:
Boa tarde, Now divide the piece mid back to work back and forth from mid back (this is done so that the seam is mid back). Work in garter stitch back and forth until piece measures 10 cm from the 28 stitches cast on mid front. Deve dividir as 152 malhas em 2 partes que tricota separadamente. até ter 10 cm medidos a partir da carreira em que montou a28 malhas, Bons tricôs!
23.10.2022 - 17:21
![]() Ana schreef:
Ana schreef:
I've just finished knitting the first 24cm and I'm already confused, what do you mean "cast on 1 stitch 2 times and 2 stitches 5 times"? I need a better explanation, please!
09.10.2022 - 16:36DROPS Design antwoorde:
Dear Ana, cast on 1 stitch at the end of each row from each side. Cast on 1 stitch at the end of the first row from the RS and WS. Repeat this once more on the next row from the RS and WS. Then, cast on 2 stitches at the end of each row from each side, but repeat this 5 times (so you increase 2 stitches at the end of the next 5 rows from the RS and 5 rows from the WS). Happy knitting!
09.10.2022 - 19:48
![]() Anna schreef:
Anna schreef:
Dzień dobry, czy jest dostępny szkic/schemat do tego projektu?
09.10.2022 - 11:54DROPS Design antwoorde:
Witaj Aniu, niestety nie. Napisz jeśli masz jakiś problem. Pozdrawiamy!
10.10.2022 - 10:09
![]() Jutta schreef:
Jutta schreef:
Hallo, wir haben mit der Anleitung angefangen, befinden uns aber grade in einer Sackgasse und kommen auch mit vereinten Denkkräften nicht weiter...Nach dem einseitige Anschlagen der 28 Maschen und dem Teilen an der hinteren Mitte können wir uns so langsam nicht mehr vorstellen wie es weiter geht und wie daraus die Kapuze entstehen soll. Hat jemand vielleicht eine Zeichnung? Was genau ist die hintere / vordere Mitte? Wie wird alles zusammengenäht? Ich hoffe jemand kann helfen
06.08.2022 - 15:54DROPS Design antwoorde:
Liebe Jutta, die Arbeit wird zuerst in Reihen von der vorderen Mitte gestrickt, dann wenn die neuen Maschen für die Öffnung für Gesicht angeschlagen wurden, soll die Arbeit von der hinteren Mitte gestrickt werden (so gibt es keine Naht an der vorderen Mitte). Am Ende nähen Sie die Kapuze oben zusammen und die unteren Reihen in der hinteren Mitte (ab den neuen Maschen bis zur Abketterand). Viel Spaß beim stricken!
08.08.2022 - 08:07
![]() Tiko schreef:
Tiko schreef:
First time I got confused with your pattern 😊1. the whole piece is in gaeter stitch except for the 158 stitches around face? 2. Is the piece worked inthe round at any stage? 3. Is it possible to send or add to the pattern a drawing fo what the finished piece looks like prior to been assambled? Thanks for the answerrs 💚
13.03.2022 - 19:12DROPS Design antwoorde:
Dear Tiko, 1. correct, only the ribbing edge around face is worked in rib, the whole work is then worked in garter stitch. 2. Piece is only worked in rows, but first from mid front (until opening for face is done), then from mid back (after you have increased/cast on the stitches for under face). 3. we have no chart for this sorry. Happy knitting!
14.03.2022 - 12:06
![]() Ana schreef:
Ana schreef:
Could I do the whole pattern in rib instead of garter stitch? How could I adapt from one to the other? Thank you so much!
24.02.2022 - 19:10DROPS Design antwoorde:
Dear Ana, your tension would be then different and your would have to re-calculate the whole pattern. You might find another pattern among these ones. Happy knitting!
25.02.2022 - 08:59
![]() Ayra schreef:
Ayra schreef:
Plz explain when you pick up 158 stitches around face opening do you have to pick up all of the stitches or you have to pick up 3 and skip one. Thanks
13.02.2022 - 20:44DROPS Design antwoorde:
Hi Ayra, you have to distribute new stitches evenly to have 158 stitches around face opening in total. Happy knitting!
14.02.2022 - 08:18
![]() Ayra schreef:
Ayra schreef:
Plz explain for mid back seam after working on 28 new cast on stitches and 62 stitches when you turn your work do you have to do the purl stitch from that side and also you have to work on 28 stitches.again so the mid back seam is done. Now you have to do garter stitch for all of the stitches. Thanks
04.02.2022 - 01:51DROPS Design antwoorde:
Dear Ayra, when you cut the yarn after the hood part, you start again piece from mid back (= approx. middle of previous rows), and will then cast on new stitches for face opening, ending rows on mid back. The seam on mid back will start here and will be sewn to the bottom edge; the 28 sts are cast on on mid front, there won't be any seam here. Hope it will help. Happy knitting!
04.02.2022 - 09:16
![]() Ayra schreef:
Ayra schreef:
Plz explain how you sew the hood in the end? Thanks
03.02.2022 - 02:10DROPS Design antwoorde:
Dear Ayra, fold the cast on edge double and sew cast on sts together; and then sew on mid back from the beginning of row worked from mid back (after face opening) towards the cast off edge. Happy knitting!
03.02.2022 - 08:47
![]() Marta schreef:
Marta schreef:
One follow up if I may. If there is a seam mid-back, where is the face opening. I'm really confused as you can tell.
02.02.2022 - 14:18DROPS Design antwoorde:
Dear Marta, you first work the hood, back and forth from mid front, then cut the yarn and start on mid back to work now from the mid back, increasing stitches on mid front and working the 2nd half of sts to mid back. The seam will be on mid back from this part. Hope it will help. Happy knitting!
02.02.2022 - 14:29
|
|
Lawless#lawlesshood |
|
 |
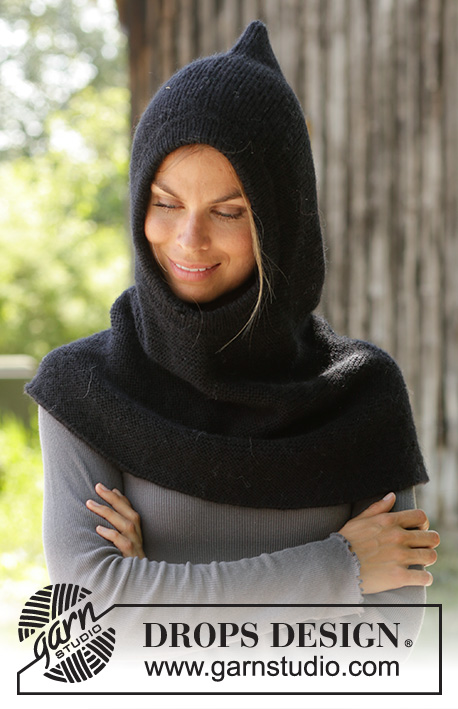 |
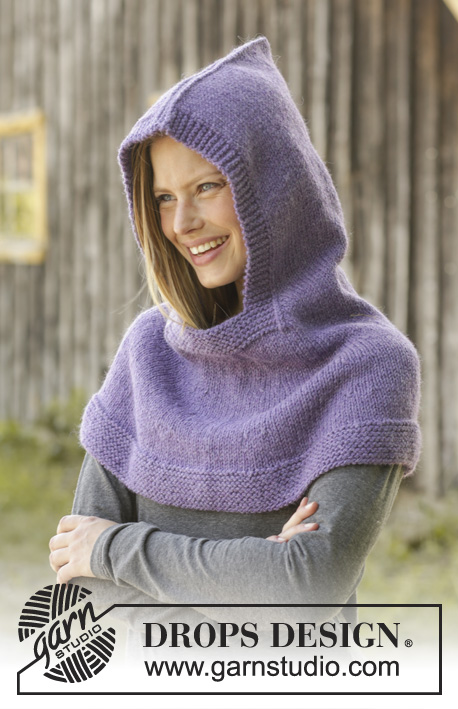
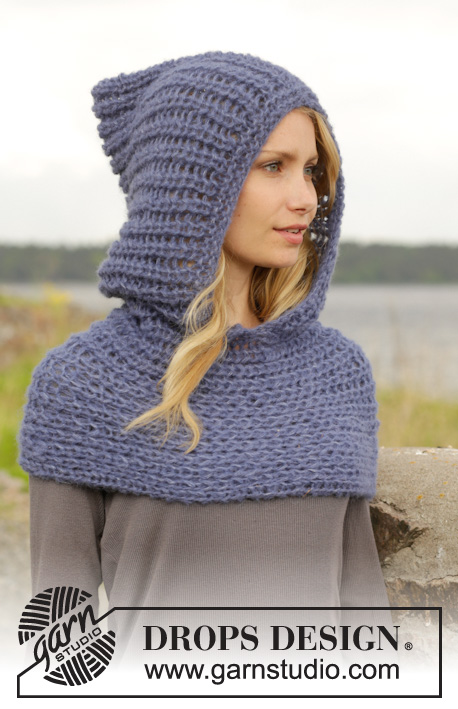
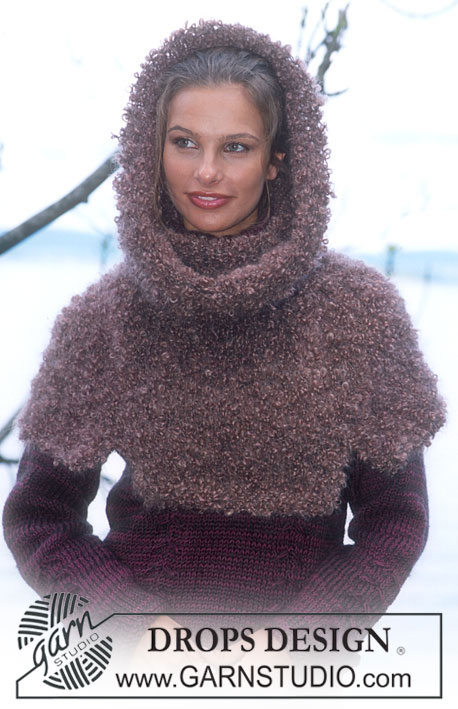
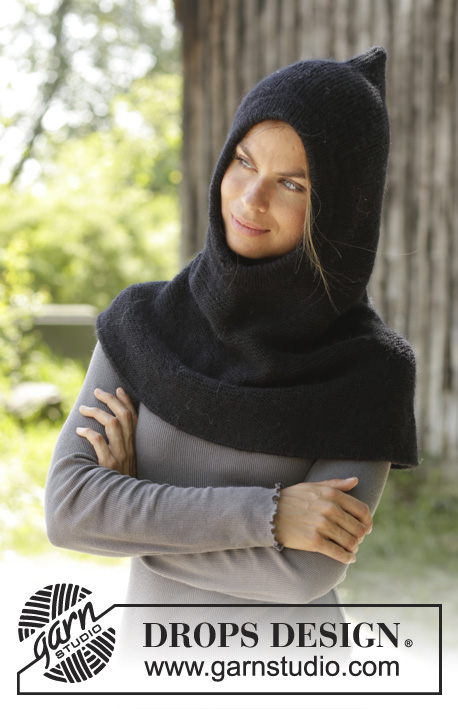
Gebreide col met capuchon met hoofdband / balaclava in DROPS Merino Extra Fine of DROPS Karisma. Het werk wordt gebreid van boven naar beneden in ribbelsteek. Maat: S - XXXL
DROPS 192-2 |
|
|
UITLEG VOOR HET PATROON: ---------------------------------------------------------- RIBBEL/RIBBELSTEEK (heen en weer gebreid): 1 ribbel = 2 naalden recht. TIP VOOR HET MEERDEREN: Brei tot er 1 steek over is voor markeerdraad, 1 omslag, 2 recht (de markeerdraad is in het midden van deze steken), 1 omslag. Brei op de volgende naald de omslag gedraaid om een gaatje te voorkomen. ---------------------------------------------------------- BEGIN HET WERK HIER: ---------------------------------------------------------- COL MET CAPUCHON - KORTE SAMENVATTING VAN HET WERK: Heen en weer gebreid op de rondbreinaald, van boven naar beneden. Het werk wordt aan het einde samen genaaid aan de achterkant en bovenkant van de capuchon. COL MET CAPUCHON: Zet 100 steken op rondbreinaald maat 3 mm met Merino Extra Fine of Karisma. Brei in RIBBELSTEEK heen en weer - lees uitleg hierboven. DENK OM DE STEKENVERHOUDING! Zet bij een hoogte van 24 cm, steken op aan het einde van iedere naald aan elke kant (richting midden voor - richting het gezicht) als volgt: Zet 2 keer 1 steek op en 5 keer 2 steken (= 12 steken gemeerderd aan elke kant) = 124 steken. Zet aan het einde van de volgende naald 28 steken op aan het einde van de naald (richting midden voor - onder de opening voor het gezicht) = 152 steken. Brei recht tot midden achter op de helmmuts door 62 steken te breien vanaf na de 28 opgezette steken midden voor. Verdeel nu het werk en brei vanaf hier heen en weer - midden achter (dit wordt gedaan zodat de naad midden achter zit). Brei in ribbelsteek heen en weer gebreid tot werk 10 cm meet vanaf de 28 opgezette steken midden voor. Voeg nu 8 markeerdraden in het werk als volgt: Begin midden achter en voeg de eerste markeerdraad in na 10 steken, voeg dan de volgende 7 markeerdraden in na 19 steken, er zijn nu 9 steken op de naald na de laatste markeerdraad. Ga verder in ribbelsteek. Meerder op de volgende naald aan de goede kant, 1 steek aan elke kant van iedere markeerdraad - lees TIP VOOR HET MEERDEREN. Meerder zo ongeveer iedere 3 cm 6-7-8 keer in totaal = 248-264-280 steken. Brei tot het werk 58-60-62 cm meet in totaal. Kant af met 2 draden. AFWERKING: Naai de helmmuts samen in de buitenste lus van de buitenste steek midden achter en langs de opzetrand op de bovenkant van de capuchon. RAND RONDOM HET GEZICHT: Neem aan de goede kant 158 steken op rondom de opening bij het gezicht op een korte rondbreinaald 2.5 mm. Brei 1 naald averecht, brei 1 naald recht, 1 naald averecht, brei 1 naald recht. Brei dan 6 cm boordsteek (= 1 recht/1 averecht). Kant af steken met recht boven recht en averecht boven averecht. Vouw de rand dubbel richting de verkeerde kant en hecht het af. |
|
Heeft u dit patroon gemaakt?Tag dan uw afbeeldingen met #dropspattern #lawlesshood of stuur ze naar de #dropsfan galerij. Heeft u hulp nodig voor dit patroon?U vind 17 instructievideo's, een commentaar/vragengedeelte en nog veel meer, als u naar het patroon gaat op garnstudio.com © 1982-2026 DROPS Design A/S. Alle rechten voorbehouden. Op dit document, inclusief alle subdocumenten, rust copyright. Lees meer over wat u kunt doen met onze patronen onderaan elk patroon op onze site |
|


Met meer dan 40 jaar ervaring in brei- en haakdesign biedt DROPS Design één van de meest uitgebreide collecties van gratis patronen aan op internet vertaald in 325 talen. Tot en met vandaag hebben wij 12298 boeken en 12005 patronen gepubliceerd.
Wij werken hard om u het beste van haken en breien te bieden; patronen, inspiratie, advies en natuurlijk garens van uitstekende kwaliteit voor de allerbeste prijzen! Wilt u onze patronen gebruiken voor meer dan privégebruik? U kunt lezen wat wel en niet is toegestaan is in de Copyright tekst, die u onderaan elk patroon kunt vinden. Veel handwerkplezier!
Laat een opmerking achter voor DROPS 192-2
Wij horen graag wat u vindt van dit patroon!
Wilt u een vraag stellen, kies dan de juiste categorie in het formulier hieronder om sneller een antwoord te krijgen. Verplichte velden zijn gemarkeerd met een *.