
Populaire categorieën
Op zoek naar garen?


Opmerkingen / Vragen (17)
![]() Charmain schreef:
Charmain schreef:
Can I have this pattern in downloadable form in PDF please
26.03.2021 - 16:19DROPS Design antwoorde:
Dear Chairman, to have the pattern as a PDF please click on the print icon, and select "print as PDF". Happy Crafting!
27.03.2021 - 02:11
![]() Helena schreef:
Helena schreef:
Another question - neck warmer, it says "when piece measures 20-24cm adjust after one whole repetition of A6", what is meant by 'adjust'? What adjustment is required, other than just to repeat once more A6 before finishing it with A5?
30.01.2021 - 01:37DROPS Design antwoorde:
Dear Helena, this means that you should emphasize pattern more than height in cm. You can stay with 19 cm or with 25 - important is knit up whole repetition of A.6. Height in cm may vary slightly depends on your personal gauge. Happy knitting!
30.01.2021 - 09:36
![]() Helena schreef:
Helena schreef:
Hi, my question refers to the neck warmer; in the photo, the neck warmer seems to have holes where the yarn overs are, but in the instructions it says to knit yo twisted to avoid holes. I get it for the headband as there should not be holes. But the neck warmer looks like it has holes left where the yo were made. Can you please clearify? Thank you
30.01.2021 - 00:37DROPS Design antwoorde:
Hi Helena, there is a mistahe here. I'll report it. Thank you. Happy knitting!
30.01.2021 - 19:20
![]() Simone schreef:
Simone schreef:
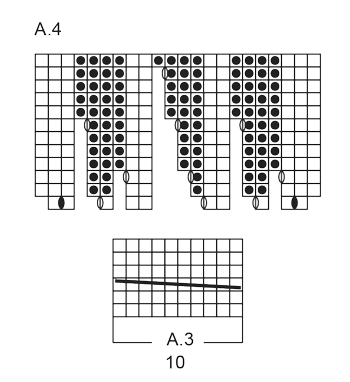
Hallo! Leider verstehe ich beim Stirnband nicht, wie das Muster A.3 gestrickt wird. Ich stricke zuerst eine Hinreihe rechts und eine Rückreihe links. Dann ziehe ich die Hälfte der Maschen (5 Maschen) auf eine andere Nadel. Aber wie stricke ich dann weiter? Danke im Voraus für die Antwort.
10.11.2020 - 20:55DROPS Design antwoorde:
Liebe Simone, ja genau die 5 ersten Maschen legen Sie vor die, dann stricken Sie die 5 letzten Maschen und stricken jetzt die 5 Maschen von der Hilfsnadel - dieses Video zeigt, wie man einen (anderen) Zopf über alle Maschen auf der Nadel strickt, es kann Ihnen sicher weiterhelfen. Viel Spaß beim stricken!
11.11.2020 - 08:41
![]() Mari Gjerdåker schreef:
Mari Gjerdåker schreef:
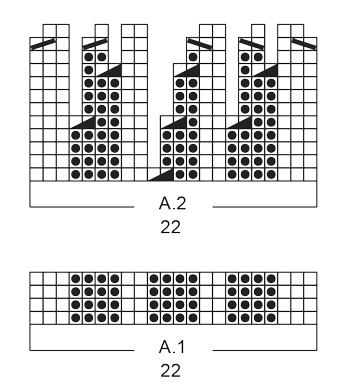
Hei! Jeg lurer på hva de diagonale stripene på nest siste pinne på A2 betyr? Regner med at de kal settes på hjelpepinne, men har det noe å si hvilken vei diagonalen er?
24.07.2020 - 20:01DROPS Design antwoorde:
Hej Mari, du finder symbolerne i symbolforklaringen: 2 r sammen og ta 1 m løst av p, 1 r, løft den løse m over. God fornøjelse!
03.08.2020 - 14:47
![]() Mallory schreef:
Mallory schreef:
Hi there, although this is a beautiful pattern, I feel like it was poorly written and drawn out in the diagrams. Multiple times I would look at the diagram and then my stitches. There where stitches that would disappear on the diagram (still on my needle) and then reappear on another row. As well as the twist, if you K5 from your working and K5 from the new, it will NOT come out right. Beautiful pattern, Horrible instructions.
11.01.2020 - 18:01
![]() Sondra schreef:
Sondra schreef:
Working the headband (straight needles) and confused by “missing boxes” in pattern A.2. Row 1, for example, appears to start on 2nd stitch and skip 4th and 5th, 7th (ie boxes missing). How do I interpret the empty spaces? Also not sure how to interpret heavy short diagonal line intermittent across second row. Nothing in diagram key matches exactly. Thabks
10.01.2019 - 01:23DROPS Design antwoorde:
Dear Sondra, start reading the diagram from the bottom corner on the right side towards the left from RS (and from the left towards the right from WS), working A.2 you will then dec 1 st (= P2 tog) in the middle of A.2, on next row the missing stitch is matching the st you decreased before. Happy knitting!
10.01.2019 - 10:03
![]() Monica Panera schreef:
Monica Panera schreef:
Buongiorno , Volevo fare un'ultima domanda. Ogni riga di uno schema è un ferro e rappresenta i punti da fare sul diritto del lavoro ,ciò significa che ogni riga è un ferro diritto è un ferro rovescio? Spero di essere stata chiara.Grazie dell'aiuto.
14.12.2018 - 07:38DROPS Design antwoorde:
Buongiorno Monica. Nel diagramma trova tutti i ferri da lavorare seguendo il motivo stesso. Quindi: primo ferro (dal basso) si lavora sul diritto del lavoro; secondo ferro si lavora sul rovescio del lavoro; terzo ferro sul diritto e così via. Buon lavoro!
14.12.2018 - 08:29
![]() Monica Panera schreef:
Monica Panera schreef:
Buonasera, non riesco a capire lo schema A3 della fascia per capelli modello Warm Lavender. Non capisco perché devo mettere 5 punti su un ferro ausiliario e come procedere con il lavoro. Ho un buio totale. Grazie per il vostro aiuto. Panera Monica
13.12.2018 - 19:05DROPS Design antwoorde:
Buonasera Monica, le 5 maglie vengono messe in sospeso per creare la treccia. Deve metterle su un ferro ausiliario sul davanti del lavoro, lavorare 5 maglie a diritto e lavorare le 5 maglie in sospeso a diritto, creando così la treccia. Buon lavoro!
13.12.2018 - 22:22
![]() Monica Panera schreef:
Monica Panera schreef:
Buongiorno, ho difficoltà a capire lo schema A2 della fascia per capelli che sto facendo Warm Lavender modello:ee-536 Quando nello schema non vi sono quadratini che spiegano il punto da fare ma c'è il vuoto cosa significa? Che il punto è da passare sull'altro ferro senza lavorarlo? Aspetto una vostra gentile risposta.Grazie
12.12.2018 - 16:49DROPS Design antwoorde:
Buongiorno Monica. Trova un vuoto perchè al ferro precedente è stata diminuita una maglia. Quando incontra il vuoto, deve lavorare la maglia come indicato nel quadratino successivo. Quindi per es., alla riga 6 del diagramma A2 (riga lavorata sul rovescio, quindi si legge da sinistra verso destra), lavora: 3 m rovescio, 3 m diritto, 2 maglie rovescio e così via. Buon lavoro!
12.12.2018 - 17:02
|
|||||||||||||||||||||||||
Warm Lavender |
|||||||||||||||||||||||||
|
|
|||||||||||||||||||||||||
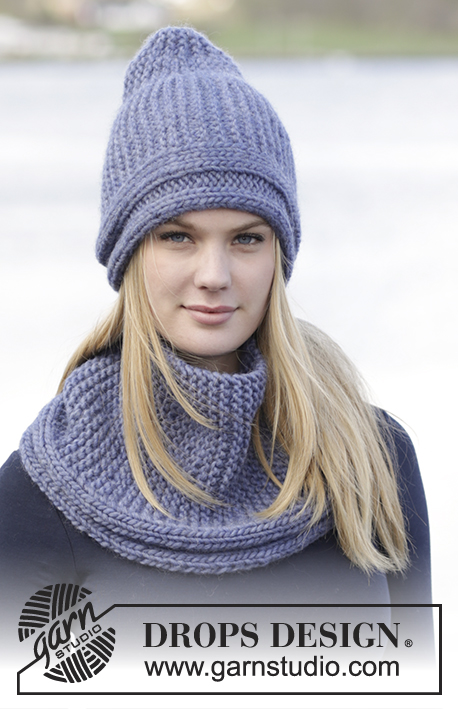
De set bevat: gebreide DROPS hoofdband en halswarmer met boordsteek van ”Snow”.
DROPS Extra 0-1234 |
|||||||||||||||||||||||||
|
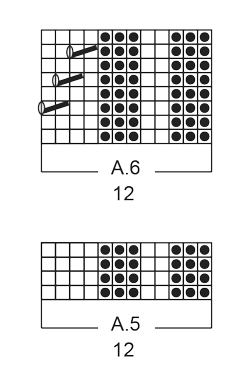
RIBBELST (heen en weer gebreid): Brei alle nld recht. 1 ribbel = 2 nld r. PATROON: Zie telpatronen A.1 tot en met A.6. De telpatronen laten het patroon aan de goede kant zien. Zowel de heengaande als de teruggaande naalden zijn weergegeven. ---------------------------------------------------------- HOOFDBAND: Wordt heen en weer gebreid op de nld. Zet 22 st op met nld 7 mm en Snow. Brei 1 ribbel in RIBBELST - zie uitleg boven. Brei dan A.1 (= 22 st). DENK OM DE STEKENVERHOUDING! Herhaal A.1 tot het werk 14-15-16 cm meet (pas zo aan dat de volgende nld aan de goede kant is). Brei A.2 boven A.1. Als A.2 een keer in de hoogte is gebreid, staan er 10 st op de nld. Brei A.3 1 keer in de hoogte. Brei A.4 boven A.3. Brei de omsl gedraaid in het patroon. Als A.4 een keer in de hoogte is gebreid, staan er 22 st op de nld. Brei A.1 tot het werk 48-50-52 cm meet. Brei 1 ribbel. Kant alle st af. Naai de opzetrand tegen de afkantrand aan elkaar. ---------------------------------------------------------- HALSWARMER: Wordt in de rondte gebreid op de rondbreinld. Zet 72-84 st op met rondbreinld 8 mm en Snow. Brei A.5 (= 12 st) 6-7 keer in de breedte in totaal. Brei bij een hoogte van 4 cm A.6 boven A.5. DENK OM DE STEKENVERHOUDING! Brei bij een hoogte van 20-22 cm – pas zo aan dat het na een hele herhaling van A.6 is – A.5 boven A.6. Kant af bij een hoogte van 24-26 cm. |
|||||||||||||||||||||||||
Uitleg van het telpatroon |
|||||||||||||||||||||||||
|
|||||||||||||||||||||||||
|
|||||||||||||||||||||||||
|
|||||||||||||||||||||||||
|
|||||||||||||||||||||||||
Heeft u dit patroon gemaakt?Tag dan uw afbeeldingen met #dropspattern of stuur ze naar de #dropsfan galerij. Heeft u hulp nodig voor dit patroon?U vind 19 instructievideo's, een commentaar/vragengedeelte en nog veel meer, als u naar het patroon gaat op garnstudio.com © 1982-2025 DROPS Design A/S. Alle rechten voorbehouden. Op dit document, inclusief alle subdocumenten, rust copyright. Lees meer over wat u kunt doen met onze patronen onderaan elk patroon op onze site |
|||||||||||||||||||||||||


Met meer dan 40 jaar ervaring in brei- en haakdesign biedt DROPS Design één van de meest uitgebreide collecties van gratis patronen aan op internet vertaald in 314 talen. Tot en met vandaag hebben wij 11822 boeken en 11528 patronen gepubliceerd.
Wij werken hard om u het beste van haken en breien te bieden; patronen, inspiratie, advies en natuurlijk garens van uitstekende kwaliteit voor de allerbeste prijzen! Wilt u onze patronen gebruiken voor meer dan privégebruik? U kunt lezen wat wel en niet is toegestaan is in de Copyright tekst, die u onderaan elk patroon kunt vinden. Veel handwerkplezier!
Laat een opmerking achter voor DROPS Extra 0-1234
Wij horen graag wat u vindt van dit patroon!
Wilt u een vraag stellen, kies dan de juiste categorie in het formulier hieronder om sneller een antwoord te krijgen. Verplichte velden zijn gemarkeerd met een *.