
Populaire categorieën
Op zoek naar garen?


Opmerkingen / Vragen (15)
![]() Gabriella schreef:
Gabriella schreef:
Buonasera, voglio realizzare lo scialle Himalaya con lana Snow (previsti g. 200 di lana) ma per sbaglio ne ho acquistata g. 250; sapreste dirmi di quanto posso allungare lo scialle se uso g. 250 di Snow ? (il vostro modello prevede larghezza in alto circa 150 cm) Grazie. Cordiali saluti Gabriella
02.12.2022 - 18:51DROPS Design antwoorde:
Buonasera Gabriella, per un'assistenza così personalizzata può rivolgersi al suo rivenditore DROPS di fiducia. Buon lavoro!
03.12.2022 - 16:17
![]() Sonca schreef:
Sonca schreef:
I don't understand the instructions for this hat. It states that the earlaps are worked with 2 thread of white then finish with 1 thread. Does this mean you are knitting both earlaps are the same time? Can you use circular needles to make the earlaps?
19.10.2022 - 03:11DROPS Design antwoorde:
Hi Sonca, The ear flaps are worked with 2 strands to make them warmer, as is the first ridge on the hat itself. Each ear flap is worked back and forth separately to begin with, then they are placed on the same circular needle, stitches are cast on for the rest of the hat, which is continued first back and forth from mid-back then finished in the round. Happy knitting!
19.10.2022 - 06:55
![]() Nicoletta schreef:
Nicoletta schreef:
Buonasera, non riesco a capire come fare i paraorecchie. Il gettato per l'aumento va fatto prima di iniziare il giro dopo il primo ferro una volta avviate le maglie? Non riesco proprio a fare il 2. a specchio. Quando inizio gli aumenti? Sempre prima del 2. ferro? In questo modo però non mi trovo col dritto del lavoro. Infine i 6 punti da avviare fra i paraorecchie vanno avviati attaccati a uno dei paraorecchie o separati? Vi ringrazio per la pazienza
02.09.2021 - 23:16DROPS Design antwoorde:
Buonasera, gli aumenti iniziano dopo il promo giro e deve lavorare 1 gettato a entrambi i lati: inoltre, sul 1° paraorecchie deve avviare le maglie alla fine di un ferro dal diritto del lavoro, verso il dietro; per il secondo paraorecchie deve avviare le maglie alla fine di un ferro dal rovescio del lavoro e aumentare verso il centro davanti all'inizio di un ferro dal diritto del lavoro invece di un ferro dal rovescio del lavoro. Buon lavoro!
04.09.2021 - 21:15
![]() Estela schreef:
Estela schreef:
Solamente puedo tejer la orejera de la que explica el patron. Como podria tejer la otra orejera de lado contrario. Me podrian explicar porfavor. O hacer un tutorial porfavor. Gracias
30.11.2019 - 02:36DROPS Design antwoorde:
Hola Estela. Los dos orejeras se trabajan antes de empezar el gorro. Cuando se termina la primera orejera, dejar la labor en espera y empezar la otra orejera, pero trabajando los aumentos a la inversa. Lee atentamente el patrón.
30.11.2019 - 19:13
![]() Lindsay schreef:
Lindsay schreef:
Hello, how do I connect the ear pieces? Do the ear pieces gonnext to each other with the 16 new cast ons next, where the forehead will be? I was confused why the pattern kept referring to start mid back. Thank you!
23.11.2017 - 03:00DROPS Design antwoorde:
Dear Lindsay, mid back will be the side of ear flaps where you cast on 5 sts on each ear flap - when joining both ear pieces together, start on mid back on 1st ear flap (sts on needle = the 5 sts cast on are at the beg of this row), then cast on 16 sts between both pieces for front piece and work 2nd ear flap (sts put aside, the 5 sts are at the end of piece). Happy knitting!
23.11.2017 - 08:38
![]() Valerie schreef:
Valerie schreef:
After further review of the shawl pattern, it appears that on the edge, I should slip the first stitch (as if to knit, I'm assuming...it doesn't specify) and then YO. Is that a correct interpretation of that first tip and instruction? Thank you, again!
19.01.2016 - 14:31DROPS Design antwoorde:
Dear Valerie, that's correct - happy knitting!
19.01.2016 - 16:36
![]() Valerie schreef:
Valerie schreef:
Your shawl pattern states: "inc 1 st at beg of every row from RS - inc by working 1 YO inside 1 edge st" - does this mean "create a yo at the first edge stitch on the RS"? Meaning, to me, on the RS, knit the first stitch, then YO. Correct? Then, on the next row (WS) P YO the YO that was created on the previous row. Thank you!
19.01.2016 - 11:50DROPS Design antwoorde:
Dear Valerie, that's right: you inc at the beg of every row from RS= 1 edge st, 1 YO, etc and on next row from WS work the YO into back of loop to avoid hole. Happy knitting!
19.01.2016 - 16:33
![]() Katy schreef:
Katy schreef:
Hello, thank you for your help. I still don't understand. I know it has to be cast on towards the back but how do I do that if my working yarn is on the other side. I would have to add a row and after that the ear flap is going to be longer than the first one. I was hoping that you could give me row by row instructions.
12.01.2016 - 17:18DROPS Design antwoorde:
Dear Katy, work reversed will mean you will make on the opposite side what you made on one side for the firt piece. For 1st earfla, you cast on sts at the end of row from RS -towards back) for 2nd piece, you will cast on sts at the end of row from WS. So that both pieces will be reversed. Happy knitting!
13.01.2016 - 10:30
![]() Katy schreef:
Katy schreef:
Hello, Could you please give me a full instruction for making a second (reversed) ear flap? Thank you!
12.01.2016 - 01:35DROPS Design antwoorde:
Dear Katy, to work the 2nd earflap reversed, cast on the sts towards back piece at the end of a row from WS (instead of at the end of a row from RS for 1st earflap), and inc towards mid front at the beg of a row from RS instead of at the beg of a row from WS. Happy knitting!
12.01.2016 - 10:02
![]() Alessandro schreef:
Alessandro schreef:
Buongiorno, ho bisogno di un chiarimento per gli aumenti a lavoro iniziato nel cappello. Date indicazione di un video per gli aumenti a lavoro iniziato, in cui illustrate due tecniche..La prima mi sembra non adatta perché fa un bordo molto morbido, la seconda tecnica non riesco ad applicarla perché ho il filo dalla parte opposta del lavoro...come consigliate di fare? grazie
27.02.2015 - 18:24DROPS Design antwoorde:
Buongiorno Alessandro. La seconda tecnica presentata può essere usata per aumentare le m sia sul rovescio che sul diritto del lavoro. Le m vanno aumentate all'inizio del ferro. Ci riscriva se non abbiamo capito correttamente la sua domanda. Buon lavoro!
28.02.2015 - 23:07
|
|||||||
Himalaya#himalayaset |
|||||||
 |
 |
||||||
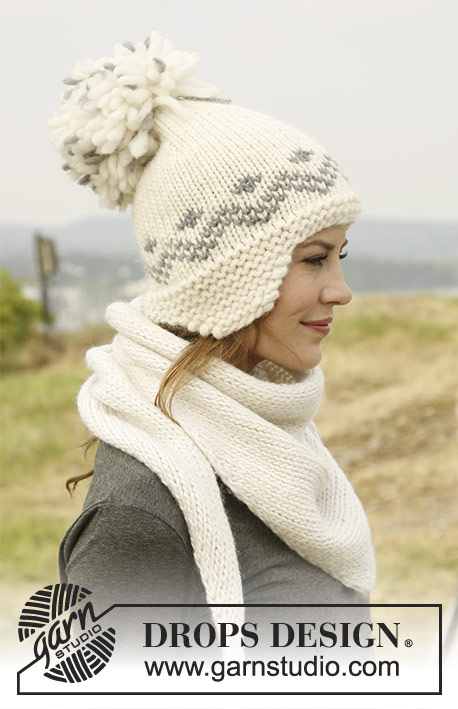
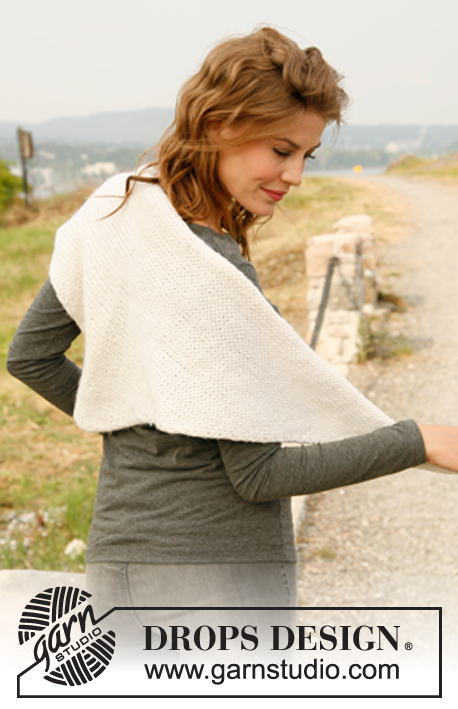
Gebreide DROPS muts met oorflappen en omslagdoek van ”Snow”.
DROPS 131-21 |
|||||||
|
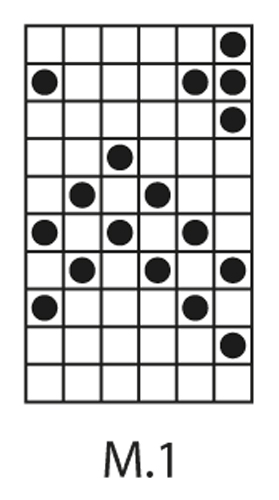
RIBBELST: 1 ribbel = 2 nld: 1e nld: Brei alle st recht, 2e nld: Brei alle st recht. TIP VOOR HET MEERDEREN voor de muts: Meerder door 1 omsl te maken, Brei de omsl in de volgende nld gedraaid recht, dus brei achter in de st in plaats van voor in de st om een gaatje te voorkomen. TIP VOOR HET BREIEN voor de omslagdoek: Brei voor een mooie rand als volgt: Haal de 1e st af elke nld zonder deze te breien. -------------------------------------------------------- -------------------------------------------------------- MUTS: De oorflappen en de eerste ribbels op de muts worden met 2 draden naturel gebreid, de muts wordt dan verder gebreid met 1 draad. Zet 7 st op met nld 8 mm en 2 draden Snow. Brei in ribbelst – meerder TEGELIJKERTIJD na 1 nld 1 st aan iedere kant om de nld in totaal 3 keer - zie Tip voor het meerderen = 13 st. Zet in de volgende nld 5 st op richting middenachter = 18 st. Brei 1 nld recht over alle st tot er 1 st overblijft (middenvoor) en meerder nu 1 st door 1 omsl te maken voor de laatste st = 19 st, brei dan 1 nld recht. Laat het werk rusten. Brei nog een oorflap maar in spiegelbeeld dus: zorg dat u duidelijk weer wat de voorkant en de achterkant is als u meerdert. Brei de oorflappen tot dezelfde nld - begin middenachter en zet 16 nieuwe st op tussen de oorflappen voor het voorhoofd = 54 st op de nld. Brei dan heen en weer vanaf middenachter. Brei 4 nld in ribbelst over alle st. Ga verder met breinld zonder knop 8 mm en eindig de muts in de rondte vanaf middenachter met 1 draad. Brei telpatroon M.1 en eindig dan met naturel in tricotst. DENK OM DE STEKENVERHOUDING! Brei bij een hoogte van 16 cm - gemeten middenvoor – de volgende nld in de rondte als volgt: * 2 st recht samen, 7 st r *, herhaal van *-*. Brei 1 nld recht. Brei de volgende nld als volgt: * 2 st recht samen, 6 st r *, herhaal van *-*. Ga verder en minder om de nld met 1 st minder tussen iedere keer dat u mindert tot er 9 st over zijn op de nld. De muts meet ongeveer 26 cm vanaf middenvoor. Knip de draad af en haal deze door de overgebleven st, trek de draad aan en zet vast. Naai de ribbels samen middenachter in de buitenste lusjes van de st voor een onzichtbare naad. Maak een grote pompom met naturel en een beetje grijs en zet deze vast aan de bovenkant van de muts. OMSLAGDOEK: Zet 3 st op met nld 8 mm en 1 draad Snow. Lees TIP VOOR HET BREIEN. Brei in tricotst en meerder TEGELIJKERTIJD 1 st aan het begin van iedere nld aan de goede kant - meerder door 1 omsl te maken naast de kant st, brei de omsl av gedraaid (dus brei achter in de st in plaats van voor in de st) in de volgende nld om gaatjes te voorkomen. DENK OM DE STEKENVERHOUDING! Bij een hoogte van 75 cm is de helft van de omslagdoek klaar. Brei 2 nld zonder te meerderen. Minder dan aan dezelfde kant als waar u gemeerderd heeft door de eerste 3 st als volgt te breien: 1 kant st, 1 st r afh, 1 st r, afgeh st overh. Ga zo verder en minder elke nld aan de goede kant tot er 3 st over zijn - het werk meet ongeveer 150 cm. Kant alle st af. |
|||||||
Uitleg van het telpatroon |
|||||||
|
|||||||
 |
|||||||
Heeft u dit patroon gemaakt?Tag dan uw afbeeldingen met #dropspattern #himalayaset of stuur ze naar de #dropsfan galerij. Heeft u hulp nodig voor dit patroon?U vind 14 instructievideo's, een commentaar/vragengedeelte en nog veel meer, als u naar het patroon gaat op garnstudio.com © 1982-2026 DROPS Design A/S. Alle rechten voorbehouden. Op dit document, inclusief alle subdocumenten, rust copyright. Lees meer over wat u kunt doen met onze patronen onderaan elk patroon op onze site |
|||||||


Met meer dan 40 jaar ervaring in brei- en haakdesign biedt DROPS Design één van de meest uitgebreide collecties van gratis patronen aan op internet vertaald in 324 talen. Tot en met vandaag hebben wij 12290 boeken en 11997 patronen gepubliceerd.
Wij werken hard om u het beste van haken en breien te bieden; patronen, inspiratie, advies en natuurlijk garens van uitstekende kwaliteit voor de allerbeste prijzen! Wilt u onze patronen gebruiken voor meer dan privégebruik? U kunt lezen wat wel en niet is toegestaan is in de Copyright tekst, die u onderaan elk patroon kunt vinden. Veel handwerkplezier!
Laat een opmerking achter voor DROPS 131-21
Wij horen graag wat u vindt van dit patroon!
Wilt u een vraag stellen, kies dan de juiste categorie in het formulier hieronder om sneller een antwoord te krijgen. Verplichte velden zijn gemarkeerd met een *.