
Populaire categorieën
Op zoek naar garen?


Opmerkingen / Vragen (23)
![]() Leeanne schreef:
Leeanne schreef:
Addtnl. info for my last comments: I was confused by the first sentence in the short rows instructions stating to do 6 rows over all stitches. I thought that was part of the directions and the piece started with 6 rows before starting the short row repeat cycle but that is incorrect. This sentence is just telling you that there are 6 rows included in the short row instruction cycle that are not, in fact, short rows – 6 full rows and 2 short rows (not in that order) are listed in the row cycle.
06.09.2025 - 15:15
![]() Leeanne schreef:
Leeanne schreef:
(Cont. from previous two comments) next row starts with R3 and finishes with L3 and last row starts with L4 and finishes with R4. Then you start the cycle again with the first short row. So yes, the short row cycle is short row, full row, short row, full row, full row, full row, full row, full row as the pattern states (1 SR followed by 1 full row followed by 1 SR followed by 5 full rows). There are no edges in which you are not doing a picot edge instruction which allows for an even 8 row cycle
06.09.2025 - 15:08
![]() Leeanne schreef:
Leeanne schreef:
(continued from my previous comment) work the L2 row to the first marker and turn to work back to the “beginning” of the left side row, ending with L3, turn and start a new row with L4, working all the way across, ending with R4, (all the remaining rows in the cycle go all the way across – no more short rows) next row begins with R1 and goes all the way across to the last 4 stitches, ending in L1, turn and start with L2 and go all the way across to finish with R2, (cont. in next comment)
06.09.2025 - 15:03
![]() Leeanne schreef:
Leeanne schreef:
For anyone that needs it, here is the cycle of rows, combining picot edge with short rows instructions (it helps to draw this out on paper): start with right side 1 (R1) and work a short row (to first marker only, not all the way across), turn and work back to the beginning and knit the last four with R2, turn to start next row beginning with R3 and knit all the way across, ending this row with L1, then start the second short row with L2, (continued in next comment)
06.09.2025 - 14:58
![]() Leeanne schreef:
Leeanne schreef:
I figured it out! It is definitely not too complicated but they could have written this pattern differently so it wouldn’t take weeks or trial and error to figure out how to work the short rows in with the picot edge. Maybe we were just making it too complicated. I don’t have enough room to write the pattern in this comment so I’ll start a new one. It is easier to draw your lines and mark each end with the picot line number but I’ll try to write it here in my next comment.
06.09.2025 - 14:55
![]() Leeanne schreef:
Leeanne schreef:
I think I get it! I will test it in the morning and comment again trying to explain it for others if I have it right. My last two comments are wrong for sure. It helps to draw the rows as a picture on paper and mark the ends with the line number.
06.09.2025 - 05:10
![]() Leeanne schreef:
Leeanne schreef:
Revising my last comment: I now have it written as: short row, R1 &L1 on the same row, short row, R2 & L2, short row, R3 & L3, short row, R4 & L4. But this adds up to 8 rows on the sides and only 4 rows in the middle, not 6. Also not sure why the short rows directions refers to the middle stitches as being 70 (for the second size) when it’s only 30 (if excluding 25 on each end) or 72 (if excluding only the outermost 4 on each end).
06.09.2025 - 04:26
![]() Leanne schreef:
Leanne schreef:
The directions for the short rows are difficult to figure out. I’ve been working at this for a few weeks with my MIL, have restarted my project 7 times and we still don’t have it right. So we are alternating between right and left rows 1, 2, etc. when doing full rows? We are not doing any picot edge instructions when doing short rows, correct? To incoorporate the short rows, does it go: left row 1, right row 1, short row, left row 2, right row 2, short row, etc. through all four edge rows?
06.09.2025 - 02:40
![]() Leeanne schreef:
Leeanne schreef:
In addition to my last comment, I’m also confused because it says for garter stitch to knit two rows. The main directions says start with the right Picot edge, then knit the directions for garter stitch for the rest of the row, except for the last four and then knit the directions for the left edge on the last four. How do you knit two rows for the garter stitch directions in between doing the right and left edges?
14.07.2025 - 19:22DROPS Design antwoorde:
Dear Leeanne, the garter stitch structure is 2 knit rows. So whenever most of the stitches in the row are knitted, both from the right side and the wrong side, the resulting texture will be garter stitch. In the picot edges we are already using garter stitch, since all other stitches except for the 4 stitches on each side for the picot are knitted from the right side and the wrong side. So you just need to work as indicated; the edges will have the picot texture while the remaining stitches are knitted. Happy knitting!
19.07.2025 - 17:47
![]() Leeanne schreef:
Leeanne schreef:
A video of the actual pattern, please! This is so confusing. I’ve now learned how to do picot edges and short rows, but I can’t understand how to do both at the same time. How do you know which row of the picot edge you’re on if you’ve turned around and gone the other direction halfway through a row? And then when you start the next row do you count as if half the row is row 5 and half is row 6 or just continue with the next direction for that edge in sequence, ignoring row numbers?
14.07.2025 - 19:18DROPS Design antwoorde:
Dear Leeanne, please remember to mark your comments as questions so that we can see them and answer sooner. When you are combining the short rows and the picot edges, count only the rows where you reach the edges; those rows where you turn before reaching the edges are not taken into account for the picot edges on that side. Happy knitting!
19.07.2025 - 17:48
|
|
Berry Kiss#berrykissvest |
|
 |
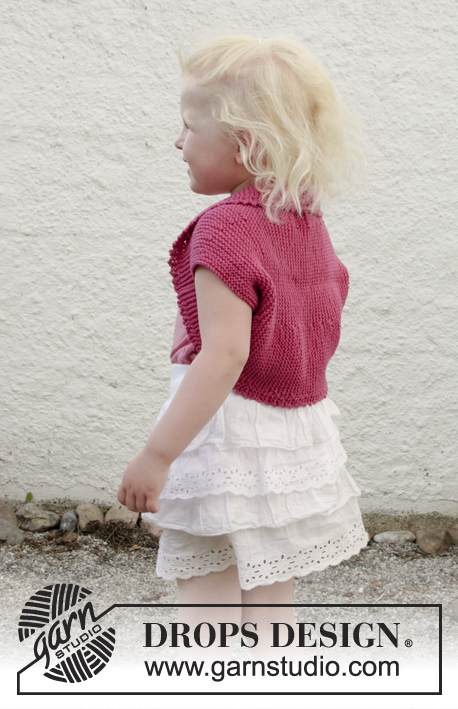 |
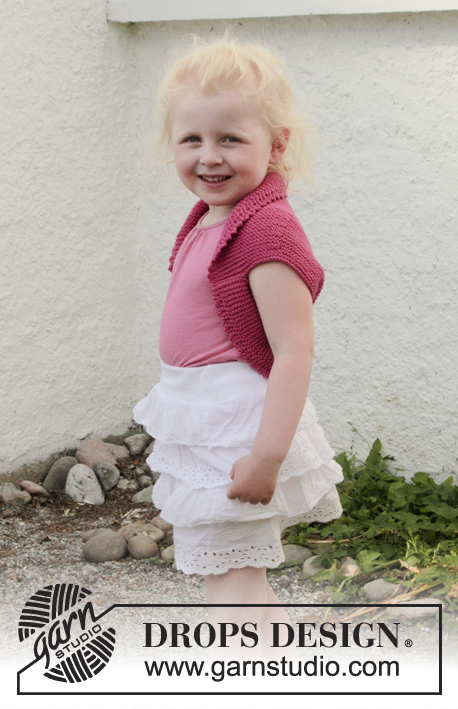
Gebreide bolero met verkorte toeren, picotranden en ribbelsteek in DROPS Cotton Merino. Maten kinderen 3 - 12 jaar.
DROPS Children 28-7 |
|
|
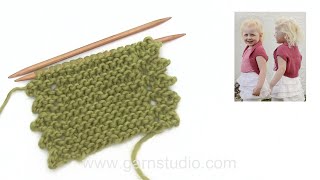
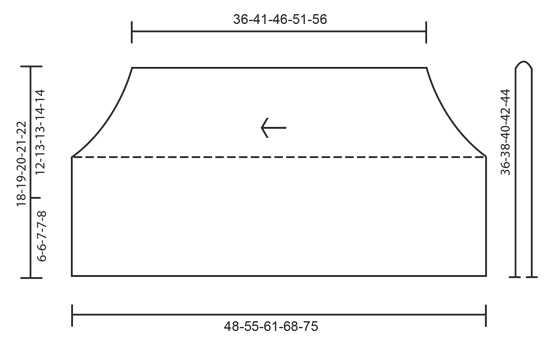
RIBBELSTEEK (heen en weer gebreid): 1 ribbel = 2 naalden recht. PICOTRAND (heen en weer gebreid op de naald): RECHTERKANT: NAALD 1 (= goede kant): Recht. NAALD 2 (= verkeerde kant): Brei recht tot er 4 steken over zijn, deze worden als volgt gebreid: 2 recht samen, 1 omslag, in elk van de 2 laatste steken 2 steken recht = 2 nieuwe steken op de naald. NAALD 3 (= goede kant): 1 steek recht afhalen, 1 recht, haal de afgehaalde steek over, 1 recht en haal de achterste steek op de rechter naald over de voorste, er zijn 2 steken geminderd – brei dan de rest van de naald recht. NAALD 4 (= verkeerde kant): Brei recht. Herhaal naalden 1 tot 4. LINKERKANT: NAALD 1 (= goede kant): Brei recht tot er 4 steken over zijn, deze worden als volgt gebreid: 2 recht samen, 1 omslag, in elk van de 2 laatste steken 2 steken recht = 2 nieuwe steken op de naald. NAALD 2 (= verkeerde kant): 1 steek recht afhalen, 1 recht, haal de afgehaalde steek over, 1 recht en haal de achterste steek op de rechter naald over de voorste, er zijn 2 steken geminderd – brei dan de rest van de naald recht. NAALD 3 (= goede kant): Brei recht. NAALD 4 (= verkeerde kant): Brei recht. Herhaal naalden 1 tot 4. VERKORTE TOEREN: Brei 6 naalden over alle steken, * brei 24-25-26-27-28 steken (tot de eerste markeerdraad), keer het werk, trek de draad aan en brei tot het einde van de naald. Brei 1 naald over alle steken, keer het werk, brei 24-25-26-27-28 steken (tot de eerste markeerdraad), keer het werk, trek de draad aan en brei tot het einde van de naald. Brei 5 naalden over alle steken *, herhaal van *-*. Dat wil zeggen, in elke herhaling breit u 6 naalden ribbelsteek (= 3 ribbels) over de middelste 66-70-72-80-86 steken en 8 naalden ribbelsteek (4 ribbels) over de steken aan elke kant. -------------------------------------------------------- BOLERO: Het werk wordt overdwars gebreid en heen en weer met de rondbreinaald van armsgat tot armsgat. Daarna wordt de bolero dubbel gevouwen en worden de zijnaden dicht genaaid. Zet 76-80-84-88-92 steken op met Cotton Merino en rondbreinaald 4 mm. Voeg 1 markeerdraad in het werk 24-25-26-27-28 steken vanaf elke zijkant (= 28-30-32-34-36 steken tussen de markeerdraden). Brei dan als volgt – aan de goede kant: PICOTRAND RECHTERKANT, RIBBELSTEEK – zie beschrijving hierboven, over de volgende 68-72-76-80-84 steken, PICOTRAND LINKERKANT over de volgende 4 steken. DENK OM DE STEKENVERHOUDING! Ga verder met ribbelsteek en de picotrand over de buitenste 4 steken aan elke kant, Brei TEGELIJKERTIJD VERKORTE TOEREN – zie uitleg hierboven! Als het werk ongeveer 36-41-46-51-56 cm meet (gemeten op de kortste punt) kant dan losjes af. AFWERKING: Vouw de bolero dubbel – de tekening laat het werk zien als het gevouwen is. Naai de onderkant 6-6-7-7-8 cm samen, rand tot rand aan elk kant (= 12-13-13-14-14 cm armsgat). |
|
 |
|
Heeft u dit patroon gemaakt?Tag dan uw afbeeldingen met #dropspattern #berrykissvest of stuur ze naar de #dropsfan galerij. Heeft u hulp nodig voor dit patroon?U vind 18 instructievideo's, een commentaar/vragengedeelte en nog veel meer, als u naar het patroon gaat op garnstudio.com © 1982-2026 DROPS Design A/S. Alle rechten voorbehouden. Op dit document, inclusief alle subdocumenten, rust copyright. Lees meer over wat u kunt doen met onze patronen onderaan elk patroon op onze site |
|


Met meer dan 40 jaar ervaring in brei- en haakdesign biedt DROPS Design één van de meest uitgebreide collecties van gratis patronen aan op internet vertaald in 324 talen. Tot en met vandaag hebben wij 12278 boeken en 11985 patronen gepubliceerd.
Wij werken hard om u het beste van haken en breien te bieden; patronen, inspiratie, advies en natuurlijk garens van uitstekende kwaliteit voor de allerbeste prijzen! Wilt u onze patronen gebruiken voor meer dan privégebruik? U kunt lezen wat wel en niet is toegestaan is in de Copyright tekst, die u onderaan elk patroon kunt vinden. Veel handwerkplezier!
Laat een opmerking achter voor DROPS Children 28-7
Wij horen graag wat u vindt van dit patroon!
Wilt u een vraag stellen, kies dan de juiste categorie in het formulier hieronder om sneller een antwoord te krijgen. Verplichte velden zijn gemarkeerd met een *.