
Populaire categorieën
Op zoek naar garen?


Opmerkingen / Vragen (43)
![]() Marion schreef:
Marion schreef:
Bonjour, que signifie « snow » dans l’expression « aiguille n 9 en snow » ? Svp
19.02.2026 - 20:14DROPS Design antwoorde:
Bonjour Marion, il s'agit du nom de la laine utilisée pour ce modèle que vous retrouverez dans la liste des fournitures, retrouvez plus d'infos ici, sur DROPS Snow. Bon tricot!
20.02.2026 - 07:51
![]() Aimée schreef:
Aimée schreef:
Hello, Can I use circular needles instead of straight ones for this pattern?
03.06.2023 - 14:31DROPS Design antwoorde:
Dear Aimée, here we use double pointed needles, not straight needles. You can use 2 sets of circular needles for this piece, using the method explained in this video: https://www.garnstudio.com/video.php?id=97&lang=en. You can also work with one circular needle and use the magic loop technique. Happy knitting!
04.06.2023 - 18:11
![]() Sharon Hunt schreef:
Sharon Hunt schreef:
Hei, is the short side referred to in the lace pattern the side that will be sewn on to the leg warmer. Thank for responding. Shaton
14.03.2023 - 23:49DROPS Design antwoorde:
Hi Sharon, Yes, the shorter side is the side which will be sewn to the leg warmer. Happy crafting!
15.03.2023 - 07:21
![]() Sharon Junt schreef:
Sharon Junt schreef:
Hello, am now working the lace border for the leg warmer. The 4 row says to bind off 3 and knit 4. am I supposed to put the last stitch on the left needle after the bonus off stiches back on the right needle. Does this stitch count as the first stitch? Thanks for your response.
13.03.2023 - 22:54DROPS Design antwoorde:
Hi Sharon, You bind off 3 stitches and have 1 stitch left on the right needle, which stays there while you knit the remaining 3 stitches (this stitch is included in the 4 knitted stitches). Happy knitting!
14.03.2023 - 07:11
![]() Sharon Hunt schreef:
Sharon Hunt schreef:
How do I make sure there is a p2 in the middle of this 6 stitch cable? Thank you.
11.03.2023 - 13:28DROPS Design antwoorde:
Dear Sharon, you need to ensure that you will have k2,p2,k2 over the 6 stitches of the cable. Since you are working a k2,p2 rib, adjust as necessary to obtain the indicated combination over the cable (start the row with k2 or p2 accordingly). Happy knitting!
12.03.2023 - 17:05
![]() Sharon Hunt schreef:
Sharon Hunt schreef:
Hi. What am I missing where are the instruction to knit 2 purl 2? When I follow the instruction I end up with garter stitch. I have ripped 2 times already and I don’t know what am doing wrong. I don’t see anywhere in the pattern instruction where i says to knit 2 purl 2 for X number of inches before starting the cable. How many cables are in the pattern? I see the cables at the front only? Are there more?
09.03.2023 - 21:40DROPS Design antwoorde:
Dear Mrs Hunt, piece is worked bottom up, at the very beginning you start with garter stitch (and you will work and sew the lace edge afterwards), then work the pattern .There is only one cable in the pattern. And then you work in rib (= K2, P2) - the rib as explained under Rib: at the top of pattern explanations - until piece measures 15 3/4" from the cast on row. Happy knitting!
10.03.2023 - 09:48
![]() Isa schreef:
Isa schreef:
Combien faut-il de pelotes pour ce modèle, je ne vois pas l'indication ?
05.10.2020 - 12:56DROPS Design antwoorde:
Bonjour Isa, vous trouverez la quantité indiquée sous l'en-tête, au poids, soit pour ce modèle300 g DROPS Eskimo /50 g la pelote = 6 pelotes. Bon tricot!
05.10.2020 - 15:33
![]() Martinique schreef:
Martinique schreef:
Please advise the pattern sais cast on then knit 3 rows and p3 rows etc then the next row the cable with the reverse stocking sts this I understand but then it sais When piece measures aprox 33 cm what rows am I repeating for my knitting to reach 34cm I am basically asking how many rows do I knit between cables? Secondly when I decrease 6 sts evenly where do I do this in the middle or where? Thank you
10.06.2020 - 15:06DROPS Design antwoorde:
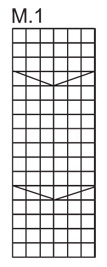
Dear Martinique, you will continue working as established (from RS) = 1 edge st, P16, M.1, P16, 1 edge st, repeating the 16 rows in M.1 until piece measures 34 cm from cast on edge. Read more here about diagrams. You decrease 3 sts on each side of M.1 (= from RS, purl 2 together evenly distributed a total of 3 times before M.1 and after M.1). Happy knitting!
10.06.2020 - 15:18
![]() Lilou schreef:
Lilou schreef:
Bonjour, j'ai toujours du mal à trouver un modèle sur votre nouvelle présentation!! j'ai le numéro du modèle comment faire?... je passe donc systhèmatiquement par google avec le n0 du modèle pour trouver!!!...
18.12.2016 - 09:55DROPS Design antwoorde:
Bonjour Lilou, recherchez des modèles plus simplement dès la page d'accueil en indiquant le numéro du modèle dans la case indiquée dans la rubrique "Cherchez des modèles!" - voir aussi l'aide à la recherche ici. Bon tricot!
19.12.2016 - 10:04Nayla Menassa schreef:
Bonjour je ne comprend pas le tout debut:tricoter 3rang à l'endroit et 3 autres rangs à l'envers? 1m lis çà ve dire quoi? Merci pour votre patience
19.02.2015 - 12:50DROPS Design antwoorde:
Bonjour Mme Menassa, on tricote d'abord toutes les mailles à l'endroit pendant 3 rangs (= 3 rangs endroit), puis on tricote toutes les mailles à l'envers pendant 3 rangs (= 3 rangs envers). Le 1er de ces 6 rangs se fait sur l'endroit de l'ouvrage. 1 m lis = la 1ère et la dernière maille du rang qui sert ensuite à l'assemblage. Bon tricot!
19.02.2015 - 14:29
|
|||||||
DROPS 98-45 |
|||||||
 |
 |
||||||
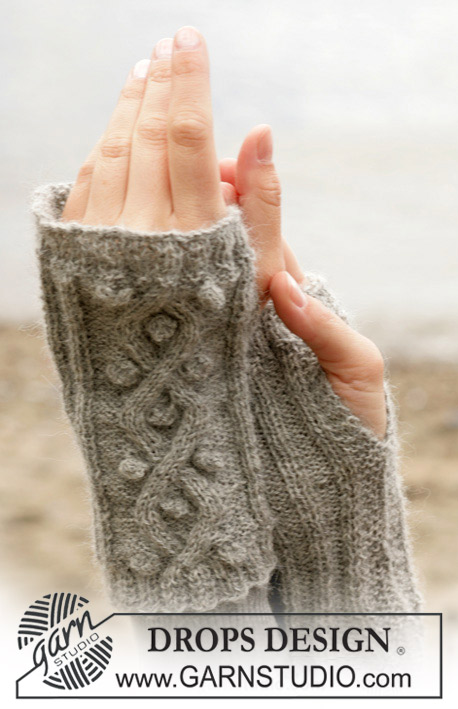
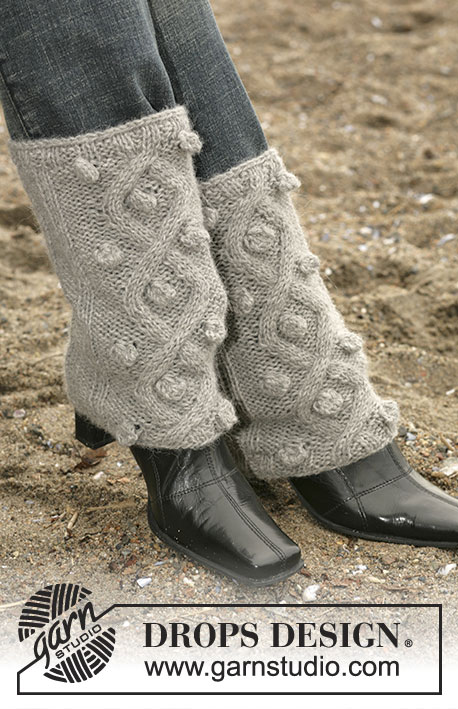
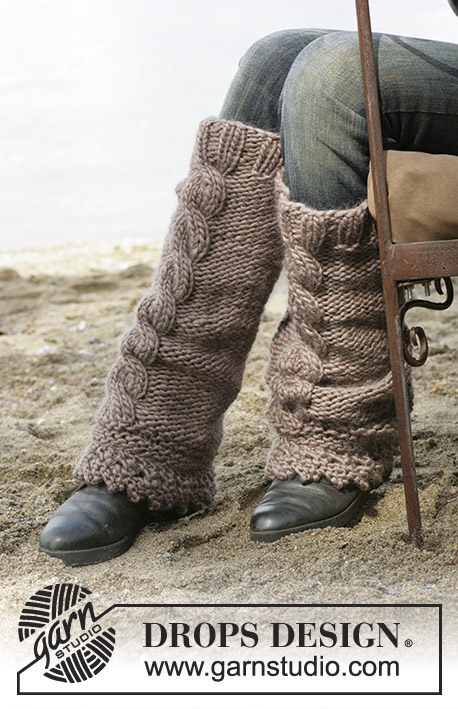
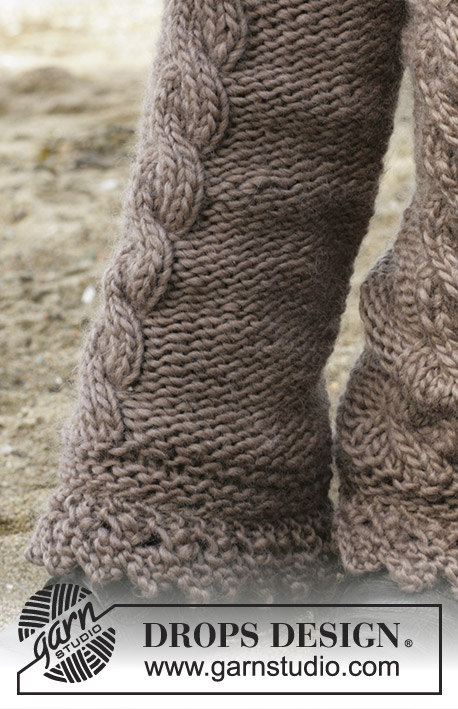
DROPS Beenwarmers met kabel van ”Snow”. One-Size.
DROPS 98-45 |
|||||||
|
Kabelpatroon: Zie teltekening M.1. De teltekening geeft de goede kant van het werk weer. Zowel de heengaande als de teruggaande naalden zijn weergegeven. Boordst: * 2 r, 2 av *, herhaal steeds *-*. Kanten rand: 1e nld: 2 r, 2 omsl, 2 r. 2e nld: 2 st in de 1e st, 2 r, 1 av (in de 2e omsl), 2 r. 3e nld: 7 r. 4e nld: Kant 3 st af, 4 r. Benwarmer: Zet 38 st op (incl. 1 kantst aan de weersz) met breinld 9mm en Snow. Brei 3 nld recht (1e nld = goede kant) en 3 nld av. Meerder tegelijkertijd 2 st in de laatste nld door 2 st in de 16e en 18e st te breien (= 40 st). Brei de volgende nld op de goede kant als volgt: 1 kantst, 16 st averechte tricotst (d.w.z. av op de goede en r op de verkeerde kant), M.1 (= 6 st), 16 st averechte tricotst en 1 kantst. Minder bij een hoogte van ca 34 cm – d.w.z. na een kabel of als er 2 nld na een kabel zijn gebreid – gelijkmatig verdeeld 6 st in een nld – niet tussen de 6 st van de kabels minderen = 34 st. Brei door in Boordst – zie beschrijving hierboven – Zorg ervoor dat er 2 av recht boven de kabel komen te zitten. Brei door totdat de beenwarmer een totale hoogte van ca 40 cm heeft. Kant losjes in patroon. Brei nog 1 beenwarmer. Afwerken: Sluit de naad van de beenwarmer vlak langs de 1 kantst. Kanten rand: Zet 4 st op met breinld 9mm en Snow en brei de kanten rand – zie beschrijving hierboven. Brei totdat de rand een hoogte van 36 cm heeft – gemeten aan de kortste zijde. Sluit de rand tot een ring en naai de rand aan de onderrand (zonder Boordst) van de beenwarmer– Naai in de rand zo dat de puntjes naar beneden wijzen. Herhaal dit bij de tweede beenwarmer. |
|||||||
Uitleg van het telpatroon |
|||||||
|
|||||||
 |
|||||||
Heeft u dit patroon gemaakt?Tag dan uw afbeeldingen met #dropspattern of stuur ze naar de #dropsfan galerij. Heeft u hulp nodig voor dit patroon?U vind 12 instructievideo's, een commentaar/vragengedeelte en nog veel meer, als u naar het patroon gaat op garnstudio.com © 1982-2026 DROPS Design A/S. Alle rechten voorbehouden. Op dit document, inclusief alle subdocumenten, rust copyright. Lees meer over wat u kunt doen met onze patronen onderaan elk patroon op onze site |
|||||||


Met meer dan 40 jaar ervaring in brei- en haakdesign biedt DROPS Design één van de meest uitgebreide collecties van gratis patronen aan op internet vertaald in 324 talen. Tot en met vandaag hebben wij 12291 boeken en 11998 patronen gepubliceerd.
Wij werken hard om u het beste van haken en breien te bieden; patronen, inspiratie, advies en natuurlijk garens van uitstekende kwaliteit voor de allerbeste prijzen! Wilt u onze patronen gebruiken voor meer dan privégebruik? U kunt lezen wat wel en niet is toegestaan is in de Copyright tekst, die u onderaan elk patroon kunt vinden. Veel handwerkplezier!
Laat een opmerking achter voor DROPS 98-45
Wij horen graag wat u vindt van dit patroon!
Wilt u een vraag stellen, kies dan de juiste categorie in het formulier hieronder om sneller een antwoord te krijgen. Verplichte velden zijn gemarkeerd met een *.