
Looking for a yarn?


Comments / Questions (8)
![]() Maria Jose Rocha wrote:
Maria Jose Rocha wrote:
Por favor. enviem me uma melhor explicação deste modelo. Podem mandar em ingles talvez a tradução complique
12.09.2024 - 13:04DROPS Design answered:
Bom dia, Na página das explicações há um link para mudar de língua, ao pé do link para imprimir o modelo. Atenção que este modelo está disponível em inglês do UK e inglês dos USA e os termos em croché são diferentes. Bons crochés!
19.09.2024 - 12:04
![]() Maria Jose Rocha wrote:
Maria Jose Rocha wrote:
Summer Ride É possivel enviar me explicação mais facil de entender deste modelo Muito obrigada
22.08.2024 - 13:29DROPS Design answered:
Bom dia, Não existe outra explicação.
20.09.2024 - 12:58
![]() Ana61 wrote:
Ana61 wrote:
I just bought the cotton fir that pattern but the pattern in french is not understandable. i am very disappointed
07.09.2019 - 17:36
![]() Sharan Stanwood wrote:
Sharan Stanwood wrote:
Well, the answer to my previous comment stating there are problems with this pattern was only defense. I have made some suggestions for this pattern on my R account, which is my 1st name with 555, if anyone else is confused. To begin with, start with 33-33-39 chain stitches, and dc in the 4th ch from hook.
28.08.2019 - 23:43
![]() Sharan Stanwood wrote:
Sharan Stanwood wrote:
Your diagrams A.1a thru A.etc, along with the written explanations, are impossible to understand. The A charts are not numbered, so there is confusion as to where to start; the * makes no sense, it does not say which size is relevant; and more, make this pattern utterly impossible! And I am an Advanced crocheter!! I could create the bikini top just by looking at it; however a pattern should make sense in ALL languages it\'s translated into, with internationally recognized symbols.
12.08.2019 - 21:01DROPS Design answered:
Der Mrs Stanwood, The DROPS patterns are knitted and crocheted by thousands and thousands of people around the world. We understand however that in certain countries, with different knitting/crochet traditions than Scandinavia, our patterns might be written in a way that differs from what some are used to. But of course we want everyone to understand our patterns, so that’s why we have created an extensive library of tutorial videos as well as step by step lessons that explain how to follow the techniques we use and how to read the diagrams in our patterns. Give them a try!
13.08.2019 - 08:45
![]() Cristina wrote:
Cristina wrote:
Se realiza con aguja de 2.5mm o de 35mm? no me queda claro
07.08.2018 - 20:16DROPS Design answered:
Hola Cristina, el patrón se realiza con aguja de 2.5 mm. Se trataba de una errata, ya está corregido.
07.08.2018 - 21:24Toby wrote:
This is very confusing. Plus it says there’s not a USA translation.
29.06.2018 - 23:11DROPS Design answered:
Dear Toby, our translators work continiously to get the patterns in every language as fast as possible. This pattern is already available in US version. Happy Crafting!
01.07.2018 - 03:32Jing wrote:
Dear, I really love the above bikini pattern, but I can't understand the diagram and the words explanation. they confused me. Would you please write to me more details, like how to start with, and where's the beginning etc? And does this bra cup crochet directly or need to crochet different parts and then sew them together to make one piece of bra? Appreciate if more information, thank you. Sincerely, Jing
27.06.2018 - 06:46DROPS Design answered:
Dear Jing, each bra cup will be worked separately starting in the middle of piece and crocheting back and forth on each side of the fundation chain, and increasing on one end of the chain to create the rounded edge towards mid front (the side where you will turn at the end of each row will be straight - see measurement chart. Follow then diagrams starting on row after the one with the star and reading from RS right to left and from WS left to right. Happy crocheting!
27.06.2018 - 08:29
|
||||||||||||||||||||||||||||
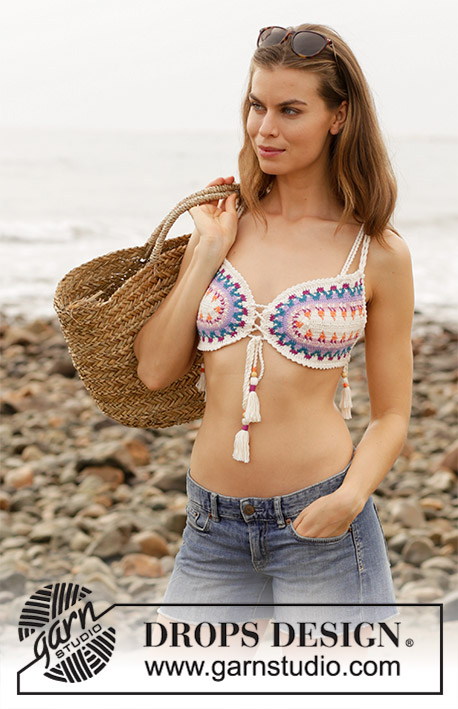
Summer Ride#summerridebikini |
||||||||||||||||||||||||||||
 |
 |
|||||||||||||||||||||||||||
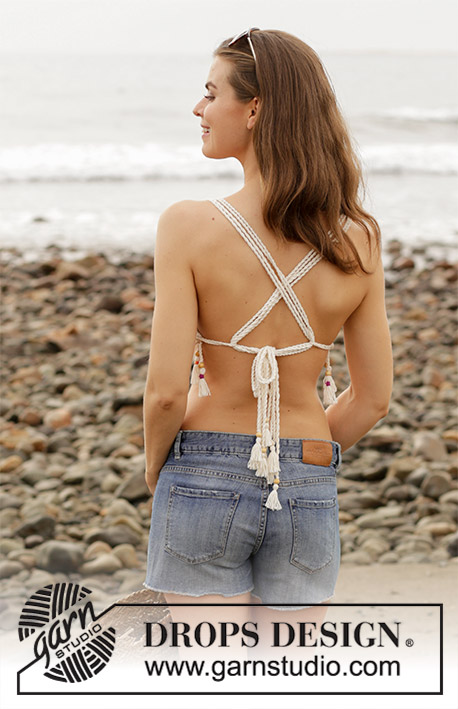
Crocheted bikini top with multi-colored pattern and ties. Size: S - XXXL Piece is crocheted in DROPS Safran.
DROPS 190-4 |
||||||||||||||||||||||||||||
|
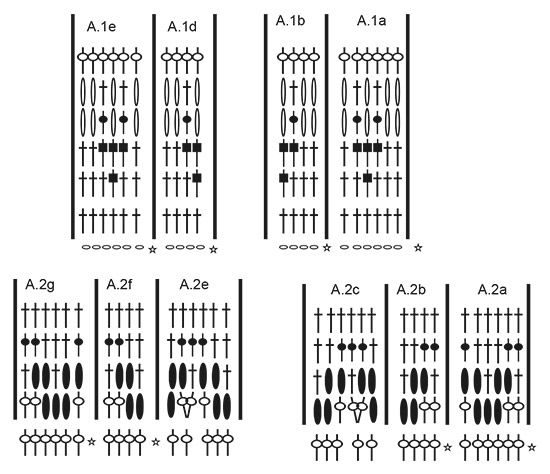
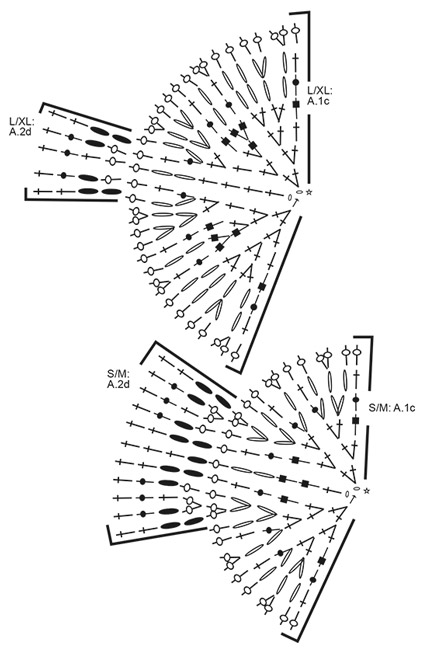
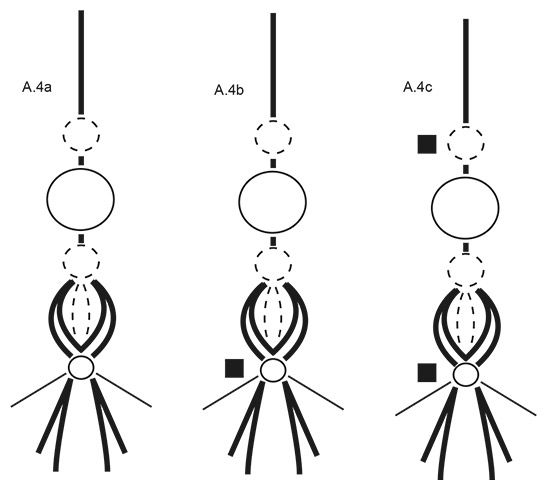
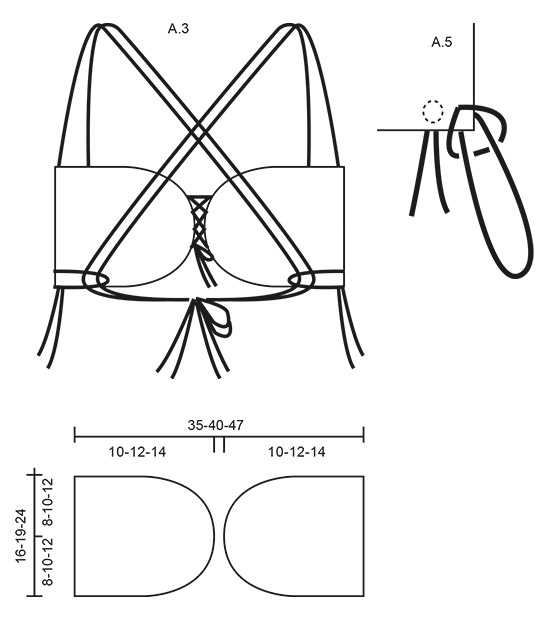
INFORMATION FOR PATTERN: PATTERN: See diagrams A.1 to A.5. Choose diagram for your size. A.3 shows how bikini is assembled. A.4 shows how tassels are made. A.5 shows how to fasten straps. CROCHET INFORMATION: Work alternately from right and wrong side. Beginning every row with double crochets with 3 chain stitches (= first double crochet) and finish with 1 slip stitch in 3rd chain stitch at beginning of row, turn piece. COLOR PATTERN: When changing color at the beginning of a new row work as follows: Work last double crochet with first color but wait with last pull through. Switch to new color, work last pull through. and 1 slip stitch in 3rd chain stitch at beginning of row. Turn piece and work 3 chain stitches (= beginning of new row). When changing color in a row work as follows: Work 1 double crochet with first color but wait with last pull through. Switch to new color, work last pull through with new color. When working with two colors place strand for the color not worked over stitches from previous row, work around the strand so that it is hidden and follows in the round. Make sure to avoid tights yarn and not to tighten yarn when picking it up from previous row. ---------------------------------------------------------- BIKINI TOP: First work 2 loose bra cups. Fasten these together mid front with a tie. Make a loop in each side, and pull ties through the loops and tie in a cross on the back. BRA CUP: Work 30-30-36 chain stitches on hook size 2.5 mm with off white. Then work from first row in A.1 (choose diagram for your size) – read CROCHET INFO and COLOR PATTERN and REMEMBER CROCHET GAUGE, as follows: Work A.1a over the first 24-24-30 chain stitches (= 4-4-5 repetitions), A.1b over the next 4 chain stitches, work the first 3 double crochets in A.1c over the last 2 chain stitches, then continue in the round on opposite side of chain stitches (= 29-29-35 chain stitches) and work the last 2 double crochets in A.1c in the second of these chain stitches (see arrow in diagram), then work A.1d over the next 4 chain stitches and A.1e over the last 24-24-30 chain stitches (= 4-4-5 repetitions). SIZE S-M: Continue pattern like this until A.1c is done vertically = 85 double crochets on last row. SIZE L/XL: Repeat first row in A.1a/b/d/e 1 more time vertically (i.e. 1 round with off white) before working these diagrams AT THE SAME TIME continue on 2nd row in A.1c. Continue pattern like this until A.1c is done vertically = 91 double crochets on last row. SIZE XXL/XXXL Repeat first row in A.1a/b/d/e 3 more times vertically (i.e. 1 round with off white) before working these diagrams AT THE SAME TIME continue on 2nd row in A.1c. Continue pattern like this until A.1c is done vertically = 113 double crochets on last row. ALL SIZES: Work A.2a over the first 24-24-30 double crochets (= 4-4-5 repetitions), A.2b over the next 4 double crochets, work A.2c over the next 10-15-15 double crochets, A.2d over the next 9-5-15 double crochets, A.2e over the next 10-15-15 double crochets, A.2f over the next 4 double crochets, A.2g over the last 24-24-30 double crochets (= 4-4-5 repetitions). Continue pattern like this until A.2 is done vertically = 91-97-121 double crochets on last row. Work next row with off white as follows: 1 chain stitch, skip 1 double crochet, * 1 single crochet in next double crochet, 2 chain stitches, 1 single crochet in same double crochet, skip 1 double crochet *, work from *-* until 2 double crochets remain, work 1 chain stitch, skip 1 double crochet, 1 single crochet in last double crochet. Fasten off. Work another bra cup the same way. STRAPS: See diagram A.3. Cut 4 lengths offwhite of 6 metres each. Twine the strands tog until they resist, fold the strands double so that they twine. Tie a knot in each end, approx. 10 cm / 4" from the end. Place strap double, thread loop from right side between 2 double crochets in the top corner on one bra cup. Then pull yarn ends through the loop and tighten. Make another tie the same way, and pull it in between 2 double crochets approx. 5-5-6 cm / 2"-2"-2½" from corner. Work strap the same way on the other bra cup. Pull each end through 1 wooden bead and make a knot - see diagram A.4a. Cut 8 strand off white of 10 cm / 4" and tie another knot with string from knot – tie this in the middle of strands. This is done to get a fuller tassel. Tie 1 strand off white approx. 1 cm / ⅜" down from bead. Cut the end. LOOPS: Cut 4 lengths offwhite of 1 metres each. Twine the strands tog until they resist, fold the strands double so that they twine. Tie a knot in each end, approx. 10 cm / 4" from the end. Place strap double, thread loop from right side between 2 double crochets in the bottom corner on bra cup. Pull yarn ends through loop on the front - leave a loop of approx. 10 cm / 4" - see diagram A.5. Tighten carefully at the back and tie a knot. Pull one end through 1 wooden bead and make a knot - see diagram A.4b. Cut 8 strand off white of 10 cm / 4" and tie another knot with string from knot – tie this in the middle of strands. This is done to get a fuller tassel. Wrap one strand dark heather approx. 8 times, approx. 1 cm / ⅜" down from bead (see black square). Cut the end. Do the same on the other end but with orange. Work this loop the same way on the other bra cup. TIE MID FRONT: Cut 4 lengths offwhite of 4 metres each. Twine the strands tog until they resist, fold the strands double so that they twine. Tie a knot in each end, approx. 10 cm / 4" from the end. Pull tie (bottom up) between 2 double crochets from one bra cup to the other, zig-zag, 3 times in total, then pull the end from the top down on the other bra cup the same way. Tie a bow at the front. Pull one end through 1 wooden bead and make a knot - see diagram A.4c. Cut 20 strand off white of 15 cm / 6" and tie another knot with string from knot – tie this in the middle of strands. This is done to get a fuller tassel. Wrap one strand dark heather approx. 16 times, approx. 1 cm / ⅜" down from bead (see bottom black square). Wrap one strand orange approx. 8 times, above the wooden bead (see top black square). Cut the end. Do the same on the other end. |
||||||||||||||||||||||||||||
Diagram explanations |
||||||||||||||||||||||||||||
|
||||||||||||||||||||||||||||
|
||||||||||||||||||||||||||||
|
||||||||||||||||||||||||||||

|
||||||||||||||||||||||||||||
|
||||||||||||||||||||||||||||
|
||||||||||||||||||||||||||||
Have you finished this pattern?Tag your pictures with #dropspattern #summerridebikini or submit them to the #dropsfan gallery. Do you need help with this pattern?You'll find 9 tutorial videos, a Comments/Questions area and more by visiting the pattern on garnstudio.com. © 1982-2025 DROPS Design A/S. We reserve all rights. This document, including all its sub-sections, has copyrights. Read more about what you can do with our patterns at the bottom of each pattern on our site. |
||||||||||||||||||||||||||||


With over 40 years in knitting and crochet design, DROPS Design offers one of the most extensive collections of free patterns on the internet - translated to 17 languages. As of today we count 314 catalogs and 11822 patterns - 11812 of which are translated into English (US/in).
We work hard to bring you the best knitting and crochet have to offer, inspiration and advice as well as great quality yarns at incredible prices! Would you like to use our patterns for other than personal use? You can read what you are allowed to do in the Copyright text at the bottom of all our patterns. Happy crafting!
Post a comment to pattern DROPS 190-4
We would love to hear what you have to say about this pattern!
If you want to leave a question, please make sure you select the correct category in the form below, to speed up the answering process. Required fields are marked *.