
Popular categories
Looking for a yarn?


Megjegyzések / Kérdések (206)
![]() Joanne írta:
Joanne írta:
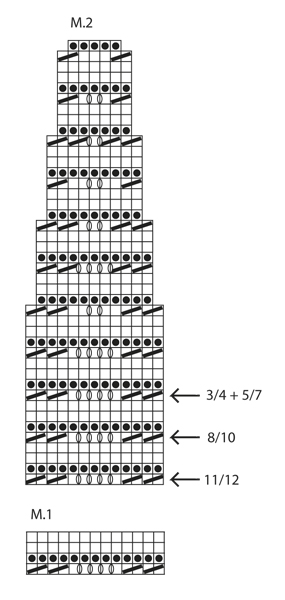
Hello thank you for this gorgeous pattern... i am lost because it says when completed diagram M2 95sts remain... there are no deductions i can see
18.06.2025 - 00:16A DROPS Design válasza:
Dear Joanne, you will decrease in each repeat of M.2 in width by working less yarn overs than you will decrease stitches, so that M.2 starts over 13 sts but ends with 5 sts only, so that you will have: 5 front band stitches + 17repeats 5 sts (85 sts) and 5 sts = 95 sts left. Happy knitting!
19.06.2025 - 10:01
![]() Reidun Ekornrød írta:
Reidun Ekornrød írta:
Skjønner ikke hvorfor en skal stoppe med 14 masker igjen, trodde det skulle være 5m på vær side til stolpe, kan du forklare det for meg,strikker den største størrelsen med 194
10.06.2025 - 10:12A DROPS Design válasza:
Hei Reidun, Første pinnen inkluderer felling av masker (2 rett sammen) for å redusere antall masker, ellers er hele pinnen strikket rett (vi anbefaler å legge opp for mange masker slik at oppleggingskanten ikke blir stram). Da har du 179 masker på pinnen og strikker 3 pinner til med rett. Etter det strikker du M.1 med 5 stolpemasker i hver side i riller. Hilsen Drops Team.
11.06.2025 - 06:52
![]() Christa írta:
Christa írta:
Wonder Wave Cardigan str 8/10år. Højre ærme: "fortsæt med M1-start i den 4. m I diag, talt fra højre, i str 8/10 år strikkes den første m ret..... Det har jeg gjort, og trevlet op igen, for mønsteret 'ligger' ikke korrekt ift 'tungekanten'?? ...men hvordan kan det også komme til at se ud som ryg/forstykke, når der på ærmet strikkes 6 r, 2 r sm, og på ryg-/forstykke strikkes 10r,2 r sm ?? Tak for forhåbentligt hurtigt svar! Vh Christa
07.06.2025 - 00:59A DROPS Design válasza:
Hej Christa, du strikker 6 r, 2 r sm for at få det rigtige antal masker før du starter med M.1 (i den 4.maske) :)
12.06.2025 - 08:23
![]() Lena Skålberg írta:
Lena Skålberg írta:
Ska sticka höger ärm, och precis börjat med M1. Undrar hur man gör med varvet början efter att man stickat ihop sista och första maskin. Var är början på varvet då? Var sätter man markören för början? Är ju noga att man gör rätt, så det funkar när man ska sticka på ärmen. Försökt räkna men snurrar bara runt. Tacksam för svar.
01.06.2025 - 14:19A DROPS Design válasza:
Hei Lena. Vi skal hjelpe deg så godt vi kan, men hvilken str. strikker du? mvh DROPS Design
02.06.2025 - 13:25
![]() Keshni Govender írta:
Keshni Govender írta:
How do I read the M2 graph that decreases for pattern R-030-bn
22.05.2025 - 13:50
![]() Keshni írta:
Keshni írta:
How do I read the M2 graph that decreases for pattern R-030-bn
22.05.2025 - 13:50A DROPS Design válasza:
Dear Mrs Keshni, read M.2 from the bottom up, from the right towards the left from RS and from the left towards the right from WS - start with the arrow matching the size; Do not hesitate to add markers between each repeat in width so that you can check and track number of stitches in each repeat all the row, especially when decreasing. Happy knitting!
22.05.2025 - 15:50
![]() Tanja írta:
Tanja írta:
Jeg er ved at strikke ryg- og forstykket. Når det måler ca. 18 cm skal jeg lukke af til ærmer. Når jeg måler fra pinden til nederste del af bølgen måler det 18 cm. Når jeg måler til øverste del af bølgen måler det 17 cm. Når jeg måler ved stolpemaskerne måler det 16. Hvilket mål skal jeg gå efter?
11.05.2025 - 13:15A DROPS Design válasza:
Hei Tanja. Ville ha målt fra den nederste delen av bølgemønstret. mvh DROPS Design
19.05.2025 - 13:13
![]() Bonaria Floris írta:
Bonaria Floris írta:
Buongiorno scusa se ti scrivo nuovamente ma vorrei capire come fare lo sprone e dove diminuire le maglie per arrivare a 115 grazie
24.04.2025 - 07:41A DROPS Design válasza:
Buongiorno Floris, le diminuzioni sono incluse nella lavorazione del diagramma. Buon lavoro!
24.04.2025 - 10:59
![]() Bonaria Floris írta:
Bonaria Floris írta:
Si ma non riesco a capire come diminuire per arrivare a 115 maglie grazie
23.04.2025 - 09:04A DROPS Design válasza:
Buongiorno Floris, deve seguire la legenda del diagramma: le diminuzioni si lavorano durante la lavorazione del diagramma. Buon lavoro!
24.04.2025 - 11:04
![]() Bonaria Floris írta:
Bonaria Floris írta:
Buonasera ho seguito le istruzioni ma non riesco a capire il diagramma M2 potrei avere la spiegazione come leggerlo grazie
22.04.2025 - 19:37A DROPS Design válasza:
Buongiorno Floris, il diagramma si legge dal basso verso l'alto, da desrea verso sinistra per i ferri di andata e da sinistra a destra per quelli di ritorno. La legenda è riportata poco sopra. Buon lavoro!
23.04.2025 - 08:30
|
|||||||||||||
Wonder Wave#wonderwavecardigan |
|||||||||||||
|
|
|||||||||||||
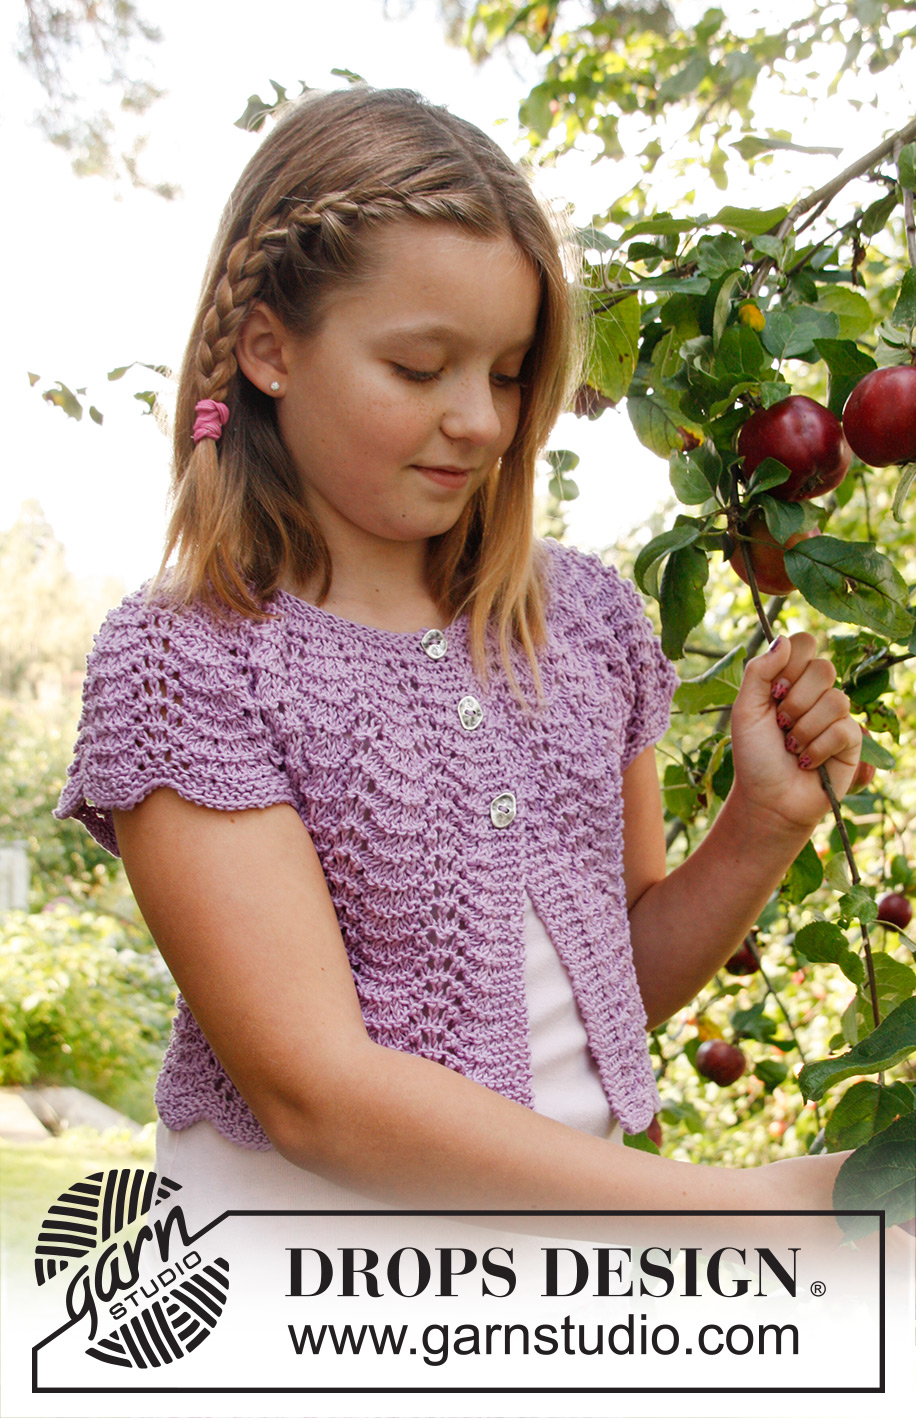
Kötött kardigán rövidujjakkal, hullámmintával és kerek vállrésszel "Muskat" fonalból. Méret: 3-12 éveseknek
DROPS Children 22-22 |
|||||||||||||
|
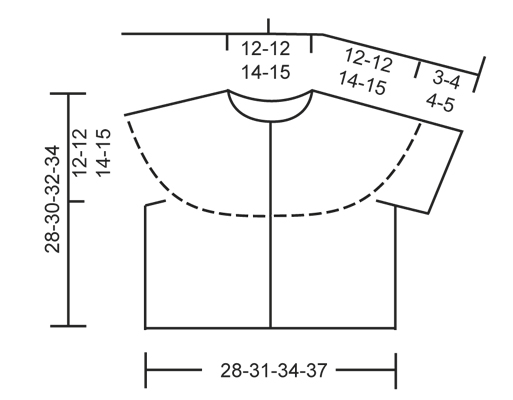
HULLÁMOS MINTA: Lásd az M.1 és M.2-es ábrát A diagram a minta minden sorát a színe oldal felől mutatja. LUSTAKÖTÉS (körkötőtűn/kéthegyű kötőtűkészleten körben kötve): *1 sima kör, 1 fordított kör, ismételjük a *-* közötti részt GOMBLYUKAK: A gomblyukakat a jobboldali gomboláspánton a színe oldal felől készítjük el. 1 gomblyuk= a szélétől számított harmadik és negyedik szemet kössük össze, majd a következő sorban az összekötött szemek fölött szedjünk fel egy új szemet. A gomblyukakat akkor készítsük el, amikor a darabunk: 3/4 éveseknek való mértben: 18, 23 és 27 cm-es / 7", 8 ¾" és 10½" 5/7 éveseknek való méretben: 20, 25 és 29 cm-es / 8", 9 ¾" és 10½" 8/10 éveseknek való méretben: 3, 10, 21, 27 és 31 cm-es / 8 ¼",1",4 12/1",12 4/4" és 11". 10/12 éveseknek való méretben 23, 29 és 33 cm-es / 9", 11½" és 13" MEGJEGYZÉS: Az utolsó gomblyukat akkor készítjük, amikor az M.2-es diagram mintáját megkötöttük. TESTRÉSZ: Körkötőtűn kötjük, oda-vissza az eleje közepétől kezdve. A kezdéshez lazán szedjünk fel 152-166-180-194-116 szemet (a két oldalon egy-egy szélszemmel együtt) az 4 mm-es körkötőtűre, a Muskat fonalból. A következő színe oldali sorban így kössük *10 sima, 2 szemet simán összekötünk*, ismételjük a *-* közötti részt, amíg 8-10-12-14 marad a sorban, ezeket a szemeket simán kötjük= 140-153-166-179 szem. Ezután kössünk 3 sort sima szemekkel oda-vissza. Folytassuk az M.1-es diagram mintájával, és a két oldalon 5-5 lustakötéses szemmel a teljes méretig. NE FELEDKEZZÜNK MEG A MEGFELELŐ KÖTÉSPRÓBA BETARTÁSÁRÓL! Amikor a darabunk körül-belül 16-18-18-19 cm-es, és egy sor maradt az M.1-es diagramból, aa következő fonákoldali sorban így haladjunk: Kössünk le 34-37-41-44 szemet, lazán láncoljunk le 7-7-6-6 szemet a karöltőhöz, kössünk 58-65-72-79 szemet, láncoljunk le 7-7-6-6 szemet a másik karöltőhöz, és kössük le a sor többi szemét (= 34-37-41-44 szem). Tegyük félre a darabot és kössük meg a két ujját. JOBB UJJA: Körben kötjük a kéthegyű kötőtűkészleten. A kezdéshez szedjünk fel 21-2256-59-74-74 szemet az 4 mm-es körkötőtűre, a Muskat fonalból. Az első körben így haladjunk: *6 sima sima, 2 szemet simán összekötünk*, ismételjük a *-* közötti részt, amíg 3-3-2-2 marad a sorban, ezeket a szemeket simán kötjük= 52-52-65-65 szem. Most 1 kör fordított, 1 kör sima, 1 kör fordított következik. Tegyünk kötésjelölőt a kötésbe a kör kezdeténél. Folytassuk a kötést az M.1-es diagram mintájával, a diagram 11., 1., 4., 7. szeménél kezdve a jobboldalról számolva (a 3/4 és 8/10 évesekre való méretnél az első szem sima, és a sor végén ezt a szemet kössük össze a kör utolsó szemével). Folytassuk a kötést a fenti módon, amíg a darabunk körülbelül 3-4-4-5 cm-es lesz (és egy sor van hátra az M.1-es diagram mintájából). A következő körben láncoljuk le az ELSŐ 6-6-7-7 szemet, és kössük le a sor többi részét=46-46-58-58 szem. BAL UJJA: Ugyanúgy kezdjük el és kötjük, mint a jobb ujját, de amikor a darabunk 3-4-4-5 cm-es a következő módon láncoljuk le a szemeket: A 3/4 és 8/10 évesekre való méretnél: láncoljuk le az ELSŐ 6-7 szemet a körben Az 5/7 és 11/12: évesekre való méretnél: láncoljuk le az UTOLSÓ 6-7 szemet a körben. (Ez azért fontos, hogy a minta kijöjjön a vállrészen). VÁLLRÉSZ: Csúsztassuk az ujjak szemeit ugyanarra a kötőtűre, amin a testrész szemei vannak, ahol a szemeket leláncoltuk a karöltőhöz=218-231-270-283 szem. MEGJEGYZÉS: Fontos, hogy ügyeljünk arra, hogy a jobb ujját a jobb oldalához illesszük be, a bal ujját pedig a bal oldalához, így a minta folyamatosan folytatódik. Folytassuk a kötést az M.2-es diagram mintájával - a megfelelő mérethez a kezdést nyíl jelöli) mindkét oldalon 5-5 lustakötéses szemmel (= 16-17-20-21 ismétlés körben). UGYANAKKOR, amikor a darabunk 18-20-21-23 cm-es, készítsük el a gomblyukakat- OLVASSUK EL A FENTI MAGYARÁZATOT A GOMBLYUKAK ELKÉSZÍTÉSÉHEZ! Amikor az M.2-es diagram mintájának minden sorát megkötöttük, 90-95-110-115 szem maradt a kötőtűnkön. A következő sort a színe oldalon így kössük: 5 sima (miközben az utolsó gomblyukat is elkészítjük a fent leírt módon), * 2 szemet simán összekötünk, 1 sima*. Ismételjük a *-* közötti részt, amíg 7-6-6-5 szem marad a körben, ezeket a szemeket simán kötjük =64-67-77-80 szem. Kössünk sima szemekkel 3-3-5-5 sort oda-vissza, majd simán láncoljunk le minden szemet a színe oldal felől. ÖSSZEÁLLÍTÁS: Varrjuk össze a nyílásokat az ujjak alatt, és varrjuk fel a gombokat. |
|||||||||||||
Diagram magyarázatok |
|||||||||||||
|
|||||||||||||
|
|||||||||||||
|
|||||||||||||
Elkészítette ezt a mintát?Akkor adja a képeihez a #dropspattern #wonderwavecardigan tageket, vagy küldje be a képet a #dropsfan galériába. Segítségre van szüksége a modell elkészítéséhez? 12 tutorial videót találhat, és egy kérdés/felelek részt, és még többet, ha a mintát megkeresi a garnstudio.com oldalán. © 1982-2025 DROPS Design A/S. Minden jog fenntartca. Ez a documentim, az összes részével védelem alatt áll. A weboldalunkon többet olvashat arról, hogy mit tehet és mit nem a mintáinkkal. |
|||||||||||||


Több mint 40 év tapasztalattal a kötés és horgolásminták tervezésében a DROPS Design az ingyenes minták egyik legszélesebb körű gyűjtemnyét kínálja az Interneten, 17 nyelvre fordítva. A mai nappal 314 katalógust 11822 mintát tudunk számon tartani a mintákból 11804 -t fordítottunk le magyarra (európai mértékegységekkel).
keményen dolgozunk azon, hogy a kötés és a horgolás világából a legjobbat hozzuk el, remek fonalakkal, hihetetlen árakon. Ha mintáinkat nemcsak személyes használatra szeretné használni, minden minta alján a Copyright szövegben olvashat arról, mit tehet s mit nem. Sikeres kézimunkázást!
Post a comment to pattern DROPS Children 22-22
Szívesen vesszük, ha megosztja velünk gondolatait erről a mintáról.
Ha kérdést szeretne feltenni, ügyeljen arra, hogy a megfelelő kategóriát válassza ki, így fegyorsíthatja a válaszadás folyamatát. Það verður að merkja við svæði merktri með *.