
Populaire categorieën
Op zoek naar garen?


Opmerkingen / Vragen (11)
![]() Pascale schreef:
Pascale schreef:
Je n’ai pas compris ce que voulait dire « 1er rang = sur l’envers », au début de l’ouvrage. Après réflexion, j’ai commencé par un rang envers. Et c’est au moment de tricoter en rond que j’ai compris. Donc j’ai dû défaire 2 rangs pour me retrouver dans le bon sens. Je regrette que les explications n’aient pas été plus détaillées, comme dans certains modèles. C’est la 1ère fois qu’elle je me retrouve bloquée avant même de commencer 😁
17.11.2022 - 07:57
![]() Rafael schreef:
Rafael schreef:
Hello again! Thanks for the immediate replies so far. Please could you elaborate on your last message as I am a beginner? My question is that I did put both pieces on the same needle and hence I have two tails. I will be using one of these tails to knit in the round but what am I supposed to do with the other tail?
24.06.2020 - 16:16DROPS Design antwoorde:
Dear Rafael, after you have worked first piece (back piece) and put aside, you can cut the yarn (you then just have to weave it in). Then you work front piece and you work both pieces together in the round with the same ball (= the one from front piece). Happy knititng!
24.06.2020 - 17:08
![]() Rafael schreef:
Rafael schreef:
Hello! According to pattern, I've done the front and back pieces of the poncho and now I am supposed to slip stc them together in the same needle. How do I do it? I've seen a couple of videos of what slip stc is but how do I to put them together? I'm a bit confused with that part. Should I slip stc the sides of each piece together? Should I to do something with the stics that were kept "alive"? Could someone guide me through? Thank you very much.
22.06.2020 - 18:25DROPS Design antwoorde:
Dear Rafael, work one row from Right side over stitches on front piece, then at the end of this row, work the stitches of back piece from right sided and, when the last of the stitches on back piece has been worked, insert a marker on the needle (= to mark beg of round) and work stitches on front piece = you have joined pieces in the round, continue now knitting all stitches (as before). Happy knitting!
23.06.2020 - 08:58
![]() Rafael schreef:
Rafael schreef:
Hello! In the pattern it says "leave it aside" about the front piece and the same goes for the back piece as well. Does that mean that I have to cast off the last row of each piece? Because later on pattern says that they need to be joined together with slip stitch. So I'm a bit confused. Thanks.
23.12.2019 - 12:49DROPS Design antwoorde:
Dear Rafael, the phrase +leave it (or put it) aside means that you should either leave the stitches on the needle and make the other pieces with another one, or put the stitches on a stitch holder or a piece of leftover yarn, while making the other bits. It is important that you dont bind off the stitches, but keep them "alive" so you can continue knitting them later. Happy Knitting!
24.12.2019 - 17:02
![]() Belén Ramón schreef:
Belén Ramón schreef:
Podría mandarme a que talla corresponde cada L o XL . Si la L corresponde a talla 46 o 48.... desgraciadamente varía depende de los fabricantes. Creo que sería muy útil. Gracias!!!!
04.12.2019 - 17:34DROPS Design antwoorde:
Hola Belen. Bajo cada modelo tienes un diagrama de la prenda con las medidas en cm, que es mejor orientación que las tallas. Ante de la duda entre dos tallas, siempre recomendamos elegir la talla más grande . No se puede concretar la correspondencia a las tallas porque esta varia dependiendo del país.
09.12.2019 - 23:54
![]() Rafael schreef:
Rafael schreef:
Hello! pattern suggets: "Work 3 rows in GARTER ST . K 1 row. " Could you please explain to me that? I know that garter st is a pattern rather than a technique and K stands for knit stitch which is the standard knitting stitch (i saw the videos that you also include here). My question is: Do I knit all stitches for the next 3 rows after casting on and then i knit 1 more row? or do i create 3 ridges through garter stitch, which essentially means to knit 6 rows and then knit 1 more row?
21.11.2019 - 19:49DROPS Design antwoorde:
Dear Rafael, you should in fact work 3 ridges (= knit 6 rows), then work one more row knitting all stitches, and on next row (8th row from the cast on), work in stocking stitch with 5 sts in garter stitch on each side. Pattern will be edited. Thank you, Happy knitting!
22.11.2019 - 08:07Ylva Forss schreef:
Jag beställde rundstickor nr 5, 40 cm ( trä, kantiga). De har inte kommit. Skulle komma v. 11. Jag har redan betalat dem.
21.03.2017 - 13:25DROPS Design antwoorde:
Hej Ylva. Du kan bedre kontakte butikken hvor du har bestilt for at höre hvor lang tid der gaar endnu.
21.03.2017 - 14:47YlvavForss schreef:
Håller på att sticka denna poncho och jag stickar slätstickning nerifrån, enl. instruktionerna skall jag börja sticka mönsterstickning då arbetet mäter 34 cm i mitt fall, men nu måste väl arbetet i sin helhet vara 15 + 34?
17.03.2017 - 18:23
![]() Claudia Carolina schreef:
Claudia Carolina schreef:
Mi affascina questo modello e il filato non l'ho ancora usato, sono molto curiosa e spero prossimamente sperimentare l'emozione "Neuquén". Grazie Drops per tanto spunti meravigliosi. Claudia
22.03.2016 - 11:46
![]() Claudia Carolina schreef:
Claudia Carolina schreef:
Mi affascina questo modello e il filato non l'ho ancora usato, sono molto curiosa e spero prossimamente sperimentare l'emozione "Neuquén". Grazie Drops per tanto spunti meravigliosi. Claudia
22.03.2016 - 11:46
|
|||||||||||||||||||
Neuqu |
|||||||||||||||||||
|
|
|||||||||||||||||||
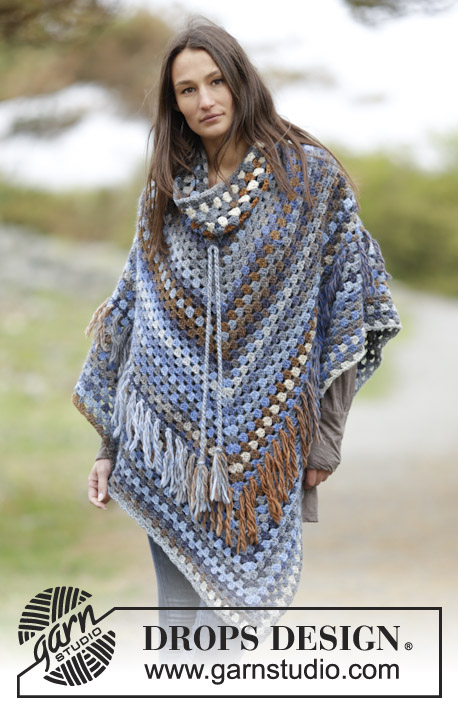
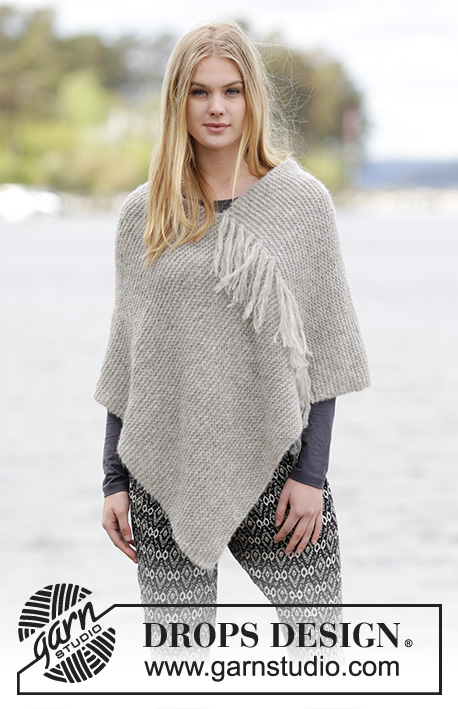
Gebreide DROPS poncho met Noors patroon van ”Nepal”. Maat: S - XXXL.
DROPS Extra 0-1164 |
|||||||||||||||||||
|
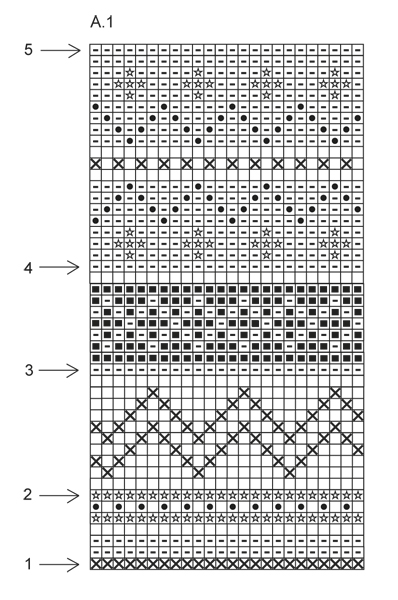
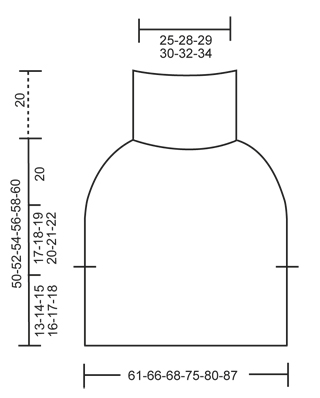
RIBBELST (heen en weer gebreid): Brei alle nld recht. 1 ribbel = 2 nld r. PATROON: Zie telpatroon A.1. Brei het hele patroon in tricotst in de rondte. TIP VOOR HET BREIEN: Om te voorkomen dat de stekenverhouding te strak wordt als u in patroon breit, is het belangrijk om de draden niet te strak aan te trekken aan de achterkant van het werk. Brei het patroon indien nodig met een grotere maat breinaalden als uw werk te strak wordt. TIP VOOR HET MINDEREN: Om uit te rekenen hoe vaak u moet minderen, deelt u het totale aantal st op de nld (bijv 264 st) door het aantal te minderen steken (bijv 32) = 8,25. Brei in dit voorbeeld ongeveer elke 7e en 8e st samen. TIP VOOR HET MEERDEREN: Meerder 1 st door 1 omsl te maken. Brei in de volgende nld de omsl gedraaid (dus brei in de achterste lus van de st). ---------------------------------------------------------- PONCHO: Brei heen en weer op de rondbreinld tot de split en brei dan verder in de rondte. ACHTERPAND (tot de split): Wordt heen en weer gebreid op de rondbreinld. Zet 106-114-118-130-138-150 st op met rondbreinld 5 mm en lichtgrijs. Brei 3 ribbels in RIBBELST - zie uitleg boven (1e nld = verkeerde kant). Brei 1 nld recht. Brei dan in tricotst met 5 st in ribbelst aan elke kant van het werk. DENK OM DE STEKENVERHOUDING! Minder bij een hoogte van 13-14-15-16-17-18 cm 1 kant st aan elke kant – pas zo aan dat de volgende nld aan de goede kant is = 104-112-116-128-136-148 st. Laat het werk rusten en brei het voorpand tot de split. VOORPAND (tot de split): Zet op en brei als het achterpand. LIJF: Wordt in de rondte gebreid. Zet de st van voorpand en achterpand op dezelfde rondbreinld = 208-224-232-256-272-296 st. Brei dan in tricotst en lichtgrijs tot het werk 30-32-34-36-38-40 cm meet. Brei dan in patroon in de rondte volgens telpatroon A.1 en minder TEGELIJKERTIJD in de nld gemarkeerd met pijl 1 in het telpatroon 6-8-8-10-10-12 st gelijkmatig - LEES TIP VOOR HET MINDEREN en TIP VOOR HET BREIEN = 202-216-224-246-262-284 st. Ga verder in patroon. Minder in de nld gemarkeerd met pijl 2 in het telpatroon 18-24-24-30-30-36 st gelijkmatig = 184-192-200-216-232-248 st. Ga verder in patroon. Minder in de nld gemarkeerd met pijl 3 in het telpatroon 32-32-32-36-44-48 st gelijkmatig = 152-160-168-180-188-200 st. Ga verder in patroon. Minder in de nld gemarkeerd met pijl 4 in het telpatroon 32-34-36-42-44-50 st gelijkmatig = 120-126-132-138-144-150 st. Ga verder in patroon. Minder in de nld gemarkeerd met pijl 5 in telpatroon (= laatste nld) 34-30-34-36-36-34 st gelijkmatig = 86-96-98-102-108-116 st. Brei 1 nld met lichtgrijs en meerder 4-6-4-6-6-4 st gelijkmatig - LEES TIP VOOR HET MEERDEREN = 90-102-102-108-114-120 st. Brei dan boordsteek in de rondte = 2 r/4 av op een korte rondbreinld. Kant losjes af met recht boven recht en averecht boven averecht als de halsboord ongeveer 20 cm meet. |
|||||||||||||||||||
Uitleg van het telpatroon |
|||||||||||||||||||
|
|||||||||||||||||||
 |
|||||||||||||||||||
 |
|||||||||||||||||||
Heeft u dit patroon gemaakt?Tag dan uw afbeeldingen met #dropspattern of stuur ze naar de #dropsfan galerij. Heeft u hulp nodig voor dit patroon?U vind 20 instructievideo's, een commentaar/vragengedeelte en nog veel meer, als u naar het patroon gaat op garnstudio.com © 1982-2026 DROPS Design A/S. Alle rechten voorbehouden. Op dit document, inclusief alle subdocumenten, rust copyright. Lees meer over wat u kunt doen met onze patronen onderaan elk patroon op onze site |
|||||||||||||||||||


Met meer dan 40 jaar ervaring in brei- en haakdesign biedt DROPS Design één van de meest uitgebreide collecties van gratis patronen aan op internet vertaald in 324 talen. Tot en met vandaag hebben wij 12290 boeken en 11997 patronen gepubliceerd.
Wij werken hard om u het beste van haken en breien te bieden; patronen, inspiratie, advies en natuurlijk garens van uitstekende kwaliteit voor de allerbeste prijzen! Wilt u onze patronen gebruiken voor meer dan privégebruik? U kunt lezen wat wel en niet is toegestaan is in de Copyright tekst, die u onderaan elk patroon kunt vinden. Veel handwerkplezier!
Laat een opmerking achter voor DROPS Extra 0-1164
Wij horen graag wat u vindt van dit patroon!
Wilt u een vraag stellen, kies dan de juiste categorie in het formulier hieronder om sneller een antwoord te krijgen. Verplichte velden zijn gemarkeerd met een *.