
Populaire categorieën
Op zoek naar garen?


Opmerkingen / Vragen (12)
![]() Clare schreef:
Clare schreef:
Hi, can you please let me know if this pattern can be updated to include larger sizes ? Like up to XXXL
21.01.2024 - 19:26
![]() Lynne Randall Caloggero schreef:
Lynne Randall Caloggero schreef:
I haven't begun to knit the project yet, but as I read through the instructions I'm wondering why it's necessary to shift M.1 half a pattern repeat to the right on every other row?
01.07.2020 - 15:30DROPS Design antwoorde:
Dear Mrs Randall Caloggero, you will displace the diagrams so that the flowers are note the one over each other but one flower will come over 2 from previous diagram. Happy knitting!
01.07.2020 - 15:43
![]() Debra schreef:
Debra schreef:
Hi, I have another question about the directions. I am working on the sleeve and am almost finished. I have cast off 10 sts mid underarm, ready to work back and forth on the needles. It says to decrease 6 sts 3 times on every other row. Where do I place these decreases- at the beginning, middle, end of row or equally spaced out across the row? Please clarify for me. Thanks for all your help so far.
20.06.2020 - 01:38DROPS Design antwoorde:
Dear Debra, after you have cast off 10 sts on mid under arm, you continue back and forth casting off (you don't decrease, pattern will be updated) 6 sts at the begining of every row on each side a total of 3 times (= 6 sts at the beg of next 6 rows). Happy knitting!
22.06.2020 - 07:37
![]() Debra schreef:
Debra schreef:
I am working on the sleeve and am questioning the instructions. Do I work M1 just once and then change to M2 as soon as it's completed or do I continue with M1 repeated several times until I have 122 sts and then switch to M2 once all 122 sts are made?
17.06.2020 - 19:41DROPS Design antwoorde:
Dear Debra, diagram M.1 is worked only one time in height (but around all stitches in the round - make sure to center a diagram mid on top of sleeve), then you work M.2 (both in width and height) to the end of sleeve. Happy knitting!
18.06.2020 - 09:37
![]() Debra schreef:
Debra schreef:
Thanks for your answer but I am still unsure about the meaning of decreasing 2 sts 2 times and 1 st 2 times. Is that all in one row and consecutively cast off. Why doesn't it just say cast off 6 stitches? Maybe I'm not understanding and making it more complicated than it is. Please help clear this up for me.
05.06.2020 - 18:08DROPS Design antwoorde:
Dear Debra, you don't cast off 6 sts 1 time to make the neck line somewhat rounded. You have to cast off the sts for neckline at the beg of row from neck towards armhole, then work row to the end, turn and work next row and repeat this 2 rows until all sts are cast off (you repeat these 2 rows 2 times casting off 2 sts at the beg of row then repeat 2 times castinf off 1 st at the beg of row). Happy knitting!
08.06.2020 - 07:35
![]() Debra schreef:
Debra schreef:
Can you give me more explicit details on how to shape the front neckline? I don't know what you mean by decrease 2 sts 2 times , 1 st 2 times. Are these all in the same row?How many stitches will I be decreasing in total? I assume I will be using the knit 2 together technique to do these decreases.
05.06.2020 - 02:08DROPS Design antwoorde:
Dear Debra, you first cast off the middle 41 sts for neck and finish each shoulder separately, at the beginning of every row from neck towards armhole (from RS on one shoulder, from WS on the other shoulder), you will cast off (will looks nicer than decrease): 2 sts 2 times and 1 stitch 2 times = you have cast off a total of 6 sts towards neck. Happy knitting!
05.06.2020 - 07:41
![]() Debra schreef:
Debra schreef:
Ughhh, I have already knitted one complete diagram as before the edits. Do you know if I can continue on pearling as the original pattern and just turn the garment inside out when finished so the knit side shows? Or is there a way to retread the stitches on the needle ? Or do I have to rip it all out and begin again? Please tell me what you think.
25.05.2020 - 23:14DROPS Design antwoorde:
Dear Debra, you could turn your work inside outside so that the knit side will be now towards outside (= from RS) and the purl side inside (from WS) - just do this at at the beg of the round - you might also continue working with purled sts outside and then just turn inside outside when dividing piece for armholes; Happy knitting!
26.05.2020 - 08:47
![]() Debra schreef:
Debra schreef:
Hi, Can you please give me some details as to how to shift the diagram half a pattern repeat to the right. Would I begin the rows on stitch 13 ? Thanks for your help.
24.05.2020 - 16:07DROPS Design antwoorde:
Dear Debra, when working the 2nd M.1 in height, you can start the round with the 13rd stitch and then repeat M.1 and finish round with the 12th stitch. On 3rd repeat, start again as before and continue like this. Happy knitting!
25.05.2020 - 09:53
![]() Debra schreef:
Debra schreef:
This pattern diagram is starting with a pearl row and the rose is done in knit stitch. Will this mean the right side of the sweater has the pearl side facing out? in the sweater photo, it looks like the main body is stocking stitch with the knitted side showing and the rose in pearls. Can you please help? Did I do something wrong to have the right side out showing pearl stitch?
23.05.2020 - 19:36DROPS Design antwoorde:
Dear Debra, diagram text has been reversed - it has been edited now, thanks for your feedback - a white square should be a K stitch and a small black square a P - Happy knitting!
25.05.2020 - 09:06
![]() Debra Briere schreef:
Debra Briere schreef:
I am confused with the instructions for the moss stitch pattern. It says to repeat second row but I am thinking it should say repeat these 2 rows of K1P1 over P1K1. Can you please clarify this for me?
22.05.2020 - 05:35DROPS Design antwoorde:
Hi Debra, Row 2 says to knit over purl and purl over knit, which is then repeated in the following rows - so all rows consist of knit over the previous row's purl and purl over the previous row's knit. I hope this helps and happy knitting!
22.05.2020 - 07:49
|
||||||||||
DROPS 29-22 |
||||||||||
|
|
||||||||||
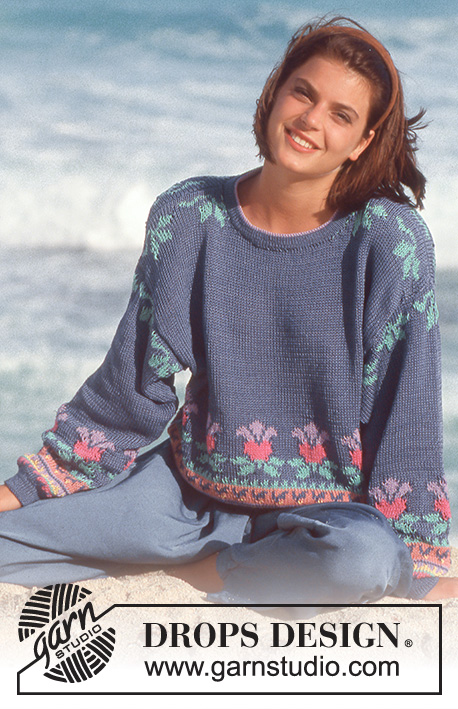
DROPS trui met bloemen in structuurpatroon van “Muskat”. Maat M.
DROPS 29-22 |
||||||||||
|
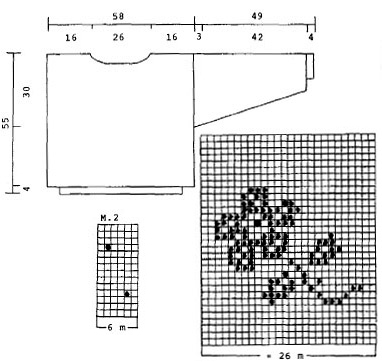
Patroon: Zie telpatroon M.1 tot en met M.4. De telpatronen geven de goede kant van het werk weer. Zowel de heengaande als de teruggaande naalden zijn weergegeven. Gerstekorrel: Nld 1: *1 st recht, 1 st av*, herhaal van *-* Nld 2: av boven recht en recht boven av. Herhaal de tweede nld. Lange versie: Vermeerder het materiaal met 100 gr. Vermeerder alle maten met 14 cm. Totale lengte = 69 cm. Voorpand en achterpand: Wordt in de rondte gebreid op de rondbreinld. Zet 188 st op met nld 2.5 en brei 4 cm gerstekorrel. Ga verder met nld 4 mm en meerder TEGELIJKERTIJD 46 st gelijkmatig in de eerste nld = 234 st. Brei steeds M.1, maar verschuif na iedere totale verticale herhaling van M.1 het patroon een halve patroonherhaling naar rechts. Denk om de stekenverhouding! Splits bij een hoogte van 25 cm het werk in twee en brei het voorpand en het achterpand apart verder. Voorpand: = 117 st. Kant bij een hoogte van 50 cm de middelste 41 st af voor de hals en minder voor de hals om de nld: 2 keer 2 st, 2 keer 1 st. Kant af bij een hoogte van 55 cm. Achterpand: = 117 st. Kant bij een hoogte van 53 cm de middelste 49 st af voor de hals en minder 2 st aan elke kant langs de hals in de volgende nld. Kant af als beschreven voor het voorpand. Mouw: Wordt in de rondte gebreid op breinld zonder knop. Zet 46 st op met breinld zonder knop 2.5 mm en brei 4 cm gerstekorrel. Ga verder met nld 4 mm en meerder TEGELIJKERTIJD 14 st gelijkmatig in de eerste nld = 60 st. Brei M.1 (zorg dat er een patroonherhaling netjes midden bovenop de mouw komt) en meerder tegelijkertijd 2 st midden onder de arm in totaal 31 keer elke 3e nld = 122 st (verwerk de gemeerderde st gaandeweg in het patroon). Ga na M.1 verder in M.2. Kant bij een hoogte van 46 cm 10 st af midden onder de arm en brei het werk verder heen en weer op de nld en minder voor de mouwkop om de nld: 3 keer 6 st. Kant af bij een hoogte van 49 cm. Afwerking: Naai de schoudernaden samen. Neem ongeveer 102 st op rond de hals met breinld zonder knop 2.5 mm en brei 4 nld gerstekorrel, kant dan alle st af. Haak een rand rond de hals met haaknld 3 mm als volgt: 1 v, *3 l, 1 stk in de eerste l, sla 2 st over, 1 v*, herhaal van *-*. Naai de mouwen in het lijf, naai in de buitenste lusjes van de st om een dikke naad te voorkomen. |
||||||||||
Uitleg van het telpatroon |
||||||||||
|
||||||||||
 |
||||||||||
Heeft u dit patroon gemaakt?Tag dan uw afbeeldingen met #dropspattern of stuur ze naar de #dropsfan galerij. Heeft u hulp nodig voor dit patroon?U vind 26 instructievideo's, een commentaar/vragengedeelte en nog veel meer, als u naar het patroon gaat op garnstudio.com © 1982-2026 DROPS Design A/S. Alle rechten voorbehouden. Op dit document, inclusief alle subdocumenten, rust copyright. Lees meer over wat u kunt doen met onze patronen onderaan elk patroon op onze site |
||||||||||


Met meer dan 40 jaar ervaring in brei- en haakdesign biedt DROPS Design één van de meest uitgebreide collecties van gratis patronen aan op internet vertaald in 324 talen. Tot en met vandaag hebben wij 12290 boeken en 11997 patronen gepubliceerd.
Wij werken hard om u het beste van haken en breien te bieden; patronen, inspiratie, advies en natuurlijk garens van uitstekende kwaliteit voor de allerbeste prijzen! Wilt u onze patronen gebruiken voor meer dan privégebruik? U kunt lezen wat wel en niet is toegestaan is in de Copyright tekst, die u onderaan elk patroon kunt vinden. Veel handwerkplezier!
Laat een opmerking achter voor DROPS 29-22
Wij horen graag wat u vindt van dit patroon!
Wilt u een vraag stellen, kies dan de juiste categorie in het formulier hieronder om sneller een antwoord te krijgen. Verplichte velden zijn gemarkeerd met een *.