
Populaire categorieën
Op zoek naar garen?


Opmerkingen / Vragen (91)
![]() Knitting Well Done schreef:
Knitting Well Done schreef:
Hello , I don't understand how to centered the diagram even if I follow the lesson... do you have a video that show exactly what to do to center it and make the sleeve? Thank you 👱🏻♀️
13.03.2022 - 11:29
![]() Vale schreef:
Vale schreef:
I'm so sorry to have to ask again but I don't understand: how can I decrease every 2,5 cm if there's a pattern? With 2 tog decrease, it will be deformed the pattern motif... I'm so confused .. I'm referring to this "When A.2 has been worked, continue with A.3. NOTE: Adjust pattern so that the middle st in diagram (see arrow) is one of the 2 middle sts on sleeve, AT THE SAME TIME beg dec under sleeve - remember DECREASE TIP" The decrease tip mean to knit just 2 stitches together?
20.02.2022 - 00:33DROPS Design antwoorde:
Dear Vale, if your tension is right in height, you should decrease approx. on every 7th round in size M = ca on every 2,5 cm; decrease as explained under DECREASE TIP , ie work until 3 sts remain before marker and decrease as shown in this video - the pattern will not match anymore at the transitions between rounds, that's just okay. Happy knitting!
21.02.2022 - 09:58
![]() Vale schreef:
Vale schreef:
I'm sorry to ask but: I don't understand how to decrease every 2,5 cm, if I have a pattern? If I decrease, the pattern will be deformed... also, what decrease I should do? (2 tog?) how? This is the pattern I'm referring: "When A.2 has been worked, continue with A.3. NOTE: Adjust pattern so that the middle st in diagram (see arrow) is one of the 2 middle sts on sleeve, AT THE SAME TIME beg dec under sleeve - remember DECREASE TIP" Thank you...seems difficult without a chart.
20.02.2022 - 00:29
![]() Vale schreef:
Vale schreef:
Sorry, I have problems again in the instructions " When A.2 has been worked, continue with A.3. NOTE: Adjust pattern so that the middle st in diagram (see arrow) is one of the 2 middle sts on sleeve, AT THE SAME TIME beg dec under sleeve - remember DECREASE TIP. Repeat dec every 3-2½-2½-2½-2½-2½ cm / 1 1/8"-7/8"-7/8"-7/8"-7/8"-7/8" 9-12-12" etc . I don't also understand how to adjust "pattern so that the middle st in diagram is one of the 2 middle". what mean? Please..help...
19.02.2022 - 15:30DROPS Design antwoorde:
Dear Vale, this lesson will explain you how to center a diagram. Happy knitting!
21.02.2022 - 09:17
![]() Pattern schreef:
Pattern schreef:
Sorry again but I don't understand the previously answer, in your comment says "you should increase a total of 60 sts in size L and get so 228", but I don't know what increase of 60 stitches is it exactly? Thank you again....
01.02.2022 - 17:29DROPS Design antwoorde:
Oops sorry, I mistyped, I meant you have 204 sts on the needle in size L - you now increase 24 sts evenly (this lesson explains how to increase evenly on a round), there are now 228 sts and you will repeat K2, P2 all the round - US-pattern will be edited asap. Happy knitting!
02.02.2022 - 07:34
![]() Patterns Difficult schreef:
Patterns Difficult schreef:
Hello, this pattern have a mistake in the Body instructions. Yesterday I had to try and try. I have 230 stitches and it says to "Continue to work rib as follows: * K 2, P 2 *, repeat from *-* until 2 sts remain, K 2. When rib has been worked for 4 cm / 1½'', bind off with K over K and P over P." But with 230 stitches, it will end with 2Kand start with 2K so I will have 4 K between the others 2k p2 2k p2 etc. What happened? Why 230 stitches?It's not an Even number to do ribbing...Thanks..
01.02.2022 - 12:22DROPS Design antwoorde:
Hi, it looks like there is a mistake in the US-English pattern, you should increase a total of 60 sts in size L and get so 228 sts and work K2 P2 over these 228 sts (= 57 times (K2,P2). thanks for noticing. Happy knitting!
01.02.2022 - 16:13
![]() Karine schreef:
Karine schreef:
Koon L suurust. Siis kui on vaja kududa varrukale mustrit A4 (5silmust) on silmuseid 48 3 simust jääb üle kuidas neid kududa?
03.01.2022 - 19:49DROPS Design antwoorde:
Tere Karine! Koo nii palju silmuseid mustrisse, kui mahub, ülejäänud nii, kuidas ilusam jääb. Head kudumist!
07.01.2022 - 21:55
![]() Val schreef:
Val schreef:
Sorry , I have to ask again, is it sure that decrease is "work until 3 sts remain before the marker this: K2 tog, K1, slip marker, K1, slip 1 as if to K, K1, psso, and work until 3 sts remain before next marker on the other side of the jumper and repeat the decrease.”" I see that in the psso passage, Should not be simply : slip marker, K1, slip 1 as if to K , and psso? Why K1 is repeated 2 times? the video tutorial says this only (not 2 times k2) : K1, slip 1 psso
14.12.2021 - 18:16DROPS Design antwoorde:
Dear Val, when working body you will decrease a total of 4 stitches on the round (= 2 sts decreased at each marker) / when working sleeve you will decrease that way only 2 sts (only 1 marker, mid under sleeve). Happy knitting!
15.12.2021 - 08:25
![]() Val schreef:
Val schreef:
Sorry >
14.12.2021 - 18:13
![]() Val schreef:
Val schreef:
Hello,I was able to adjust everything.I'm now again the beginning of the round, before start the dec tip. So, I hope this time I 've understood well: So I have to: knit the first 12 stitches, but before reach the first stitch marker of the round, 3 stitches before, I have to “work until 3 sts remain before the marker, K2 tog, K1, slip marker, K1, slip 1 as if to K, K1, psso, and work until 3 sts remain before next marker on the other side of the jumper and repeat. Right? Thank you again!
14.12.2021 - 17:43DROPS Design antwoorde:
Dear Val, looks right, I'm just wondering about the first 12 stitches, rounds were worked on yoke from mid back, so that you continue from mid back towards the side, and then work until 3 sts remain before 1st marker on the side and decrease etc.. But if you could find the sides of the jumper, it looks then fine, as the decreases are worked on each side (below sleeves). Happy knitting!
15.12.2021 - 07:55
|
||||||||||
Silver Stag#silverstagsweater |
||||||||||
 |
 |
|||||||||
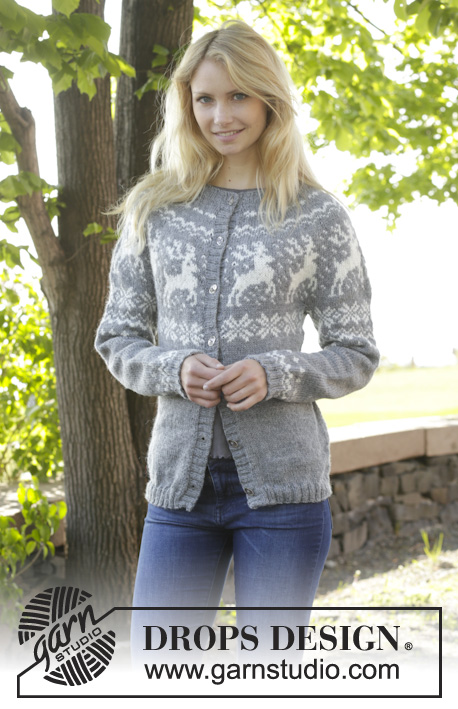
Gebreide DROPS trui / kersttrui met ronde pas, rendierpatroon, wordt van boven naar beneden gebreid van ”Karisma”. Maat: S - XXXL.
DROPS 157-23 |
||||||||||
|
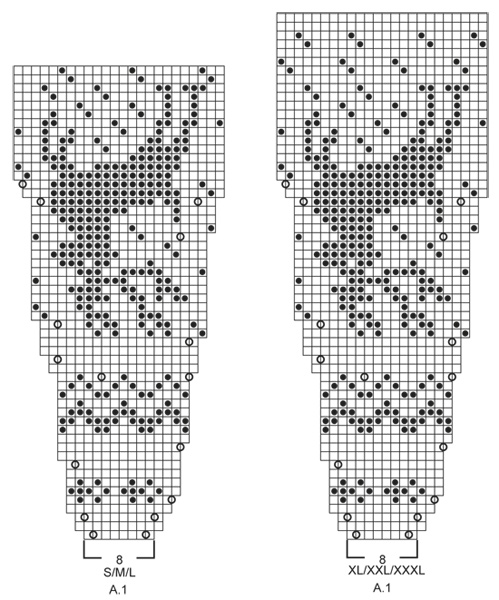
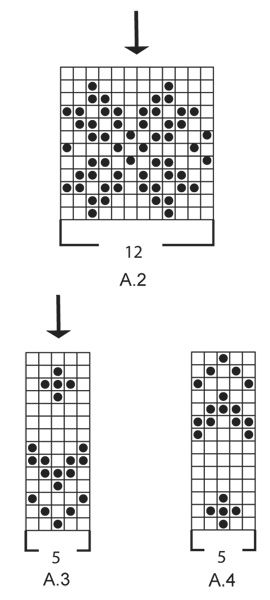
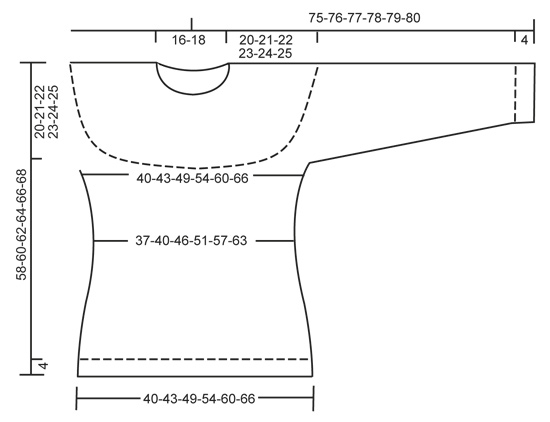
PATROON: Zie telpatronen A.1 tot en met A.4. De telpatronen laten het patroon aan de goede kant zien. De patronen worden in de rondte in tricotsteek gebreid. TIP VOOR HET MINDEREN (voor de zijkanten en de mouwen): Minder voor de markeerder en 1 st r als volgt: 2 r samen. Minder na de markeerder en 1 st r als volgt: 1 r afh, 1 r, afgeh st overh. TIP VOOR HET MEERDEREN (voor de zijkanten): Meerder 4 st in totaal op de nld. Brei tot er 1 st overblijft voor de markeerder, 1 omsl, 2 st in tricotst, 1 omsl = 2 st gemeerderd. Brei in de volgende nld de omsl gedraaid recht (dus brei achter in de steek in plaats van voor in de steek) om gaatjes te voorkomen. ---------------------------------------------------------- TRUI: Wordt in de rondte gebreid op de rondbreinld, van boven naar beneden. Brei de mouwen in de rondte op breinld zonder knop. PAS: Zet 88-92-96-100-104-108 st op met rondbreinld 3 mm en grijs. Brei boordsteek 2 av/2 r tot het werk 3 cm meet. Ga nu verder met rondbreinld 4 mm en brei 1 nld in tricotst en meerder TEGELIJKERTIJD 0-4-8-20-24-28 st gelijkmatig = 88-96-104-120-128-136 st. Brei nu als volgt: A.1 (= 8 st) 11-12-13-15-16-17 keer in de rondte. DENK OM DE STEKENVERHOUDING! Als A.1 een keer in de hoogte is gebreid staan er 264-288-312-360-384-408 st op de nld. Ga verder met 3-5-9-5-7-11 nld in grijs. LET OP: stop voor maat S, L, XL, XXXL 24 st (= 1 herhaling) voor de laatste nld klaar is. Dit is nu het begin van de volgende nld. Het patroon is nu juist geplaatst nadat de st zijn verdeeld voor lijf en mouwen. Brei de volgende nld als volgt: Brei de eerste 37-40-46-52-58-64 st (= helft achterpand), zet de volgende 58-64-64-76-76-76 st op een hulpdraad (= mouw), zet 10 nieuwe st op onder de mouw, plaats een markeerder in het midden tussen deze 10 st, brei de volgende 74-80-92-104-116-128 st (= voorpand), zet de volgende 58-64-64-76-76-76 st op een hulpdraad (= mouw), zet 10 nieuwe st op onder mouw, plaats een markeerder in het midden tussen deze 10 st, brei de overgebleven 37-40-46-52-58-64 st (= half achterpand). LIJF: Er zijn nu 168-180-204-228-252-276 st voor het lijf. Brei nu A.2 (= 12 st) over alle st op de nld. Ga zo verder tot A.2 een keer in de hoogte is gebreid. Brei het werk verder in tricotst met grijs. Minder in de volgende nld 1 st aan elke kant van elke markeerder aan de zijkanten - ZIE TIP VOOR HET MINDEREN. Herhaal dit minderen elke 2 cm nog 2 keer = 156-168-192-216-240-264 st. Meerder bij een hoogte van 12-13-14-15-16-17 cm vanaf de markeerder onder de mouwen en meerder 1 st aan elke kant van de markeerder aan elke zijkant van het werk – zie TIP VOOR HET MEERDEREN. Herhaal dit meerderen elke 2 cm nog 2 keer = 168-180-204-228-252-276 st. Ga bij een hoogte van 56-58-60-62-64-66 cm verder met rondbreinld 3 mm en meerder 20-24-24-28-28-32 st gelijkmatig = 188-204-228-256-280-308 st. Ga verder in boordsteek als volgt: * 2 r, 2 av *, herhaal van *-*. Kant als de boordsteek 4 cm meet af met recht boven recht en averecht boven averecht. MOUWEN: Brei eerst in patroon, ga dan verder in grijs. Zet de st van de hulpdraad terug op de breinld zonder knop 4 mm. Er zijn nu 58-64-64-76-76-76 st voor de mouw. Brei 1 nld in tricotst. Zet dan 10 st op onder de mouw = 68-74-74-86-86-86 st. Plaats een markeerder in het midden tussen deze nieuwe st. Brei dan de mouw in de rondte in tricotst. Brei nu A.2. LET OP: pas zo aan dat de 2 middelste st in het telpatroon (zie pijl) de 2 middelste st op de mouw zijn. Ga als A.2 klaar is verder met A.3. LET OP: pas het patroon zo aan dat de middelste st in het telpatroon (zie pijl) een van de 2 middelste st op de mouw is en begin TEGELIJKERTIJD met minderen onder de mouw - denk om de TIP VOOR HET MINDEREN. Herhaal dit minderen elke 3-2½-2½-2½-2½-2½ cm nog 9-12-12-12-12-12 keer = 48-48-48-60-60-60 st. Brei als de mouw 38 cm meet A.4. LET OP: pas zo aan dat de middelste st in het telpatroon (zie pijl) een van de 2 middelste st op de mouw is. Ga als A.4 een keer in de hoogte is gebreid verder met breinld zonder knop 3 mm en meerder 4-8-8-0-4-4 st gelijkmatig = 52-56-56-60-64-64 st. Brei dan 3 cm boordsteek (= 2 r/2 av). Kant af met recht boven recht en averecht boven averecht. AFWERKING: Naai de openingen onder de mouwen dicht. |
||||||||||
Uitleg van het telpatroon |
||||||||||
|
||||||||||
 |
||||||||||
 |
||||||||||
 |
||||||||||
Heeft u dit patroon gemaakt?Tag dan uw afbeeldingen met #dropspattern #silverstagsweater of stuur ze naar de #dropsfan galerij. Heeft u hulp nodig voor dit patroon?U vind 25 instructievideo's, een commentaar/vragengedeelte en nog veel meer, als u naar het patroon gaat op garnstudio.com © 1982-2026 DROPS Design A/S. Alle rechten voorbehouden. Op dit document, inclusief alle subdocumenten, rust copyright. Lees meer over wat u kunt doen met onze patronen onderaan elk patroon op onze site |
||||||||||


Met meer dan 40 jaar ervaring in brei- en haakdesign biedt DROPS Design één van de meest uitgebreide collecties van gratis patronen aan op internet vertaald in 324 talen. Tot en met vandaag hebben wij 12290 boeken en 11997 patronen gepubliceerd.
Wij werken hard om u het beste van haken en breien te bieden; patronen, inspiratie, advies en natuurlijk garens van uitstekende kwaliteit voor de allerbeste prijzen! Wilt u onze patronen gebruiken voor meer dan privégebruik? U kunt lezen wat wel en niet is toegestaan is in de Copyright tekst, die u onderaan elk patroon kunt vinden. Veel handwerkplezier!
Laat een opmerking achter voor DROPS 157-23
Wij horen graag wat u vindt van dit patroon!
Wilt u een vraag stellen, kies dan de juiste categorie in het formulier hieronder om sneller een antwoord te krijgen. Verplichte velden zijn gemarkeerd met een *.