
Populaire categorieën
Op zoek naar garen?


Opmerkingen / Vragen (12)
![]() Wilnellia Diep schreef:
Wilnellia Diep schreef:
I love all your patterns. Unfortunately I do not understand how to knit the neck warmer which seems to me easy at first. `could you give me every step until the end? I started by doing the top 2K2P First row 2nd row etc… when to increase … Thank you so much for your support
14.12.2024 - 21:41DROPS Design antwoorde:
Dear Wilnellia, you cast on stitches for the neck warmer. Then work 4 rounds in garter stitch. Continue in stocking stitch until piece measures 12 cm. Then you start slipping stitches to a thread: work and slip the first 4 stitches to one thread, work in stocking stitches until 4 stitches are left, work and slip the last 4 stitches to another thread. *Turn the piece, work and slip the new first 2 stitches to the thread on this side, work in stocking stitch until 2 stitches are left, work and slip the last 2 stitches to the thread on this side.* Repeat * to * until 1 stitch is left on the needle. Cut the yarn and place all stitches back on needle to continue working. Happy knitting!
15.12.2024 - 22:59
![]() Corina Avram schreef:
Corina Avram schreef:
Also, what should happen after the hat reaches 14-16cm? One should knit without increasing until 17-18 cm?
18.12.2023 - 13:11DROPS Design antwoorde:
Dear Mrs Avram, when piece measures 14 cm, increase one more time, then when piece measures 16 cm increase one last time (there are now 67-69 sts), then continue over these stitches until pieces measures 17-18 cm, then cast off. Happy knitting!
19.12.2023 - 07:31
![]() Corina Avram schreef:
Corina Avram schreef:
Hello, about the hat instructions: "When piece measures 9-10 cm, work in garter st over all sts AT THE SAME TIME on 1st row inc 4 sts evenly = 59-61 sts. Repeat inc when piece measures 14 and 16 cm = 67-69 sts on needle" Is the increase done on every row, RS and WS? My hat reached 69 stitches, but measures only 12 cm. Thanks :) Corina
18.12.2023 - 13:09DROPS Design antwoorde:
Dear Mrs Avram, increase on a row from right side (read how to increase evenly here); increase when hat measures 10 cm, then work until it measures 14 cm and increase evenly 4 sts, then work until it measures 16 cm and increase 4 sts evenly = there are 69 sts in total when piece measures 16 cm.. Cast off when it measures 18 cm. Happy knitting!
18.12.2023 - 16:21
![]() Diane Turcot schreef:
Diane Turcot schreef:
Pour le tour du cou, après que l'ouvrage mesure 12 cm, vous dites de le diviser, en deux? Donc 25 et 24 m. Pouvez-vous expliquer clairement la suite. Tricoter les mailles restantes? Combien, le reste des 25? Ensuite on tourne?Je ne comprends pas. SVP, aidez-moi, je veux le réussir. MERCI
26.10.2021 - 02:56DROPS Design antwoorde:
Bonjour Mme Turcot, vous divisez l'ouvrage pour le tricoter de ce moment en allers et retours (pas en rond) en jersey sur les aiguilles circulaires. Ce sont les rangs raccourcis. Regardez la video ICI. Pour la suite, suivez les explications. Bon tricot!
26.10.2021 - 17:21
![]() Helena schreef:
Helena schreef:
Sadly, I still don't understand the instructions for the neck warmer. Also, it always helps to state if the item is knitted top down or bottom up. It helps get a picture of the garment in the head. Hat in this pattern is great though - I knitted 4 of them. Pity about the neck warmer, unless you improve on the instructions.
22.11.2019 - 20:21DROPS Design antwoorde:
Dear Helena, the neck warmer is worked top down, first in the round, then with short rhows (leave first 4 sts then 2 sts unworked at the end of each row until the middle stitch remains on needle, then work in the round again for the last rounds. Happy knitting!
25.11.2019 - 08:11
![]() Helena schreef:
Helena schreef:
I have done countless knitting from your patterns and I really like everything you do. However, the instructios for this neck warmer are totally incomprehensible to me. I don't understand at all where to make a division and what stitches to put on a stitch holder and which ones to knit. Love the hat though.
05.10.2019 - 12:47DROPS Design antwoorde:
Dear Helena, work now in rows (short rows): work the first 4 sts and slip them on a thread, work to the end of the row, turn and work the first 4 sts and slip them on a thread, work to the end of the row (= 4 sts on each side are on a thread). Continue like this but slip the first 2 sts at the beg of each row -both from RS and from WS on a thread until 1 stitch remains (= middle stitch). Happy knitting!
07.10.2019 - 10:55
![]() Rosalba Di Salvio schreef:
Rosalba Di Salvio schreef:
Salve,io vorrei fare questo cappello per una taglia 58 cm e 60 cm vorrei farlo con i ferri circolari e il filato Big delight,perché preferisco lavorare in cerchio che con i ferri diritti e poi cucire alla fine,come devo fare? Grazie per l'aiuto
15.02.2019 - 21:05DROPS Design antwoorde:
Buongiorno Rosalba, per un aiuto così personalizzato può rivolgersi al suo rivenditore DROPS di fiducia. Buon lavoro!
17.02.2019 - 09:37
![]() Rosalba schreef:
Rosalba schreef:
Salve,io vorrei fare questo cappello per una taglia 58 cm e 60 cm vorrei farlo con i ferri circolari e il filato Big delight,perché preferisco lavorare in cerchio che con i ferri diritti e poi cucire alla fine,come devo fare? Grazie per l'aiuto
15.02.2019 - 18:47
![]() Isabelle schreef:
Isabelle schreef:
Que veut dire 1m lis au point mousse de chaque côté? Vous dite de continuée en jersey. Merci!
18.02.2018 - 20:27DROPS Design antwoorde:
Bonjour Isabelle, on continue en jersey mais la 1ère et la dernière maille va se tricoter à l'endroit tous les rangs (= mailles lisière pour la couture). Bon tricot!
19.02.2018 - 10:18
![]() Jacqueline Lhote schreef:
Jacqueline Lhote schreef:
Je ne comprends pas la division et le glissement des mailles pour le tour de cou
08.02.2015 - 18:51DROPS Design antwoorde:
Bonjour Mme Lhote, vous tricotez comme pour les rangs raccourcis en laissant non travaillées les mailles de chaque côté, puis reprenez toutes les mailles ensemble, en rond. Bon tricot!
08.02.2015 - 19:34
|
|
Eliana#elianaset |
|
|
|
|
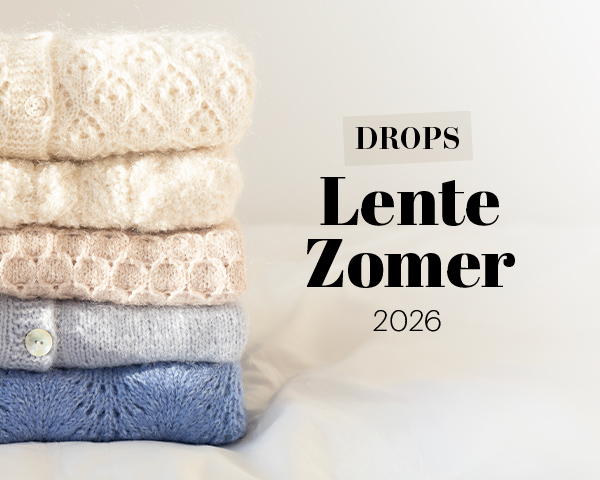
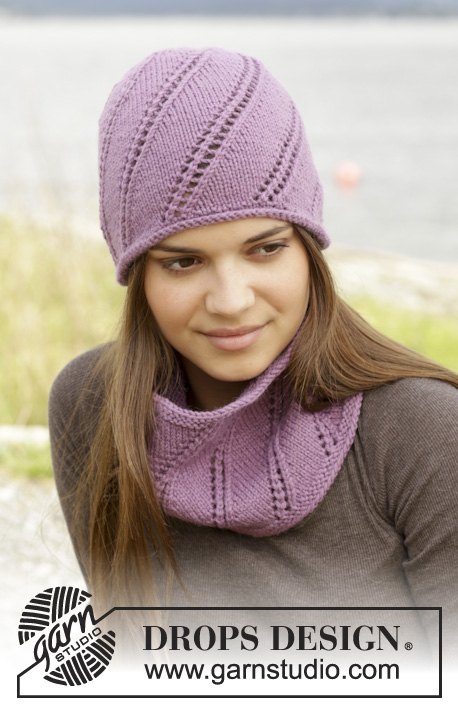
Gebreide DROPS muts en halswarmer in ribbelst en tricotst van ”Andes”.
DROPS 156-40 |
|
|
RIBBELST (heen en weer gebreid op de nld): Brei alle nld recht. 1 ribbel = 2 nld r. RIBBELST (in de rondte op de rondbreinld): * brei 1 nld recht en brei 1 nld av *, herhaal van *-*. 1 ribbel = 2 nld. ---------------------------------------------------------- MUTS: Brei heen en weer in RIBBELST - zie uitleg boven, van boven naar beneden Zet 9 st op met nld 8 mm en Andes. NLD 1 (en nld aan de verkeerde kant): brei alle st recht. NLD 2 (= goede kant): * 1 r, 1 omsl *, herhaal van *-* tot er 1 st overblijft, eindig met 1 r = 17 st. brei de omsl gedraaid r in de volgende nld (dus brei in de achterste lus van de st) om gaatjes te voorkomen. NLD 4 (= goede kant): * 2 r, 1 omsl *, herhaal van *-* tot er 1 st overblijft, eindig met 1 r = 25 st. NLD 6 (= goede kant): * 3 r, 1 omsl *, herhaal van *-* tot er 1 st overblijft, eindig met 1 r = 33 st. NLD 8 (= goede kant): * 4 r, 1 omsl *, herhaal van *-* tot er 1 st overblijft, eindig met 1 r = 41 st. NLD 10 (= goede kant): * r 5, 1 omsl *, herhaal van *-* tot er 1 st overblijft, eindig met 1 r = 49 st. NLD 12 (= goede kant): r st en meerder TEGELIJKERTIJD 6-8 st gelijkmatig (= na ongeveer elke 8-6 st) = 55-57 st. DENK OM DE STEKENVERHOUDING! Plaats 1 markeerder in het werk. MEET NU HET WERK VANAF HIER! Brei dan in tricotst met 1 kant st in ribbelst aan elke kant van het werk. Brei bij een hoogte van 9-10 cm in ribbelst over alle st en meerder TEGELIJKERTIJD in de 1e nld meerder 4 st gelijkmatig = 59-61 st. Herhaal dit meerderen bij een hoogte van 14 en 16 cm = 67-69 st op de nld. Kant af bij een hoogte van 17-18 cm. AFWERKING: Naai samen in de buitenste lusjes van de kant st. Rijg de draad aan de bovenkant op en neer door de st van de opzetrand, trek aan en zet vast. ---------------------------------------------------------- HALSWARMER: Wordt in de rondte gebreid op de rondbreinld. Zet 49 st op met rondbreinld 8 mm en Andes. Brei 2 ribbels in RIBBELST - zie uitleg boven. Brei in tricotst tot het werk 12 cm meet. DENK OM DE STEKENVERHOUDING! Splits nu het werk en brei heen en weer in tricotst als volgt: brei de eerste 4 st, zet ze dan op een hulpdraad, brei de overgebleven st, herhaal aan de andere kant van het werk. Er staan nu 4 st op een hulpdraad aan elke kant van het werk. Brei dan als volgt: * brei de eerste 2 st, zet ze dan op een hulpdraad, brei de overgebleven st *, herhaal van *-* elke nld. Dus zet 2 st op een hulpdraad aan elke kant van het werk op deze 2 nld. Ga zo verder tot er 1 st overblijft op de nld (= middelste st). Knip de draad af. Zet alle st nu terug op de rondbreinld = 49 st. Brei nu in de rondte op de rondbreinld vanaf middenachter. Brei als volgt: * 1 av, 1 omsl *, herhaal van *-* tot de middelste st (= 24 keer), 1 av, * 1 omsl, 1 av *, herhaal van *-* de hele nld (= 24 keer) = 97 st. Brei 1 nld recht, brei de omsl gedraaid r. Brei dan 1 ribbel over alle st en meerder TEGELIJKERTIJD in de 1e nld door een omsl te maken na de eerste 1 st, aan elke kant van de middelst st (dus 48 st aan elke kant) en 1 omsl voor de laatste st op de nld = 101 st op de nld. Kant losjes alle st af. |
|
Heeft u dit patroon gemaakt?Tag dan uw afbeeldingen met #dropspattern #elianaset of stuur ze naar de #dropsfan galerij. Heeft u hulp nodig voor dit patroon?U vind 23 instructievideo's, een commentaar/vragengedeelte en nog veel meer, als u naar het patroon gaat op garnstudio.com © 1982-2026 DROPS Design A/S. Alle rechten voorbehouden. Op dit document, inclusief alle subdocumenten, rust copyright. Lees meer over wat u kunt doen met onze patronen onderaan elk patroon op onze site |


Met meer dan 40 jaar ervaring in brei- en haakdesign biedt DROPS Design één van de meest uitgebreide collecties van gratis patronen aan op internet vertaald in 324 talen. Tot en met vandaag hebben wij 12290 boeken en 11997 patronen gepubliceerd.
Wij werken hard om u het beste van haken en breien te bieden; patronen, inspiratie, advies en natuurlijk garens van uitstekende kwaliteit voor de allerbeste prijzen! Wilt u onze patronen gebruiken voor meer dan privégebruik? U kunt lezen wat wel en niet is toegestaan is in de Copyright tekst, die u onderaan elk patroon kunt vinden. Veel handwerkplezier!
Laat een opmerking achter voor DROPS 156-40
Wij horen graag wat u vindt van dit patroon!
Wilt u een vraag stellen, kies dan de juiste categorie in het formulier hieronder om sneller een antwoord te krijgen. Verplichte velden zijn gemarkeerd met een *.