The yarn cost is calculated from the pattern’s smallest size and the yarn’s cheapest product type. Looking for an even better price? You might find it on the DROPS Deals!
-------------------------------------------------------
Alternative Yarn – See how to change yarns here
Yarn Groups A to F – Use the same pattern and change the yarn here
Yarn usage using an alternative yarn – Use our yarn converter here
-------------------------------------------------------
The yarn cost is calculated from the pattern’s smallest size and the yarn’s cheapest product type. Looking for an even better price? You might find it on the DROPS Deals!
This pattern has been corrected. Click here to see the correction/s.
All measurements in charts are in cm.
= knit with light grey blue | |
= knit with off white | |
= knit with black | |
= knit with pistachio | |
= knit with cerise | |
= between 2 stitches make 1 yarn over, knit yarn over twisted on next round. It should not make a hole. |
Each of our patterns has specific tutorial videos to help you.
These step-by-step tutorials might also help you:
Why is the knitting/crochet tension so important?
Knitting tension is what determines the final measurements of your work, and is usually measured per 10 x 10 cm. It is provided like so: number of stitches in width x number of rows in height - eg: 19 stitches x 26 rows = 10 x 10 cm.
The knitting tension is very individual; some people knit/crochet loosely while others work tightly. You adjust the knitting tension with the needle size, which is why the suggested needle size only serve as a guide! You need to adjust this (up or down) to ensure that YOUR knitting tension matches the knitting tension provided in the pattern. If you work with a different knitting tension than provided you will have a different yarn consumption, and your work will have different measurements than what the pattern suggests.
The knitting tension also determines which yarns can replace each other. As long as you achieve the same knitting tension you can replace one yarn with another.
See DROPS lesson: How to measure your tension/gauge
See DROPS video: How to make a gauge tension swatch
How do I know how many balls of yarn I need?
The required amount of yarn is provided in grams, eg: 450 g. To calculate how many balls you’ll need you first need to know how many grams are in 1 ball (25g, 50g or 100g). This information is available if you click on the individual yarn quality on our pages. Divide the amount required with the amount of each ball. For example, if each ball is 50g (the most common amount), the calculation will be as follows: 450 / 50 = 9 balls.
Can I use a different yarn than what the pattern suggests?
The important thing when changing from one yarn to another is that the knitting/crochet tension remains the same. This is so that the measurements of the finished piece will be the same as on the sketch provided. It is easier to achieve the same knitting tension using yarns from the same yarn group. It is also possible to work with multiple strands of a thinner yarn to achieve the knitting tension of a thicker one. Please try our yarn converter. We recommend you to always work a test swatch.
Please NOTE: when changing yarn the garment might have a different look and feel to the garment in the photo, due to individual properties and qualities of each yarn.
See DROPS lesson: Can I use a different yarn than the one mentioned in the pattern?
What are the yarn groups?
All our yarns are categorised into yarn groups (from A to F) according to thickness and knitting tension – group A contains the thinnest yarns and group F the thickest. This makes it easier for you to find alternative yarns to our patterns, should you wish to switch yarn. All yarns within the same group have a similar knitting tension and can easily replace each other. However, different yarn qualities have different structures and properties which will give the finished work a unique look and feel.
How do I use the yarn converter?
At the top of all our patterns you’ll find a link to our yarn converter, which is a helpful tool should you wish to use a different yarn than suggested. By filling in the yarn quality you wish to replace, the amount (in your size) and number of strands, the converter will present good alternative yarns with the same knitting tension. Additionally it will tell you how much you’ll require in the new qualities and whether you’ll need to work with multiple strands. Most skeins are 50g (some are 25g or 100g).
If the pattern is worked with multiple colours, every colour will have to be converted separately. Similarly, if the pattern is worked with several strands of different yarns (for example 1 strand Alpaca and 1 strand Kid-Silk) you will have to find alternatives for each, individually.
Why do you show discontinued yarns in the patterns?
Since different yarns have different qualities and textures we have chosen to keep the original yarn in our patterns. However, you can easily find options among our available qualities by using our yarn converter, or simply pick a yarn from the same yarn group.
It is possible that some retailers still have discontinued yarns in stock, or that someone has a few skeins at home that they would like to find patterns for.
The yarn converter will provide both alternative yarn as well as required amount in the new quality.
What size should I knit?
If you think it's hard to decide what size to make, it can be a good idea to measure a garment you own already and like the size of. Then you can pick the size by comparing those measures with the ones available in the pattern's size chart.
You'll find the size chart at the bottom of the pattern.
See DROPS lesson: How to read size chart
Why do I get the wrong knitting tension with the suggested needle size?
The needle size provided in the pattern serves only as a guide, the important thing is to follow the knitting tension. And since knitting tension is very individual, you will have to adjust the needle size to ensure that YOUR tension is the same as in the pattern – maybe you’ll have to adjust 1, or even 2 needle sizes, up or down to achieve the correct tension. For this, we recommend that you work test swatches.
Should you work with a different knitting tension than the one provided, the measurements of the finished garment might deviate from the measurement sketch.
See DROPS lesson: How to measure your tension/gauge
See DROPS video: How to make a gauge tension swatch
Why is the pattern worked top-down?
Working a garment top-down provides more flexibility and room for personal adjustment. For example it is easier to try the garment on while working, as well as making adjustments to length of yoke and shoulder caps.
The instructions are carefully explaining every step, in the correct order. Diagrams are adjusted to the knitting direction and are worked as usual.
How do I work according to a knitting diagram?
The diagram depicts all rows/rounds, and every stitch seen from the right side. It is read from bottom to top, from right to left. 1 square = 1 stitch.
When working back and forth, every other row is worked from the right side and every other row is worked from the wrong side. When working from the wrong side, the diagram will have to be worked reversed: from left to right, knit stitches are purled, purl stitches are knit etc.
When working in the round every round is worked from the right side and the diagram are worked from right to left on all rounds.
See DROPS lesson: How to read knitting diagrams
How do I work according to a crochet diagram?
The diagram depicts all rows/rounds, and every stitch seen from the right side. It is worked from bottom to top, from right to left.
When working back and forth every other row is worked from the right side: from right to left and every other row is worked from the wrong side: from left to right.
When working in the round, every row in the diagram are worked from the right side, from right to left.
When working a circular diagram you start in the middle and work your way outwards, counter clockwise, row by row.
The rows usually start with a given number of chain stitches (equivalent to the height of the following stitch), this will either be depicted in the diagram or explained in the pattern.
See DROPS lesson: How to read crochet diagrams
How do I work several diagrams simultaneously on the same row/round?
Instructions for working several diagrams after each other on the same row/round, will often be written like so: “work A.1, A.2, A.3 a total of 0-0-2-3-4 times". This means you work A.1 once, then A.2 is worked once, and A.3 is repeated (in width) the number of times provided for your size – in this case like so: S = 0 times, M = 0 times, L=2 times, XL= 3 times and XXL = 4 times.
The diagrams are worked as usual: begin with the first row in A.1, then work the first row in A.2 etc.
See DROPS lesson: How to read knitting diagrams
See DROPS lesson: How to read crochet diagrams
Why are the sleeves shorter in larger sizes?
The total width of the garment (from wrist-to-wrist) will be larger in the larger sizes, despite the actual sleeves being shorter. The larger sizes have longer sleeve caps and wider shoulders, so there will be a good fit in all sizes.
Where on the garment is the length measured?
The measurement sketch/schematic drawing provides information regarding the full length of the garment. If it’s a jumper or a jacket the length is measured from the highest point on the shoulder (usually closest to the neckline), and straight down to the bottom of the garment. It is NOT measured from the tip of shoulder. Similarly, the length of yoke is measured from the highest point on the shoulder and down to where yoke is split into body and sleeves.
See DROPS lesson: How to read a schematic drawing
What is a repeat?
Diagrams are often repeated on the round or in height. 1 repeat is the diagram the way it appears in the pattern. If it says to work 5 repeats of A.1 in the round, then you work A.1 a total of 5 times after/next to each other in the round. If it says to work 2 repeats of A.1 vertically/in height you work the entire diagram once, then begin again at the start and work the entire diagram one more time.
Why does the piece start with more chain stitches than it’s worked with?
Chain stitches are slightly narrower than other stitches and to avoid working the cast-on edge too tight, we simply chain more stitches to begin with. The stitch count will be adjusted on the following row to fit the pattern and measurement sketch.
Why increase before the rib edge when the piece is worked top-down?
The rib edge is more elastic and will contract slightly compared to, for example, stocking stitch. By increasing before the rib edge, you avoid a visible difference in width between the rib edge and the rest of the body.
Why increase in the cast-off edge?
It’s very easy to cast off too tightly, and by making yarn overs while casting off (and simultaneously casting these off) you avoid a too tight cast off edge.
See DROPS video: How to bind off with yarn overs (yo)
How do I increase/decrease on every 3rd and 4th row/round alternately?
To achieve an even increase (or decrease) you can increase on, for example: every 3rd and 4th row alternately, like so: work 2 rows and increase on the 3rd row, work 3 rows and increase on the 4th. Repeat this until the increase is complete.
See DROPS lesson: Increase or decrease 1 st on every 3rd and 4th row alternately
How can I work a jacket in the round instead of back and forth?
Should you prefer to work in the round instead of back and forth, you may of course adjust the pattern. You’ll need to add steeks mid-front (usually 5 stitches), and follow the instructions. When you would normally turn and work from the wrong side, simply work across the steek and continue in the round. At the end you’ll cut the piece open, pick up stitches to work bands, and cover the cut edges.
See DROPS video: How to knit steeks and cut open
Can I work a jumper back and forth instead of in the round?
Should you prefer to work back and forth instead of in the round, you may of course adjust the pattern so you work the pieces separately and then assemble them at the end. Divide the stitches for the body in 2, add 1 edge stitch in each side (for sewing) and work the front and back pieces separately.
See DROPS lesson: Can I adapt a pattern for circular needles into straight needles?
Why is the pattern slightly different than what I see in the photo?
Pattern repeats can vary slightly in the different sizes, in order to get the correct proportions. If you’re not working the exact same size as the garment in the photo, yours might deviate slightly. This has been carefully developed and adjusted so that the complete impression of the garment is the same in all sizes.
Make sure to follow instructions and diagrams for your size!
How do I make a women’s size garment into a men’s size one?
If you have found a pattern you like which is available in women’s size it’s not very difficult to convert it to men’s size. The biggest difference will be the length of sleeves and body. Start working on the women size that you think would fit across the chest. The additional length will be worked right before you cast off for the armhole/sleeve cap. If the pattern is worked top-down you can add the length right after the armhole or before the first decrease on sleeve.
Regarding additional yarn amount, this will depend on how much length you add, but it is better with a skein too many than too few.
How do I prevent a hairy garment from shedding?
All yarns will have excess fibres (from production) that might come off as lint or shedding. Brushed yarns (ie hairier yarns) have more of these loose, excess fibres, causing more shedding.
Shedding also depends on what is worn under or over the garment, and whether this pulls at the yarn fibres. It’s therefore not possible to guarantee that there will be no shedding
Below are some tips on how to get the best result when working with hairier yarns:
1. When the garment is finished (before you wash it) shake it vigorously so the looser hairs come off. NOTE: do NOT use a lint roller, brush or any method that pulls at the yarn.
2. Place the garment in a plastic bag and put it in your freezer - the temperature will cause the fibres to become less attached to each other, and excess fibres will come off easier.
3. Leave in the freezer for a few hours before taking it out and shaking it again.
4. Wash the garment according to the instructions on the yarn label.
Why does my garment pill?
Pilling is a natural process that happens to even the most exclusive of fibers. It's a natural sign of wear and tear that is hard to avoid, and that is most visible in high friction areas of your garment like a sweater's arms and cuffs.
You can make your garment look as new by removing the pilling, using a fabric comb or a pill/lint remover.
Lamb Dance Sweater |
|||||||||||||||||||
|
|
||||||||||||||||||
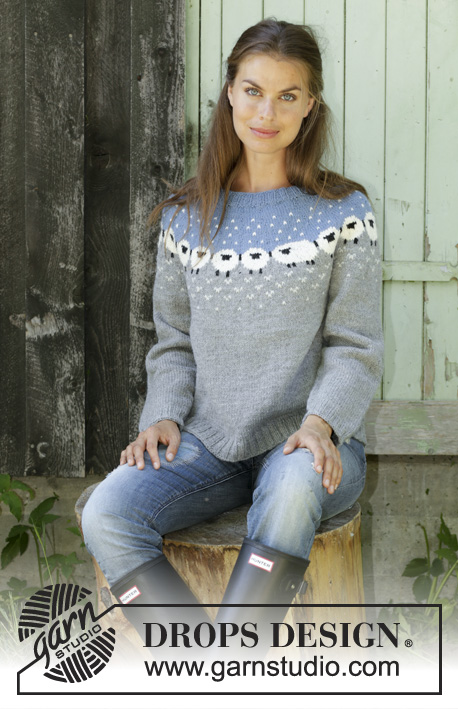
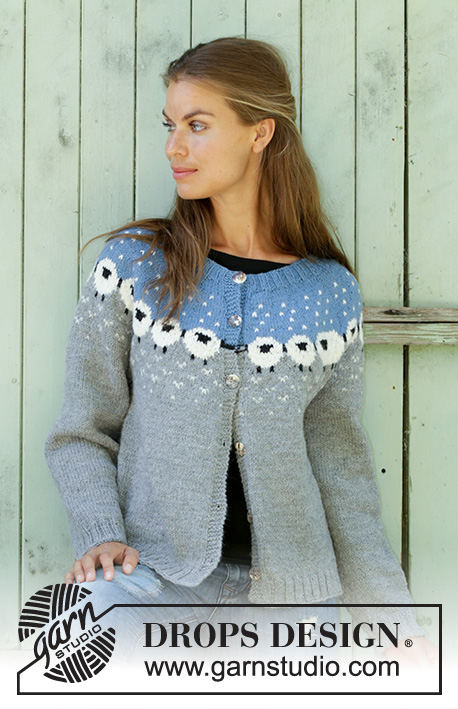
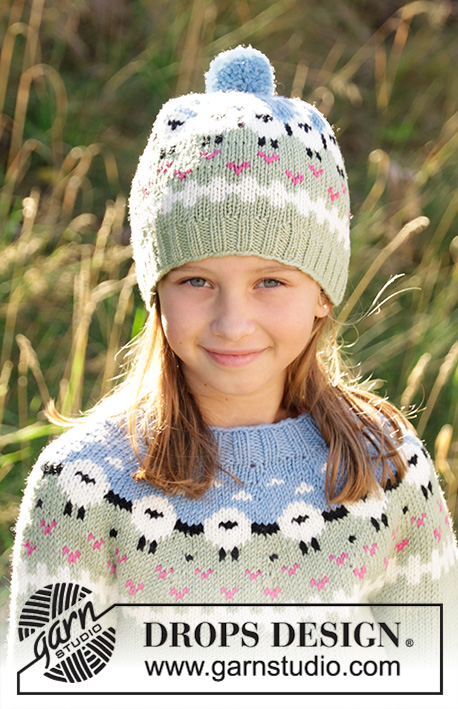
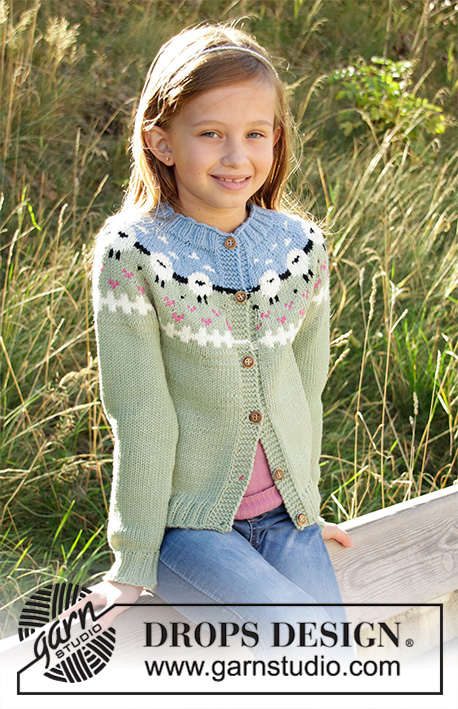
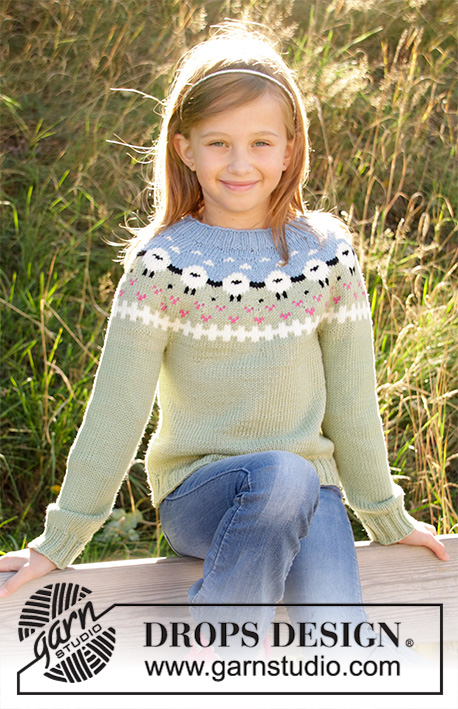
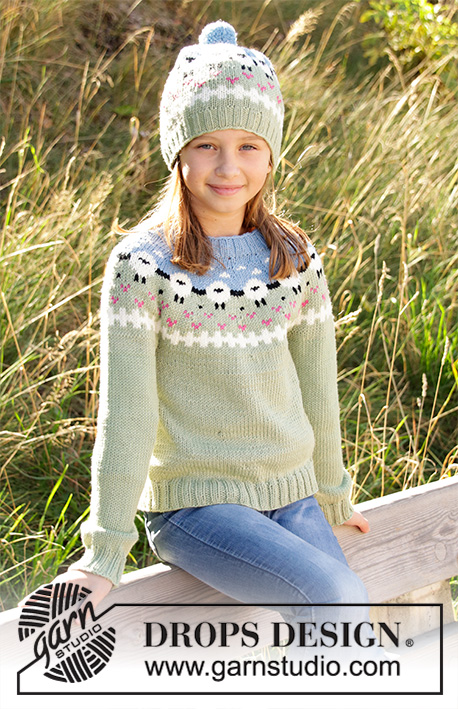
Knitted sweater for kids in DROPS Merino Extra Fine or DROPS Lima. Piece is knitted top down with sheep, color pattern, ribs and stockinette stitch. Size 3-12 years
DROPS Children 34-3 |
|||||||||||||||||||
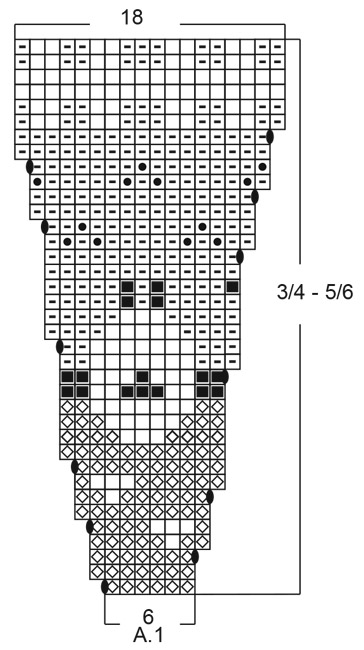
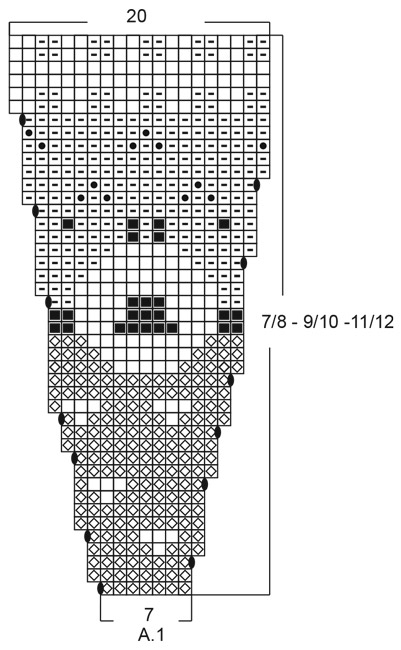
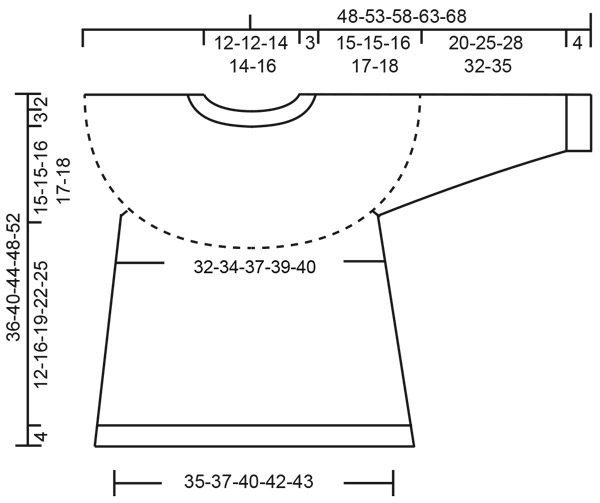
---------------------------------------------------------- EXPLANATION FOR THE PATTERN: ---------------------------------------------------------- PATTERN: See diagrams A.1. Choose diagram for your size. Diagrams show all rows in pattern seen from the right side. DECREASE/INCREASE TIP (evenly): To calculate how to decrease evenly, use the total number of stitches on round (e.g. 84 stitches) and divide stitches by number of decreases to be done (e.g. 7) = 12. In this example decrease by knitting every 11th and 12th stitch together. To increase use the same calculation but make instead a yarn over after every 12th stitch. Knit yarn overs twisted on next round to avoid holes. INCREASE TIP-2 (applies to sides of body): Work until 1 stitch remains before marker thread, 1 yarn over, knit 2 (marker thread is in the middle of these stitches), 1 yarn over = 2 stitches increased. On next round work yarn over twisted to avoid hole. Then work the new stitches in stockinette stitch. DECREASE TIP-2 (applies to sleeves): Decrease 1 stitch on each side of marker thread as follows: Work until 3 stitches remain before marker thread, knit 2 together, knit 2 stitches (marker thread is between these stitches), slip 1 stitch knitwise, knit 1, pass slipped stitch over stitch worked = 2 stitches decreased. ---------------------------------------------------------- START THE PIECE HERE: ---------------------------------------------------------- SWEATER - SHORT OVERVIEW OF THE PIECE: Worked in the round on circular needle, top down. When dividing for sleeves, work body in the round on circular needle, work sleeves in the round on double pointed needles/short circular needle. YOKE: Cast on 80-84-96-108-112 stitches on circular needle size 3 mm = US 2,5 with light grey blue. Join to work in the round and work 1 round in stockinette stitch. Work rib in the round with knit 2/purl 2 for 3 cm = 1⅛" (neck edge). Switch to circular needle size 4 mm = US 6. Work 1 round in stockinette stitch while decreasing 14-12-12-17-14 stitches evenly - read DECREASE/INCREASE TIP = 66-72-84-91-98 stitches. Then work according to diagram A.1, work diagram 11-12-12-13-14 times on round. NOTE: Choose diagram for correct size. REMEMBER THE KNITTING GAUGE! When entire A.1 has been worked there are 198-216-240-260-280 stitches on round. On next round work with pistachio and stockinette stitch and increase 14-8-2-2-2 stitches evenly on round = 212-224-242-262-282 stitches. Continue with pistachio and in stockinette stitch until piece measures approx. 18-18-19-20-21 cm = 7"-7"-7½"-8"-8¼" from cast-on edge. Work next round as follows: Knit 62-64-70-77-79 stitches (= back piece), slip the next 44-48-51-54-62 stitches on a stitch holder (= sleeve), cast on 6 new stitches under sleeve, work 62-64-70-77-79 stitches in stockinette stitch (= front piece), slip the next 44-48-51-54-62 stitches on a new stitch holder (= sleeve), cast on 6 new stitches under sleeve. BODY: There are now 136-140-152-166-170 stitches on round. NOW MEASURE PIECE FROM HERE! Insert 1 marker thread in the middle of the 6 new stitches cast on. Continue in stockinette stitch and pistachio. When piece measures 3 cm = 1⅛", increase 1 stitch on each side of each marker (= 4 stitches increased) - read INCREASE TIP-2! Repeat increase 1 more time after 4 cm = 1½" = 144-148-160-174-178 stitches on needle. Work until piece measures approx. 12-16-19-22-25 cm (or to desired length, there is approx. 4 cm = 1½" until finished measurements). . Work 1 round in stockinette stitch and increase 12-12-12-10-10 stitches evenly = 156-160-172-184-188 stitches. Switch to circular needle size 3 mm = US 2,5 and work rib with knit 2/purl 2. Work rib for 4 cm = 1½". Loosely bind off stitches with knit over knit and purl over purl. Cut and fasten the yarn. SLEEVE: Slip stitches from on stitch holder back on a short circular needle/double pointed needles size 4 mm = US 6 (= 44-48-51-54-62 stitches), pick up 1 stitch in each of the 6 stitches cast on on body (= 50-54-57-60-68 stitches). Insert 1 marker thread in the middle of these 6 stitches. Work in stockinette stitch in the round until sleeve measures 2 cm = ¾". Now decrease 1 stitch on each side of marker thread - read DECREASE TIP-2! Continue in stockinette stitch and repeat decrease every 4-3½-4-4-3½ cm = 1½"-1¼"-1½"-1½"-1¼" until decrease has been done 5-7-7-8-10 times in total = 40-40-43-44-48 stitches on needle. Work in stockinette stitch until sleeve measures 21-26-29-33-36 cm = 8¼"-10¼"-11⅜"-13"-14½". Knit 1 round and increase 4-4-5-4-4 stitches on round = 44-44-48-48-52 stitches. Switch to double pointed needles size 3 mm = US 2,5 and work rib in the round with knit 2/purl 2 for 4 cm = 1½". Loosely bind off stitches with knit over knit and purl over purl. Cut and fasten the yarn. Work the other sleeve the same way. |
|||||||||||||||||||
Diagram explanations |
|||||||||||||||||||
|
|||||||||||||||||||
Have you made this or any other of our designs? Tag your pictures in social media with #dropsdesign so we can see them! Do you need help with this pattern?You'll find tutorial videos, a Comments/Questions area and more by visiting the pattern on garnstudio.com. © 1982-2024 DROPS Design A/S. We reserve all rights. This document, including all its sub-sections, has copyrights. Read more about what you can do with our patterns at the bottom of each pattern on our site. |
With over 40 years in knitting and crochet design, DROPS Design offers one of the most extensive collections of free patterns on the internet - translated to 17 languages. As of today we count 304 catalogs and 11428 patterns - 11419 of which are translated into English (US/in).
We work hard to bring you the best knitting and crochet have to offer, inspiration and advice as well as great quality yarns at incredible prices! Would you like to use our patterns for other than personal use? You can read what you are allowed to do in the Copyright text at the bottom of all our patterns. Happy crafting!
Comments / Questions (41)
Ana Maria LEONI wrote:
NO entiendo esta parte de la explicación: "Después de haber tejido A.1 entero, hay 198-216-240-260-280 puntos en la vuelta. En la vuelta siguiente, tejer con pistacho y punto jersey y aumentar 14-8-2-2-2 puntos distribuidos equitativamente en la vuelta = 212-224-242-262-282 puntos." Estoy tejiendo el talle 8, cuantos puntos tengo que aumentar y en que vueltas?
03.08.2021 - 22:49DROPS Design answered:
Hola Ana Maira, si estas tejiendo el talle 7/8 anos, tienes que aumentar 2 puntos. Tienes que aumentarlos después de haber tejido A.1, en la vuelta siguiente (una sola). Buen trabajo!
04.08.2021 - 09:37Inger wrote:
Genseren har merkelige mål. Jeg strikket 1. genser i str.3/4 til en liten 1,5 åring. Måtte strikke på 10 cm ekstra på bolen. Nå holder jeg på med genser nr to (3). Rekket opp en gang..oppskriften samsvarer ikke med størrelsen til en vanlig 5 åring. Måtte opp 2 str. og øker lengden på bolen. Tips til andre: Opp 1-2 størrelser og plusse på 10cm lengde på bolen, så blir det bra .
30.03.2021 - 13:47Wenche Hjelseth wrote:
Får overhode ikke mønster til p stemme på 3-4 år. Starte med 80 masker og felle 16 etter hals. Veldig liten hals. Må vel heller øke når en strikker ovenfra og ned. Skjønner ingenting
12.12.2020 - 18:51Karen Bell wrote:
When knitting the ribbing it's k2/p2 but the number of stitches for this ribbing is supposed to be divisible by 4 which 160 is NOT...so at the end of the row in the round and the beginning of the next round you end up with 4 knit stitches together. How is that right?
05.12.2020 - 14:32DROPS Design answered:
Hi Karen, 160 divided by 4 = 40, so it is divisible. Happy knitting!
07.12.2020 - 07:19Brigitte wrote:
Liebes Drops Team, ich habe den Pullover Lamb Dance Sweater in der Größe für 11/12 Jahre gestrickt. Er ist super gelungen und die Anleitung ist sehr verständlich geschrieben. Vielen Dank. Jedoch die angegebene notwendige Garnmenge ist für diese Größe nicht korrekt. Merino Extra Fine 26 Pistazie + 1 Knäuel also insgesamt 350g und Merino Extra Fine 19 hell Graublau - 1 Knäuel also insgesamt 50g anstelle von 100g wie in der Anleitung beschrieben. Viele Grüße Brigitte
26.11.2020 - 12:03Vera Kjærstad wrote:
Er det feil i diagram på omg 35 og 36? Hvis ikke blir det litt rart når man strikker diagrammet for andre gang. 1 rosa, grønne, en rosa. Synes ikke dette ser pent ut.
29.10.2020 - 21:37DROPS Design answered:
Hei Vera. Diagrammet er oversendt til design avd. slik at de evnt kan rette opp i diagrammet og komme med en rettelse. mvh DROPS design
02.11.2020 - 11:41Annika wrote:
Guten Morgen, kann ich die Zunahmen durch Umschläge auch durch Zunahmen aus dem Querfaden in der nächsten Runde ersetzen? Ich habe etwas Angst, dass sonst ein größeres Loch entsteht und so das schöne Schafmuster stört. Vielen Dank
14.05.2020 - 06:44DROPS Design answered:
Liebe Annika, es passt auch sicher so, am besten stricken Sie eine Maschenprobe mit den 2 unterschiedlichen Techniken - Maschenprobe waschen und trocknen lassen - und so sehen Sie wie es aussieht (und ob Nadelgrösse stimmt). Viel Spaß beim stricken!
14.05.2020 - 08:05Karin Seefeldt wrote:
Hallo! Ich möchte gerne das Modell Lamb Dance Sweater mit dem Garn Safran stricken. Kann ich dafür die Umrechnung erhalten? Vielen Dank im voraus! Liebe grüße Karin Seefeldt
30.04.2020 - 18:53DROPS Design answered:
Liebe Frau Seefeldt, leider können wir jeder Anleitung nach jedem individuellen Frage anpassen und einzelne Modelle auf individuellen Wunsch hin umrechnen. Wenn sie Hilfe damit brauchen, wenden Sie sich bitte an Ihrem DROPS Laden, dort hilft man Ihnen gerne weiter. Viel Spaß beim stricken!
04.05.2020 - 09:43Marie-France wrote:
Comment joindre la première et la dernière mailles (x80) sur aiguilles circulaires de 60cm de long ??? Je n’y arrive pas. Pourquoi ?
14.01.2020 - 13:11DROPS Design answered:
Bonjour Marie-France, vous pouvez utiliser les aiguilles doubles pointes ou bien l'aiguille de 80 cm et tricoter en magic loop. Bon tricot!
14.01.2020 - 14:34Visi wrote:
En la talla 11/12 dice montar 110 puntos y empieza con una vuelta del derecho se sigue con 2 derechos y 2 revés, no me da pues al final termina con dos derechos igual que al comienzo, o sea que serían 4 derechos seguidos. No se si lo entiendo bien, un saludo
22.12.2019 - 19:56DROPS Design answered:
Hola Visi. Ya hemos enviado tu pregunta al departamento de diseño. Cuando recibamos una respuesta, corregiremos el patrón.
09.02.2020 - 20:00