How to cast on

How to cast on

There are several ways of casting on. We have chosen to show you the most common way that results in a firm yet stretchy edge.

It’s important that the casting on is not too tight. Do you feel that the edge is becoming too tight it’s always a possibility to change to a larger needle or to cast on over two needles. But don’t forget to change back to the original needles when you start knitting.

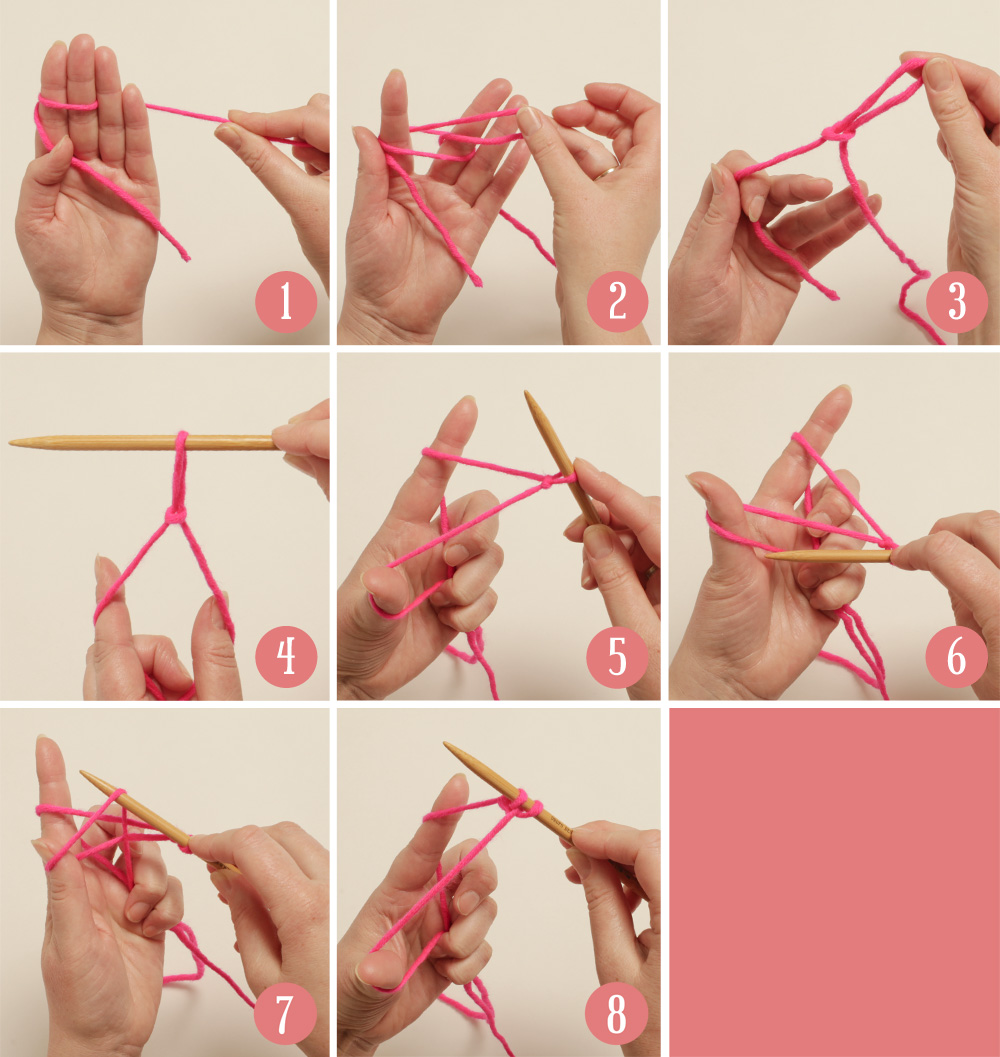
Figure 1: Begin by measuring a long tail from the end of the working yarn (the length varies depending on how many stitches you want to cast on, the yarn and size of the needle). Hold the tail of the yarn with your thumb and wind the yarn around your index and middle finger.

Figure 2: Pull the working yarn through the loop around your index and middle finger from behind and towards yourself.

Figure 3: Pull the loop to make a long stitch.

Figure 4: Place the stich onto the knitting needle and pull the yarn tails to tighten the stitch. You are now ready to cast on.

Figure 5: Place the yarn tail around your left thumb as seen on the photo. Slide the yarn strand over your left index finger and hold the two yarn strands in place in the palm of your hand using your ring and little finger.

Figure 6: Bring the right hand needle tip under the strand on your thumb.

Figure 7: To create the stitch, use the right hand needle tip and bring the strand from the working yarn (the yarn on your index finger) through the loop created by the thumb.

Figure 8: Drop the loop off the thumb onto the right hand needle. You have now cast on one new stitch. Tighten the stitch and pick up the thread with your thumb again. Continue in the same way until all stitches has been cast on.

See this video for extra help

Comments (23)

Guadalupe wrote:

629

28.01.2023 - 22:12:

Chantal Bonneton wrote:

Bonjour, Merci pour cette vidéo. Mais est-ce que ce rang de montage est considéré comme le 1er premier rang sur l’endroit ? Ou le rang de retour -que je considère comme le rang envers- est bien en fait le rang end ? Merci d’avance pour votre réponse. Chantal

23.11.2022 - 16:00:

DROPS Design answered:

Bonjour Mme Bonneton, le rang de montage n'est jamais considéré comme le premier rang; traditionnellement, le 1er rang correspond à l'endroit de l'ouvrage, mais il peut arriver que le 1er rang soit à tricoter sur l'envers en fonction des modèles. Bon tricot!

23.11.2022 - 16:15:

Jamal wrote:

Hej

02.11.2022 - 10:26:

Mr Johnson wrote:

Is very likely that I will use it thanks for the tutorial

02.11.2022 - 09:16:

Ebbe wrote:

Jeg elsker det

02.11.2022 - 09:00:

Bob wrote:

Is hard for me because I’m left handled \r\nbut nice 👍

02.11.2022 - 08:59:

Kronis wrote:

Hår startars mans vidooned snella hjalp

21.10.2022 - 13:34:

Snyggis wrote:

Jag gillar snopp

21.10.2022 - 13:32:

Alice wrote:

Hej! Räknas första loopen/knuten som en maska?😊

19.08.2022 - 22:27:

DROPS Design answered:

Hei Alice. Ja, det gjøre det. mvh DROPS Design

22.08.2022 - 08:15:

Gloria Scase wrote:

I have difficulty knowing how much tail I need for over 100 stitches when working on tops for top down yokes. I was taught by my Italian Mother years ago how to cast on I just use my thumb when casting on, wrapping it round much easier

09.06.2022 - 14:50:

DROPS Design answered:

Dear Mrs Scase, this video might be the one that can help you to find out how to have enough thread when you cast on with continental method. Happy knitting!

10.06.2022 - 09:07:

Lebron James wrote:

H0RA

19.04.2022 - 13:53:

Björne wrote:

Hur pausar man videon.

28.02.2022 - 14:07:

DROPS Design answered:

Hei Björne Før musen over videoen, slik at du ser "tidslinjen" nederst. Klikk på firkanten til venstre med 2 loddrette streker. Da stopper du videoen, klikk på samme knapp for å starte videoen. mvh DROPS Design

07.03.2022 - 07:31:

Walla wrote:

Lag ramis el doso Omar ek ladokre makaroni spag

23.02.2022 - 08:23:

Ole Gunnar wrote:

Elendige videoer

19.01.2022 - 09:48:

Bianca wrote:

Als een patroon zegt: motief over 12 + 1 (is volgens mij 13 steken) en je hebt dat motief 10 x nodig, hoeveel steken moet je dan in totaal opzetten? Alvast hartelijk dank voor het antwoord.

07.12.2021 - 16:31:

DROPS Design answered:

Dag Bianca,

Dan is het eerst 12 x 10 = 120 plus 1 steek = 121. Dus die ene steek komt er maar één keer bij.

12.01.2022 - 10:53:

Nikolai wrote:

Uff

26.04.2021 - 09:41:

Oliver wrote:

Dette er ein dorlig nettside

14.08.2020 - 08:39:

Valdenice Goncalves Rovere wrote:

Eu não conseguiria acompanhar uma receita.em ingles ou qualquer outra lingua, só em portugues

13.08.2020 - 02:52:

Jana wrote:

Dobrý den. Co mám dělat, když mi při nahazování dojde volný konec dříve, než nahodím potřebný počet ok? děkuji. jana

27.12.2019 - 13:41:

DROPS Design answered:

Dobrý den, Jano, to je nepříjemná situace, která občas potká každou z nás :-) Bohužel se v tu chvíli nedá dělat nic jiného, než nahození vypárat a ponechat konec o kus delší. Pokud chcete mít lepší odhad, můžete si před samotným nahozením omotat jehlici koncem příze - otáček kolem jehlice uděláte tolik, kolik ok chcete nahazovat. Získáte tak volný konec příze dlouhý dost na to, aby vystačil na nahození daného počtu ok. Hodně zdaru! Hana

31.12.2019 - 12:41:

Calla Dean wrote:

I'm trying to knit your "Cold Springs" headband and am having trouble reading the diagrams A.1 and A.2 Could you please assist me and tell me how to proceed? Thank you Calla

07.02.2017 - 00:42:

DROPS Design answered:

Dear Mrs Dean, diagrams will be worked simultaneously, ie work first Row 1 in A.1, then row 1 in A.2 and row 1 in A.1 (+ remaining sts as stated). Work then row 2 both diagrams, and so on. When A.1 has been worked 1 time in height, repeat A.1 from row 1. When A.2 has been worked 1 time in height, repeat A.2 from row 1. Happy knitting!

07.02.2017 - 09:59:

Leave a comment or question to this lesson

Your email address will not be published. Required fields are marked *.