Lamb Dance by DROPS Design

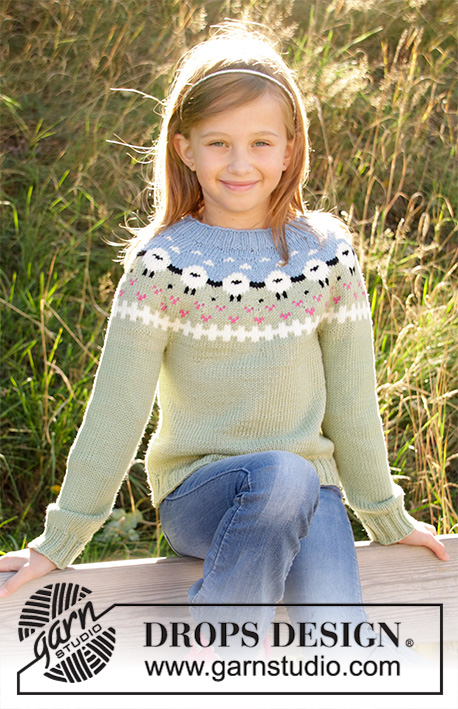
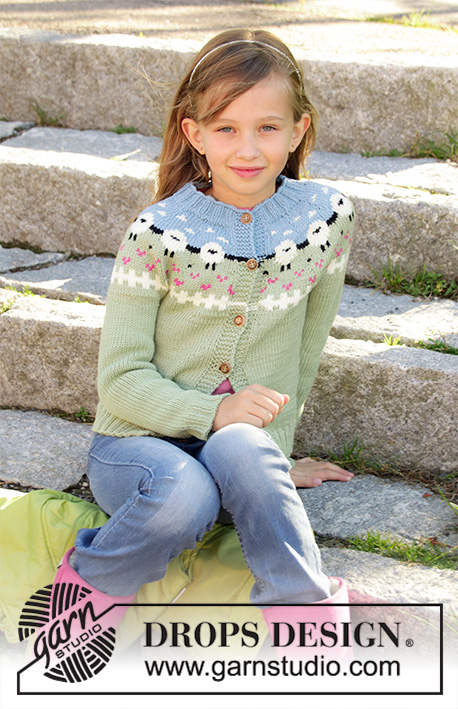
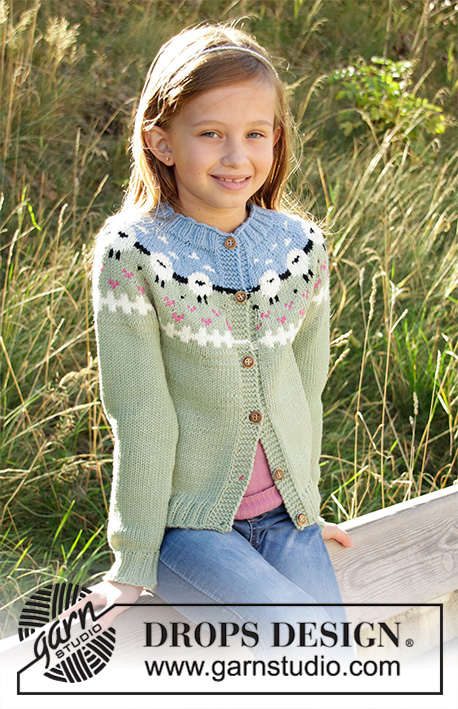
Knitted jacket for kids in DROPS Merino Extra Fine or DROPS Lima. Piece is knitted top down with sheep, color pattern, ribs and stockinette stitch. Size 3-12 years

DROPS Children 34-1
DROPS design: Pattern me-054-bn
Yarn group B
----------------------------------------------------------

SIZE:
3/4 - 5/6 - 7/8 - 9/10 - 11/12 years
Sizes equivalent to approx. height of child in cm:
98/104 - 110/116 - 122/128 - 134/140 - 146/152
Sizes equivalent to approx. height of child in feet:
3ft3/3ft5 – 3ft7/3ft9 – 4ft/4ft2 – 4ft5/4ft7 – 4ft9/4ft12

Finished measurements:
Chest measurements: 64-68-74-78-80 cm = 25 1/2”-26 3/4”-29 1/8”-30 3/4”-31 1/2”
Full length: 35-39-43-47-51 cm = 13 3/4”-15 1/4”-17”-18 1/2”-20”

All measurements in charts are in cm.

MATERIALS:
DROPS MERINO EXTRA FINE from Garnstudio (belongs to yarn group B)
200-250-250-250-300 g color 26, pistachio
50-50-100-100-100 g color 19, light grey blue
50-50-50-50-50 g color 01, off white
50-50-50-50-50 g color 02, black
50-50-50-50-50 g color 17, cerise

Or use:
DROPS LIMA from Garnstudio (belongs to yarn group B)
200-250-250-250-300 g color 7219, pistachio
50-50-100-100-100 g color 8112, ice blue
50-50-50-50-50 g color 0100, off white
50-50-50-50-50 g color 8903, black
50-50-50-50-50 g color 6273, cerise

KNITTING GAUGE:
21 stitches in width and 28 rows vertically in stockinette stitch = 10 x 10 cm = 4” x 4”.

NEEDLES:
DROPS DOUBLE POINTED NEEDLES SIZE 4 mm = US 6
DROPS CIRCULAR NEEDLE SIZE 4 mm = US 6, length 60 or 80 cm = 24” or 32”.
DROPS DOUBLE POINTED NEEDLES SIZE 3 mm = US 2,5 for ribs.
DROPS CIRCULAR NEEDLE SIZE 3 mm = US 2,5, length 60 or 80 cm = 24” or 32” for ribs.
Needle size is only a suggestion! If you have too many stitches on 10 cm = 4” switch to larger needles. If you have too few stitches on 10 cm = 4” switch to smaller needles.

DROPS WOOD BUTTONS Cedar NO 513: 6-6-7-7-7 pieces

-------------------------------------------------------

Knitting tension – See how to measure it and why here
Alternative Yarn – See how to change yarns here
Yarn Groups A to F – Use the same pattern and change the yarn here
Yarn usage using an alternative yarn – Use our yarn converter here

-------------------------------------------------------


100% Wool
from 4.55 $ /50g
DROPS Merino Extra Fine uni colour DROPS Merino Extra Fine uni colour 4.55 $ /50g
Wool Warehouse Direct Ltd
Order
DROPS Merino Extra Fine mix DROPS Merino Extra Fine mix 4.55 $ /50g
Wool Warehouse Direct Ltd
Order
needles DROPS Needles & Hooks
You can get the yarn to make this pattern from 31.85$. Read more.

Pattern instructions

NOTE: This pattern is written in American English. All measurements in charts are in cm. For conversion from inches to cm - click here. There are different terms for crocheting in American and British English. If this pattern includes crochet, click for "crochet terms" here. For this pattern in British English, please click here.
----------------------------------------------------------

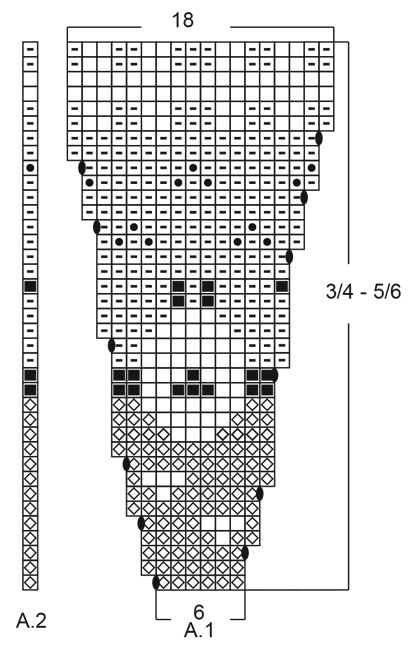
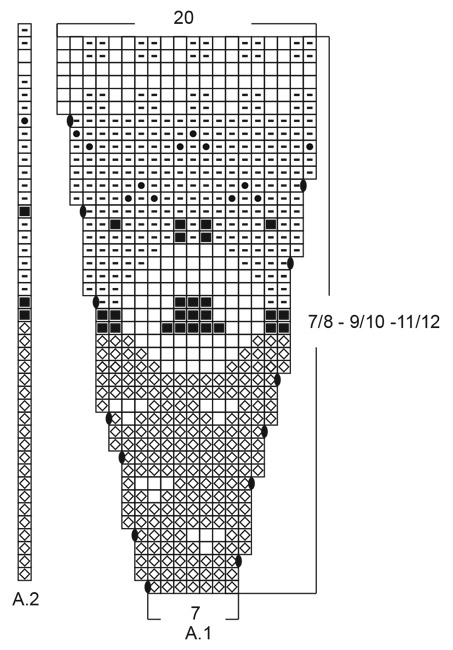
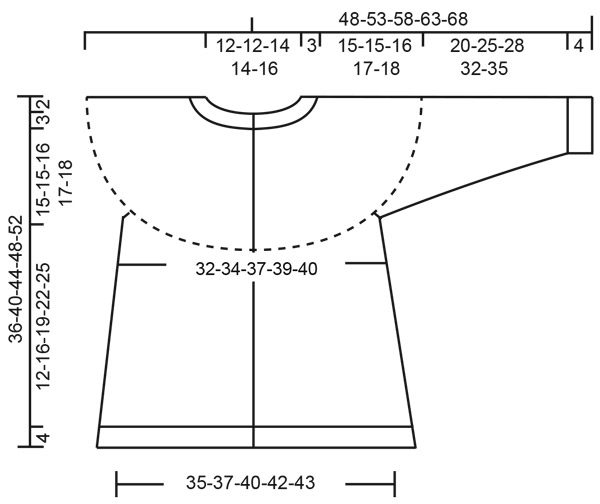
EXPLANATION FOR THE PATTERN:

----------------------------------------------------------

PATTERN:
See diagrams A.1 and A.2. Choose diagram for your size. Diagrams show all rows in pattern seen from the right side.

DECREASE/INCREASE TIP (evenly):
To calculate how to decrease evenly, use the total number of stitches on row (e.g. 84 stitches) minus the band stitches (e.g. 10 stitches) = 74 and divide stitches by number of decreases to be done (e.g. 7) = 10,5.
In this example decrease by work alternately every 9th and 10th /10th and 11th stitch together. To increase use the same calculation but make instead a yarn over after alternately every 10th and 11th stitch. Work yarn overs twisted on next row to avoid holes.

INCREASE TIP-2 (applies to sides of body):
Work until 1 stitch remains before marker thread, 1 yarn over, knit 2 (marker thread is in the middle of these stitches), 1 yarn over = 2 stitches increased. On next row work yarn overs twisted to avoid holes. Then work the new stitches in stockinette stitch.

DECREASE TIP-2 (applies to sleeves):
Decrease 1 stitch on each side of marker thread as follows: Work until 3 stitches remain before marker thread, knit 2 together, knit 2 stitches (marker thread is between these stitches), slip 1 stitch knitwise, knit 1, pass slipped stitch over stitch worked = 2 stitches decreased.

BUTTONHOLES:
Decrease for buttonholes on right band (when garment is worn). 1 buttonhole = begin from wrong side and knit 2nd and 3rd stitch from edge together, make 1 yarn over. On next row knit yarn over to make holes.
Decrease for first buttonhole after 2 cm on neck edge, then decrease the next 5-5-6-6-6 buttonholes every 6-7-6½-7-8 cm = 2 3/8”-2 3/4”-2 1/2”-2 3/4”-3 1/8”.
----------------------------------------------------------

START THE PIECE HERE:

----------------------------------------------------------

JACKET - SHORT OVERVIEW OF THE PIECE:
Piece is worked back and forth on circular needle, top down, then work front and back piece back and forth. Work sleeves in the round on double pointed needles/a short circular needle.

YOKE:
Cast on 84-88-100-112-116 stitches on circular needle size 3 mm = US 2,5 with light grey blue. Purl 1 row from wrong side. Work next row as follows from right side: 5 band stitches in GARTER STITCH - see explanation above - * knit 2, purl 2 *, repeat from *-* until 7 stitches remain, finish with knit 2 and 5 band stitches in garter stitch. Continue rib like this for 3 cm = 1 1/8” – remember BUTTONHOLES on right band – see explanation above and finish after 1 row from right side (= neck edge). Switch to circular needle size 4 mm = US 6. Purl 1 row from wrong side while decreasing 7-5-5-10-7 stitches evenly - read DECREASE/INCREASE TIP = 77-83-95-102-109 stitches. Work as follows from right side: 5 band stitches in garter stitch, work pattern according to A.1 until 6 stitches remain on row - NOTE: Choose diagram for correct size (= 11-12-12-13-14 repetitions of 6-6-7-7-7 stitches), work A.2 over 1 stitch and finish with 5 band stitches in garter stitch. Continue pattern like this and increase as shown in diagram - read KNITTING TIP and REMEMBER KNITTING GAUGE. When A.1 and A.2 have been worked, there are 209-227-251-271-291 stitches on needle. Continue in pistachio, on next row from right side work in stockinette stitch (garter stitch over band stitches) and increase 13-11-5-1-1 stitch on needle = 222-238-256-272-292 stitches on needle.
Work in stockinette stitch (garter stitch over band stitches) until piece measures approx. 18-18-19-20-21 cm = 7"-7"-7 1/2"-8"-8 1/4" from cast-on edge. Work next row from right side as follows: Work 5 band stitches in GARTER STITCH, work 31-33-36-36-37 stitches in stockinette stitch (= front piece), slip the next 44-48-51-54-62 stitches on a stitch holder (= sleeve), cast on 6 new stitches under sleeve, work 62-66-72-82-84 stitches in stockinette stitch (= back piece), slip the next 44-48-51-54-62 stitches on a new stitch holder (= sleeve), cast on 6 new stitches, work 31-33-36-36-37 stitches (= front piece) and work 5 band stitches in GARTER STITCH.

BODY:
There are now 146-154-166-176-180 stitches on needle. NOW MEASURE PIECE FROM HERE! Insert 1 marker thread in the middle of the 6 new stitches cast on in each side. Work in stockinette stitch back and forth with 5 band stitches in garter stitch in each side. When piece measures 3 cm = 1 1/8”, increase 1 stitch on each side of each marker thread (= 4 stitches increased) - read INCREASE TIP-2! Repeat increase every 3-4-5-6-7 cm = 1 1/8”-1 1/2”-2”-2 3/8”-2 3/4” 3 times in total = 158-166-178-188-192 stitches on needle. Then work as before until piece measures approx. 12-16-19-22-25 cm = 4 3/4”-6 1/4”-7 1/2”-7 3/4”-9 3/4” (or to desired length, there is approx. 4 cm = 1 1/2" until finished measurements). . Work 1 row in stockinette stitch from right side while increasing 10-6-6-8-12 stitches evenly (do not increase over band stitches) = 168-172-184-196-204 stitches.
Switch to circular needle size 3 mm = US 2,5 and work next row from wrong side as follows: Work 5 band stitches in garter stitch, purl 2, * knit 2, purl 2 *. Work from *-* until the 5 stitches remain and work 5 band stitches in garter stitch.
Work as follows from right side: 5 band stitches in garter stitch, knit 2, * purl 2, knit 2 *, repeat from *-* until 5 stitches remain and work 5 band stitches in garter stitch. Continue rib like this until it measures 4 cm = 1 1/2”. On next row from right side loosely bind off with garter stitch over garter stitch, knit over knit and purl over purl. Cut and fasten the yarn.

SLEEVE:
Slip stitches from on stitch holder back on a short circular needle/double pointed needles size 4 mm = US 6 (= 44-48-51-54-62 stitches), pick up 1 stitch in each of the 6 stitches cast on on body (= 50-54-57-60-68 stitches). Insert 1 marker thread in the middle of these 6 stitches. Work in stockinette stitch in the round until sleeve measures 2 cm = 3/4”. Now decrease 1 stitch on each side of marker thread - read DECREASE TIP-2! Continue in stockinette stitch and repeat decrease every 4-3½-4-4-3½ cm = 1 1/2”-1 1/4”-1 1/2”-1 1/2”-1 1/4” until decrease has been done 5-7-7-8-10 times in total = 40-40-43-44-48 stitches on needle. Work in stockinette stitch until sleeve measures 21-26-29-33-36 cm = 8 1/4”-10 1/4”-11 3/8”-13”-14 1/4”. Knit 1 round and increase 4-4-5-4-4 stitches on round = 44-44-48-48-52 stitches. Switch to double pointed needles size 3 mm = US 2,5 and work rib in the round with knit 2/purl 2 for 4 cm = 1 1/2”. Loosely bind off stitches with knit over knit and purl over purl. Cut and fasten the yarn.

Work the other sleeve the same way.

This pattern has been corrected. .

Updated online: 10.04.2019
Correction to yarn amount: Merino Extra Fine color 26 and 19, and Lima color 7219 and 8112.
+ Correction - YOKE: Work in stockinette stitch (garter stitch over band stitches) until piece measures approx. 18-18-19-20-21 cm = 7"-7"-7 1/2"-8"-8 1/4" from cast-on edge.
Updated online: 17.06.2019
Correction - diagram: A.1 size 7-12 years has been corrected: Yarn over moved from row 15 to row 14.
Updated online: 25.09.2020
Correction: Edit in amount of cast on stitches in the 3 largest sizes.
Updated online: 09.02.2021
Correction - diagram: A.1 size 7-12 years has been corrected on row 29, 35 and 36.

Diagram

All measurements in charts are in cm.

symbols = knit from right side, purl from wrong side with light grey blue
symbols = knit from right side, purl from wrong side with off white
symbols = knit from right side, purl from wrong side with black
symbols = knit from right side, purl from wrong side with pistachio
symbols = knit from right side, purl from wrong side with cerise
symbols = between 2 stitches make 1 yarn over, work yarn over twisted on next row. It should not make a hole.
diagram
diagram
diagram

Do you need help with this pattern?

Thank you for choosing a DROPS Design pattern. We take pride in providing patterns that are correct and easy to understand. All patterns are translated from Norwegian and you can always check the original pattern (DROPS Children 34-1) for measurements and calculations.

Are you having trouble following the pattern? See below for a list of resources to help you finish your project in no time - or why not, learn something new.

signature-image signature

Are you having trouble following the pattern? See below for a list of resources to help you finish your project in no time - or why not, learn something new.

Each of our patterns has specific tutorial videos to help you.

We have also step-by-step guides for different techniques which you'll find here.

1) Why is the knitting/crochet tension so important?

Knitting tension is what determines the final measurements of your work, and is usually measured per 10 x 10 cm. It is provided like so: number of stitches in width x number of rows in height - eg: 19 stitches x 26 rows = 10 x 10 cm.

The knitting tension is very individual; some people knit/crochet loosely while others work tightly. You adjust the knitting tension with the needle size, which is why the suggested needle size only serve as a guide! You need to adjust this (up or down) to ensure that YOUR knitting tension matches the knitting tension provided in the pattern. If you work with a different knitting tension than provided you will have a different yarn consumption, and your work will have different measurements than what the pattern suggests.

The knitting tension also determines which yarns can replace each other. As long as you achieve the same knitting tension you can replace one yarn with another.

See DROPS lesson: How to measure your tension/gauge

See DROPS video: How to make a gauge tension swatch

to top

2) What are the yarn groups?

All our yarns are categorised into yarn groups (from A to F) according to thickness and knitting tension – group A contains the thinnest yarns and group F the thickest. This makes it easier for you to find alternative yarns to our patterns, should you wish to switch yarn. All yarns within the same group have a similar knitting tension and can easily replace each other. However, different yarn qualities have different structures and properties which will give the finished work a unique look and feel.

Click here for an overview of the yarns in each yarn group

to top

3) Can I use a different yarn than what the pattern suggests?

The important thing when changing from one yarn to another is that the knitting/crochet tension remains the same. This is so that the measurements of the finished piece will be the same as on the sketch provided. It is easier to achieve the same knitting tension using yarns from the same yarn group. It is also possible to work with multiple strands of a thinner yarn to achieve the knitting tension of a thicker one. Please try our yarn converter. We recommend you to always work a test swatch.

Please NOTE: when changing yarn the garment might have a different look and feel to the garment in the photo, due to individual properties and qualities of each yarn.

See DROPS lesson: Can I use a different yarn than the one mentioned in the pattern?

to top

4) How do I use the yarn converter?

At the top of all our patterns you’ll find a link to our yarn converter, which is a helpful tool should you wish to use a different yarn than suggested. By filling in the yarn quality you wish to replace, the amount (in your size) and number of strands, the converter will present good alternative yarns with the same knitting tension. Additionally it will tell you how much you’ll require in the new qualities and whether you’ll need to work with multiple strands. Most skeins are 50g (some are 25g or 100g).

If the pattern is worked with multiple colours, every colour will have to be converted separately. Similarly, if the pattern is worked with several strands of different yarns (for example 1 strand Alpaca and 1 strand Kid-Silk) you will have to find alternatives for each, individually.

Click here to see our yarn converter

to top

5) Why do I get the wrong knitting tension with the suggested needle size?

The needle size provided in the pattern serves only as a guide, the important thing is to follow the knitting tension. And since knitting tension is very individual, you will have to adjust the needle size to ensure that YOUR tension is the same as in the pattern – maybe you’ll have to adjust 1, or even 2 needle sizes, up or down to achieve the correct tension. For this, we recommend that you work test swatches.

Should you work with a different knitting tension than the one provided, the measurements of the finished garment might deviate from the measurement sketch.

See DROPS lesson: How to measure your tension/gauge

See DROPS video: How to make a gauge tension swatch

to top

6) Why is the pattern worked top-down?

Working a garment top-down provides more flexibility and room for personal adjustment. For example it is easier to try the garment on while working, as well as making adjustments to length of yoke and shoulder caps.

The instructions are carefully explaining every step, in the correct order. Diagrams are adjusted to the knitting direction and are worked as usual.

to top

7) Why are the sleeves shorter in larger sizes?

The total width of the garment (from wrist-to-wrist) will be larger in the larger sizes, despite the actual sleeves being shorter. The larger sizes have longer sleeve caps and wider shoulders, so there will be a good fit in all sizes.

to top

8) What is a repeat?

Diagrams are often repeated on the round or in height. 1 repeat is the diagram the way it appears in the pattern. If it says to work 5 repeats of A.1 in the round, then you work A.1 a total of 5 times after/next to each other in the round. If it says to work 2 repeats of A.1 vertically/in height you work the entire diagram once, then begin again at the start and work the entire diagram one more time.

to top

9) How do I work according to a knitting diagram?

The diagram depicts all rows/rounds, and every stitch seen from the right side. It is read from bottom to top, from right to left. 1 square = 1 stitch.

When working back and forth, every other row is worked from the right side and every other row is worked from the wrong side. When working from the wrong side, the diagram will have to be worked reversed: from left to right, knit stitches are purled, purl stitches are knit etc.

When working in the round every round is worked from the right side and the diagram are worked from right to left on all rounds.

See DROPS lesson: How to read knitting diagrams

to top

10) How do I work according to a crochet diagram?

The diagram depicts all rows/rounds, and every stitch seen from the right side. It is worked from bottom to top, from right to left.

When working back and forth every other row is worked from the right side: from right to left and every other row is worked from the wrong side: from left to right.

When working in the round, every row in the diagram are worked from the right side, from right to left.

When working a circular diagram you start in the middle and work your way outwards, counter clockwise, row by row.

The rows usually start with a given number of chain stitches (equivalent to the height of the following stitch), this will either be depicted in the diagram or explained in the pattern.

See DROPS lesson: How to read crochet diagrams

to top

11) How do I work several diagrams simultaneously on the same row/round?

Instructions for working several diagrams after each other on the same row/round, will often be written like so: “work A.1, A.2, A.3 a total of 0-0-2-3-4 times". This means you work A.1 once, then A.2 is worked once, and A.3 is repeated (in width) the number of times provided for your size – in this case like so: S = 0 times, M = 0 times, L=2 times, XL= 3 times and XXL = 4 times.

The diagrams are worked as usual: begin with the first row in A.1, then work the first row in A.2 etc.

See DROPS lesson: How to read knitting diagrams

See DROPS lesson: How to read crochet diagrams

to top

12) Why does the piece start with more chain stitches than it’s worked with?

Chain stitches are slightly narrower than other stitches and to avoid working the cast-on edge too tight, we simply chain more stitches to begin with. The stitch count will be adjusted on the following row to fit the pattern and measurement sketch.

to top

13) Why increase before the rib edge when the piece is worked top-down?

The rib edge is more elastic and will contract slightly compared to, for example, stocking stitch. By increasing before the rib edge, you avoid a visible difference in width between the rib edge and the rest of the body.

to top

14) Why increase in the cast-off edge?

It’s very easy to cast off too tightly, and by making yarn overs while casting off (and simultaneously casting these off) you avoid a too tight cast off edge.

See DROPS video: How to bind off with yarn overs (yo)

to top

15) How do I increase/decrease on every 3rd and 4th row/round alternately?

To achieve an even increase (or decrease) you can increase on, for example: every 3rd and 4th row alternately, like so: work 2 rows and increase on the 3rd row, work 3 rows and increase on the 4th. Repeat this until the increase is complete.

See DROPS lesson: Increase or decrease 1 st on every 3rd and 4th row alternately

to top

16) Why is the pattern slightly different than what I see in the photo?

Pattern repeats can vary slightly in the different sizes, in order to get the correct proportions. If you’re not working the exact same size as the garment in the photo, yours might deviate slightly. This has been carefully developed and adjusted so that the complete impression of the garment is the same in all sizes.

Make sure to follow instructions and diagrams for your size!

to top

17) How can I work a jacket in the round instead of back and forth?

Should you prefer to work in the round instead of back and forth, you may of course adjust the pattern. You’ll need to add steeks mid-front (usually 5 stitches), and follow the instructions. When you would normally turn and work from the wrong side, simply work across the steek and continue in the round. At the end you’ll cut the piece open, pick up stitches to work bands, and cover the cut edges.

See DROPS video: How to knit steeks and cut open

to top

18) Can I work a jumper back and forth instead of in the round?

Should you prefer to work back and forth instead of in the round, you may of course adjust the pattern so you work the pieces separately and then assemble them at the end. Divide the stitches for the body in 2, add 1 edge stitch in each side (for sewing) and work the front and back pieces separately.

See DROPS lesson: Can I adapt a pattern for circular needles into straight needles?

to top

19) Why do you show discontinued yarns in the patterns?

Since different yarns have different qualities and textures we have chosen to keep the original yarn in our patterns. However, you can easily find options among our available qualities by using our yarn converter, or simply pick a yarn from the same yarn group.

It is possible that some retailers still have discontinued yarns in stock, or that someone has a few skeins at home that they would like to find patterns for.

The yarn converter will provide both alternative yarn as well as required amount in the new quality.

to top

20) How do I make a women’s size garment into a men’s size one?

If you have found a pattern you like which is available in women’s size it’s not very difficult to convert it to men’s size. The biggest difference will be the length of sleeves and body. Start working on the women size that you think would fit across the chest. The additional length will be worked right before you cast off for the armhole/sleeve cap. If the pattern is worked top-down you can add the length right after the armhole or before the first decrease on sleeve.

Regarding additional yarn amount, this will depend on how much length you add, but it is better with a skein too many than too few.

to top

21) How do I prevent a hairy garment from shedding?

All yarns will have excess fibres (from production) that might come off as lint or shedding. Brushed yarns (ie hairier yarns) have more of these loose, excess fibres, causing more shedding.

Shedding also depends on what is worn under or over the garment, and whether this pulls at the yarn fibres. It’s therefore not possible to guarantee that there will be no shedding

Below are some tips on how to get the best result when working with hairier yarns:

1. When the garment is finished (before you wash it) shake it vigorously so the looser hairs come off. NOTE: do NOT use a lint roller, brush or any method that pulls at the yarn.

2. Place the garment in a plastic bag and put it in your freezer - the temperature will cause the fibres to become less attached to each other, and excess fibres will come off easier.

3. Leave in the freezer for a few hours before taking it out and shaking it again.

4. Wash the garment according to the instructions on the yarn label.

to top

22) Where on the garment is the length measured?

The measurement sketch/schematic drawing provides information regarding the full length of the garment. If it’s a jumper or a jacket the length is measured from the highest point on the shoulder (usually closest to the neckline), and straight down to the bottom of the garment. It is NOT measured from the tip of shoulder. Similarly, the length of yoke is measured from the highest point on the shoulder and down to where yoke is split into body and sleeves.

See DROPS lesson: How to read a schematic drawing

to top

23) How do I know how many balls of yarn I need?

The required amount of yarn is provided in grams, eg: 450 g. To calculate how many balls you’ll need you first need to know how many grams are in 1 ball (25g, 50g or 100g). This information is available if you click on the individual yarn quality on our pages. Divide the amount required with the amount of each ball. For example, if each ball is 50g (the most common amount), the calculation will be as follows: 450 / 50 = 9 balls.

to top

Have you purchased DROPS yarn to make this pattern? Then you are entitled to receive help from the store where you bought the yarn. Find a list of DROPS stores here!
Still can't find the answer you need? Then scroll down and leave your question so one of our experts can try to help you. This will be done normally within 5 to 10 working days. In the meantime, you can read the questions and answers that others have left to this pattern or join the DROPS Workshop on Facebook to get help from fellow knitters/crocheters!

Comments / Questions (25)

country flag Marianne Verduin wrote:

Bij het telpatroon: zijn daar alleen de naalden aan de goede kant aangegeven of de heen en weer naalden?

27.10.2022 - 09:24

DROPS Design answered:

Dag Marianne,

In de telpatronen zijn altijd alle naalden weergegeven, dus zowel de heengaande als de teruggaande naalden.

27.10.2022 kl. 20:47

country flag Marianne Verduin wrote:

Waar vind ik telpatroon A2?

25.10.2022 - 20:04

DROPS Design answered:

Dag Marianne,

Deze staat naast telpatroon A.1 en is 1 steek breed.

26.10.2022 kl. 08:39

country flag Cathy Dicharrry wrote:

J'ai fait le même modèle 3 fois, 1fois en taille 9/10 et 2 fois en taille 5/6 ans. Je trouve que les augmentations ne sont pas bien réparties, pas régulières donc l'allure du gilet est un peu bizarre... Dommage ! Je joins une photo de l'un d'entre eux...

14.10.2022 - 12:44

country flag Mary Levine wrote:

If with the larger sizes, you start chart A2 on row 1 of A1, then should realign the charts correctly on the printout. Currently it shows chart A2 starting on row 2 of chart A1.

13.09.2022 - 12:35

country flag Mary Levine wrote:

Lamb Dance - In the larger sizes - 7 and up - does the chart A2 start on row 1 or row 2 of chart A1? Thank you -

11.09.2022 - 22:06

DROPS Design answered:

Dear Mrs Levine, start diagrams from RS as follows: 5 front band sts, repeat the 7 sts of A.1 (increasing 1 stitch = knit 7 with light grey blue, YO) until 8 sts remain, work A.2 (1 stitch) and 5 front band stitches. From WS read diagrams from the left towards the right starting with A.2 then repeat A.1. Happy knitting!

12.09.2022 kl. 11:38

country flag VARAIN Evelyne wrote:

Bonjour, lorsque vous signalez des corrections sur ce modèle, est ce que les explications sont changées ou bien faut-il corriger nous mêmes ? En vous remerciant pour la réponse

06.04.2022 - 23:20

DROPS Design answered:

Bonjour Mme Varain, si vous avez imprimé les explications après la date des corrections, alors le modèle est juste, sinon, il peut être de sage de l'imprimer à nouveau. Bon tricot!

07.04.2022 kl. 09:49

country flag Gigi wrote:

Bonjour je suis rendu à faire les rangs couleur pistache et quand je tricote cette couleur : il y a un décalage de couleur dans les motifs des moutons , pourquoi? Que dois je faire ? Merci

25.02.2022 - 16:04

DROPS Design answered:

Bonjour Gigi, avez-vous bien pensé à augmenter au 2ème rang en noir, juste avant le 1er rang en pistache? en fonction de la taille vous aurez ainsi soit 3 m pistache au début de A.1 et 2 m pistache à la fin de A.1 (tailles 3/4 et 5/6 ans) ou bien 2 mailles pistache au début et à la fin de A.1 + 1 augmentation à la fin de A.1 au 1er rang pistache ((7/8, 9/10 et 11/12 ans). Bon tricot!

25.02.2022 kl. 16:09

country flag Gigi wrote:

Après avoir fait dans l’empiècement le premier rang avec les jetés aux 6 mailles , le rang sur l’envers je tricote les mailles comme elles se présente mais comment je tricote le jeté pour ne pas avoir de trou ? Quand je reviens en façade je fais le deuxième rang du diagramme endroit sur endroit ? Merci

16.02.2022 - 15:45

DROPS Design answered:

Bonjour Gigi, tricotez les jetés torse à l'envers sur l'envers (= en jersey - cf vidéo). Les diagrammes montrent tous les rangs du motif, autrement dit, sur l'envers, lisez le diagramme de gauche à droite et sur l'endroit de droite à gauche. Vous trouverez plus d'infos sur les diagrammes ici>/a>. Bon tricot!

16.02.2022 kl. 17:00

country flag Christine J Manzagol wrote:

Confused as to needle size. The ribbing with the smaller needles is fine, but when i switch to larger needles, it looks like the needles are too bog for the yarn. The project looks loose and holy. I am using lyon brand truboo yarn. Weight 3. Its a rayon from bamboo. I also noticed that the smaller needles fit the gauge that you guys gave. Should i just do the whole thing with the smaller needles? Making the 7/8 size

19.01.2022 - 00:20

DROPS Design answered:

Dear Mrs Manzagol, did you check your tension? You should have 21 sts x 28 rows stocking stitch = 10 x 10 cm; sorry we do not know this yarn and cannot help with it; maybe contact the store where you bought the yarn for any further assistance, they should be able to help you. Happy knitting!!

19.01.2022 kl. 08:50

country flag Ilovedogs wrote:

Sto lavorando questo delizioso golfino, ma temo che la lana acquistata non sia sufficiente. Avendo contattato il negozio in cui l'ho acquistata, ed avendo ricevuto la risposta che la lana Baby Merino col. 38 ce l'hanno di bagno diverso, volevo chiedere un suggerimento: fare delle righe magari azzurre e bianche dato che sono i colori che ho usato per lo sprone? oppure qualche altra idea? Spero che riusciate a darmi una mano...il bagno che mi serve è il 48322

07.12.2021 - 17:16

DROPS Design answered:

Buonasera Ilovedogs, può rivolgersi al suo rivenditore DROPS per un'assistenza così personalizzata, oppure può scrivere ad altri rivenditori per vedere se hanno delle rimanenze di quel bagno. Buon lavoro!

07.12.2021 kl. 21:45

Post a comment to pattern DROPS Children 34-1

We would love to hear what you have to say about this pattern!

If you want to leave a question, please make sure you select the correct category in the form below, to speed up the answering process. Required fields are marked *.

From the #dropsfan gallery

Drops Lamb dance

Simone, Netherlands

Lamb Dance Cardigan

Katka, Czech Republic

Lamb Dance

Debra, United States

See more