
Looking for a yarn?


Megjegyzések / Kérdések (30)
![]() Crochet Vest írta:
Crochet Vest írta:
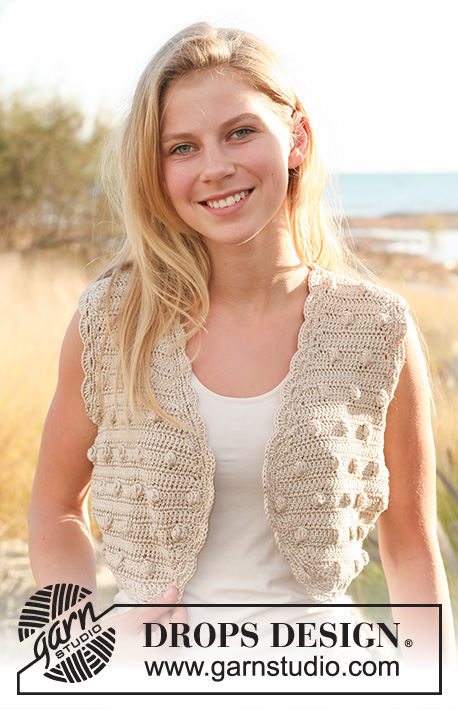
Name it fancy bobble cropped vest.
30.06.2019 - 21:18Nir Halfon írta:
Hello, When working on the Right Front Piece towards mid front do I use increase tip 1 only once for row 2? or for every row towards mid front. Later instructions state I should use increase tip 2. Thanks, Nir
19.02.2018 - 22:59A DROPS Design válasza:
Dear Mrs Halfon, increase tip 1 is made at the end of row from WS to increase 2 sts towards mid front. Increase tip 2 is used when increasing 1 st for the side. Happy crocheting!
20.02.2018 - 08:42Raji Ajith írta:
Hello... I need help for increasing tip 1.. To start row with ,4 chain and DC in the 4 th chain... 2 DC made... end of next row did I have to put 2dc and 1 hdc I. The last DC... or only 1 hdc Thank you
12.07.2016 - 11:21A DROPS Design válasza:
Dear Mrs Ajith, at the end of row towards mid front, work 1 hdc in the last dc (instead of 1 dc in last dc), turn and inc as before with 4 ch, 1 dc in 4th chain from hook, 1 dc in next dc, etc. Happy crocheting!
12.07.2016 - 13:10
![]() Constanze írta:
Constanze írta:
Ich habe ein Verständnisproblem beim Rückenteil. Dort steht nach x cm während des Noppenteils Maschen aufnehmen soll - soweit okay. Dass hätte ich jetzt über die 16 cm gemacht. Was hat das mit den 7x 97 Stäbchen auf sich ?
04.08.2014 - 17:23A DROPS Design válasza:
Liebe Constanze, wenn die Arbeit 3 cm misst, nehmen beidseitig je 1 Stb zu, diese Zunahmen wiederholen Sie in jeder 2. R. Insgesamt arbeiten Sie diese Zunahmen 7x, d.h. Sie haben dann insgesamt 14 Stb zugenommen. Vorher hatten Sie ja 83 Stb, nach den Zunahmen haben Sie dann 97 Stb insgesamt. Bei einer Gesamtlänge von 18 cm arbeiten Sie dann die Armausschnitte, darauf bezieht sich nämlich die nächste Maßangabe, sie hat mit den Zunahmen nichts zu tun.
04.08.2014 - 19:58
![]() Tamara írta:
Tamara írta:
Ik zou het gilet graag maken voor mijn dochters, ze hebben maat 110-116 en 128. Ik heb alleen geen idee hoe ik dit patroon kan omrekenen naar kindermaten. Kan iemand mij daar mee helpen, of is er een versie voor kinderen beschikbaar?
30.03.2014 - 16:31A DROPS Design válasza:
Hoi Tamara. We hebben helaas niet een soortgelijk patroon voor kinderen. Je kan het patroon kleiner maken met hulp van de haakstekenverhouding (aantal stk in de breedte x toeren in de hoogte per 10 x 10 cm). Je weet hoe groot de kleinste maat is en kan vervolgens minder rekenen. Ik kan je helaas niet helpen met individuele aanpassingen, maar je mag ook altijd vragen bij jouw DROPS verkooppunt of één van de vele handwerkforums. Veel haakplezier.
01.04.2014 - 17:53
![]() Rumpel írta:
Rumpel írta:
Please help me with the right front piece, i don't understand much.how to inc tip 1 on 2nd row? does it mean that making 1 more dc in the next row, not 2nd row?
14.08.2013 - 03:19A DROPS Design válasza:
Dear Rumpel, at beg of row from mid front, you will inc making 4 ch, 1 dc in 4th ch from hook (=first 3 ch= 1st dc (us - uk tr), we have here 2 dc), at the end of row from side towards mid front, crochet 1 hdc (us - uk htr) in the last dc to get a smoother curve. Happy crocheting!
14.08.2013 - 09:59
![]() Wijntje írta:
Wijntje írta:
Er staat in het patroon: 1 stk in de 4e l van de haak, * sla 1 l over, 1 stk in iedere van de volgende 3 l *, herhaal herhaal van *-*... Je haakt dus eerst 1 stk in de 4 l. Daarna sla je eerst 1 l over en haakt 1 stk in IEDERE van de volgende 3 l. Je haakt dus in elke 3 l 1 st een slaat elke 4e l over. Volgens mij klopt dit niet ik kom niet aan het aantal stokjes en het staat bol omdat er te veel lossen worden overgeslagen
14.04.2013 - 13:52A DROPS Design válasza:
Het patroon klopt. Bijvoorbeeld maat S. Je hebt 91 l. Haak 1 stk in de 4 l van de nld (= 2 stk). Dan sla je 1 l over en 1 stk in elk van de volgende 3 l (= 3 stk per 4 l), dat wordt 21 keer 3 stk per 4 l (= 63 stk) en je hebt dan ook 2 l. Hier haak je 1 stk in elke l = 67 stk op de toer. Bekijk ook of je stekenverhouding correct is ;o). Veel haakplezie verder.
16.04.2013 - 21:19
![]() Ntref írta:
Ntref írta:
Hallo,ik snap he niet zo goed! er staat 1L overslaan dan in de 3e L stk en herhaal dus dat is eigenlijk in elke 4eL een stokje maar dan krijg ik te weinig stokjes?
02.12.2012 - 12:24A DROPS Design válasza:
Er staat in het patroon: 1 stk in de 4e l van de haak, * sla 1 l over, 1 stk in iedere van de volgende 3 l *, herhaal herhaal van *-*... Je haakt dus eerst 1 stk in de 4 l. Daarna sla je eerst 1 l over en haakt 1 stk in IEDERE van de volgende 3 l. Je haakt dus in elke 3 l 1 st een slaat elke 4e l over.
03.12.2012 - 15:47
![]() Michelle Meyers írta:
Michelle Meyers írta:
Re: Inc Tip 1. It seems like you are increasing at the beginning of the row which starts at the mid front. To increase 9 times (for Med) it would require a minimum of 19 rows which would exceed the 16 cm length at which neckline decreases begin. What am I missing?
06.09.2012 - 01:00A DROPS Design válasza:
Dear Mrs Meyers, Inc Tip 1 includes both inc at beg of row and at the end of row towards mid front. So that you will inc each row. Happy Crocheting !
12.11.2012 - 11:18
![]() Deloris írta:
Deloris írta:
I need a chart for the sides. Is one available?
09.07.2012 - 12:13
|
|||||||||||||
Sandy Bubbles#sandybubblesvest |
|||||||||||||
 |
 |
||||||||||||
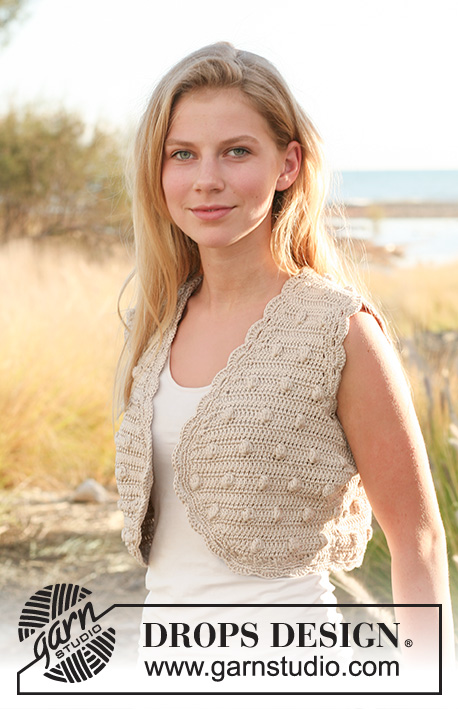
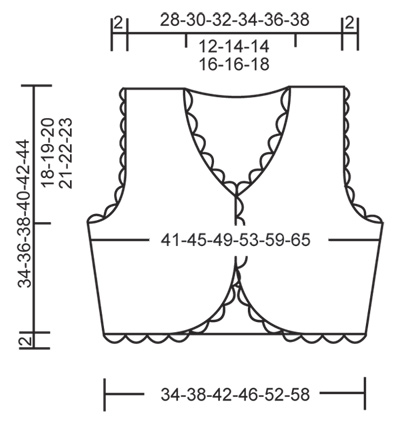
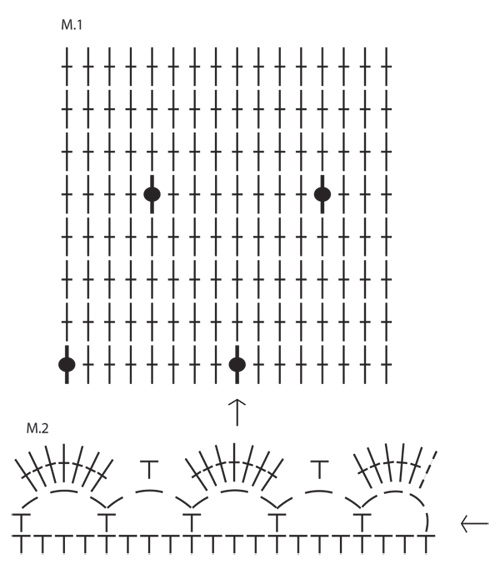
Horgolt DROPS mellény bogyókkal és csipkeszegéllyel "Muskat" fonalból Méret: S - XXXL.
DROPS 130-31 |
|||||||||||||
|
HORGOLÁSI TANÁCS: A sor első erp-ja helyett 3 láncszemet horgolunk. Minden sort egy, a sor kezdetétől számított 3. láncszembe öltött kúszószemmel fejezünk be. MINTA: Lásd az M.1-es és M.2-es diagramot MEGJEGYZÉS: A M..1 minta 1. sora = a színe oldal. 1-ES TANÁCS A STAPORÍTÁSHOZ (az eleje kerek ívének kialakításánál szap 2 erp-hez): Az eleje kerek ívének kialakításához az eleje közepénél minden sorban a köv módon szap: 4 lsz, ford, 1 erp a ht-től a 4. lsz-be (most 2 erp-nk van a sor elején = 3 lsz + 1 erp), majd a korábbiaknak megfelelően folyt a sort. A köv sor végén az eleje közepénél, 1 fp az ut erp-a (az ut erp-ba öltött erp helyett)) mielőtt a kerek szélhez az új szemet szap. Így az eleje szélének íve nem törik meg. 2-ES TANÁCS A SZAP-HOZ (1 erp szaporításához). 2 erp 1 erp-be öltésével szaporítunk a következő módon: Tanács a fogyasztáshoz, 1. 1 erp-t 2 erp összedolgozásával fogyasztunk a következő módon: Horgoljunk 1 erp-t de az utolsó rh-al várjunk, és még 1 erp-t húzzunk fel ugyanilyen módon, ugyanabba a szembe. Az utolsó erp utolsó rh-át mind az 3 szemen húzzuk át = 2 szemet dolgoztunk össze. 2-ES TANÁCS A FOGYASZTÁSHOZ: Amikor a karöltőnél, és a nyakkivágásnál egyszerre több erp-t fogyasztunk egyszerre, a fogyasztásokat a köv módon készítjük: A sor elején: Ahány erp-t fogyasztunk, annyit szemet helyettesítünk ksz-ekkel. A sor végén: Amikor annyi szem van hátra a sorból, ahány szemet fogyasztanunk kell, fordítsuk meg a munkát, és folyt a korábbiaknak megfelelően. ---------------------------------------------------------- HÁTA: 91-102-112-123-139-155 lsz-et készítünk a 3,5 mm-es horgolótűvel a Muskat fonallal. AZ 1. SORBAN A SZÍNE OLDAL FELŐL ÍGY HALADJUNK 1 rp a horgolótűtől a 3. lsz-be, * 1 lsz-t kihagyunk, 1 rp a köv 3 lsz mindegyikébe*. Ismételjük a *-* közötti részt, amíg 3-2-4-3-3-3 lsz marad, 1 lsz-t kihagyunk, és 1-1 rp az utolsó 2-1-3-2-2-2 lsz mindegyikébe= 67-75-83-91-103-115 rp. 2. sor (= fonákoldal) OLVASSUK EL A FENTI HORGOLÁSI TANÁCSOT! 1 rp minden rp-ba. Fordítsuk meg a munkát. Folyt az M.1-es mintával. MEGJEGYZÉS: A diagramban a nyíl a háta közepét jelöli, vagyis a háta közepén a középső szemben egy bogyónak kell lennie. Számoljunk innen kifelé, hogy megtaláljuk, hol kell elkezdenünk a diagramot. UGYANAKKOR, Amikor a darabunk 2-3-3-4-5-6 cm-es mindkét szélen szap1-1 szemet. OLVASSUK EL A FENTI TANÁCSOT A SZAPORÍTÁSHOZ! Ismételjük meg a szaporítást minden 2. sorban összesen 7 alkalommal = 81-89-97-105-117-129 szem. Amikor a darabunk 16-17-18-19-20-21 cm-es, minden sor elején és végén fogy a karöltő kialakításához (vagyis a SZO és a FO felől is fogy!). OLVASSUK EL A FENTI 2-ES TANÁCSOT A FOGYASZTÁSHOZ. 5-5-7-7-10-12 erp-t összesen 1 alkalommal, 2 erp-t összesen 3-4-4-4-4-5 alkalommal, 1 erp-t összesen 2-2-2-4-5-5 alkalommal = 55-59-63-67-71-75 rp. Amikor a darabunk 32-34-36-38-40-42 cm, a következő módon folytassuk a munkát a vállrészen: 17-17-19-19-21-21 erp a sor elején, fordítsuk meg a darabot, az első 2 erp-t összedolgozva fogy 1 erp-t, majd horg a sor többi részét. Vágjuk el és dolgozzuk el a fonalat, a darabunk kb 34-36-38-40-42-44 cm-es. Ism a másik oldalon. JOBB ELEJE: Oda vissza haladva készítjük, az eleje közepénél kezdve. MIELŐTT FOLYTATNÁNK A MUNKÁT, OLVASSUK EL A TELJES HÁTRA LÉVŐ RÉSZT: 30-34-36-42-48-54 lsz-et készítünk a 3,5 mm-es horgolótűvel a Muskat fonallal. AZ 1. SORBAN A SZÍNE OLDAL FELŐL ÍGY HALADJUNK 1 rp a horgolótűtől a 3. lsz-be, * 1 lsz-t kihagyunk, 1 rp a köv 2 lsz mindegyikébe*. Ismételjük a *-* közötti részt, amíg 3-2-4-2-4-2 lsz marad, 1 lsz-t kihagyunk, és 1-1 rp az utolsó 1-1-3-1-3-1 lsz mindegyikébe= 21-24-26-30-35-39 rp. 2. sor (= fonákoldal) OLVASSUK EL A FENTI HORGOLÁSI TANÁCSOT! 1 erp minden erp-ba, ugyanakkor. a sor végén az eleje közepénél szap 2 erp-t. OLVASSUK EL A FENTI 1-ES TANÁCSOT A SZAP-HOZ. SZAP AZ ELEJÉN ÉS AZ OLDALÁN: UGYANAKKOR, Amikor a darabunk 2-3-3-4-5-6 cm-es mindkét szélen szap1-1 erp-t. OLVASSUK EL A FENTI TANÁCSOT A SZAPORÍTÁSHOZ! Ism a szap az oldalán minden 2. sorban, összesen 7 alkalommal UGYANAKKOR, a 2. sorban, váltsunk a sötétbarna színű fonalra. Az oldal felé az utolsó bogyónak ugyanannyi erp-ra kell lennie az oldaltól, mint a háta darabon. Az oldaltól számoljuk ki, hol kell a diagram mintáját elkezdenünk. UGYANAKKOR, az eleje közepénél minden sor végén a köv módon szap: 2 erp-t összesen 4-4-5-5-5-6 alkalommal (a 2. sor szap-val együtt), majd 1 erp-t összesen 4-5-5-5-6-6 alkalommal. OLVASSUK EL A FENTI 2-ES TANÁCSOT A SZAP-HOZ. NYAKKIVÁGÁS: UGYANAKKOR, Amikor a darabunk 15-16-17-18-19-20 cm-es mindkét szélen fogy 1-1 erp-t. OLVASSUK EL A FENTI 1-es TANÁCSOT A fogyasztáshoz! Ism a fogy minden sorban (vagyis a SZ és a FO felől is) összesen 8-10-10-13-13-15 alkalommal, majd minden 2. sorban 3-3-3-2-2-2 alkalommal. KARÖLTŐ: UGYANAKKOR, amikor a darabunk 16-17-18-19-20-21 cm-es (az oldalánál mérve), a hátánál leírt módon fogy szemeket a karöltő kialakításához (vagyis a SZO és a FO felől is). Miután minden fogyasztást elkészítettünk a karöltő és a nyakkivágáshoz 16-16-18-18-20-20 erp marad a sorban. Folyt a mintával, amíg a darabunk 34-36-38-40-42-44 cm-es. Ügyeljünk arra, hogy az eleje és a háta ugyanakkora legyen. Vágjuk el a fonalat, és varrjuk el a szálat. BAL ELEJE: Ugyanúgy készítjük, mint a jobb elejét, annak tükörképeként készítjük, vagyis az oldalánál kezdjük. ÖSSZEÁLLÍTÁS: A széleket egymás mellé illesztve, aró öltésekkel varrjuk össze a vállakat. A széleket egymás mellé illesztve varrjuk össze az oldalvarrásokat. HORGOLT SZEGÉLY: Mindkét karöltő köré horgoljunk szegélyt 3,5 mm vastag horgolótűvel, a Muskat fonallal a következő módon: 1. kör: A SZO felől kezdjük, és 1 rp az 1. szembe. *1 lsz, 1 erp-t kihagyunk, 1 rp a köv erp-ba.*Ism a *-* közötti részt a teljes körben. MEGJEGYZÉS: Ennek a körnek ki kell egyenlítenie a karöltő szélét. Szükség szerint hagyjuk ki több vagy kevesebb szemet. 2. kör: 1 rp minden rp-ba, éa 1 rp minden lsz-e a teljes körben, miközben UGYANAKKOR, annyi szemet fogy vagy szap, hogy a szemek száma 8-cal osztható legyen. 3. + 4. kör: Az M.2-es minta. MEGJEGYZÉS: A diagramban nyíllal jelölt körnél kezdjünk. A 3. kört a kör kezdeténél a 2. lsz-be öltött ksz-mel zárjuk. A mellény teljes nyílása köré ugyanezt a szegélyt készítsük el. MEGJEGYZÉS: ÜGYELJÜNK ARRA, HOGY A SZEGÉLY EGYENLETES LEGYEM! |
|||||||||||||
Diagram magyarázatok |
|||||||||||||
|
|||||||||||||
|
|||||||||||||
|
|||||||||||||
Elkészítette ezt a mintát?Akkor adja a képeihez a #dropspattern #sandybubblesvest tageket, vagy küldje be a képet a #dropsfan galériába. Segítségre van szüksége a modell elkészítéséhez? 9 tutorial videót találhat, és egy kérdés/felelek részt, és még többet, ha a mintát megkeresi a garnstudio.com oldalán. © 1982-2025 DROPS Design A/S. Minden jog fenntartca. Ez a documentim, az összes részével védelem alatt áll. A weboldalunkon többet olvashat arról, hogy mit tehet és mit nem a mintáinkkal. |
|||||||||||||


Több mint 40 év tapasztalattal a kötés és horgolásminták tervezésében a DROPS Design az ingyenes minták egyik legszélesebb körű gyűjtemnyét kínálja az Interneten, 17 nyelvre fordítva. A mai nappal 314 katalógust 11822 mintát tudunk számon tartani a mintákból 11804 -t fordítottunk le magyarra (európai mértékegységekkel).
keményen dolgozunk azon, hogy a kötés és a horgolás világából a legjobbat hozzuk el, remek fonalakkal, hihetetlen árakon. Ha mintáinkat nemcsak személyes használatra szeretné használni, minden minta alján a Copyright szövegben olvashat arról, mit tehet s mit nem. Sikeres kézimunkázást!
Post a comment to pattern DROPS 130-31
Szívesen vesszük, ha megosztja velünk gondolatait erről a mintáról.
Ha kérdést szeretne feltenni, ügyeljen arra, hogy a megfelelő kategóriát válassza ki, így fegyorsíthatja a válaszadás folyamatát. Það verður að merkja við svæði merktri með *.