December Carnival by DROPS Design

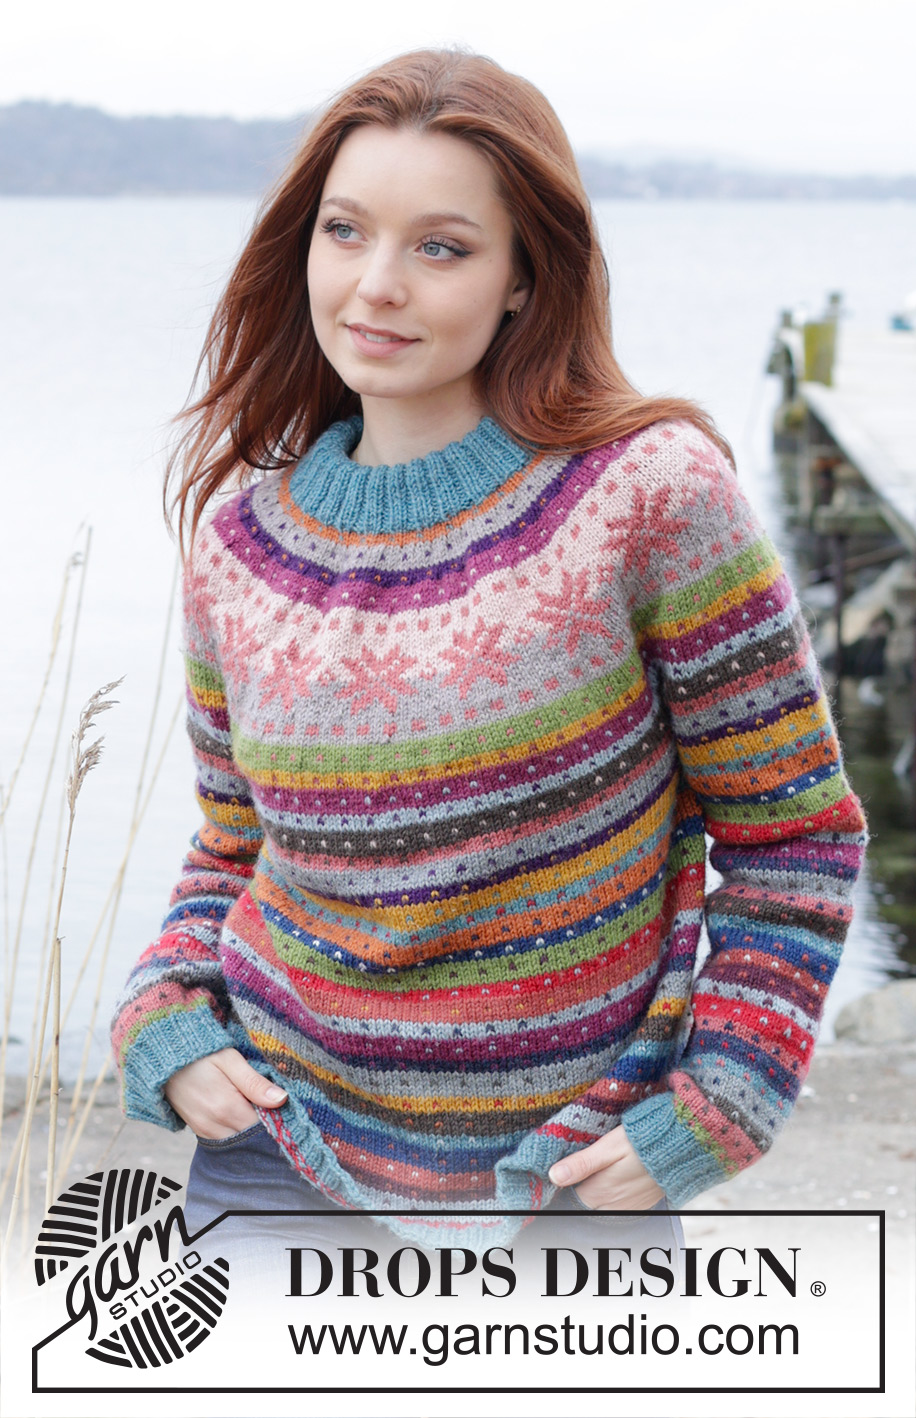
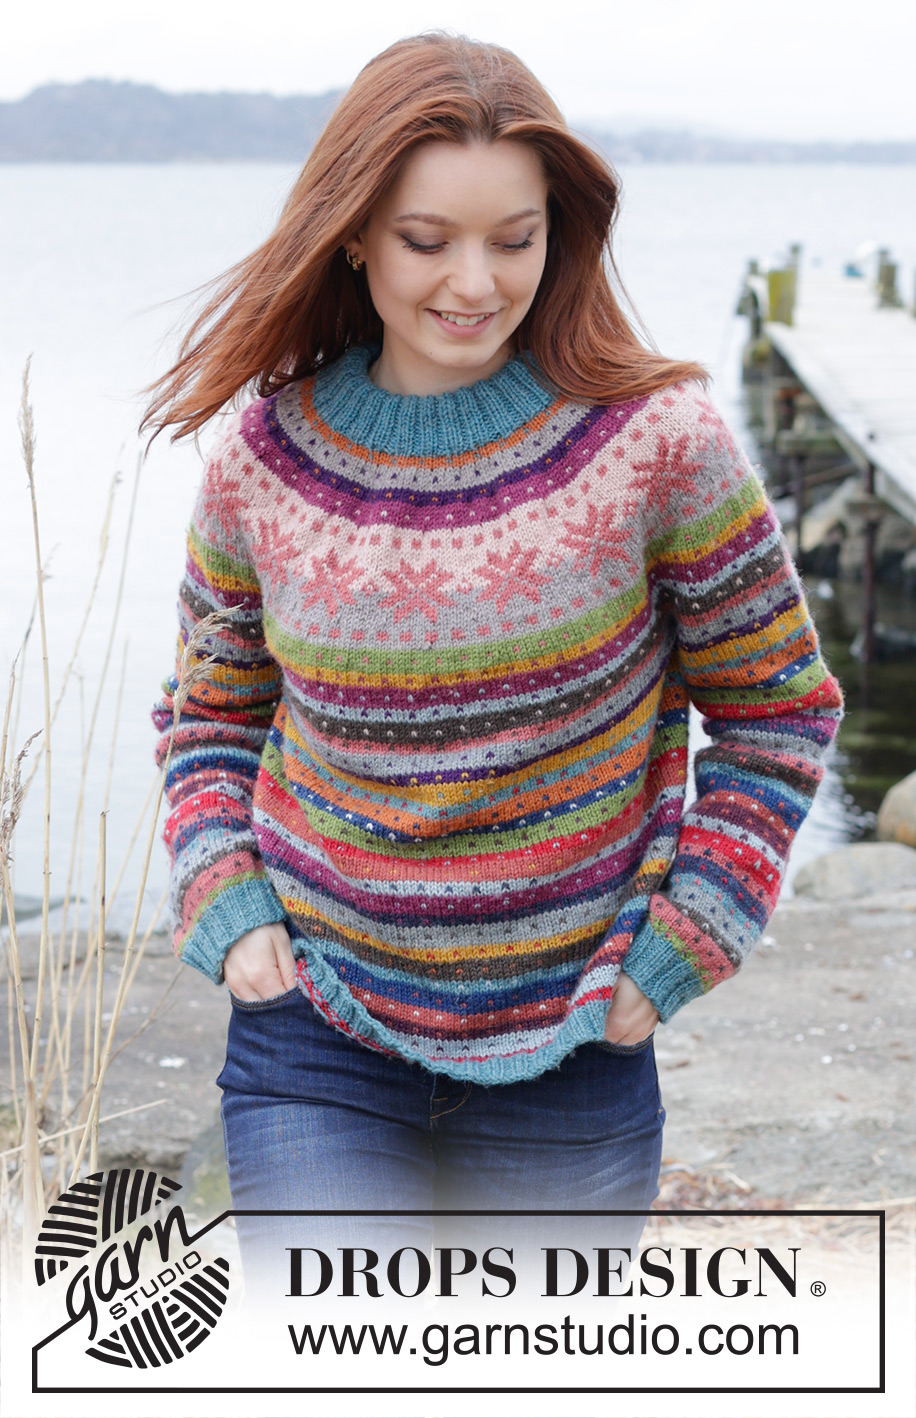
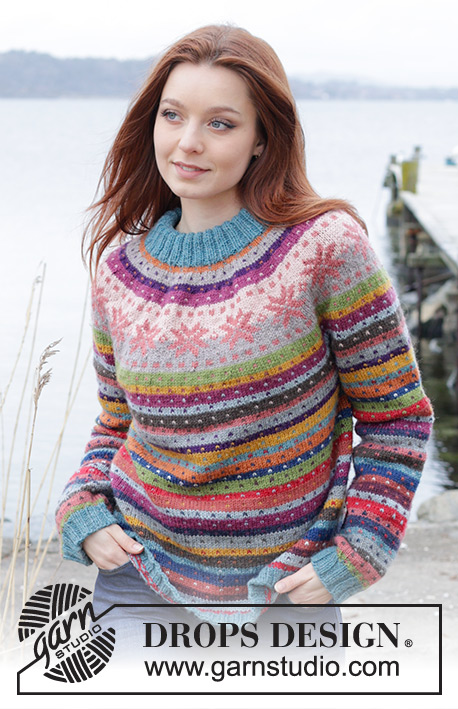
Kötött Drops pulóver DROPS Karisma fonalból. A darabot fentről lefelé irányban készítjük, kerek vállrésszel, norvégmintával és dupla nyakkal. XS-XXL méretben

DROPS 245-5
MÉRETEK:
XS S - M - L - XL - XXL:

FONAL:
DROPS KARISMA fonal a Garnstudiótól (a B fonalcsoporthoz tartozik)
150-150-150-200-200-200 gramm a 50 sz. tengerzöld színből
50-50-50-50-100-100 g gramm a 80 sz. rózsa színből
50-50-50-50-100-100 gramm a 84 sz. sivatagi rózsa színből
50-50-50-50-100-100 gramm a 55 sz. világos bézs-barna színből:
50-50-50-50-50-50 gramm a 04 sz. csokoládébarna színből
50-50-50-50-50-50 gramm a 11 sz., narancs színből
50-50-50-50-50-50 gramm a 21 sz. középszürke színből
50-50-50-50-50-50 gramm a 37 sz. sötét szürkéskék színből
50-50-50-50-50-50 gramm a 39 sz. sötét fáradt rózsaszínből színből
50-50-50-50-50-50 gramm a 45 sz. világos olíva színből:
50-50-50-50-50-50 gramm a 48 sz. borvörös színből
50-50-50-50-50-50 gramm a 52 sz. sötét mustár színből
50-50-50-50-50-50 gramm a 69 sz. világos szürkészöld színből
50-50-50-50-50-50 gramm a 73 sz. petrol színből
50-50-50-50-50-50 gramm a 76 sz. sötét lila színből
50-50-50-50-50-50 gramm a 82 sz. gesztenye színből

KÖTŐTŰ:
DROPS KÖRKÖTŐTŰ: 4 MM VASTAG 40 és 80 cm hosszú
DROPS KÖRKÖTŐTŰ: 3 MM VASTAG 40 és 80 cm hosszú
DROPS KÉTHEGYŰ KÖTŐTŰ KÉSZLET: 4 MM VASTAG
DROPS KÉTHEGYŰ KÖTŐTŰ KÉSZLET: 3 MM VASTAG
Használhatjuk a varázshurok (Magic Loop) technikát, ekkor csak 80 cm hosszú, körkötőtűre lesz szükségünk, minden mérethez.

A KÖTÉSPRÓBA:
21 szem egymás mellett és 28 sor egymás fölött a harisnyakötéssel és a norvégmintával = kb 10 x 10 cm.
MEGJEGYZÉS: Ne feledkezzünk meg arról, hogy a kötőtű mérete csak ajánlás. Mindig készítsünk, és ellenőrizzük a kötéspróbát. Ha a 10 cm-n túl sok szemünk van, váltsunk nagyobb kötőtűre. Ha a 10 cm-n túl kevés szemünk van, váltsunk kisebb kötőtűre.

-------------------------------------------------------

Varázshurok – A technikát itt nézheti meg
Kötéspróba – Nézze meg hogyan és miért kell megmárni ITT
Választható más fonalak – Nézze meg hogyan helyettesítheti be a fonalat ITT.
A_F fonalcsoportok – Használja ugyanazt a mintát és helyettesítse be a fonalat ITT.
Fonalhasználat más, behelyettesített fonalnál – Hazsnálja a fonalátváltónkat.

-------------------------------------------------------


100% gyapjú
minimum 1020.00 Ft /50g
DROPS Karisma uni colour DROPS Karisma uni colour 1020.00 Ft /50g
Nordfonal.hu
Rendelés
DROPS Karisma mix DROPS Karisma mix 1020.00 Ft /50g
Nordfonal.hu
Rendelés
needles Kötőtűk & Horgolótűk Rendelés
Ehhez a darabhoz, megvásárolhatja a fonalat már 18360Ft. Olvasson tovább.

Mintaleírás

----------------------------------------------------------

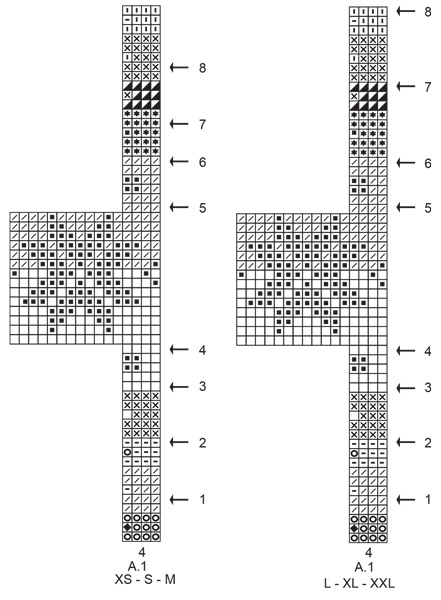
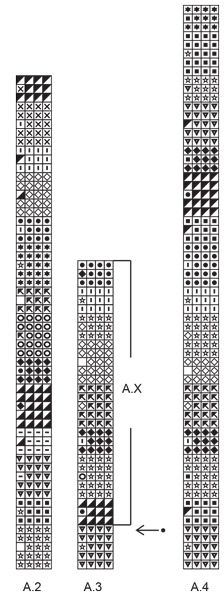
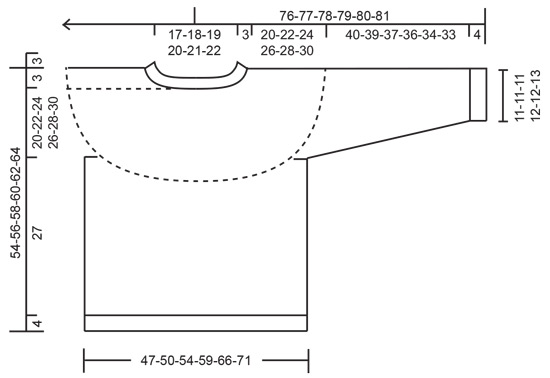
TANÁCSOK A MINTA ELKÉSZÍTÉSÉHEZ:
----------------------------------------------------------

MINTA:
Lásd az A.1 - A.4 jelű diagramokat Az A.1-es mintáknál válasszuk a méretnek megfelelő diagramot. A teljes mintát harisnyakötéssel kötjük.

TANÁCS A KÖTÉSHEZ:
Ügyeljünk arra, hogy a kötés ne húzódjon össze, amikor a mintát kötjük, ezért figyeljünk arra, hogy a szálakat a szokásosnál lazábbra hagyjuk, és ne húzzuk meg a darab mögött. Ha a mintával kötött sorokban így is összehúzódik a darab, használjunk vastagabb kötőtűt.

TANÁCS A FOGYASZTÁSHOZ (az ujjánál):
Minden jelölő mindkét oldalán a következő módon fogyasztunk 1 szemet: Kössünk, amíg 3 szem marad a jelölő előtt, 2 szemet simán összekötünk, 2 sima szemet kötünk (a jelölő a 2 szem között van), 1 szemet simán leemelünk, 1 sima, majd a leemelt szemet a lekötött szemen átemeljük. (= 2 szemet fogyasztottunk)

----------------------------------------------------------

A MINTALEÍRÁS ITT KEZDŐDIK:

----------------------------------------------------------

PULÓVER: RÖVID ÖSSZEFOGLALÓ
A nyakkivágás szegélyét és a vállrészt körben kötjük, a háta közepénél kezdve, a körkötőtűn fentről lefelé haladva. A vállrész szemeit szétosztjuk és a darabot körben haladva készítjük tovább. A két ujját körben kötjük, a rövidebb körkötőtűvel, és/vagy kéthegyű kötőtűkkel.

DUPLANYAK:
A kezdéshez szedjünk fel 96-100-104-108-112-116 szemet a rövidebb, 4 mm vastag körkötőtűre az tengerzöld DROPS Karisma fonalból. Váltsunk a 3 mm-es körkötőtűre, s szemekkel kötünk 1 kört. Folytassuk a kötést bordás mintával körben (2 sima, 2 fordított szem) 10 cm-ig.
Váltsunk a 4 mm vastag körkötőtűre és kössünk 1 kört sima szemekkel (harisnyakötéssel), UGYANAKKOR, egyenletesen elosztva a körben 24-28-32-36-36-36 szemet szaporítunk a körben = 120-128-136-144-148-152 szem. Kössünk 1 kört S szemekkel.
Tegyünk jelölőt a kör kezdetéhez- a háta közepe a vállrészt ettől a ponttól mérjük.

VÁLLRÉSZ:
Olvassuk el a fenti tanácsot a kötéshez és kössük a mintát körben az A.1 jelű diagram szerint (30-32-34-36-37-38 ismétlés a 4 szemes mintaegységből.) NE FELEDKEZZÜNK MEG A MEGFELELŐ KÖTÉSPRÓBA BETARTÁSÁRÓL!
Ugyanakkor, az A.1 jelű diagram minden nyíllal jelölt sorában egyenletesen elosztva szaporítsunk az alábbi magyarázat szerint -
1. NYÍL: Szaporítsunk egyenletesen elosztva 44-44-44-52-52-56 szemet = 164-172-180-196-200-208 szem.
2. NYÍL: Szaporítsunk egyenletesen elosztva 40-40-44-48-52-52 szemet = 204-212-224-244-252-260 szem.
3. NYÍL: Szaporítsunk egyenletesen elosztva 36-36-40-44-48-48 szemet = 240-248-264-288-300-308 szem.
4. NYÍL: Szaporítsunk egyenletesen elosztva 0-8-8-16-20-28 szemet = 240-256-272-304-320-336 szem.
5. NYÍL: Szaporítsunk egyenletesen elosztva 24-28-28-24-28-32 szemet = 264-284-300-328-348-368 szem.
6. NYÍL: Szaporítsunk egyenletesen elosztva 16-16-20-20-20-24 szemet = 280-300-320-348-368-392 szem.
7. NYÍL: Szaporítsunk egyenletesen elosztva 12-12-12-16-16-20 szemet = 292-312-332-364-384-412 szem.
8. NYÍL: Szaporítsunk egyenletesen elosztva 8-12-8-12-12-16 szemet = 300-324-340-376-396-428 szem.

Amikor a vállrész 20-22-24-26-28-30 cm-es (a jelölőtől mérve), az alábbi magyarázat szerint osszuk szét a testész és az ujjak szemeit, UGYANAKKOR, amikor elkészültünk az A.1 jelű mintával, folytassuk az A.2 jelű diagram szerint.
Most osszuk el a vállrész szemeit, és az eleje és háta darabot külön-külön fejezzük be a köv módon: Kössük le az első 45-49-51-56-61-67 szemet a korábbiak szerint (= fél háta). A következő 60-64-68-76-76-80 szemet tegyük szemtartóra az ujjához, szedjünk fel 8-8-12-12-16-16 új szemet az ujja alatt, folytassuk a következő 90-98-102-112-122-134 szemmel (= eleje), csúsztassuk a következő 60-64-68-76-76-80 szemet szemtartóra a másik ujjához, szedjünk fel 8-8-12-12-16-16 új szemet az ujja alatt. Kössük le a maradék 45-49-51-56-61-67 szemet a korábbiak szerint (= fél háta). Vágjuk el a fonalat. A testrész és az ujjak szemeit külön-külön kötjük tovább. A DARABOT EZENTÚL ETTŐL A PONTTÓL MÉRJÜK!

TESTRÉSZ:
= 196-212-228-248- 276-300 szem. Tegyünk jelölőszálat az 1 ujja alsó középvonalához, az újonnan felszedett 8-8-12-12-16-16 szem közepére A jelölőnél kezdjük, és folytassuk az A.2 jelű mintával, körben haladva (folytassuk onnan, ahol a vállrészt befejeztük). Amikor az A.2 jelű mintát elkészítettük, kössük az A.3 jelű mintát, amíg a test 27 cm-es lesz, attól a ponttól, ahol szétválasztottuk a szemeket, és egy teljes csík után járunk. Ha még nem értünk el a megfelelő hosszig, folytassuk az A.x jelű mintával a kívánt hosszig.
Váltsunk a 3 mm vastag körkötőtűre, és folytassuk a tengerzöld színnel. Kössünk 1 kört S szemekkel minden szemen, és egyenletesen elosztva szaporítsunk 40-40-44-52-56-60 szemet a körben = 236-252-272-300-332-360 szem.
Folytassuk a bord minta kötésével (= 2 sima / 2 fordított), 4 cm-ig, majd a bord mintának megfelelően láncoljuk le a szemeket. A pulóver kb 54- 56- 58- 60- 62- 64 cm-es a vállrésztől lefelé mérve.

Ujjak:
Csúsztassuk vissza az egyik ujjához szemtartóra félretett 60-64-68-76-76-80 szemet a 4 mm- vastag kéthegyű kötőtűkészletre / rövidebb körkötőtűre. Szedjünk fel 1-1 új szemet az ujjak alatt felszedett 8-8-12-12-16-16 szem mindegyikébe a = 68-72-80-88-92-96 szem van a kötőtűnkön.
Tegyünk jelölőt az ujja alatt felszedett új szemek közepére. A munka haladtával mozdítsuk el a jelölőket is; középvonalánál készített szaporítások elhelyezésénél lesz rájuk szükségünk. A jelölőnél kezdjük, és folytassuk az A.2 jelű mintával, körben haladva (folytassuk onnan, ahol a vállrészt befejeztük).
Mielőtt tovább haladnánk a kötéssel, olvassuk el a teljes hátralévő szakaszt.
Az A.2 jelű minta után ismételjük az A.4 jelű minta sorait egymás fölött a teljes méretig. UGYANAKKOR, amikor az ujja kb 4-4-4-2-2-2 cm-es attól a ponttól, ahol a szemeket szétválasztottuk, az ujja alsó középvonalánál fogyasszunk 2 szemet - OLVASSUK EL A FENTI TANÁCSOT A FOGYASZTÁSHOZ! Ismételjük meg a fogyasztást a fentiek szerint 3-3-2-1½-1½-1½ cm-ként, összesen 12-12-16-18-20-20 alkalommal = 44-48-48-52-52-56 szem. Folytassuk a kötést, amíg a darabunk kb 40-39-37-36-34-33 cm-es lesz és egy teljes csík után járunk (kb 4 cm marad a darabból).
Váltsunk a 3 mm-es körkötőtűre/ kéthegyű kötőtűkészletre és kössünk 1 kört sima szemekkel (harisnyakötéssel), UGYANAKKOR, egyenletesen elosztva a körben 4-4-4-8-8-8 szemet szaporítunk a körben = 48-52-52-60-60-64 szem, Folytassuk a bord minta kötésével (= 2 sima / 2 fordított), 4 cm-ig, majd a bord mintának megfelelően láncoljuk le a szemeket. Az ujja kb 44-43-41-40-38-37 cm-es attól a ponttól, ahol a szemeket szétválasztottuk, Készítsük el ugyanilyen módon a másik ujját.

ÖSSZEÁLLÍTÁS:
Hajtsuk be a nyakkivágás szegélyét a FO felé, és apró öltésekkel varrjuk le. Ügyeljünk arra, hogy a varrás ne legyen túl szoros, és a szegély ne forduljon ki vagyis, a pulóver nyakkivágása elég rugalmas legyen.

Diagram

symbols = rózsa
symbols = sivatagi rózsa
symbols = narancs
symbols = zsályazöld
symbols = sötétlila
symbols = sötét fáradtrózsaszín
symbols = világos bézsbarna
symbols = világos olíva
symbols = sötétmustár
symbols = világos szürkészöld
symbols = csokibarna
symbols = középszürke
symbols = borvörös
symbols = sötétszürkés kék
symbols = petrol
symbols = gesztenye
symbols = kör szaporításokkal
symbols = A nyíl az ujjára vonatkozik. Ha eljutottunk a nyílig, kössük az A.4 jelű mintát a teljes hosszig.
diagram
diagram
diagram

Segítségre van szüksége a mintával kapcsolatban?

Köszönjük, hogy a DROPS Design mintáját választotta! Sokat dolgozunk azért, hogy mintáink könnyen érthetőek és hibamentesek legyenek. Minden mintát Norvégból fordítunk, és a méreteket, számításokat mindig ellenőrizheti az eredeti mintán (DROPS 245-5) .

Gondja van a minta követésével? Az alábbiakban talál egy listát, olyan helyekről, amik segíthetenek abban, hogy a projektet hamr befjezze, vagy akár - miért ne?- tanuljon valami újat.

signature-image signature

Gondja van a minta követésével? Az alábbiakban talál egy listát, olyan helyekről, amik segíthetenek abban, hogy a projektet hamr befjezze, vagy akár - miért ne?- tanuljon valami újat.

Minden mintánkhoz tartoznak oktató-videók, amik segítenek.

Vannak olyan útmutatóink is, amelyek lépésről lépésre mutatják meg a különféle technikákat, ezeket itt találhatják meg.

1) Why is the knitting/crochet tension so important?

Knitting tension is what determines the final measurements of your work, and is usually measured per 10 x 10 cm. It is provided like so: number of stitches in width x number of rows in height - eg: 19 stitches x 26 rows = 10 x 10 cm.

The knitting tension is very individual; some people knit/crochet loosely while others work tightly. You adjust the knitting tension with the needle size, which is why the suggested needle size only serve as a guide! You need to adjust this (up or down) to ensure that YOUR knitting tension matches the knitting tension provided in the pattern. If you work with a different knitting tension than provided you will have a different yarn consumption, and your work will have different measurements than what the pattern suggests.

The knitting tension also determines which yarns can replace each other. As long as you achieve the same knitting tension you can replace one yarn with another.

See DROPS lesson: How to measure your tension/gauge

See DROPS video: How to make a gauge tension swatch

fel

2) Fonalcsoportok - Mik ezek, és hogyan használjuk őket?

A fonalakat vastagságuk, és a velük elérhető kötéspróba szerint csoportokba rendeztük, így könnyebben találhat mintát a kedvenc fonalához. Vagy könnyebben találhat egy mintához fonal-alternatívákat. Az ugyanabban a fonalcsoportban levő fonalak hasonló kötéspróbát adnak, így egymással behelyettesíthetőek. Azonban, ettől függetlenül a minőségük, a struktúrájuk eltérő, így az elkészült darab különleges és egyedi lesz. Az egyes fonalcsoportok áttekintéséhez kattintson ide!.

A fonalcsoport = a csoporton belül minden fonallal 26 -23 szemet tudunk 10 cm-en kötni.

B fonalcsoport = a csoporton belül minden fonallal 22 -20 szemet tudunk 10 cm-en kötni.

C fonalcsoport = a csoporton belül minden fonallal 19 -16 szemet tudunk 10 cm-en kötni.

D fonalcsoport = a csoporton belül minden fonallal 15 -12 szemet tudunk 10 cm-en kötni.

E fonalcsoport = a csoporton belül minden fonallal 11 -9 szemet tudunk 10 cm-en kötni.

E fonalcsoport = a csoporton belül minden fonallal 8 -5,5 szemet tudunk 10 cm-en kötni.

Amennyiben több szál fonalat összefogva szeretne dolgozni, ehhez a következőket érdemes tudni: A C fonalcsoport 1 szálával hasonló kötéspróbát tudunk készíteni, mint az A. fonalcsoport 2 szálát összefogva, Az A fonalcsoportból tehát bármely fonalból 2 szálat, vagy bármely 2 fonalból 1-1 szálat összefogva megfelel a C fonal 1-1 szálának, ezt a mintákban így jeleztük: A + A = C.

Az alábbiakban áttekintjük, hogyan működnek a fonalaink, ha 1 szálnál többel dolgozunk:

2 szál az A fonalcsoportból megfelel a C fonalcsoport 1 szálának. Ezt a mintában így jeleztük: A + A = C

3 szál az A fonalcsoportból megfelel a D fonalcsoport 1 szálának. Ezt a mintában így jeleztük: A+A+A = D

4 szál az A fonalcsoportból megfelel az E fonalcsoport 1 szálának. Ezt a mintában így jeleztük: A + A+A+A = D

8 szál az A fonalcsoportból megfelel az F fonalcsoport 1 szálának. Ezt a mintában így jeleztük: A+A+A+A +A+A+A+A = F

2 szál az B fonalcsoportból megfelel a D fonalcsoport 1 szálának. Ezt a mintában így jeleztük: B+B =D

2 szál a C fonalcsoportból megfelel az E fonalcsoport 1 szálának. Ezt a mintában így jeleztük: C+C = E

4 szál a C fonalcsoportból megfelel az F fonalcsoport 1 szálának. Ezt a mintában így jeleztük: C+C+C+C = F

2 szál az E fonalcsoportból megfelel az F fonalcsoport 1 szálának. Ezt a mintában így jeleztük: E+E= F

A fonalak ilyen cseréjével új minőségeket, új struktúrákat érhetünk el, a választott kombinációktól függően. Kifejlesztettünk egy fonal-kalkulátort, amivel kiszámolhatja, mennyi fonalra van szüksége, ha 1 szál fonal helyett 2 vagy több szál kombinációját választja. A kalkulátorhoz a linket minden minta oldalán megtalálja. Ne feledje, hogy a megadott kötéspróba határozza meg, melyik fonalakat használhatjuk. Feltétlenül készítsünk próbadarabot a választott fonalkombinációval, és ellenőrizzük, hogy be tudjuk-e tartani a megfelelő kötéspróbát.

fel

3) Can I use a different yarn than what the pattern suggests?

The important thing when changing from one yarn to another is that the knitting/crochet tension remains the same. This is so that the measurements of the finished piece will be the same as on the sketch provided. It is easier to achieve the same knitting tension using yarns from the same yarn group. It is also possible to work with multiple strands of a thinner yarn to achieve the knitting tension of a thicker one. Please try our yarn converter. We recommend you to always work a test swatch.

Please NOTE: when changing yarn the garment might have a different look and feel to the garment in the photo, due to individual properties and qualities of each yarn.

See DROPS lesson: Can I use a different yarn than the one mentioned in the pattern?

fel

4) How do I use the yarn converter?

At the top of all our patterns you’ll find a link to our yarn converter, which is a helpful tool should you wish to use a different yarn than suggested. By filling in the yarn quality you wish to replace, the amount (in your size) and number of strands, the converter will present good alternative yarns with the same knitting tension. Additionally it will tell you how much you’ll require in the new qualities and whether you’ll need to work with multiple strands. Most skeins are 50g (some are 25g or 100g).

If the pattern is worked with multiple colours, every colour will have to be converted separately. Similarly, if the pattern is worked with several strands of different yarns (for example 1 strand Alpaca and 1 strand Kid-Silk) you will have to find alternatives for each, individually.

Click here to see our yarn converter

fel

5) Why do I get the wrong knitting tension with the suggested needle size?

The needle size provided in the pattern serves only as a guide, the important thing is to follow the knitting tension. And since knitting tension is very individual, you will have to adjust the needle size to ensure that YOUR tension is the same as in the pattern – maybe you’ll have to adjust 1, or even 2 needle sizes, up or down to achieve the correct tension. For this, we recommend that you work test swatches.

Should you work with a different knitting tension than the one provided, the measurements of the finished garment might deviate from the measurement sketch.

See DROPS lesson: How to measure your tension/gauge

See DROPS video: How to make a gauge tension swatch

fel

6) Why is the pattern worked top-down?

Working a garment top-down provides more flexibility and room for personal adjustment. For example it is easier to try the garment on while working, as well as making adjustments to length of yoke and shoulder caps.

The instructions are carefully explaining every step, in the correct order. Diagrams are adjusted to the knitting direction and are worked as usual.

fel

7) Why are the sleeves shorter in larger sizes?

The total width of the garment (from wrist-to-wrist) will be larger in the larger sizes, despite the actual sleeves being shorter. The larger sizes have longer sleeve caps and wider shoulders, so there will be a good fit in all sizes.

fel

8) What is a repeat?

Diagrams are often repeated on the round or in height. 1 repeat is the diagram the way it appears in the pattern. If it says to work 5 repeats of A.1 in the round, then you work A.1 a total of 5 times after/next to each other in the round. If it says to work 2 repeats of A.1 vertically/in height you work the entire diagram once, then begin again at the start and work the entire diagram one more time.

fel

9) How do I work according to a knitting diagram?

The diagram depicts all rows/rounds, and every stitch seen from the right side. It is read from bottom to top, from right to left. 1 square = 1 stitch.

When working back and forth, every other row is worked from the right side and every other row is worked from the wrong side. When working from the wrong side, the diagram will have to be worked reversed: from left to right, knit stitches are purled, purl stitches are knit etc.

When working in the round every round is worked from the right side and the diagram are worked from right to left on all rounds.

See DROPS lesson: How to read knitting diagrams

fel

10) How do I work according to a crochet diagram?

The diagram depicts all rows/rounds, and every stitch seen from the right side. It is worked from bottom to top, from right to left.

When working back and forth every other row is worked from the right side: from right to left and every other row is worked from the wrong side: from left to right.

When working in the round, every row in the diagram are worked from the right side, from right to left.

When working a circular diagram you start in the middle and work your way outwards, counter clockwise, row by row.

The rows usually start with a given number of chain stitches (equivalent to the height of the following stitch), this will either be depicted in the diagram or explained in the pattern.

See DROPS lesson: How to read crochet diagrams

fel

11) How do I work several diagrams simultaneously on the same row/round?

Instructions for working several diagrams after each other on the same row/round, will often be written like so: “work A.1, A.2, A.3 a total of 0-0-2-3-4 times". This means you work A.1 once, then A.2 is worked once, and A.3 is repeated (in width) the number of times provided for your size – in this case like so: S = 0 times, M = 0 times, L=2 times, XL= 3 times and XXL = 4 times.

The diagrams are worked as usual: begin with the first row in A.1, then work the first row in A.2 etc.

See DROPS lesson: How to read knitting diagrams

See DROPS lesson: How to read crochet diagrams

fel

12) Why does the piece start with more chain stitches than it’s worked with?

Chain stitches are slightly narrower than other stitches and to avoid working the cast-on edge too tight, we simply chain more stitches to begin with. The stitch count will be adjusted on the following row to fit the pattern and measurement sketch.

fel

13) Why increase before the rib edge when the piece is worked top-down?

The rib edge is more elastic and will contract slightly compared to, for example, stocking stitch. By increasing before the rib edge, you avoid a visible difference in width between the rib edge and the rest of the body.

fel

14) Why increase in the cast-off edge?

It’s very easy to cast off too tightly, and by making yarn overs while casting off (and simultaneously casting these off) you avoid a too tight cast off edge.

See DROPS video: How to bind off with yarn overs (yo)

fel

15) How do I increase/decrease on every 3rd and 4th row/round alternately?

To achieve an even increase (or decrease) you can increase on, for example: every 3rd and 4th row alternately, like so: work 2 rows and increase on the 3rd row, work 3 rows and increase on the 4th. Repeat this until the increase is complete.

See DROPS lesson: Increase or decrease 1 st on every 3rd and 4th row alternately

fel

16) Why is the pattern slightly different than what I see in the photo?

Pattern repeats can vary slightly in the different sizes, in order to get the correct proportions. If you’re not working the exact same size as the garment in the photo, yours might deviate slightly. This has been carefully developed and adjusted so that the complete impression of the garment is the same in all sizes.

Make sure to follow instructions and diagrams for your size!

fel

17) How can I work a jacket in the round instead of back and forth?

Should you prefer to work in the round instead of back and forth, you may of course adjust the pattern. You’ll need to add steeks mid-front (usually 5 stitches), and follow the instructions. When you would normally turn and work from the wrong side, simply work across the steek and continue in the round. At the end you’ll cut the piece open, pick up stitches to work bands, and cover the cut edges.

See DROPS video: How to knit steeks and cut open

fel

18) Can I work a jumper back and forth instead of in the round?

Should you prefer to work back and forth instead of in the round, you may of course adjust the pattern so you work the pieces separately and then assemble them at the end. Divide the stitches for the body in 2, add 1 edge stitch in each side (for sewing) and work the front and back pieces separately.

See DROPS lesson: Can I adapt a pattern for circular needles into straight needles?

fel

19) Why do you show discontinued yarns in the patterns?

Since different yarns have different qualities and textures we have chosen to keep the original yarn in our patterns. However, you can easily find options among our available qualities by using our yarn converter, or simply pick a yarn from the same yarn group.

It is possible that some retailers still have discontinued yarns in stock, or that someone has a few skeins at home that they would like to find patterns for.

The yarn converter will provide both alternative yarn as well as required amount in the new quality.

fel

20) How do I make a women’s size garment into a men’s size one?

If you have found a pattern you like which is available in women’s size it’s not very difficult to convert it to men’s size. The biggest difference will be the length of sleeves and body. Start working on the women size that you think would fit across the chest. The additional length will be worked right before you cast off for the armhole/sleeve cap. If the pattern is worked top-down you can add the length right after the armhole or before the first decrease on sleeve.

Regarding additional yarn amount, this will depend on how much length you add, but it is better with a skein too many than too few.

fel

21) How do I prevent a hairy garment from shedding?

All yarns will have excess fibres (from production) that might come off as lint or shedding. Brushed yarns (ie hairier yarns) have more of these loose, excess fibres, causing more shedding.

Shedding also depends on what is worn under or over the garment, and whether this pulls at the yarn fibres. It’s therefore not possible to guarantee that there will be no shedding

Below are some tips on how to get the best result when working with hairier yarns:

1. When the garment is finished (before you wash it) shake it vigorously so the looser hairs come off. NOTE: do NOT use a lint roller, brush or any method that pulls at the yarn.

2. Place the garment in a plastic bag and put it in your freezer - the temperature will cause the fibres to become less attached to each other, and excess fibres will come off easier.

3. Leave in the freezer for a few hours before taking it out and shaking it again.

4. Wash the garment according to the instructions on the yarn label.

fel

22) Where on the garment is the length measured?

The measurement sketch/schematic drawing provides information regarding the full length of the garment. If it’s a jumper or a jacket the length is measured from the highest point on the shoulder closest to the neckline, and straight down to the bottom of the garment. It is NOT measured from the tip of shoulder. Similarly, the length of yoke is measured from the highest point on the shoulder and down to where yoke is split into body and sleeves.

On a jacket measures are never taken along bands, unless specifically stated. Always measure inside band stitches when measuring the length.

See DROPS lesson: How to read a schematic drawing

fel

23) How do I know how many balls of yarn I need?

The required amount of yarn is provided in grams, eg: 450 g. To calculate how many balls you’ll need you first need to know how many grams are in 1 ball (25g, 50g or 100g). This information is available if you click on the individual yarn quality on our pages. Divide the amount required with the amount of each ball. For example, if each ball is 50g (the most common amount), the calculation will be as follows: 450 / 50 = 9 balls.

fel

DROPS fonalat vásárolt a minta elkészítéséhez? akkor, abban a boltban, ahol a fonalat vásárolta, joga van segítséget kérni és kapni. A DROPS üzletek listáját ITT találja!
Még mindig nem találta meg a választ, amire szüksége van? Görgessen lejjebb, és tegye fel kérdését, és szakembereink megpróbálnak segíteni. Ez általában 5-10 munkanapon beül megtörténik.. Addig is elolvashatja a korábban, mások által feltett kérdéseket és a válaszokat, vagy csatlakozhat a Facebook-on a DROPS Workshophoz, hogy kézimunkázó társaitól kaphasson segítséget.

Megjegyzések / Kérdések (24)

country flag Helen wrote:

Hello. After the 8th increase, the smallest size should have 300 stitches. But at the start of the ribbing at the bottom of the body, the pattern states 'Knit 1 round and increase 40 stitches evenly spaced = 236 stitches.' Should this read increase 40 to 340 stitches, please? P.S. This has been a good yarn stash buster jumper for me!

27.11.2023 - 12:15

DROPS Design answered:

Dear Helen, after you have increased to 300 sts on the yoke, you will divide piece for body and sleeves so that there are 196 sts for body (including 8 sts cast on under each sleeve), then before ribbing edge at the bottom you increase 40 sts evenly (to avoid ribbing to tighten piece) = 196+40= 236 sts. Happy knitting!

27.11.2023 - 15:52

country flag Hanne Lejre Pedersen wrote:

Spændende bluse er vild mef den Hvor meget garn i væg er der brugt, mere fordi jeg vil bruge mine rester samt købe noget nyt

09.11.2023 - 14:02

DROPS Design answered:

Hej Hanne, det har vi desværre ingen oversigt over, men prøv at finde en anden bluse i DROPS Karisma i den størrelse du er ude efter - du finder målene i måleskitsen nederst i alle opskrifter - så kan du bedre sammenligne :)

10.11.2023 - 15:13

country flag Karien wrote:

Waarom verschilt de kleur op de foto met de benodigde kleur wol. Op de foto is de kraag blauw en de kleur wol zeegroen?

20.10.2023 - 15:35

DROPS Design answered:

Dag Karien,

De kleuren die je op het beeldscherm ziet kunnen altijd afwijken van de werkelijke kleuren omdat de licht per keer anders invalt en vooral bij dit soort 'moeilijke' (voor de een is het groen, de ander zegt blauw), dus bekijk altijd de daadwerkelijke kleuren van de bollen bij daglicht.

21.10.2023 - 10:32

country flag Karien wrote:

Waarom zijn de kleuren anders op de foto dan de beschreven benodigde wol. Bv. Op de foto is de kraag meer blauw en ik moet zeegroen gebruiken volgens de beschrijving.

20.10.2023 - 15:33

country flag Irina wrote:

Mardi Gras

07.08.2023 - 06:33

country flag Karin L wrote:

Rigtig fin trøje, hvor man kan få brugt alle resterne

06.08.2023 - 10:55

country flag Karina Haupt Larsen wrote:

Kulør på tilværelsen

05.08.2023 - 19:24

country flag Kristiina wrote:

It can be " Happy stripes"

04.08.2023 - 19:17

country flag Jeannine wrote:

Norwegian woods

04.08.2023 - 08:20

country flag Ritva wrote:

Song of colours

03.08.2023 - 23:03

Post a comment to pattern DROPS 245-5

Szívesen vesszük, ha megosztja velünk gondolatait erről a mintáról.

Ha kérdést szeretne feltenni, ügyeljen arra, hogy a megfelelő kategóriát válassza ki, így fegyorsíthatja a válaszadás folyamatát. Það verður að merkja við svæði merktri með *.