December Carnival by DROPS Design

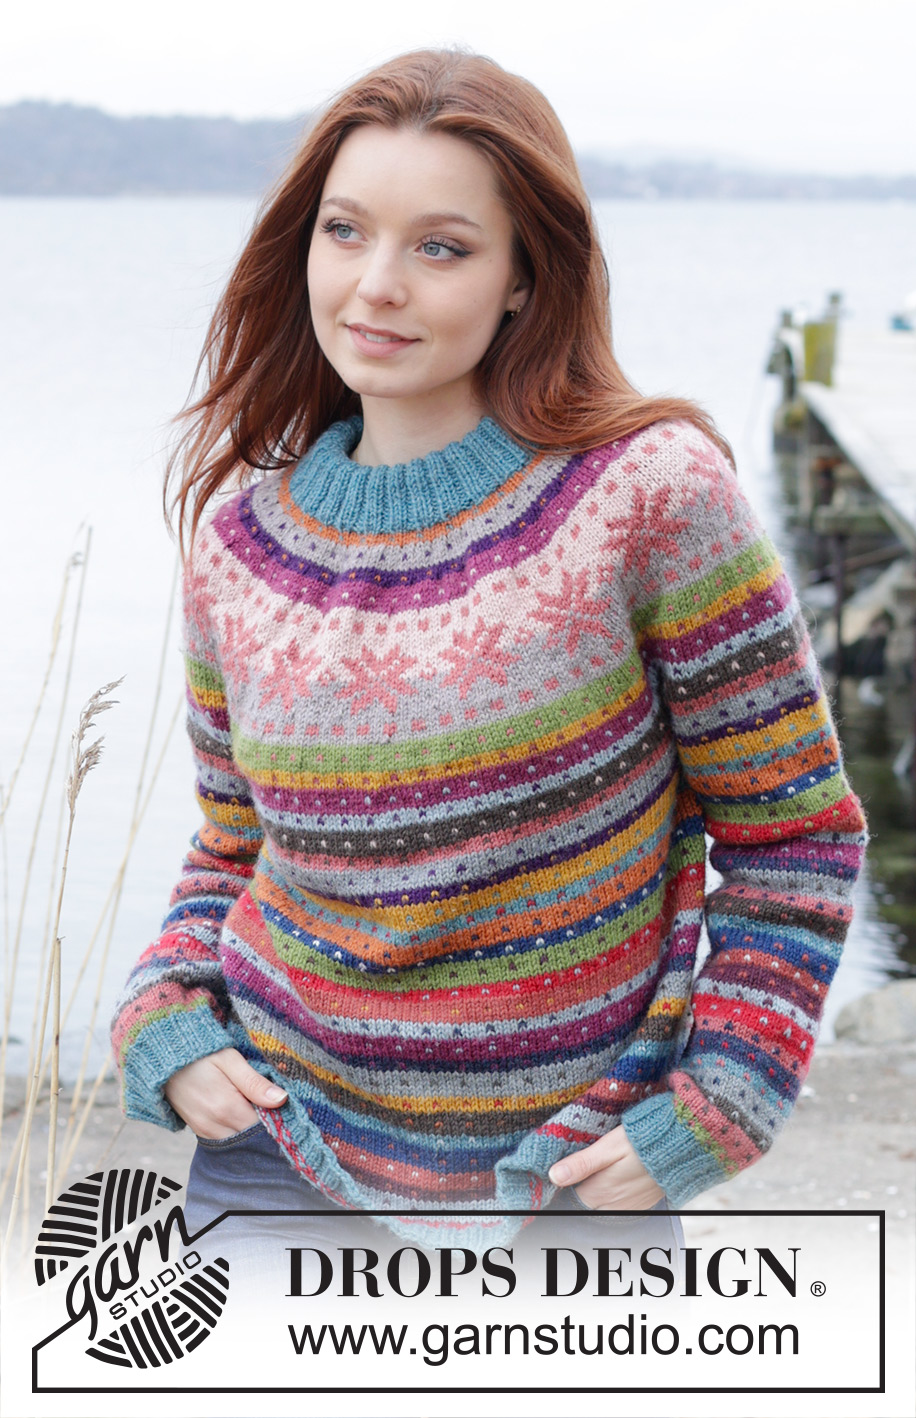
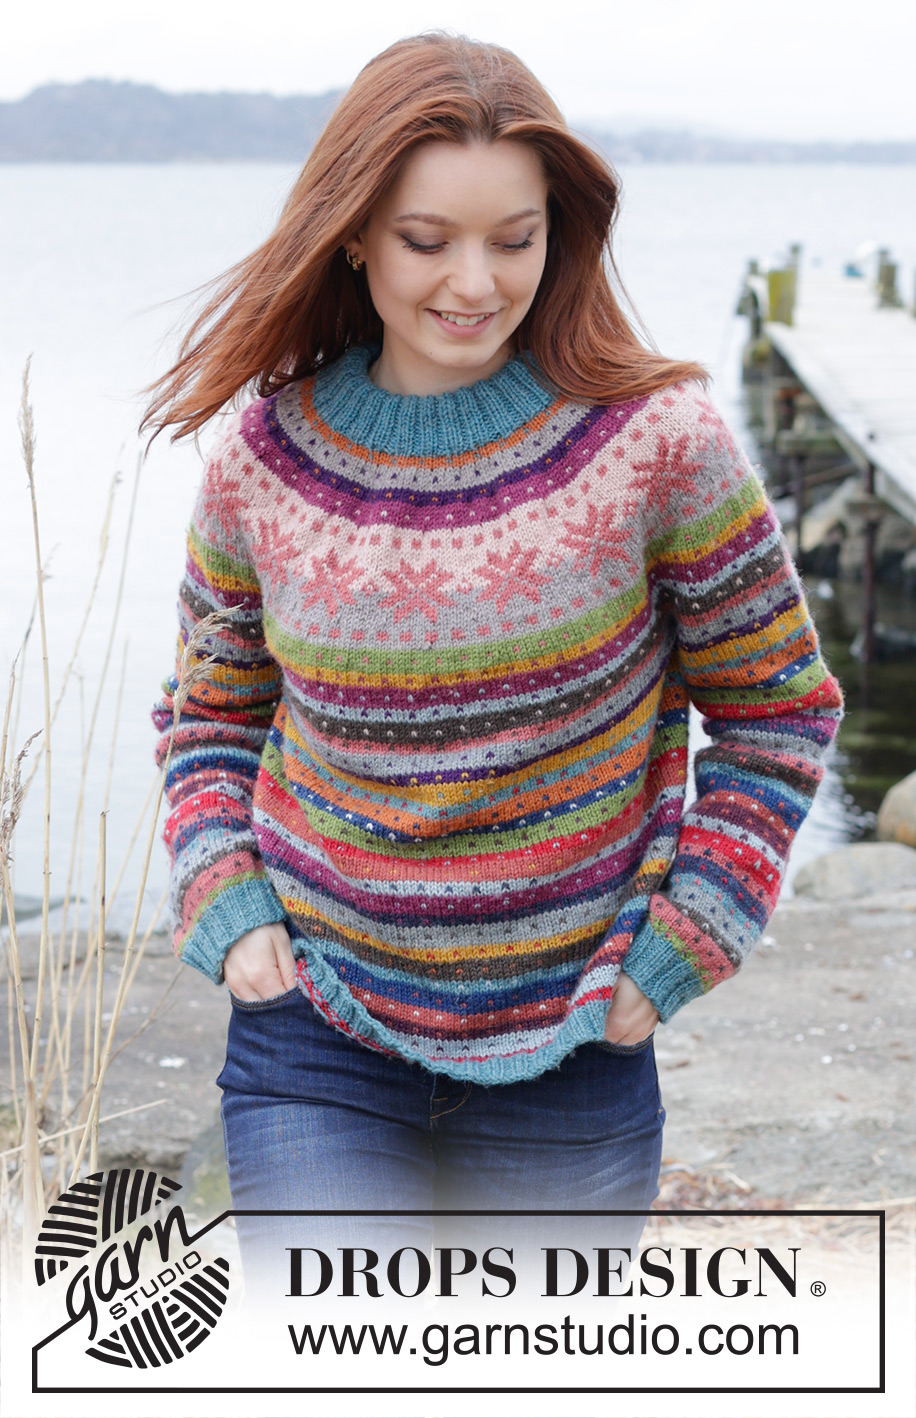
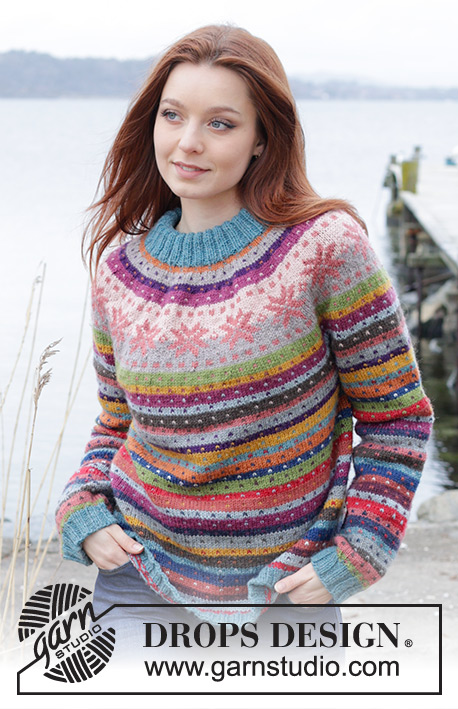
Pulovr s kruhovým sedlem a vyplétaným norským vzorem pletený shora dolů z příze DROPS Karisma. Velikost XS - XXL.

DROPS 245-5
DROPS Design: model u-962
Skupina přízí B
-------------------------------------------------------

VELIKOST:
XS - S - M - L - XL - XXL

MATERIÁL:
DROPS KARISMA firmy Garnstudio (spadá do skupiny přízí B)
150-150-150-200-200-200 g barva č. 50, modrozelená
50-50-50-50-100-100 g barva č. 80, růže
50-50-50-50-100-100 g barva č. 84, pudrová
50-50-50-50-100-100 g barva č. 55, hnědo-béžová
50-50-50-50-50-50 g barva č. 04, hnědá
50-50-50-50-50-50 g barva č. 11, oranžová
50-50-50-50-50-50 g barva č. 21, šedá
50-50-50-50-50-50 g barva č. 37, tmavě šedo modrá
50-50-50-50-50-50 g barva č. 39, tmavě starorůžová
50-50-50-50-50-50 g barva č. 45, světle olivová
50-50-50-50-50-50 g barva č. 48, vínová
50-50-50-50-50-50 g barva č. 52, tmavě hořčicová
50-50-50-50-50-50 g barva č. 69, světle šedozelená
50-50-50-50-50-50 g barva č. 73, petrol
50-50-50-50-50-50 g barva č. 76, lilek
50-50-50-50-50-50 g barva č. 82, kaštanová hnědá

JEHLICE:
DROPS KRUHOVÁ JEHLICE č. 4: délka 40 cm a 80 cm.
DROPS KRUHOVÁ JEHLICE č. 3: délka 40 cm a 80 cm.
DROPS PONOŽKOVÉ JEHLICE č. 4.
DROPS PONOŽKOVÉ JEHLICE č. 3.
Můžete použít techniku zvanou KOUZELNÁ SMYČKA - pak stačí pro všechny velikosti jen kruhová jehlice dlouhá 80 cm

ZKUŠEBNÍ VZOREK:
21 ok na šířku a 28 řad na výšku lícovým žerzejem a norským vzorem = 10 x 10 cm.
POZNÁMKA: Uvedená síla jehlic je pouze orientační. Máte-li ve svém zkušebním vzorku více ok na 10 cm, použijte jehlice silnější. Pokud máte naopak méně ok na 10 cm, použijte jehlice slabší.

-------------------------------------------------------

Magická smyčka či kouzelný kroužek – Podívejte se, jak na něj
Zkušební vzorek – Podívejte se, jak ho měřit a proč
Náhradní příze – Podívejte se, jak změnit přízi
Skupina přízí A až F – Neměňte návod, změňte přízi
Spotřeba příze při použití náhradní příze – Využijte náš převodník

-------------------------------------------------------


100% vlna
od 70.00 Kč /50g
DROPS Karisma uni colour DROPS Karisma uni colour 70.00 Kč /50g
Ganella
Objednat
DROPS Karisma mix DROPS Karisma mix 70.00 Kč /50g
Ganella
Objednat
needles Jehlice a háčky Objednat
Přízi na tento model můžete mít už za 1260Kč. Více zde.

Návod

-------------------------------------------------------

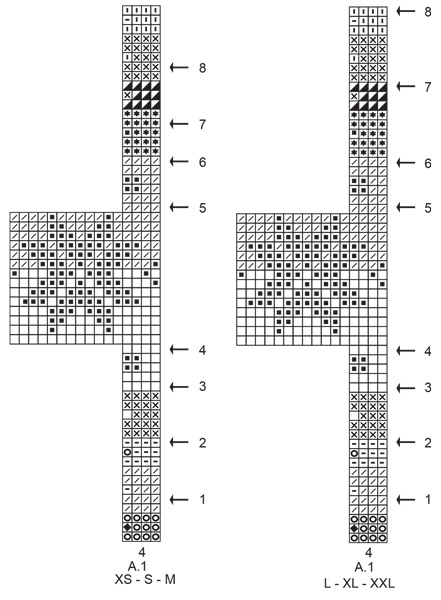
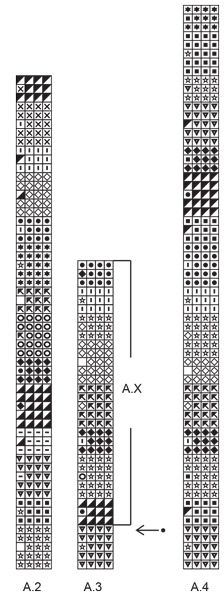
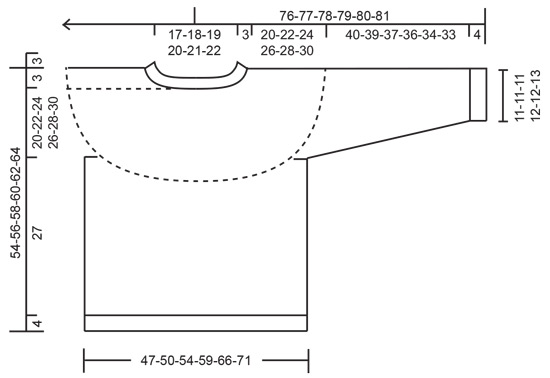
VYSVĚTLIVKY K NÁVODU:

-------------------------------------------------------

VZOR:
Viz schémata A.1 až A.4. Vybereme si schéma pro požadovanou velikost (vztahuje se na vzor A.1). Celý vzor pleteme lícovým žerzejem.

TIP:
Abychom předešli deformování pleteniny v místech s vyplétaným vzorem, dbáme na to, aby vlákna příze vedená za prací nebyla příliš utažená. Pokud má vzor přece jen tendenci se příliš stahovat, použijeme na vyplétání vzoru silnější jehlice.

TIP – UJÍMÁNÍ (platí pro rukávy):
Ujímáme 1 oko na každé straně značky takto: Začínáme 3 oka před značkou, 2 oka spleteme hladce, 2 oka upleteme hladce (značka leží mezi těmito oky), 1 oko sejmeme hladce, 1 oko upleteme hladce a sejmuté oko přes ně přetáhneme (= ujmuli jsme 2 oka).

-------------------------------------------------------

PRÁCE ZAČÍNÁ ZDE:

-------------------------------------------------------

PULOVR – JAK BUDEME POSTUPOVAT:
Pleteme shora dolů v kruhových řadách a na kruhové jehlici. Nejdříve upleteme lem průkrčníku a sedlo. Od sedla pak oddělíme rukávy a trup dopleteme v kruhových řadách. Rukávy pleteme v kruhových řadách na krátké kruhové jehlici popř. ponožkových jehlicích.

DVOJITÝ LEM PRŮKRČNÍKU:

Na kruhovou jehlici č. 4 nahodíme modrozelenou přízí DROPS Karisma 96-100-104-108-112-116 ok. Převedeme práci na kruhovou jehlici č. 3 a upleteme 1 kruhovou řadu hladce. Potom pokračujeme v kruhových řadách pružným vzorem 2/2 (tj. střídáme 2 oka hladce, 2 obrace). Když je lem 10 cm vysoký, převedeme pleteninu na kruhovou jehlici č. 4.
Upleteme 1 kruhovou řadu hladce a SOUČASNĚ rovnoměrně přidáme 24-28-32-36-36-36 ok = 120-128-136-144-148-152 ok. Pak upleteme ještě 1 kruhovou řadu hladce.
Označíme si začátek kruhové řady - doprostřed zadního dílu vložíme značku.
SEDLO MĚŘÍME OD TOHOTO MÍSTA.

SEDLO:
Viz TIP! Pleteme v kruhových řadách vzor A.1 (30-32-34-36-37-38 sekvencí po 4 okách) a SOUČASNĚ v každé řadě označené ve vzoru A.1 šipkou přidáváme takto:
1. ŠIPKA: Přidáme rovnoměrně 44-44-44-52-52-56 ok = 164-172-180-196-200-208 ok.
2. ŠIPKA: Přidáme rovnoměrně 40-40-44-48-52-52 ok = 204-212-224-244-252-260 ok.
3. ŠIPKA: Přidáme rovnoměrně 36-36-40-44-48-48 ok = 240-248-264-288-300-308 ok.
4. ŠIPKA: Přidáme rovnoměrně 0-8-8-16-20-28 ok = 240-256-272-304-320-336 ok.
5. ŠIPKA: Přidáme rovnoměrně 24-28-28-24-28-32 ok = 264-284-300-328-348-368 ok.
6. ŠIPKA: Přidáme rovnoměrně 16-16-20-20-20-24 ok = 280-300-320-348-368-392 ok.
7. ŠIPKA: Přidáme rovnoměrně 12-12-12-16-16-20 ok = 292-312-332-364-384-412 ok.
8. ŠIPKA: Přidáme rovnoměrně 8-12-8-12-12-16 ok = 300-324-340-376-396-428 ok.

Ve výši 20-22-24-26-28-30 cm od značky rozdělíme pleteninu na trup a rukávy; SOUČASNĚ po dokončení sekvence vzoru A.1 na výšku pleteme vzor A.2.
Upleteme 45-49-51-56-61-67 ok jako dosud (= polovina zadního dílu), odložíme následujících 60-64-68-76-76-80 ok na pomocnou jehlici (= rukáv), nahodíme 8-8-12-12-16-16 nových ok (= podpaží), upleteme 90-98-102-112-122-134 ok jako dosud (= přední díl), odložíme následujících 60-64-68-76-76-80 ok na pomocnou jehlici (= rukáv), nahodíme 8-8-12-12-16-16 nových ok (= podpaží), upleteme zbývajících 45-49-51-56-61-67 jako dosud (= polovina zadního dílu).
Přízi odstřihneme. Trup a rukávy dokončíme samostatně.
DÍL TEĎ MĚŘÍME OD TOHOTO MÍSTA.

TRUP:
= 196-212-228-248-276-300 ok. Doprostřed nových 8-8-12-12-16-16 ok v podpaží vložíme značku. Začínáme u značky a pokračujeme v kruhových řadách vzorem A.2 (dbáme na to, abychom pokračovali další kruhovou řadou vzoru ze sedla).
Po dokončení sekvence vzoru A.2 na výšku, pleteme vzor A.3 až do výše 27 cm od podpaží – do konce zbývají asi 4 cm – dokončíme celý pruh. Pokud je pletenina kratší, pleteme vzor A.X až do požadované výše. Poté převedeme pleteninu na kruhovou jehlici č.3 a pleteme modrozelenou přízí.
Upleteme 1 kruhovou řadu hladce a SOUČASNĚ přidáme rovnoměrně 40-40-44-52-56-60 ok = 236-252-272-300-332-360 ok. Dále pleteme lem pružným vzorem 2/2 (tj. střídáme 2 oka hladce, 2 oka obrace). Když je lem vysoký 4 cm, oka dle vzoru uzavřeme. Pulovr měří asi 54-56-58-60-62-64 cm od ramene.

RUKÁVY:
Odložených 60-64-68-76-76-80 ok jednoho rukávu vrátíme z pomocné jehlice na krátkou kruhovou jehlici nebo ponožkové jehlice č. 4 a navíc k nim nabereme po 1 oku z každého z 8-8-12-12-16-16 nových ok nahozených v podpaží = 68-72-80-88-92-96 ok.
Doprostřed nových ok v podpaží vložíme značku - později ji využijeme při ujímání, snímáme ji proto během práce do aktuálně pletené kruhové řady. Začínáme u značky a pokračujeme v kruhových řadách vzorem A.2 (dbáme na to, abychom pokračovali správnou kruhovou řadou vzoru ze sedla).
NEŽ BUDETE POKRAČOVAT, PŘEČTĚTE SI POZORNĚ CELÝ NÁSLEDUJÍCÍ POPIS!

Po dokončení sekvence vzoru A.2 (na výšku) pleteme vzor A.4; SOUČASNĚ ve výši asi 4-4-4-2-2-2 cm od podpaží ujmeme na každé straně značky 1 oko – viz TIP - UJÍMÁNÍ.
Takto ujímáme každých 3-3-2-1,5-1,5-1,5 cm výšky, celkem 12-12-16-18-20-20x = 44-48-48-52-52-56 ok. Pak pleteme až do výše rukávu 40-39-37-36-34-33 cm - dopleteme celý pruh - do konce nám zbývají asi 4 cm.
Převedeme pleteninu na ponožkové jehlice č. 3. Upleteme 1 kruhovou řadu hladce a SOUČASNĚ rovnoměrně přidáme 4-4-4-8-8-8 ok = 48-52-52-60-60-64 ok.
Pak pleteme lem pružným vzorem 2/2 (tj. střídáme 2 oka hladce, 2 oka obrace). Když je lem vysoký 4 cm, oka dle vzoru uzavřeme. Rukáv měří asi 44-43-41-40-38-37 cm od podpaží. Stejným způsobem upleteme i druhý rukáv.

DOKONČENÍ:
Lem průkrčníku přeložíme napolovic do rubu a přišijeme, dbáme na to, aby byl šev pružný - jinak se bude lem kroutit a ohýbat na lícovou stranu.

Schéma

symbols = růže
symbols = pudrová
symbols = oranžová
symbols = modrozelená
symbols = lilek
symbols = tmavě starorůžová
symbols = hnědo-béžová
symbols = světle olivová
symbols = tmavě hořčicová
symbols = světle šedozelená
symbols = hnědá
symbols = šedá
symbols = vínová
symbols = tmavě šedo modrá
symbols = petrol
symbols = kaštanová hnědá
symbols = kruhová řada s přidáváním
symbols = šipka platí pro rukáv. Upleteme kruhovou řadu se šipkou, poté pleteme vzor A.4 až do konce
diagram
diagram
diagram

Potřebujete poradit s tímto návodem?

Děkujeme, že jste si vybrali návod DROPS Design. Zakládáme si na tom, že dáváme k dispozici návody ověřené a snadno srozumitelné. Všechny návody jsou přeložené z norského originálu a tak si můžete kdykoli srovnat rozměry a počty s původním návodem (DROPS 245-5) .

Máte s návodem potíže? Níže najdete seznam odkazů, které vám pomohou dokončit vaše dílo co nejdříve - nebo se třeba přiučit něco nového.

signature-image signature

Máte s návodem potíže? Níže najdete seznam odkazů, které vám pomohou dokončit vaše dílo co nejdříve - nebo se třeba přiučit něco nového.

Každý náš návod je doprovázen speciálními video-ukázkami, které vás navedou.

Máme takopodrobné rozpisy různých technik a postupů krok za krokem - najdete je zde.

1) Why is the knitting/crochet tension so important?

Knitting tension is what determines the final measurements of your work, and is usually measured per 10 x 10 cm. It is provided like so: number of stitches in width x number of rows in height - eg: 19 stitches x 26 rows = 10 x 10 cm.

The knitting tension is very individual; some people knit/crochet loosely while others work tightly. You adjust the knitting tension with the needle size, which is why the suggested needle size only serve as a guide! You need to adjust this (up or down) to ensure that YOUR knitting tension matches the knitting tension provided in the pattern. If you work with a different knitting tension than provided you will have a different yarn consumption, and your work will have different measurements than what the pattern suggests.

The knitting tension also determines which yarns can replace each other. As long as you achieve the same knitting tension you can replace one yarn with another.

See DROPS lesson: How to measure your tension/gauge

See DROPS video: How to make a gauge tension swatch

nahoru

2) What are the yarn groups?

All our yarns are categorised into yarn groups (from A to F) according to thickness and knitting tension – group A contains the thinnest yarns and group F the thickest. This makes it easier for you to find alternative yarns to our patterns, should you wish to switch yarn. All yarns within the same group have a similar knitting tension and can easily replace each other. However, different yarn qualities have different structures and properties which will give the finished work a unique look and feel.

Click here for an overview of the yarns in each yarn group

nahoru

3) Can I use a different yarn than what the pattern suggests?

The important thing when changing from one yarn to another is that the knitting/crochet tension remains the same. This is so that the measurements of the finished piece will be the same as on the sketch provided. It is easier to achieve the same knitting tension using yarns from the same yarn group. It is also possible to work with multiple strands of a thinner yarn to achieve the knitting tension of a thicker one. Please try our yarn converter. We recommend you to always work a test swatch.

Please NOTE: when changing yarn the garment might have a different look and feel to the garment in the photo, due to individual properties and qualities of each yarn.

See DROPS lesson: Can I use a different yarn than the one mentioned in the pattern?

nahoru

4) How do I use the yarn converter?

At the top of all our patterns you’ll find a link to our yarn converter, which is a helpful tool should you wish to use a different yarn than suggested. By filling in the yarn quality you wish to replace, the amount (in your size) and number of strands, the converter will present good alternative yarns with the same knitting tension. Additionally it will tell you how much you’ll require in the new qualities and whether you’ll need to work with multiple strands. Most skeins are 50g (some are 25g or 100g).

If the pattern is worked with multiple colours, every colour will have to be converted separately. Similarly, if the pattern is worked with several strands of different yarns (for example 1 strand Alpaca and 1 strand Kid-Silk) you will have to find alternatives for each, individually.

Click here to see our yarn converter

nahoru

5) Why do I get the wrong knitting tension with the suggested needle size?

The needle size provided in the pattern serves only as a guide, the important thing is to follow the knitting tension. And since knitting tension is very individual, you will have to adjust the needle size to ensure that YOUR tension is the same as in the pattern – maybe you’ll have to adjust 1, or even 2 needle sizes, up or down to achieve the correct tension. For this, we recommend that you work test swatches.

Should you work with a different knitting tension than the one provided, the measurements of the finished garment might deviate from the measurement sketch.

See DROPS lesson: How to measure your tension/gauge

See DROPS video: How to make a gauge tension swatch

nahoru

6) Why is the pattern worked top-down?

Working a garment top-down provides more flexibility and room for personal adjustment. For example it is easier to try the garment on while working, as well as making adjustments to length of yoke and shoulder caps.

The instructions are carefully explaining every step, in the correct order. Diagrams are adjusted to the knitting direction and are worked as usual.

nahoru

7) Why are the sleeves shorter in larger sizes?

The total width of the garment (from wrist-to-wrist) will be larger in the larger sizes, despite the actual sleeves being shorter. The larger sizes have longer sleeve caps and wider shoulders, so there will be a good fit in all sizes.

nahoru

8) What is a repeat?

Diagrams are often repeated on the round or in height. 1 repeat is the diagram the way it appears in the pattern. If it says to work 5 repeats of A.1 in the round, then you work A.1 a total of 5 times after/next to each other in the round. If it says to work 2 repeats of A.1 vertically/in height you work the entire diagram once, then begin again at the start and work the entire diagram one more time.

nahoru

9) How do I work according to a knitting diagram?

The diagram depicts all rows/rounds, and every stitch seen from the right side. It is read from bottom to top, from right to left. 1 square = 1 stitch.

When working back and forth, every other row is worked from the right side and every other row is worked from the wrong side. When working from the wrong side, the diagram will have to be worked reversed: from left to right, knit stitches are purled, purl stitches are knit etc.

When working in the round every round is worked from the right side and the diagram are worked from right to left on all rounds.

See DROPS lesson: How to read knitting diagrams

nahoru

10) How do I work according to a crochet diagram?

The diagram depicts all rows/rounds, and every stitch seen from the right side. It is worked from bottom to top, from right to left.

When working back and forth every other row is worked from the right side: from right to left and every other row is worked from the wrong side: from left to right.

When working in the round, every row in the diagram are worked from the right side, from right to left.

When working a circular diagram you start in the middle and work your way outwards, counter clockwise, row by row.

The rows usually start with a given number of chain stitches (equivalent to the height of the following stitch), this will either be depicted in the diagram or explained in the pattern.

See DROPS lesson: How to read crochet diagrams

nahoru

11) How do I work several diagrams simultaneously on the same row/round?

Instructions for working several diagrams after each other on the same row/round, will often be written like so: “work A.1, A.2, A.3 a total of 0-0-2-3-4 times". This means you work A.1 once, then A.2 is worked once, and A.3 is repeated (in width) the number of times provided for your size – in this case like so: S = 0 times, M = 0 times, L=2 times, XL= 3 times and XXL = 4 times.

The diagrams are worked as usual: begin with the first row in A.1, then work the first row in A.2 etc.

See DROPS lesson: How to read knitting diagrams

See DROPS lesson: How to read crochet diagrams

nahoru

12) Why does the piece start with more chain stitches than it’s worked with?

Chain stitches are slightly narrower than other stitches and to avoid working the cast-on edge too tight, we simply chain more stitches to begin with. The stitch count will be adjusted on the following row to fit the pattern and measurement sketch.

nahoru

13) Why increase before the rib edge when the piece is worked top-down?

The rib edge is more elastic and will contract slightly compared to, for example, stocking stitch. By increasing before the rib edge, you avoid a visible difference in width between the rib edge and the rest of the body.

nahoru

14) Why increase in the cast-off edge?

It’s very easy to cast off too tightly, and by making yarn overs while casting off (and simultaneously casting these off) you avoid a too tight cast off edge.

See DROPS video: How to bind off with yarn overs (yo)

nahoru

15) How do I increase/decrease on every 3rd and 4th row/round alternately?

To achieve an even increase (or decrease) you can increase on, for example: every 3rd and 4th row alternately, like so: work 2 rows and increase on the 3rd row, work 3 rows and increase on the 4th. Repeat this until the increase is complete.

See DROPS lesson: Increase or decrease 1 st on every 3rd and 4th row alternately

nahoru

16) Why is the pattern slightly different than what I see in the photo?

Pattern repeats can vary slightly in the different sizes, in order to get the correct proportions. If you’re not working the exact same size as the garment in the photo, yours might deviate slightly. This has been carefully developed and adjusted so that the complete impression of the garment is the same in all sizes.

Make sure to follow instructions and diagrams for your size!

nahoru

17) How can I work a jacket in the round instead of back and forth?

Should you prefer to work in the round instead of back and forth, you may of course adjust the pattern. You’ll need to add steeks mid-front (usually 5 stitches), and follow the instructions. When you would normally turn and work from the wrong side, simply work across the steek and continue in the round. At the end you’ll cut the piece open, pick up stitches to work bands, and cover the cut edges.

See DROPS video: How to knit steeks and cut open

nahoru

18) Can I work a jumper back and forth instead of in the round?

Should you prefer to work back and forth instead of in the round, you may of course adjust the pattern so you work the pieces separately and then assemble them at the end. Divide the stitches for the body in 2, add 1 edge stitch in each side (for sewing) and work the front and back pieces separately.

See DROPS lesson: Can I adapt a pattern for circular needles into straight needles?

nahoru

19) Why do you show discontinued yarns in the patterns?

Since different yarns have different qualities and textures we have chosen to keep the original yarn in our patterns. However, you can easily find options among our available qualities by using our yarn converter, or simply pick a yarn from the same yarn group.

It is possible that some retailers still have discontinued yarns in stock, or that someone has a few skeins at home that they would like to find patterns for.

The yarn converter will provide both alternative yarn as well as required amount in the new quality.

nahoru

20) How do I make a women’s size garment into a men’s size one?

If you have found a pattern you like which is available in women’s size it’s not very difficult to convert it to men’s size. The biggest difference will be the length of sleeves and body. Start working on the women size that you think would fit across the chest. The additional length will be worked right before you cast off for the armhole/sleeve cap. If the pattern is worked top-down you can add the length right after the armhole or before the first decrease on sleeve.

Regarding additional yarn amount, this will depend on how much length you add, but it is better with a skein too many than too few.

nahoru

21) How do I prevent a hairy garment from shedding?

All yarns will have excess fibres (from production) that might come off as lint or shedding. Brushed yarns (ie hairier yarns) have more of these loose, excess fibres, causing more shedding.

Shedding also depends on what is worn under or over the garment, and whether this pulls at the yarn fibres. It’s therefore not possible to guarantee that there will be no shedding

Below are some tips on how to get the best result when working with hairier yarns:

1. When the garment is finished (before you wash it) shake it vigorously so the looser hairs come off. NOTE: do NOT use a lint roller, brush or any method that pulls at the yarn.

2. Place the garment in a plastic bag and put it in your freezer - the temperature will cause the fibres to become less attached to each other, and excess fibres will come off easier.

3. Leave in the freezer for a few hours before taking it out and shaking it again.

4. Wash the garment according to the instructions on the yarn label.

nahoru

22) Where on the garment is the length measured?

The measurement sketch/schematic drawing provides information regarding the full length of the garment. If it’s a jumper or a jacket the length is measured from the highest point on the shoulder closest to the neckline, and straight down to the bottom of the garment. It is NOT measured from the tip of shoulder. Similarly, the length of yoke is measured from the highest point on the shoulder and down to where yoke is split into body and sleeves.

On a jacket measures are never taken along bands, unless specifically stated. Always measure inside band stitches when measuring the length.

See DROPS lesson: How to read a schematic drawing

nahoru

23) How do I know how many balls of yarn I need?

The required amount of yarn is provided in grams, eg: 450 g. To calculate how many balls you’ll need you first need to know how many grams are in 1 ball (25g, 50g or 100g). This information is available if you click on the individual yarn quality on our pages. Divide the amount required with the amount of each ball. For example, if each ball is 50g (the most common amount), the calculation will be as follows: 450 / 50 = 9 balls.

nahoru

Pořídili jste si přízi DROPS na tento model? Pak máte taky právo žádat po svém prodejci, u něhož jste nakoupili, pomoc a rady. Seznam DROPS obchodů najdete tady!
Pořád se nemůžete dobrat odpovědi, kterou hledáte? Pak posuňte stránku dolů a napište nám svůj dotaz, naši specialisté se vám pokusí poradit. Obvykle to zvládneme během 5 až 10 pracovních dnů.. Mezitím si můžete pročíst otázky a odpovědi, které k tomuto modelu položili ostatní, nebo navštívit skupinu DROPS Workshop na Facebooku, kde vám může poradit některá spřízněná duše!

Komentáře / Otázky (24)

country flag Helen wrote:

Hello. After the 8th increase, the smallest size should have 300 stitches. But at the start of the ribbing at the bottom of the body, the pattern states 'Knit 1 round and increase 40 stitches evenly spaced = 236 stitches.' Should this read increase 40 to 340 stitches, please? P.S. This has been a good yarn stash buster jumper for me!

27.11.2023 - 12:15

DROPS Design answered:

Dear Helen, after you have increased to 300 sts on the yoke, you will divide piece for body and sleeves so that there are 196 sts for body (including 8 sts cast on under each sleeve), then before ribbing edge at the bottom you increase 40 sts evenly (to avoid ribbing to tighten piece) = 196+40= 236 sts. Happy knitting!

27.11.2023 - 15:52

country flag Hanne Lejre Pedersen wrote:

Spændende bluse er vild mef den Hvor meget garn i væg er der brugt, mere fordi jeg vil bruge mine rester samt købe noget nyt

09.11.2023 - 14:02

DROPS Design answered:

Hej Hanne, det har vi desværre ingen oversigt over, men prøv at finde en anden bluse i DROPS Karisma i den størrelse du er ude efter - du finder målene i måleskitsen nederst i alle opskrifter - så kan du bedre sammenligne :)

10.11.2023 - 15:13

country flag Karien wrote:

Waarom verschilt de kleur op de foto met de benodigde kleur wol. Op de foto is de kraag blauw en de kleur wol zeegroen?

20.10.2023 - 15:35

DROPS Design answered:

Dag Karien,

De kleuren die je op het beeldscherm ziet kunnen altijd afwijken van de werkelijke kleuren omdat de licht per keer anders invalt en vooral bij dit soort 'moeilijke' (voor de een is het groen, de ander zegt blauw), dus bekijk altijd de daadwerkelijke kleuren van de bollen bij daglicht.

21.10.2023 - 10:32

country flag Karien wrote:

Waarom zijn de kleuren anders op de foto dan de beschreven benodigde wol. Bv. Op de foto is de kraag meer blauw en ik moet zeegroen gebruiken volgens de beschrijving.

20.10.2023 - 15:33

country flag Irina wrote:

Mardi Gras

07.08.2023 - 06:33

country flag Karin L wrote:

Rigtig fin trøje, hvor man kan få brugt alle resterne

06.08.2023 - 10:55

country flag Karina Haupt Larsen wrote:

Kulør på tilværelsen

05.08.2023 - 19:24

country flag Kristiina wrote:

It can be " Happy stripes"

04.08.2023 - 19:17

country flag Jeannine wrote:

Norwegian woods

04.08.2023 - 08:20

country flag Ritva wrote:

Song of colours

03.08.2023 - 23:03

Přidejte komentář k návodu DROPS 245-5

Rádi bychom věděli, co si o tomto modelu myslíte!

Pokud se chcete na něco zeptat, dbejte prosím na to, abyste ve formuláři níže vybrali správnou kategorii - díky tomu se dříve dozvíte, co potřebujete vědět. Povinná pole jsou označena *.