
Populaire categorieën
Op zoek naar garen?


Opmerkingen / Vragen (6)
![]() Michelle schreef:
Michelle schreef:
Thanks for the reply about the neckline. But if you look at the photo of the finished garment on the model, the neckline starts only a few cms before the shoulder seam. The way the instructions read, the neckline starts much further down - only 10cm after the start of the armholes. The way the instructions read and the way the garment looks on the model are completely different.
13.01.2022 - 13:47DROPS Design antwoorde:
Dear Michelle, correct, you start neck 15 cm before shoulder, ie 10 cm after armhole (= armhole is a total of 25 cm). Feel free to make it shorter. Happy knitting!
13.01.2022 - 16:15
![]() Michelle schreef:
Michelle schreef:
Two problems: 1. I have left 8 stitches on a holder after 55cm but this leaves the front of the sweater looking more like a V neck than what is shown on the model photo. My tension is correct yet 55cm brings me to nowhere near where the pattern is showing as being at the neckline in the photo. Is there a typo?? 2. Pattern says only one ball of each shade other than brown & cream but I have run out of the olive half way up the 2nd sleeve and now it's out of stock!
11.01.2022 - 14:37DROPS Design antwoorde:
Dear Michelle, the neck on front piece started when piece measures 55 cm - see also measurement chart for the V-neck. You then continue back and forth decreasing for neck on each side, and cast off stitches for neck on back piece when piece measures 68 cm. The height of the neck is now shown on the chart, only its shape. You then will work M.1 around (picking sts around + 8 sts on thread). Sorry for the missing yarn, this info will be forwarded to our design team. Happy knitting!
12.01.2022 - 06:32
![]() Michelle schreef:
Michelle schreef:
What a good job I decided to watch some of the explanatory videos BEFORE buying all my yarn etc. There is nothing in the pattern itself that mentions that you need A SEWING MACHINE!!!! Is it possible to complete this sweater by splitting the front and the back at the beginning of the armholes and working from two lots of yarn? I really don't want to have to go out an buy a sewing machine - that makes it a very expensive sweater indeed.
18.11.2021 - 12:09DROPS Design antwoorde:
Dear Michelle, sure you can adjust the pattern to divide piece for armholes instead of casting on steek stitches - just cast on 1 extra st on each side for seam allowance and adapt pattern if necessary - or find with this video other way to work and cut steek stitches without sewing machine, but with a crochet hook. Happy knitting!
18.11.2021 - 17:18
![]() Rita schreef:
Rita schreef:
Grazie per la risposta, ma intrecciando solo sul diritto (ferri alterni), significa che lo scollo a V viene modellato sempre e solo da una parte delle 8 maglie messe in attesa sul ferro ausiliario. Cosa non capisco? Grazie Rita
07.05.2018 - 23:17DROPS Design antwoorde:
Buongiorno Rita, si, quando mette le maglie centrali in sospeso lavora le parti laterali in modo separato, come indicato, prima una spalla poi l'altra. Buon lavoro!
08.05.2018 - 09:23
![]() Rita schreef:
Rita schreef:
“Quando il lavoro misura 55 cm trasferire le 8 m centrali per il collo davanti su un fermamaglie e finire il lavoro avanti e indietro sui f. Continuare a intrecciare per modellare la scollatura a f alterni: 1 m 15 volte. “ significa che intreccio una maglia sul diritto vicino alle 8 maglie in attesa, poi giro il lavoro e intreccio una maglia sul rovescio vicino alle maglie in attesa. Faccio un avanti e un indietro senza intrecciare (ferri alterni) e poi ripeto per altre 14 volte? Grazie Rita
06.05.2018 - 23:26DROPS Design antwoorde:
Buongiorno Rita. Deve chiudere la maglia un ferro sì e un ferro no, quindi se intreccia la prima volta sul diritto del lavoro, lavora il ferro successivo (sul rovescio) senza intrecciare, poi intreccia nuovamente sul diritto. Buon lavoro!
07.05.2018 - 08:49
![]() Sophie Serot schreef:
Sophie Serot schreef:
Ce modèle est superbe j'ai promis de le réaliser pour ma fille le problème c'est qu'elle fait une taille xs/S comment adapter ce pull à sa taille (en réduisant d'un motif soit 14 mailles la réduction sera -t' elle suffisante et comment du coup adapter les manches? merci de votre aide je n'ai pas l'habitude des jacquards mais plutôt des torsades ou des points ajourés.
30.11.2016 - 16:29DROPS Design antwoorde:
Bonjour Mme Serot, vous pouvez vous aider du schéma des mesures et d'un modèle analogue qui lui irait pour ajuster comme vous le souhaitez. Pour toute assistance personnalisée, contactez votre magasin, il pourra vous aider et vous renseigner. Bon tricot!
01.12.2016 - 08:53
|
||||||||||||||||||||||||||||||||||
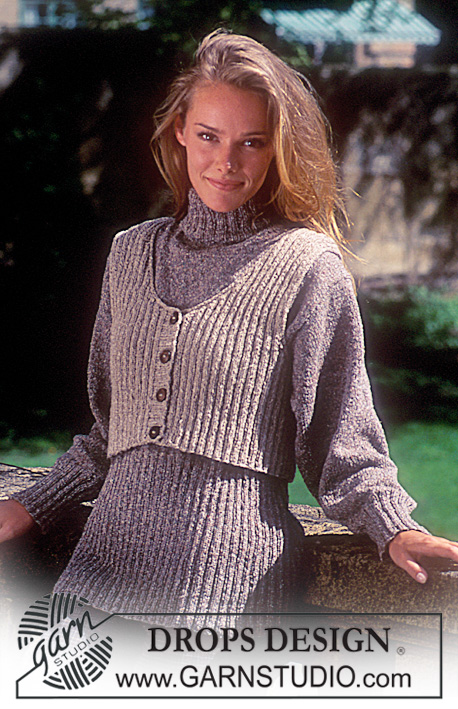
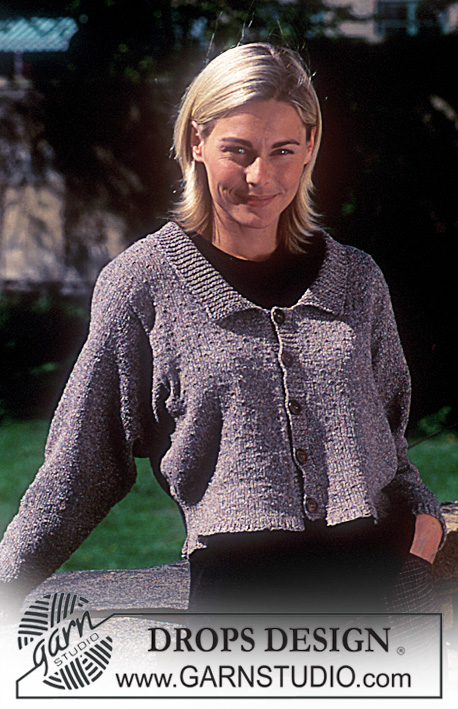
DROPS 43-10 |
||||||||||||||||||||||||||||||||||
|
|
||||||||||||||||||||||||||||||||||
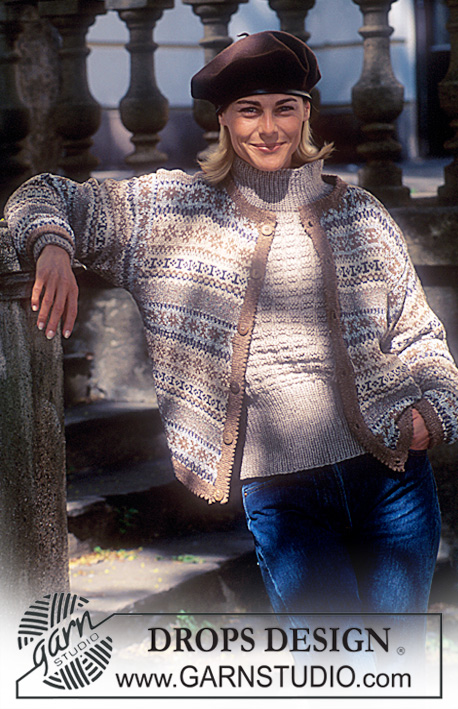
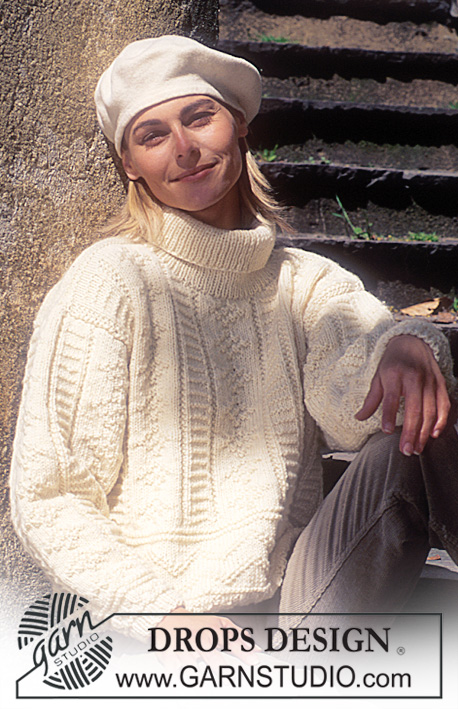
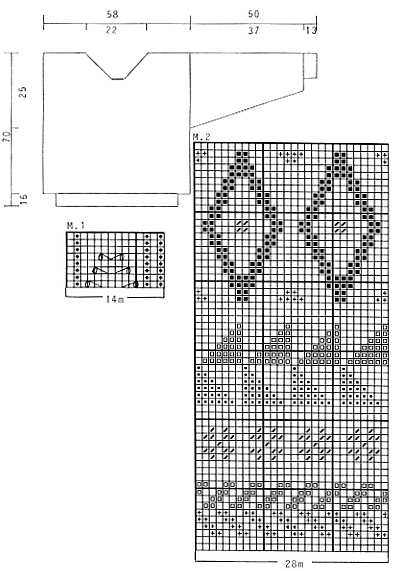
Trui van Alaska of Nepal met patroonbanen. Maat M.
DROPS 43-10 |
||||||||||||||||||||||||||||||||||
|
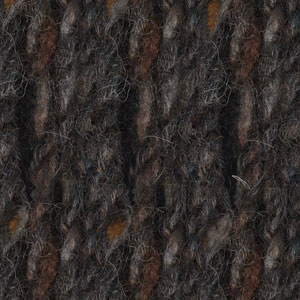
Stekenverhouding: 17 st x 22 nld op nld 5 mm in patroon = 10 x 10 cm. Of gebruik de maat breinld die u nodig heeft voor de juiste stekenverhouding. Patroon: Zie telpatronen. 1 telpatroon = 1 herhaling. Zowel de heengaande als de teruggaande naalden zijn weergegeven. Brei het hele patroon in tricotst. De Nederlandse vertaling van de termen in de teltekening staat onderaan dit patroon in dezelfde volgorde als de termen in de teltekening staan. Lijf: Brei de trui in de rondte op de rondbreinaald en knip later de armsgaten in. Zet 182 st op met rondbreinld 4 mm en bruin en brei 1 nld tricotst en dan 5 x M.1 in de hoogte (= ongeveer 16 cm). Ga verder met rondbreinld 5 mm en brei M.2 en meerder 14 st gelijkmatig in de 1e nld = 196 st. Denk om de stekenverhouding! Zet bij een hoogte van 45 cm 5 st op aan iedere kant voor de armsgaten (knipbiezen voor het armsgat – brei niet in patroon). Zet bij een hoogte van 55 cm de middelste 8 st voor de hals op het voorpand op een hulpdraad en brei verder heen en weer op de nld. Ga verder en kant af voor de hals om de nld: 15 x 1 st. Kant TEGELIJKERTIJD bij een hoogte van 68 cm de middelste 34 st op het achterpand af voor de hals. Kant dan 2 st af aan iedere kant in de volgende nld voor de hals. Kant af bij een hoogte van 70 cm (pas zo aan dat het netjes uitkomt met het patroon). Mouw: Zet 42 st op met breinld zonder knop 4 mm en bruin en brei 1 nld tricotst en dan 4 x M.1 in de hoogte – Meerder TEGELIJKERTIJD midden onder de arm elke 5e nld: 6 x 1 st. Ga verder met breinld zonder knop 5 mm, brei steeds M.2 (zorg dat een patroonherhaling netjes midden boven op de mouw komt) en meerder 8 st gelijkmatig in de 1e nld = 56 st. Meerder TEGELIJKERTIJD na M.1 midden onder de arm: 15 x 2 st elke 5e nld = 86 st. Brei bij een hoogte van 50 cm 2 cm averechte tricotst voor een naadtoeslag over de knipkant op het lijf, kant dan alle st af. Afwerking: Rijg een markeerdraad door het midden van de knipbies st op ieder armsgat en middenvoor. Naai met de naaimachine twee zomen aan iedere kant van de markeerdraad, 1/2 st van de markeerdraad. Knip de biezen in tussen de genaaide zomen. Naai de schoudernaden dicht. Naai de mouwen in het lijf op de goede kant als volgt: Naai afwisselend een steek in de laatste naald gebreid op de mouw voor de naadtoeslag en een steek op de lijf na de naaimachine zoom. Keer het vest binnestebuiten en naai de naadtoeslag van de mouw met de hand over de knipbiesranden op het lijf. Neem ongeveer 98 st op rond de hals met breinld zonder knop 4 mm en bruin en brei 2 x M.1 in de hoogte en kant alle st af. |
||||||||||||||||||||||||||||||||||
Uitleg van het telpatroon |
||||||||||||||||||||||||||||||||||
|
||||||||||||||||||||||||||||||||||
 |
||||||||||||||||||||||||||||||||||
Heeft u dit patroon gemaakt?Tag dan uw afbeeldingen met #dropspattern of stuur ze naar de #dropsfan galerij. Heeft u hulp nodig voor dit patroon?U vind 26 instructievideo's, een commentaar/vragengedeelte en nog veel meer, als u naar het patroon gaat op garnstudio.com © 1982-2026 DROPS Design A/S. Alle rechten voorbehouden. Op dit document, inclusief alle subdocumenten, rust copyright. Lees meer over wat u kunt doen met onze patronen onderaan elk patroon op onze site |
||||||||||||||||||||||||||||||||||


Met meer dan 40 jaar ervaring in brei- en haakdesign biedt DROPS Design één van de meest uitgebreide collecties van gratis patronen aan op internet vertaald in 324 talen. Tot en met vandaag hebben wij 12290 boeken en 11997 patronen gepubliceerd.
Wij werken hard om u het beste van haken en breien te bieden; patronen, inspiratie, advies en natuurlijk garens van uitstekende kwaliteit voor de allerbeste prijzen! Wilt u onze patronen gebruiken voor meer dan privégebruik? U kunt lezen wat wel en niet is toegestaan is in de Copyright tekst, die u onderaan elk patroon kunt vinden. Veel handwerkplezier!
Laat een opmerking achter voor DROPS 43-10
Wij horen graag wat u vindt van dit patroon!
Wilt u een vraag stellen, kies dan de juiste categorie in het formulier hieronder om sneller een antwoord te krijgen. Verplichte velden zijn gemarkeerd met een *.