
Populaire categorieën
Op zoek naar garen?


Opmerkingen / Vragen (4)
![]() Hetty Stok schreef:
Hetty Stok schreef:
Thanks for the help. Now I have another question. Please explain the instruction for thumb, specifically “knit up stitches at the same time as you increase behind and on each side of the thumb where the 3 stitches were cast on.” It is confusing. “Knit up, make 1 yarn over…” ?? Where are these 3 stitches??
05.10.2024 - 09:17DROPS Design antwoorde:
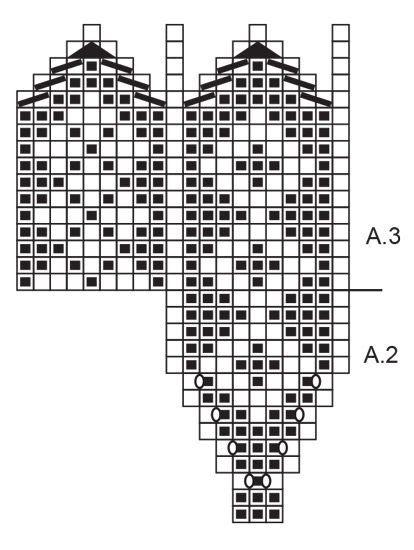
Dear Hetty, the 3 stitches that were cast on were used to continue working over the thumb and not interrupt pattern A.1. So you already worked over these 3 stitches. Now you have the stitches of A.2, that were on a thread, and you pick up the other end of these 3 stitches and pick up 1 stitch on each side of these 3 cast-on stitches, so that the thumb will be fully connected to the rest of the piece, and you will have no holes. So first work over the 11 stitches in the thread, with A.3 over A.2 as shown. Then, you knit up around the little hole for the thumb and work yarn overs in between the knitted up stitches, to get the correct number of stitches. Happy knitting!
06.10.2024 - 13:49
![]() Hetty Stok schreef:
Hetty Stok schreef:
Could you please clarify the instruction to increase at the base of the thumb? The colours do not remain as in the diagram. The instruction is to make a yarn over with the dark colour however the diagram indicates that the next stitch must be white. I’m aware that our English technique for “yarn over” is to bring the yarn to be knitted in the next stitch should be brought to the front (ie as for knitting a purl stitch) and that you may have a different technique. Please explain. Hetty
04.10.2024 - 14:30DROPS Design antwoorde:
Dear Mrs Stock, in this video we show how to increase for a thumb gusset (without pattern, but with the technique of the yarn overs); for these mittens we work the yarn over in the dark colour, but feel free to work it with the light colour if you rather like the result like this. Happy knitting!
04.10.2024 - 15:59
![]() Lorýa Björk Jónsson schreef:
Lorýa Björk Jónsson schreef:
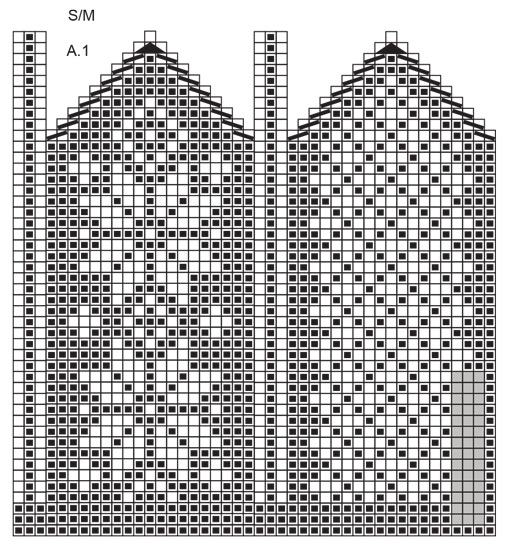
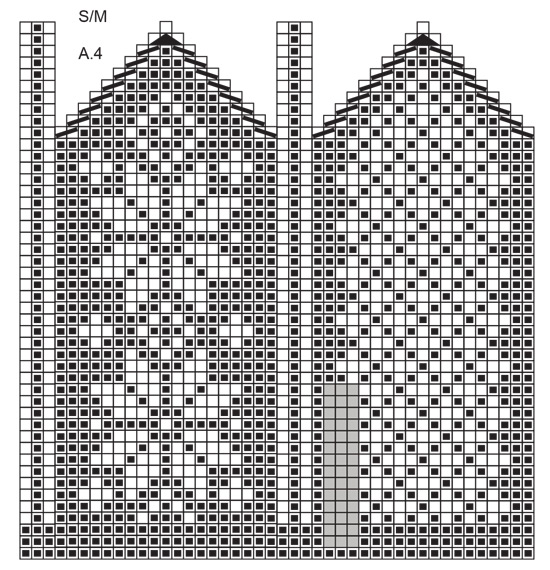
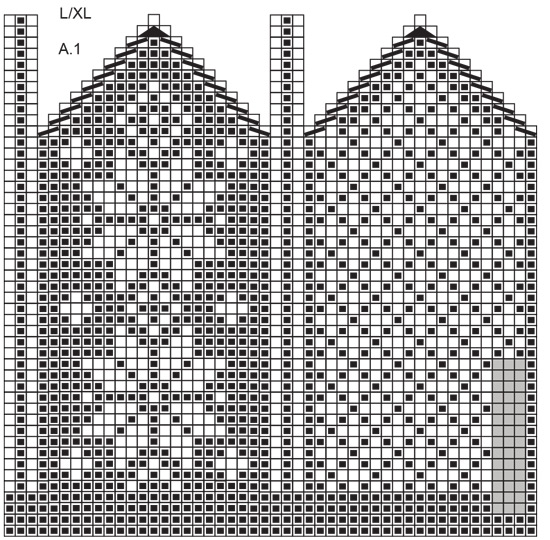
Fehler in muster a4 grösse s/m, linie 7 11 und 15 und fehler in muster a1 grösse l/xl, linie 16
04.12.2023 - 23:41
![]() Mette schreef:
Mette schreef:
Hej, Jag har lagt märke till att era vantar för herrar är väldigt små i storleken. Flera gånger har jag stickat olika modeller i största storlek och de är oftast passliga på en luten kvinnohand ändå. Här också är ju mönstret för storlek S/M lika långt som L/XL, vilket känns lite konstigt.
01.12.2023 - 11:44
|
||||||||||||||||||||||
Snow Flake Mittens#snowflakemittens |
||||||||||||||||||||||
 |
 |
|||||||||||||||||||||
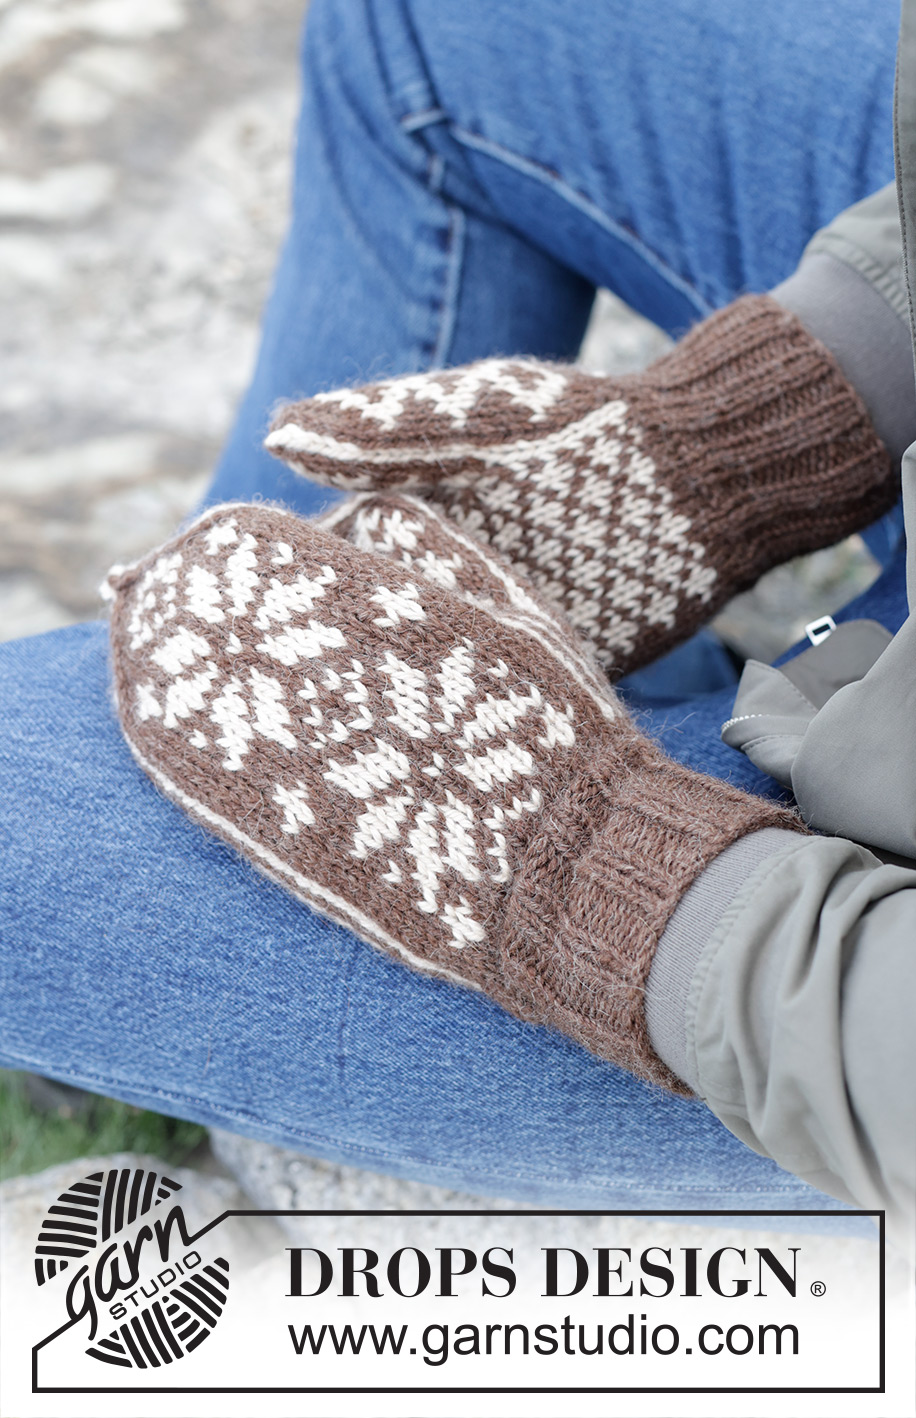
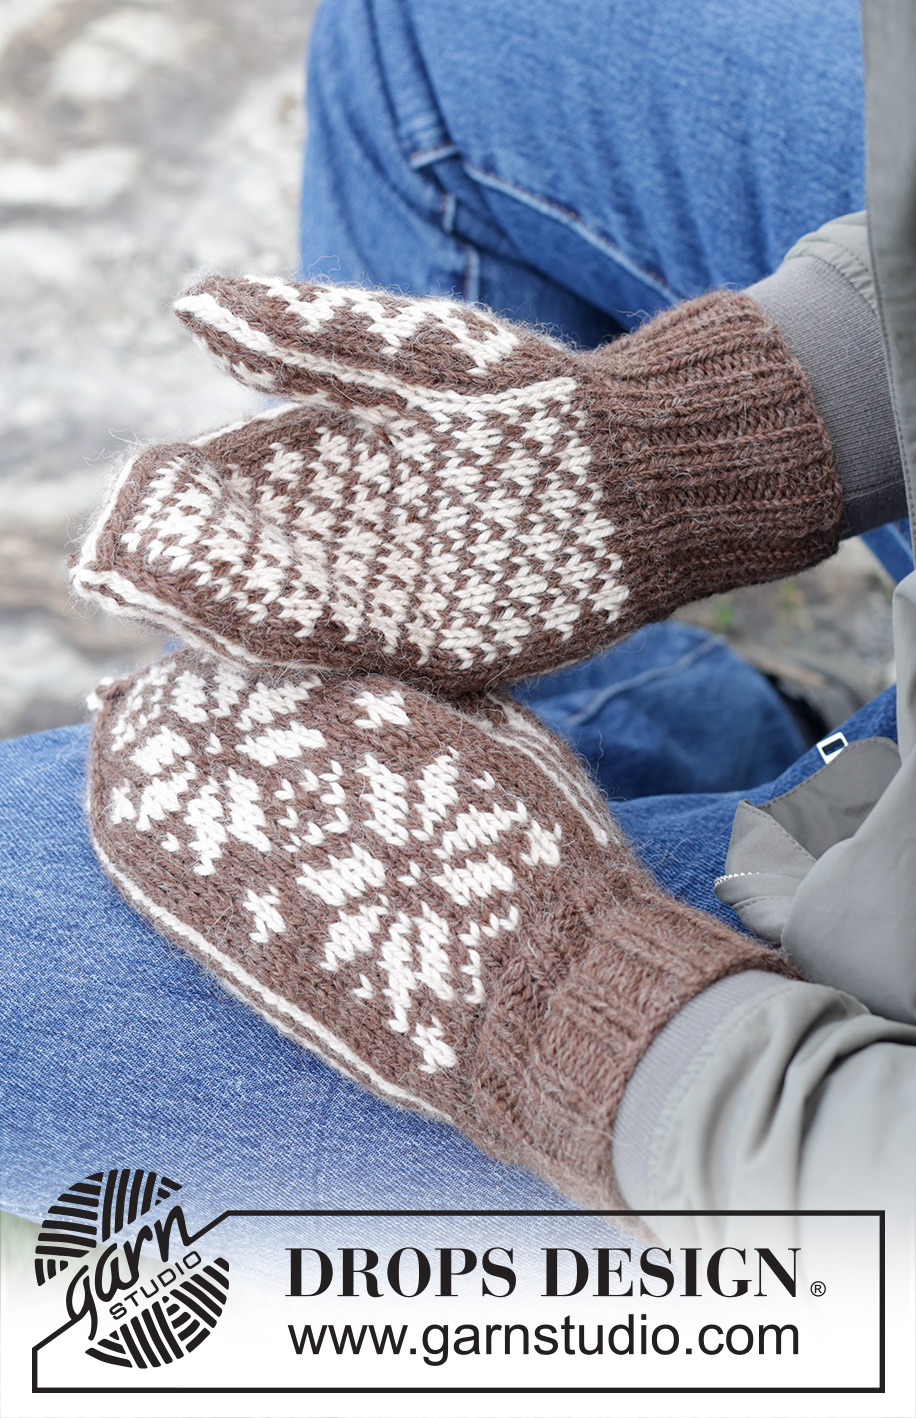
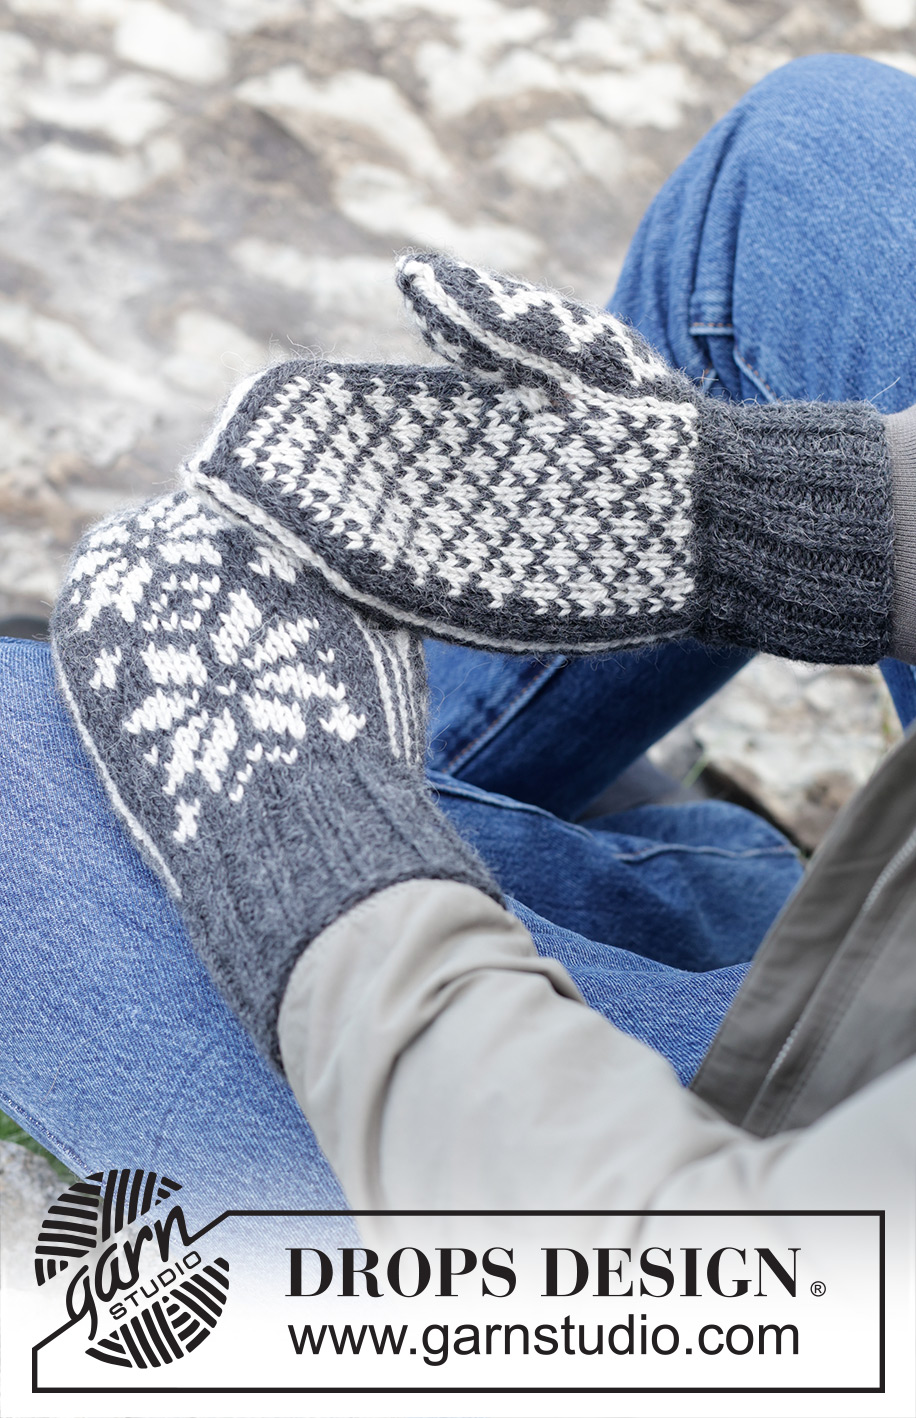
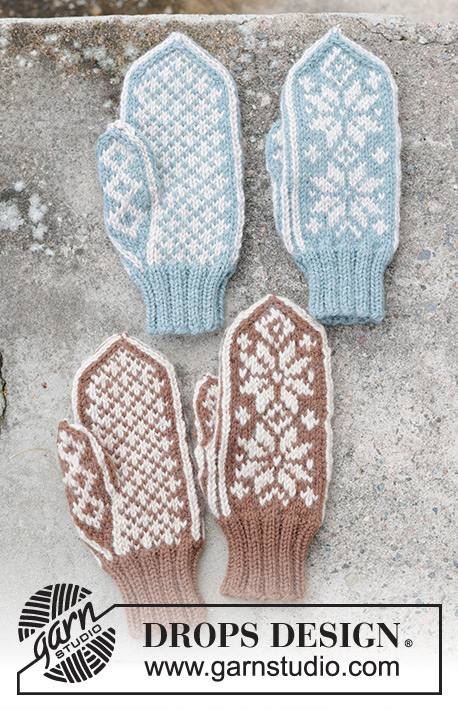
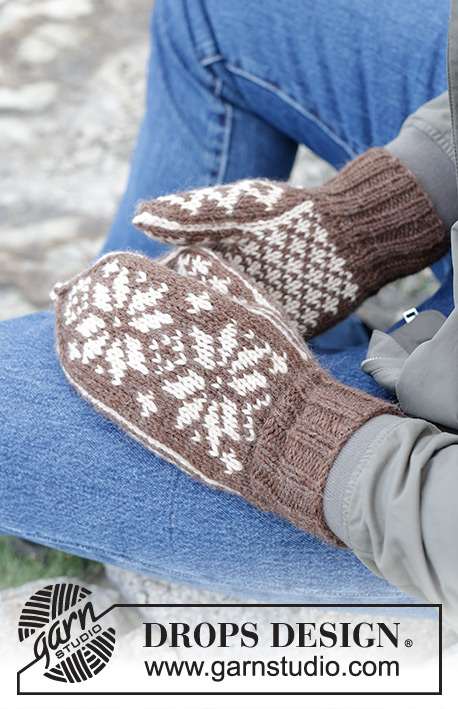
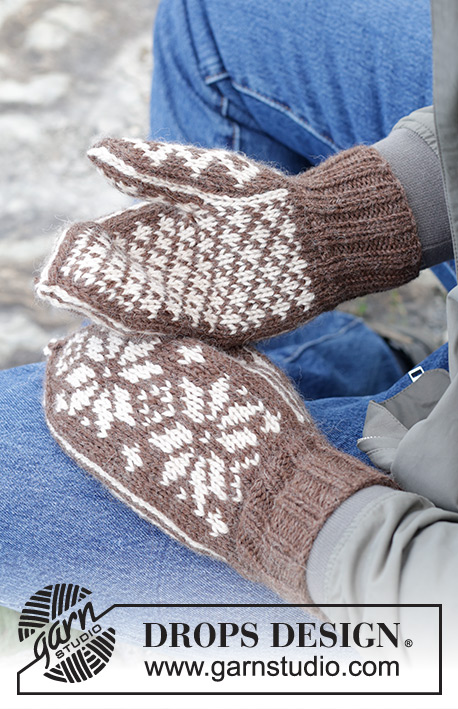
Gebreide wanten voor heren in DROPS Nepal. Het werk wordt gebreid met Scandinavisch patroon.
DROPS 246-20 |
||||||||||||||||||||||
|
------------------------------------------------------- UITLEG VOOR HET PATROON: ------------------------------------------------------- PATROON: Zie telpatronen A.1 tot A.4. Kies de telpatronen voor uw maat. ------------------------------------------------------- BEGIN HET WERK HIER: ------------------------------------------------------- WANTEN – KORTE SAMENVATTING VAN HET WERK: Het werk wordt in de rondte gebreid met breinaalden zonder knop. RECHTER WANT: Zet 44-48 steken op met breinaalden zonder knop maat 3 mm en donkergrijs/bruin DROPS Nepal. Brei boordsteek in de rondte (2 recht, 2 averecht) voor 7-8 cm. Ga verder met breinaalden zonder knop maat 3.5 mm. De rest van de want wordt gebreid in tricotsteek. Brei volgens telpatroon A.1. Telpatroon A.2 wordt gebreid over de grijze vierkanten in A.1 = duim. DENK OM DE STEKENVERHOUDING! Als telpatroon A.2 klaar is, zijn er 8 steken gemeerderd in A.2 (11 steken in A.2). Plaats op de volgende naald, de steken in A.2 op een hulpdraad en zet 3 steken op zoals te zien is boven de grijze vierkanten in A.1. Als A.1 klaar is, knip dan de draden af en haal ze door de overgebleven steken, trek aan en hecht goed af. DUIM: Plaats de 11 steken van de hulpdraad op breinaalden zonder knop maat 3.5 mm. Om een mooi einde te maken, neemt u nu tegelijkertijd steken op terwijl u meerdert achter en aan elke kant van de duim, waar de 3 steken opgezet zijn als volgt: Begin door A.3 te breien over de steken op de naald, neem 1 steek op met donkergrijs/bruin, maak 1 omslag met lichtgrijs/lichtbeige, neem 1 steek op met lichtgrijs/lichtbeige, 1 omslag met lichtgrijs/lichtbeige, neem 1 steek op met donkergrijs/bruin, 1 omslag met lichtgrijs/ lichtbeige, neem 1 steek op met lichtgrijs/lichtbeige, 1 omslag met lichtgrijs/lichtbeige en neem 1 steek op met donkergrijs/bruin. De eerste naald in A.3 is nu gebreid/opgenomen. Brei op de volgende naald, de omslag gedraaid recht volgens naald 2 in A.3. Als A.3 klaar is, knip de draden dan af en haal ze door de overgebleven steken, trek aan en hecht goed af. LINKER WANT: Brei op dezelfde manier als de rechter want maar brei volgens telpatroon A.4 in plaats van A.1. A.2 wordt gebreid aan de tegenovergestelde kant, waar de grijze vierkanten in A.4 zitten. Als A.4 klaar is, brei dan de duim op dezelfde manier als op de rechter want. |
||||||||||||||||||||||
Uitleg van het telpatroon |
||||||||||||||||||||||
|
||||||||||||||||||||||
 |
||||||||||||||||||||||
 |
||||||||||||||||||||||
 |
||||||||||||||||||||||
 |
||||||||||||||||||||||
 |
||||||||||||||||||||||
Heeft u dit patroon gemaakt?Tag dan uw afbeeldingen met #dropspattern #snowflakemittens of stuur ze naar de #dropsfan galerij. Heeft u hulp nodig voor dit patroon?U vind 20 instructievideo's, een commentaar/vragengedeelte en nog veel meer, als u naar het patroon gaat op garnstudio.com © 1982-2026 DROPS Design A/S. Alle rechten voorbehouden. Op dit document, inclusief alle subdocumenten, rust copyright. Lees meer over wat u kunt doen met onze patronen onderaan elk patroon op onze site |
||||||||||||||||||||||


Met meer dan 40 jaar ervaring in brei- en haakdesign biedt DROPS Design één van de meest uitgebreide collecties van gratis patronen aan op internet vertaald in 324 talen. Tot en met vandaag hebben wij 12290 boeken en 11997 patronen gepubliceerd.
Wij werken hard om u het beste van haken en breien te bieden; patronen, inspiratie, advies en natuurlijk garens van uitstekende kwaliteit voor de allerbeste prijzen! Wilt u onze patronen gebruiken voor meer dan privégebruik? U kunt lezen wat wel en niet is toegestaan is in de Copyright tekst, die u onderaan elk patroon kunt vinden. Veel handwerkplezier!
Laat een opmerking achter voor DROPS 246-20
Wij horen graag wat u vindt van dit patroon!
Wilt u een vraag stellen, kies dan de juiste categorie in het formulier hieronder om sneller een antwoord te krijgen. Verplichte velden zijn gemarkeerd met een *.