
Popular categories
Looking for a yarn?


Megjegyzések / Kérdések (57)
![]() Michelle írta:
Michelle írta:
Bonjour. Ce modèle m interesse... j aimerais savoir si dans le dos vu qu il n y a pas de photo du dos. il y a de la dentelle ou est ce du jersey? merci 😁😁
25.09.2020 - 13:13A DROPS Design válasza:
Bonjour Michelle, le point fantaisie ajouré est le même dans le dos que devant. Bon tricot!
25.09.2020 - 14:38
![]() Richard írta:
Richard írta:
HELP! I am in need of 3 x 50g balls of 'Drops Cotton Merino' - Colour 17- Dye Lot 52848. Any help or suggestions, gratefully received. Also, If I make a hat using Cotton Merino, but the pattern calls for 'Fingering Merino' will it make much difference?? Thank you. Richard.
27.01.2020 - 13:12A DROPS Design válasza:
Dear Richard, please contact your DROPS store (and more stores if necessary) or even our DROPS Workshop - CottonMerino is a 8 ply/Dk/Worsted yarn - see shadecard - see here all patterns you can use for Cotton Merino. Happy knitting!
27.01.2020 - 14:24
![]() Richard írta:
Richard írta:
Sorry, the last comment should read with "I placed the marker to the side (on my RIGHT)!" Thanks.
24.01.2020 - 15:28
![]() Richard írta:
Richard írta:
Hi, Thanks for your replies & I've mastered the difficult start - as you say, with double-pointed needles. The raglan decreasing is another matter. As I look at the sleeve (to my left), I have placed a marker on the stitch nearest to the side. I have then placed another marker on the 1st stitch of the side (which is to my left). Now, you say to start 3 stitches before this marker- yes? Where to I start on the sleeve decrease, please.
24.01.2020 - 15:25A DROPS Design válasza:
Dear Richard, you should have 1 marker between each piece; so if you look at the sleeve, there is 1 marker at the end of body (either back or front piece) = before the first stitch on sleeve and 1 marker at the end of sleeve, after the last stitch on sleeve = before the first stitch on front/back piece. Start 3 sts before the first of these 2 markers, K2 tog, = 1 stitch remain before marker, work this stitch + the next st (= first after marker) and dec = there are 2 sts decreased at the marker and K2 between the dec (with marker in the middle of these K2). Repeat at each marker. Happy knitting!
24.01.2020 - 16:04
![]() Richard írta:
Richard írta:
Hi, once more. I've placed markers at the sleeves & sides & now trying to knit the raglan decreases! I understand the pattern for instructions for the sides, but starting 3 stitches before the marker (does this include the marker), I end up, after the decrease, taking the first stitch of the sleeve. Your assistance once again would be very much appreciated. Thank you. Richard.
24.01.2020 - 12:29A DROPS Design válasza:
Dear Richard, there should be 1 stitch on each side of marker on each piece between the raglan decreases, ie you will work at each transition: K2 tog (1 dec), K2 (= Knit the stitch before marker + the stitch after marker), slip 1 as if to K, K1, psso. So starting at the transition between back and one sleeve, you will start (and end) round with K1, Hope it helps, Happy knitting!
24.01.2020 - 14:23
![]() Richard írta:
Richard írta:
Good morning. I have completed the body & both sleeves. But now that I have joined them on one needle, I find that when trying to knit the sleeves, the stitches are stretched (almost impossible to do)! I've had to use double-pointed needles to help me out! I don't remember having this trouble when I made the first one of this pattern (in size medium). Please can you help. Thanks. Richard.
24.01.2020 - 10:15A DROPS Design válasza:
Dear Richard, that's right, the first few rounds at the beginning of yoke can be somewhat tricky, you can use the double pointed needles or circular needles if you like to, after few rounds, all stitches will have enough place on the circular needle to work them on the round. Happy knitting!
24.01.2020 - 14:08
![]() Richard írta:
Richard írta:
Thank you for the reply to my question. I sent a sketch via email, showing how I was knitting the round. So, from what you are saying, I have to knit A1 (1st row), (only for the complete round)! Then for the next round, I have to knit A1 (2nd row), for the complete round! Then 3rd row, 4th row & so on.... This makes sense. Please can you confirm this for me.. Thanks a million. Richard.
13.01.2020 - 20:17A DROPS Design válasza:
Dear Richard, that's how you should work the diagrams (row 1 in A.1 on all diagrams, then row 2 in A.1 on all diagrams and so on). Happy knitting!
14.01.2020 - 07:50
![]() Richard írta:
Richard írta:
Good morning, again. Continuing from the two Ridge rows, I began the round, as per your instructions. But, I find that the *A1* pattern, repeats 3 times (2 with odd row numbers, 1 even row number. in the first half, up to 124 stitches. But for the continuing *A1* pattern, there is only 1 odd number row! But, there are 2 even row numbers! Is this so? Please. Richard. I have made a drawing which explains better. If I may upload it.
13.01.2020 - 11:03A DROPS Design válasza:
Dear Richard, not sure I'm getting this properly, when working A.1 in the round, you should work same round in each diagram all the round = round 1 A.1 when working round 1 on yoke, then work round 2 in A.1 and so on. What do I misunderstand?
13.01.2020 - 11:34
![]() Richard írta:
Richard írta:
Sadly, (Hi again). I'm still struggling after completing the two ridges! It is written that I knit 20, purl 3 (23 stitches), then *A1 (22 stitches, purl 6! (A1 = 10 rows @22 stitches) = 220 stitches. But adding the first 23 stitches to the 220 stitches = 243 stitches? Yet it is written, that I then purl 6! Doing this gives a total of 249 stitches! What am I doing wrong please? Forgive me, I am nearly 78 years old. Have a good day.
09.01.2020 - 12:22A DROPS Design válasza:
Dear Richard, you should work the 248 sts in size L as follows: knit 20, purl 3, *A.1 (= 22 sts), purl 6*, repeat from *-* a total of 2 times (= 28 sts x 2= 56 sts), A.1 (= 22 sts), purl 3, knit 40 , purl 3, repeat from *-* (= 56 sts), A.1 (= 22 sts), purl 3, knit 20 = 20+3 + 56+22 + 3+40+3 + 56+22 +3+20=248 sts. Try to add markers between each section, it can help you to check the number of stitches. Happy knitting!
09.01.2020 - 14:07
![]() Richard írta:
Richard írta:
Hi (once again). This should be the last for awhile. I understand the A1 block now, working from the bottom up! But, please tell me: Do I follow the pattern from left to right or right to left?? I ask this, because, I am reading the block from right to left! I don't believe it makes much difference (but, there again, you are the Expert). Thank you. Richard.
07.01.2020 - 22:07A DROPS Design válasza:
Dear Richard, diagrams are read bottom up starting from the right corner to the left, ie you will read every row in diagrams from the right towards the left (since you are working in the round) - read more about diagrams here (link is now working). Happy knitting!
08.01.2020 - 09:04
|
|||||||||||||||||||
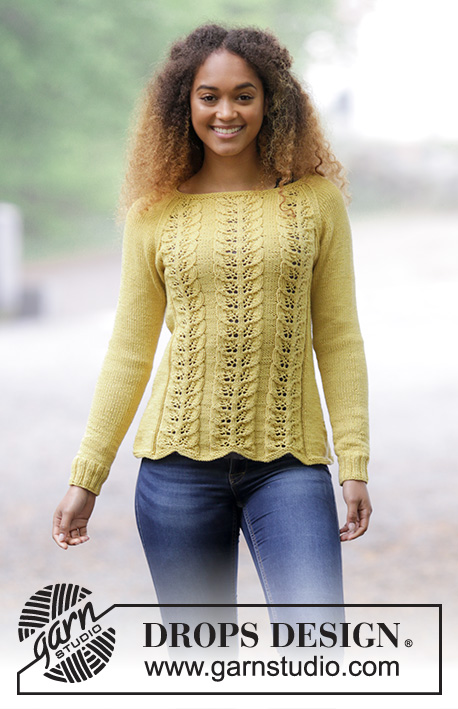
Lemon Parfait#lemonparfaitsweater |
|||||||||||||||||||
 |
 |
||||||||||||||||||
Kötött pulóver levélmintával és raglán szabásvonallal S - XXXL méretekben, A darabot DROPS Cotton Merino fonalból készítjük
DROPS 180-1 |
|||||||||||||||||||
|
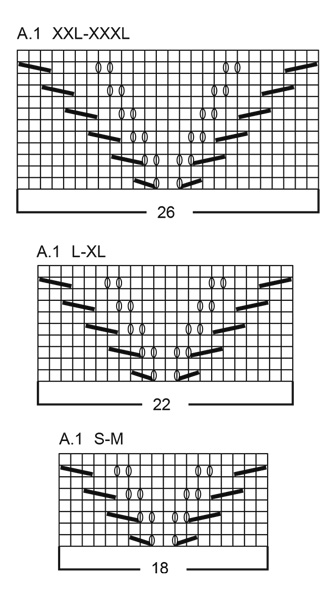
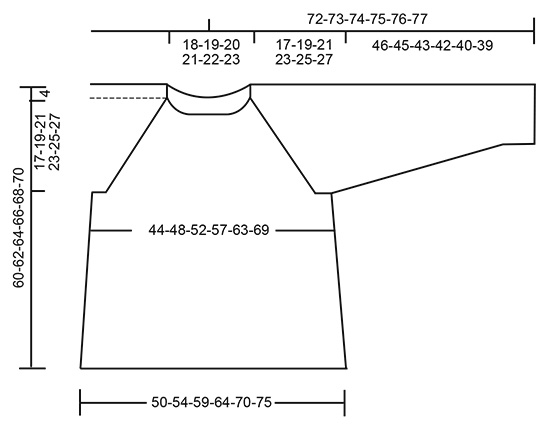
---------------------------------------------------------- TANÁCSOK A MINTA ELKÉSZÍTÉSÉHEZ: BORDA / LUSTAKÖTÉS (körben kötve): 1 borda = két kör 1 kör sima szemekkel, 1 kör fordított szemekkel. MINTA: Lásd az A.1 jelű diagramot. Válasszuk a megfelelő méretű a diagramot. TANÁCS A FOGYASZTÁSHOZ (az oldalaknál): Az oldalába tett jelölő előtt 3 szemmel kezdjük: 2 szemet simán összekötünk, 2 sima szemet kötünk (a jelölő a két szem között van), 1 szemet S leemelünk, 1 sima, majd a leemelt szemet a lekötött szemen átemeljük. TANÁCS A SZAPORÍTÁSHOZ: Az ujja alsó középvonalánál a következő módon készítünk szaporításokat - 1 szemmel a jelölő előtt kezdünk: 1 rh-t készítünk, 2 szem sima (a jelölő a két szem között van), 1 rh. A következő sorban/körben a ráhajtást csavartan kötjük, így a helyükön nem keletkezik lyuk. RAGLÁN: A testrész és az ujjak között minden átmenetnél fogyasztunk 2 szemet. 3 szemmel a jelölő előtt kezdünk: 2 szemet simán összekötünk, 2 sima szemet kötünk (a jelölő a két szem között van), 1 szemet S leemelünk, 1 sima, majd a leemelt szemet a lekötött szemen átemeljük. TANÁCS A KÖTÉSHEZ: Ha nem megfelelő kötéspróbával kötünk, és a kötésünk túl szoros, a raglánvonal fogyasztása túl rövid lesz, a karöltők pedig túl kicsik. Ezen úgy segíthetünk, hogy fogyasztásos sorok között elosztva egyenlő távolságban, fogyasztás nélkül kötött sorokat szúrunk be. ---------------------------------------------------------- TESTRÉSZ: A darabot körben kötjük a körkötőtűn az alsó szélétől felfelé haladva. A kezdéshez szedjünk fel 212-228-248-268-292-316 szemet a 4 mm-es körkötőtűre a Cotton Merino fonalból. Kössünk 2 bordányit lustakötéssel - olvassuk el a fenti magyarázatot! Folytassuk a következő módon: 17-21-20-25-25-31 sima, 3 fordított. * Az A.1 jelű minta (= 18-18-22-22-26-26 szem), 6 f.* Ismételjük meg a *-* közötti részt, összesen 2 alkalommal, az A.1 jelű minta, 3 F, 34-42-40-50-50-62 sima, 3 F. * Az A.1 jelű minta, 6 fordított. * Ismételjük meg a *-* közötti részt, összesen 2 alkalommal, az A.1 jelű minta, 3 F, 17-21-20-25-25-31 sima szem. Tegyünk 1 jelölőt a kör kezdetéhez, és 1 másikat 106-114-124-134-146-158 szem után (= az oldalak). Folytassuk a mintával. NE FELEDKEZZÜNK MEG A MEGFELELŐ KÖTÉSPRÓBA BETARTÁSÁRÓL! Amikor a darabunk 8 cm-es, mindkét jelölő mindkét oldalán fogyasszunk 1 szemet (= összesen 4 szemet fogyasztottunk a körben). OLVASSUK EL A FENTI TANÁCSOT A FOGYASZTÁSHOZ. Ismételjük meg a fogyasztást 4,5 cm-ként, minden méretben, összesen 7 alkalommal = 184-200-220-240-264-288 szem a kötőtűn a körben. Amikor a darabunk 39-39-39-39-39-39 cm-es, mindkét oldalon láncoljunk le 8-8-10-10-12-14 szemet (= mindkét jelölő mindkét oldalán 4-4-5-5-6-7 szemet). Most 84-92-100-110-120-130 szem van az eleje és a háta darabhoz is. Tegyük félre a darabot, és kössük meg a két ujját. UJJA: A darabot körben haladva készítjük a kéthegyű kötőtűkön, majd, amikor elég szemünk van, tegyük a szemeket körkötőtűkre. A kezdéshez szedjünk fel 48-52-56-56-60-64 szemet a 3,5 mm-es kéthegyű kötőtű készletre, a Cotton Merino fonalból. 1 kör sima, majd kössünk bordás mintával = 2 sima/ 2 fordított. Amikor a darabunk 6 cm-es váltsunk a 4 mm-es körkötőtűre/kéthegyű kötőtű készletre. Kössünk 1 kört sima szemekkel (harisnyakötéssel), UGYANAKKOR, egyenletesen elosztva a körben 4-6-8-6-8-10 szemet szaporítunk a körben = 44-46-48-50-52-54 szem. Tegyünk 1 kötésjelölőt a kör kezdetéhez = ez lesz az ujja alsó középvonala. Folytassuk harisnyakötéssel. Amikor a darabunk 10-7-7-10-7-7 cm-es szaporítsunk egy-egy szemet mindkét oldalon az ujja alsó vonala mellett (= összesen 2 szemet szaporítottunk). OLVASSUK EL A FENTI TANÁCSOT A SZAPORÍTÁSHOZ! Ismételjük meg a szaporítást 3-2½-2-1½-1½-1½ cm-ként összesen 12-15-18-19-20-21 alkalommal = 68-76-84-88-92-96 szem. Amikor a darabunk 46-45-43-42-40-39 cm-es (a nagyobb méreteknél az ujja a szélesebb vállak miatt rövidebb), láncoljuk le a középső 8-8-10-10-12-14 szemet mindkét oldalon az ujjal alsó középvonalánál = 60-68-74-78-80-82 szem marad a kötőtűn. Tegyük félre a darabot, és kössünk meg még egy ujját. VÁLLRÉSZ: Csúsztassuk az ujjak szemeit ugyanarra a kötőtűre, amin a testrész szemei vannak, ahol a szemeket leláncoltuk a karöltőhöz = 288-320-348-376-400-424 szem. Tegyünk egy-egy jelölőt minden testrész és ujja között átmenethez (= összesen 4 jelölőt tettünk a kötésbe). Folytassuk a mintával, a korábbiak szerint, és fogyasszunk szemeket a raglánvonal kialakításához - olvassuk el a fenti magyarázatot! Fogy minden 4. körben 4-5-6-6-6-7 alkalommal, majd minden 2. körben 14-16-18-21-23-24 alkalommal, (= összesen 19-21-24-27-29-31 alkalommal). Miután minden fogyasztást elkészítettünk 136-152-156-160-168-176 szem marad a kötőtűn a körben. Kössünk 2 bordányit minden szemen, de az 1. körben, a két ujján a 22-26-26-24-22-20 szemet kettesével összekötjük, és további 18-28-26-28-34-40 szemet fogyasztunk a körben, egyenletesen elosztva = 96-98-104-108-112-116 szem. Lazán láncoljuk le a szemeket S szemekkel. ÖSSZEÁLLÍTÁS: Varrjuk össze a nyílásokat az ujjak alsó részénél. |
|||||||||||||||||||
Diagram magyarázatok |
|||||||||||||||||||
|
|||||||||||||||||||
 |
|||||||||||||||||||
 |
|||||||||||||||||||
Elkészítette ezt a mintát?Akkor adja a képeihez a #dropspattern #lemonparfaitsweater tageket, vagy küldje be a képet a #dropsfan galériába. Segítségre van szüksége a modell elkészítéséhez? 24 tutorial videót találhat, és egy kérdés/felelek részt, és még többet, ha a mintát megkeresi a garnstudio.com oldalán. © 1982-2026 DROPS Design A/S. Minden jog fenntartca. Ez a documentim, az összes részével védelem alatt áll. A weboldalunkon többet olvashat arról, hogy mit tehet és mit nem a mintáinkkal. |
|||||||||||||||||||


Több mint 40 év tapasztalattal a kötés és horgolásminták tervezésében a DROPS Design az ingyenes minták egyik legszélesebb körű gyűjtemnyét kínálja az Interneten, 17 nyelvre fordítva. A mai nappal 324 katalógust 12290 mintát tudunk számon tartani a mintákból 12268 -t fordítottunk le magyarra (európai mértékegységekkel).
keményen dolgozunk azon, hogy a kötés és a horgolás világából a legjobbat hozzuk el, remek fonalakkal, hihetetlen árakon. Ha mintáinkat nemcsak személyes használatra szeretné használni, minden minta alján a Copyright szövegben olvashat arról, mit tehet s mit nem. Sikeres kézimunkázást!
Post a comment to pattern DROPS 180-1
Szívesen vesszük, ha megosztja velünk gondolatait erről a mintáról.
Ha kérdést szeretne feltenni, ügyeljen arra, hogy a megfelelő kategóriát válassza ki, így fegyorsíthatja a válaszadás folyamatát. Það verður að merkja við svæði merktri með *.