
Populaire categorieën
Op zoek naar garen?


Opmerkingen / Vragen (6)
![]() Barbara Kamm schreef:
Barbara Kamm schreef:
Thanks you for those latest instructions. So the cable is not really a cable but I. Your last instructions I still don’t see the pattern for the o dented cable like pattern but I guess I can try to figure it out. Are there only 3 stitches in the cable like pattern?
05.09.2023 - 04:41DROPS Design antwoorde:
Dear Mrs Kamm, the cable is a real cable but you will either cross the first 6 sts or the last 6 sts - work 3rd row A.1 as follows: slip 3 sts on cable needle behind piece, K 3, K 3 from cable needle, K3, and work 11th row as follows: K3, slip 3 sts on cable needle behind piece, K 3, K 3 from cable needle. Happy knitting!
05.09.2023 - 13:35
![]() Barbara Kamm schreef:
Barbara Kamm schreef:
Wow, that I do not understand. I’m going to have to look for an American pattern. I don’t know how to read diagrams. It’s greek to me. So frustrating
03.09.2023 - 22:39
![]() Barbara Kamm schreef:
Barbara Kamm schreef:
I have 46 stitches on my needles, 4 stitches in garter, purl 1, 29 stitches in stocking knit, that 34 stitches than plus 3 at the end of the row =37, the other nine must be for the cable pattern. Which is on a diagonal. I don’t see any instructions on how to work the cable and the other stitches ?
02.09.2023 - 04:21DROPS Design antwoorde:
Dear Mrs Kamm, on right front piece in larger size, work the 46 sts as follows from right side: 4 front band stitches in garter stitch, work the 9 sts A.1 (= knit on 1st row, cable on 3rd row), then purl 1 and knit to the end of the row. from wrong side, work: K3, P29, K1, P9, K4. In A.1 as well as in A.2 all the stitches will not be crossed for the cable; in A.1 cross the first 6 sts and knit the last 3; then knit the first 3 and cross the last 6. Happy knitting!
04.09.2023 - 09:20
![]() Barbara Kamm schreef:
Barbara Kamm schreef:
I am sorry to keep bothering you. But I don’t see in The instructions how to do the cable pattern. I am totally lost
02.09.2023 - 03:57DROPS Design antwoorde:
Dear Barbara, the instructions for the cable pattern are in the charts A.1 and A.2, where, on specific rows, you will slip 3 stitches to the cable needle, knit 3 and place the stitches back onto the main needle. So you will have 1 stitch in garter stitch before the cable in A.2 and purl 1 after A.2. On the other front piece you will have A.1 instead of A.2 and 1 purl before the cable and the edge stitch after the cable. Happy knitting!
03.09.2023 - 20:08
![]() Barbara Kamm schreef:
Barbara Kamm schreef:
Hi: I am starting the right front and I am confused with the instructions. I am making the 3X size. I have knitted the first 4 stitches that you call Band. Then it states A.2, P1 which I assume is for pearl 1. That confuses me. Then it states 29 stitches in stocking knit. If I am looking at the picture and the right side is on the left, I am not sure what kind of stitch you do before and after the cable? I would think I would do pearl stitches bebore the cable and the cable is zig zag about
29.08.2023 - 05:39DROPS Design antwoorde:
Dear Mrs Kamm, on right front piece, work from RS as follows: 4 sts in garter stitch (K them on every row), then work A.2 (see diagram, read from right towards the left from RS and from the left towards the right from WS), purl 1 (this stitch will be knitted from WS), and work the next 29 sts in stocking stitch (= these stitches will be knitted from RS and purled from WS), end with 3 sts in garter stitch (knit them on every row). Happy knitting!
29.08.2023 - 09:27
![]() Barbara Kamm schreef:
Barbara Kamm schreef:
It confuses me that on the back piece of this sweater it say to do garter stitch on 3 stitches on each side and I interpret that at the beginning and end of the back ?? Why is that? I understand using it on the front pieces
19.08.2023 - 18:05DROPS Design antwoorde:
Dear Barbara, the 3 stitches in garter stitch in each side of the back form a small border for the vent at the lower part of the jacket. After finishing the vent, you will have a single edge stitch in garter stitch, which will be used for the seam. Happy knitting!
20.08.2023 - 17:19
|
||||||||||
Winter Sparkle Cardigan |
||||||||||
|
|
||||||||||
Gebreid DROPS vest met kabels van 1 draad Cloud of 2 draden Air. Maat: S - XXXL.
DROPS Extra 0-1188 |
||||||||||
|
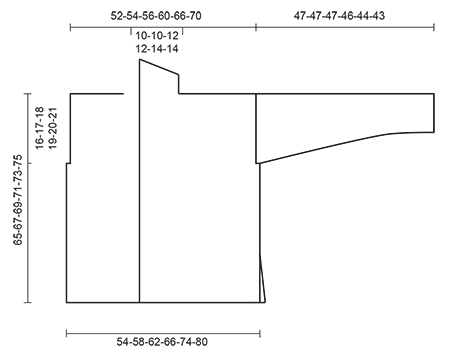
RIBBELST (heen en weer gebreid): Brei alle nld recht. 1 ribbel = 2 nld r. PATROON: Zie telpatronen A.1-A.2. De telpatronen laten het patroon aan de goede kant zien. Zowel de heengaande als de teruggaande naalden zijn weergegeven. KNOOPSGATEN: Maak aan de goede kant 4 knoopsgaten op de rechtervoorbies. 1 KNOOPSGAT = brei 2 st vanaf middenvoor, maak 1 omsl en brei de volgende 2 st r samen. Brei in de volgende nld de omsl r. Maak knoopsgaten bij een hoogte van ongeveer: MAAT S: 20, 29, 38 en 47 cm MAAT M: 20, 29, 38 en 47 cm MAAT L: 24, 33, 42 en 51 cm MAAT XL: 24, 33, 42 en 51 cm MAAT XXL: 25, 35, 45 en 55 cm MAAT XXXL: 25, 35, 45 en 55 cm ---------------------------------------------------------- ACHTERPAND: Wordt heen en weer gebreid op de rondbreinld. Zet 54-58-62-66-74-80 st op met rondbreinld 8 mm en 1 draad Cloud en 2 draden Air. Brei 2 ribbels in RIBBELST - zie uitleg boven. Ga verder met rondbreinld 9 mm. Brei in tricotst met 3 st in ribbelst aan elke kant. Brei bij een hoogte van 14 cm (= split) de 3 st in ribbelst aan elke kant van het werk in tricotst en zet TEGELIJKERTIJD 1 nieuwe st op (= kant st) aan elke kant van het werk aan het einde van de volgende 2 nld = 56-60-64-68-76-82 st. Brei de kant st in ribbelst. DENK OM DE STEKENVERHOUDING! Kant bij een hoogte van 49-50-51-52-53-54 cm 2-3-4-4-5-6 st af aan elke kant van het werk voor de armsgaten aan het begin van de volgende 2 nld = 52-54-56-60-66-70 st. Kant bij een hoogte van 63-65-67-69-71-73 cm de middelste 10-10-12-12-14-14 st af voor de hals = 21-22-22-24-26-28 st over voor de schouder. Brei in tricotst tot het werk 64-66-68-70-72-74 cm meet. Brei 1 ribbel. Kant alle st af. Brei de andere schouder op dezelfde manier. RECHTERVOORPAND: Zet 31-33-35-37-41-44 st op (incl. 4 voorbies st in ribbelst) met rondbreinld 8 mm en 1 draad Cloud en 2 draden Air. Brei 2 ribbels – meerder TEGELIJKERTIJD in de laatste nld 2 st gelijkmatig = 33-35-37-39-43-46 st. Ga verder met rondbreinld 9 mm. Brei als volgt aan de goede kant: 4 voorbies st in ribbelst, A.2, 1 av, 16-18-20-22-26-29 st in tricotst, 3 st in ribbelst. Brei bij een hoogte van 14 cm de 3 st in ribbelst aan het einde van de nld aan de goede kant in tricotst en zet TEGELIJKERTIJD 1 nieuwe st op (= kant st) aan het einde van de nld aan de goede kant = 34-36-38-40-44-47 st. Brei de kant st in ribbelst. Denk om de KNOOPSGATEN - zie uitleg boven. Kant bij een hoogte van 49-50-51-52-53-54 cm 2-3-4-4-5-6 st af voor het armsgat aan het begin van de volgende nld aan de verkeerde kant =32-33-34-36-39-41 st. Brei bij een hoogte van 64-66-68-70-72-74 cm – pas zo aan dat de volgende nld aan de verkeerde kant is –1 ribbel over alle st. Kant dan de eerste 21-22-22-24-26-28 st af voor de schouder = 11-11-12-12-13-13 st over voor de sjaalkraag. Ga verder in ribbelst over deze st – brei TEGELIJKERTIJD verkorte toeren, begin bij de hals (goede kant) als volgt: *brei 1 ribbel over alle st (= 2 nld r). Brei in de volgende nld aan de goede kant 9 r, keer en brei r terug*, herhaal van *-* tot het werk 7-7-8-8-9-9 cm meet aan de kant van de schouder (korte kant). Kant losjes alle st af. LINKERVOORPAND: Brei als het rechtervoorpand maar in spiegelbeeld, brei A.1 in plaats van A.2. Zet st op aan het einde van de nld aan de verkeerde kant. Kant af voor het armsgat aan het begin van de nld aan de goede kant. Kant af voor de schouder aan het begin van de nld aan de goede kant. MOUW: Wordt heen en weer gebreid op de rondbreinld. Zet 24-24-24-26-26-26 st op met rondbreinld 8 mm en 1 draad Cloud en 2 draden Air. Brei 2 ribbels. Ga verder met rondbreinld 9 mm. Brei in tricotst met 1 kant st in ribbelst aan elke kant. Meerder bij een hoogte van 9 cm 1 st naast de kant st aan elke kant van het werk en herhaal dit meerderen elke 9-7-6-5½-4½-4 cm nog 4-5-6-6-7-8 keer = 34-36-38-40-42-44 st. Kant af bij een hoogte van 47-47-47-46-44-43 cm. LET OP! Minder cm voor de grotere maten, want deze hebben bredere schouders. Brei nog een mouw. AFWERKING: Naai de schoudernaden samen. Naai de mouwen in het vest. Naai de mouw- en zijnaden samen naast de kant st tot waar de kant st zijn opgezet (de splitten meten ongeveer 14 cm). Naai de kraag samen middenachter en naai de kraag langs de hals op het achterpand; naai met de zijkanten tegen elkaar om een dikke naad te voorkomen. Naai de knopen op het linkervoorpand. |
||||||||||
Uitleg van het telpatroon |
||||||||||
|
||||||||||
 |
||||||||||
 |
||||||||||
Heeft u dit patroon gemaakt?Tag dan uw afbeeldingen met #dropspattern of stuur ze naar de #dropsfan galerij. Heeft u hulp nodig voor dit patroon?U vind 26 instructievideo's, een commentaar/vragengedeelte en nog veel meer, als u naar het patroon gaat op garnstudio.com © 1982-2026 DROPS Design A/S. Alle rechten voorbehouden. Op dit document, inclusief alle subdocumenten, rust copyright. Lees meer over wat u kunt doen met onze patronen onderaan elk patroon op onze site |
||||||||||


Met meer dan 40 jaar ervaring in brei- en haakdesign biedt DROPS Design één van de meest uitgebreide collecties van gratis patronen aan op internet vertaald in 324 talen. Tot en met vandaag hebben wij 12291 boeken en 11998 patronen gepubliceerd.
Wij werken hard om u het beste van haken en breien te bieden; patronen, inspiratie, advies en natuurlijk garens van uitstekende kwaliteit voor de allerbeste prijzen! Wilt u onze patronen gebruiken voor meer dan privégebruik? U kunt lezen wat wel en niet is toegestaan is in de Copyright tekst, die u onderaan elk patroon kunt vinden. Veel handwerkplezier!
Laat een opmerking achter voor DROPS Extra 0-1188
Wij horen graag wat u vindt van dit patroon!
Wilt u een vraag stellen, kies dan de juiste categorie in het formulier hieronder om sneller een antwoord te krijgen. Verplichte velden zijn gemarkeerd met een *.