
Populaire categorieën
Op zoek naar garen?


Opmerkingen / Vragen (65)
![]() Annick Mercier schreef:
Annick Mercier schreef:
Bonjour, je me demandais quel type de laine utiliser puisque la laine n'est pas disponible ici au Canada. Merci, Annick
02.09.2019 - 16:01DROPS Design antwoorde:
Bonjour Mme Mercier, je suis heureuse de vous informer que vous pouvez trouver notre laine au Canada - plus d'infos ici. Bon tricot!
02.09.2019 - 16:47
![]() Patricia Olivia Fuchs schreef:
Patricia Olivia Fuchs schreef:
Hallo, liebes Drops-Team. Wenn ich KEIN umgeknicktes Bündchen möchte, kann ich dann anstatt * 2 re., 3 li. * gleich mit Diagrammm M1 beginnen und der weiteren Anleitung folgen, oder muss ich dafür noch etwas anderes beachten?
24.06.2019 - 14:52DROPS Design antwoorde:
Liebe Frau Fuchs, also wahrscheinlich können Sie dann mit Zöpfen über die gewünschte Höhe stricken, dann setzt man eine Markierung und der Socken wird ab Markierer gemessen (nicht von der Anschlagskante). Viel Spaß beim stricken!
24.06.2019 - 17:00
![]() Mathilde schreef:
Mathilde schreef:
Bonjour, Je souhaiterais savoir ce que veux dire retourner le tricot ? Je ne comprends pas .... J'ai retourner mon ouvrage mais je tricote toujours dans le même sens ... Je vous remercie de bien vouloir l'éclairer Mathilde
14.01.2019 - 19:09DROPS Design antwoorde:
Bonjour Mathilde, après les côtes, retournez l'ouvrage sur l'envers = les premiers rangs de côtes seront retournés sur l'endroit à la fin et ont donc été tricotés sur l'envers. Au premier tour après avoir retourné votre ouvrage, vous allez tricoter la dernière maille du tour précédent pour terminer par la première maille, continuez ensuite toujours ainsi, c'est maintenant l'endroit de la chaussette. Bon tricot!
15.01.2019 - 09:02Nicola Stuart schreef:
Would love to knit these but would have to make them longer and bigger. How would I go about changing size?
11.11.2018 - 22:41DROPS Design antwoorde:
Dear Nicola, the pattern goes up to size 44. If you need even bigger by using a slightly bigger needle. Conversly, you can use the yarn Lima isntead of the Karisma =with bgger needles). If you only want it somewhat higher, you can continue knitting straight for a couple more cm-s, and6 or you can increase a stitch on both ides of this middle stitch. You can find the videos, related to this pattern at the left of the page, below the pictures. Also there are detailed explanation of the symbos of the pattern chart. If you need further help you can also ask for it in person in the store where you bought your DROPS yarn from. Happy Crafting!
12.11.2018 - 01:56
![]() Nicole schreef:
Nicole schreef:
Vielen Dank für diese tolle Anleitung. Die Strümpfe sehen im Original schöner aus wie auf Eurem Foto und war für mich als Anfänger leicht verständlich nach zu stricken. Inzwischen habe ich schon 3 Paar gestricht und es macht immer wieder Spaß.
08.08.2018 - 17:26
![]() Alexandra schreef:
Alexandra schreef:
When i get to this part in the M2 chart do I pearl the 6 after i pearl the first 18 or do i knit them I'm not sure how to determine if I am working on the right side or wrong side now? Knit following round like this: P the first 15-18-21 sts, chart M.2 (= 36 sts), P the last 15-18-21 sts. I hope you understand my question thank you , Alex
08.06.2016 - 21:34DROPS Design antwoorde:
Dear Alexandra, when working M.2 you are now working from RS and WS of M.1 is facing you (will be folded at the very end). M.2 is 36 sts in width, work rounds like this: P the first 15-18-21 sts from beg of round, then work the 36 sts in M.2 starting to read at the bottom corner on the right side towards the left and P the last 15-18-21 sts on round. Happy knitting!
09.06.2016 - 08:49
![]() Alexandra schreef:
Alexandra schreef:
I'm talking about the Drops long Sock pattern their is M,M2, M3 Diagram it's just a little harder to understand . Thanks, Alex
18.05.2016 - 16:05DROPS Design antwoorde:
Dear Alexandra, then follow the legend to diagram, and start reading diagram from the bottom corner on the right side towards the left every round. 1 square = 1 st x 1 round. Read more here. Happy knitting!
18.05.2016 - 17:11
![]() Alexandra schreef:
Alexandra schreef:
Okay What about the empty space at the bottom of the diagrams? What is that about? I'm sorry I'm new and to doING and reading diagrams. Thank you, Alexandra
18.05.2016 - 04:38DROPS Design antwoorde:
Dear Alexandra, an empty space can be added at the bottom of a diagram when there are less sts on some rows before you inc and get then more sts than on previous rows. Maybe you could ask your question on the pattern you are thinking about, it might help to make an accurate answer. Happy knitting!
18.05.2016 - 09:23
![]() Alexandra Dick schreef:
Alexandra Dick schreef:
I am wondering about the pattern for 103-10 are you to read the diagram from top to bottom or bottom to top? And is it read right to left or left to right? And what are the empty space at the bottom of diagram ment for? And are you to repeat pattern like the M1 it was p1,k4,p1,k4 do you continue doing that for a whole round? I tried finding a video to help but was unable to . Thank you
29.04.2016 - 05:27DROPS Design antwoorde:
Dear Mrs Dick, diagrams are read from bottom up starting on the corner on the right side, every round from the right towards the left (see here) 1st round in M1 will be workd; (K4, P1,K4, P1) repeat from (to) over all sts on round. Happy knitting!
29.04.2016 - 09:09
![]() Birgitt schreef:
Birgitt schreef:
Hallo, danke für die schnelle Antwort. Genau so habe ich die Anleitung auch verstanden, hatte schon bedenken, ich hätte es nicht kapiert. Meinem Mann ist das aber -zu langweilig- (OTon). Da ich für ihn die Maschenzahl ohnehin ändern muss, bekommt er auf der Rückseite M3 gestrickt (bis FerseI und in den linken Maschen zw. beiden Mustern kann ich super die Abnahmen für die Wade vornehmen. Gruß Birgitt
14.03.2016 - 19:03
|
||||||||||||||||||||||
Hilde & Winter |
||||||||||||||||||||||
|
|
||||||||||||||||||||||
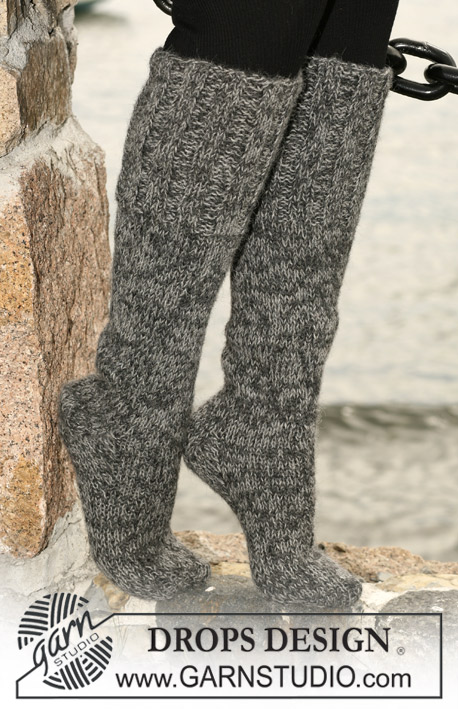
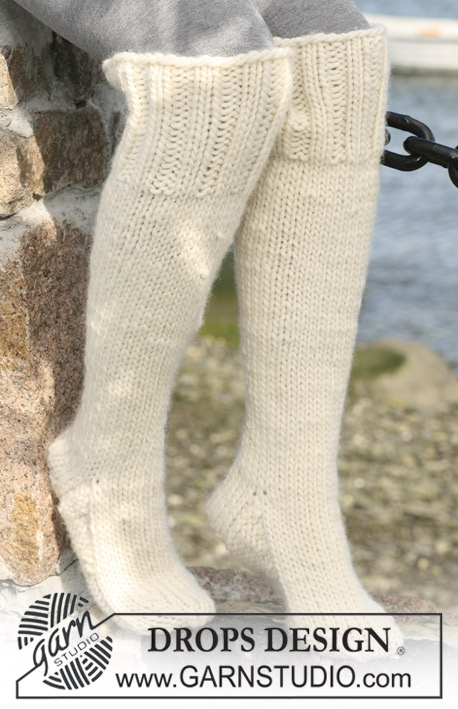
Lange DROPS sokken met kabels en omgeslagen boord van ”Karisma Superwash”.
DROPS 103-10 |
||||||||||||||||||||||
|
Boordst: * 2 r, 3 av *, herhaal steeds *-*. Motief: Zie teltekening M.1, M.2 en M.3. De teltekening geeft het motief weer op de goede kant. Minderen voor de hiel: 1e nld (= goede kant): Brei totdat er nog 7-8-9 st over zijn, haal de volgende st r af, 1 r, haal de afgeh st daarover. 2e nld (= verkeerde kant): Brei totdat er nog 7-8-9 st over zijn, haal de volgende st av af, 1 av, haal de afgeh st daarover. 3e nld (= goede kant): Brei totdat er nog 6-7-8 st over zijn, haal de volgende st r af, 1 r, haal de afgeh st daarover. 4e nld (=verkeerde kant): Brei totdat er nog 6-7-8 st over zijn, haal de volgende st av af, 1 av, haal de afgeh st daarover. 5e nld (=goede kant): Brei totdat er nog 5-6-7 st over zijn, haal de volgende st r af, 1 r, haal de afgeh st daarover. 6e nld (=verkeerde kant): Brei totdat er nog 5-6-7 st over zijn, haal de volgende st av af, 1 av, haal de afgeh st daarover. Ga zo door met steeds 1 st minder voor elke mindering, totdat er nog 8-10-12 st over zijn op de breinld. Sokken: De sokken worden in het rond gebreid vanaf het middenachter. Zet 80-90-100 st op met sokkenbreinld 3,5 mm en Karisma en brei Boordst – lees de instructie hierboven. Brei vanaf een hoogte van 2 cm door volgens teltekening M.1. Keer bij een hoogte van 20 het werk – dwz u breit door op de verkeerde kant (de eerste 20 cm is de omgeslagen boord van de sok). Brei nog 1 nld r en minder tegelijkertijd gelijkmatig verdeeld 14-18-22 st in deze nld = 66-72-78 st. Brei 1 nld av. Plaats 1 merkdraad in het werk. Meet het werk verder vanaf hier. Brei de volgende nld als volgt: av over de eerste 15-18-21 st, M.2 (= 36 st), av over de laatste 15-18-21 st. Minder vanaf een hoogte van 5 cm 11-12-13 x 1 st aan weerskanten van M.2 op elke 2e cm (brei de 2 st av samen) = 44-48-52 st. Plaats bij een hoogte van 33-36-39 cm de middelste 24 st (van de wreef) op 1 draad. Brei nu 5-5½-6 cm tricotst over de resterende 20-24-28 st aan het middenachter (= hiel). Minder vervolgens voor de hiel – lees Minderen voor de hiel. Neem vervolgens 11-13-15 st op aan weerskanten van de hiel. Verdeel alle st over de sokkenbreinld = 54-60-66 st. Brei volgens M.3 over de middelste 24 st van de wreef (de overige st in tricotst breien). Minder tegelijkertijd als volgt: Brei de 2 st voor M.3 r samen en brei de eerste 2 st na M.3 verdraaid r samen (dwz brei achter in de st in plaats van voor in) in totaal 6 keer in elke 2e nld = 42-48-54 st. Brei zo door tot de voet een lengte van ca 18-20-22 cm heeft, gemeten van de rand van de hiel (dwz vanaf waar de minderingen voor de hiel beginnen). Brei door in tricotst over alle st. Plaats nu 1 merkdraad aan de weerskanten van de voet, dwz 22-24-26 st voor de wreef en 20-24-28 st voor de zool. Minder nu aan de weerskanten van de merkdraad als volgt: Brei de 2 st voor de merkdraad r samen en de 2 st na de merkdraad verdraaid r samen. Herhaald de minderingen in totaal 3 keer in elke 2e nld = 30-36-42 st. Minder vervolgens in elke nld in totaal 6-7-9 keer = 6-8-6 st. Rijg de draad door de resterende st, trek goed aan en hecht af. |
||||||||||||||||||||||
Uitleg van het telpatroon |
||||||||||||||||||||||
|
||||||||||||||||||||||
 |
||||||||||||||||||||||
Heeft u dit patroon gemaakt?Tag dan uw afbeeldingen met #dropspattern of stuur ze naar de #dropsfan galerij. Heeft u hulp nodig voor dit patroon?U vind 15 instructievideo's, een commentaar/vragengedeelte en nog veel meer, als u naar het patroon gaat op garnstudio.com © 1982-2026 DROPS Design A/S. Alle rechten voorbehouden. Op dit document, inclusief alle subdocumenten, rust copyright. Lees meer over wat u kunt doen met onze patronen onderaan elk patroon op onze site |
||||||||||||||||||||||


Met meer dan 40 jaar ervaring in brei- en haakdesign biedt DROPS Design één van de meest uitgebreide collecties van gratis patronen aan op internet vertaald in 324 talen. Tot en met vandaag hebben wij 12291 boeken en 11998 patronen gepubliceerd.
Wij werken hard om u het beste van haken en breien te bieden; patronen, inspiratie, advies en natuurlijk garens van uitstekende kwaliteit voor de allerbeste prijzen! Wilt u onze patronen gebruiken voor meer dan privégebruik? U kunt lezen wat wel en niet is toegestaan is in de Copyright tekst, die u onderaan elk patroon kunt vinden. Veel handwerkplezier!
Laat een opmerking achter voor DROPS 103-10
Wij horen graag wat u vindt van dit patroon!
Wilt u een vraag stellen, kies dan de juiste categorie in het formulier hieronder om sneller een antwoord te krijgen. Verplichte velden zijn gemarkeerd met een *.