
Popular categories
Looking for a yarn?


Comments / Questions (98)
![]() Carolin wrote:
Carolin wrote:
Hallo, ist es möglich, dass die jeweils letzten zwei Reihen in den Charts falsch dargestellt sind? Auf den Bildern sind zwischen den Mustern jeweils zwei Reihen rechts gestrickt wurden, die die Muster klar voneinander trennen, laut den Charts enden die Muster jedoch immer mit zwei Reihen links. Das stimmt nicht überein. Vg, Carolin
17.07.2020 - 22:16DROPS Design answered:
Liebe Carolin, so stimmen die 2 letzten Reihen in A.1/A.2, dh die enden mit 2 Reihen glatt links (1 Hinreihe links, 1 Rückreihe rechts). Viel Spaß beim stricken!
20.07.2020 - 08:52
![]() MAry Jane MAjor wrote:
MAry Jane MAjor wrote:
I found it impossible to maintain the proper number of stitches for each row and finally gave up; it seemed that the very thin yarn and repeated yarn overs made errors unavoidable no matter how hard I tried. I might not have gotten into this project had it been labelled as advanced or difficult and I suggest it be so labelled for those considering it in the future.
19.05.2020 - 11:58
![]() Melanie wrote:
Melanie wrote:
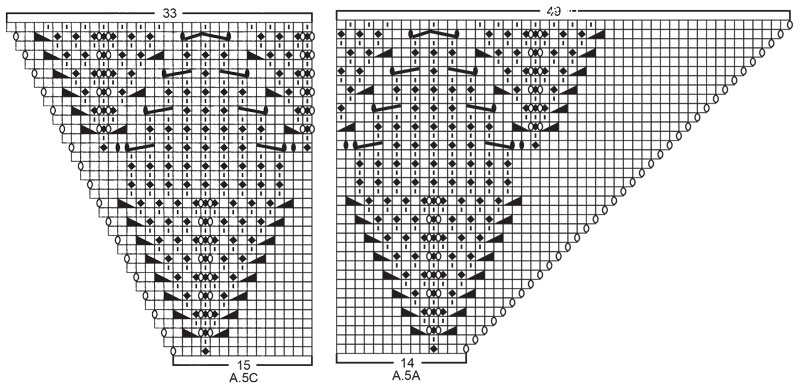
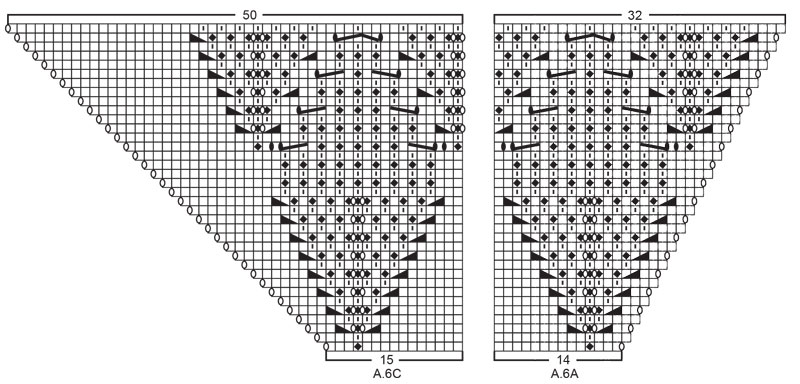
Bonjour, après avoir répéter 4 fois .. et mis sur papier .. je me retrouve avec le même problème .. je suis sur la partie où l’on tricote les diagrammes À.5. A.6 . Après avoir fait le rang 25 pour le diagramme A6C je me retrouve avec 41 mailles.. . au rang 26 de la grille A6C on doit travailler sur 40 mailles ? Je n’arrive pas à trouver mon erreur.. pouvez vous m’aider ? J’interprète peut être mal le diagramme ?
16.04.2020 - 20:32DROPS Design answered:
Bonjoru Mélanie, avez-vous bien fait les 6 jetés (7 avec celui de la fin du motif) et diminué 1 fois 1 m et 2 fois 2 m au rang 25? Vérifiez que vous avez bien 22 m dans le A.5B précédent, le jeté au début de A.6C au rang 25 doit être maintenant la dernière maille du A.5B juste avant A.6C- essayez de placer un marqueur entre chaque diagramme pour bien vérifier le bon nombre de mailles à chaque fois, également entre chaque A.5B. En espérant que ceci vous aide. Bon tricot!
17.04.2020 - 08:36
![]() Leonie Zock wrote:
Leonie Zock wrote:
In A5A, A5C, A6A en A6C heb ik telkens dat er meer steken zijn dan in het patroon staat aangegeven, Als ik dan minder tot het 'goede' aantal en ik draai het werk om verder te gaan heb ik weer te weinig steken. Er zit iets verkeerd in het patroon ben ik bang?
05.04.2020 - 22:19DROPS Design answered:
Dag Leonie,
Ik heb de telpatronen nagekeken en het aantal steken uitgerekend. Als je de telpatronen volgt en aan het eind (dus nadat je A.5 en A.6 hebt gebreid, dan zou het moeten kloppen. Na A.5 en A.6 heb je in totaal 106 steken gemeerderd. Alleen de omslagen aan de buitenkant van A.5 en A.6 zorgen voor meerderingen. De rest van de omslagen worden gecompenseerd door minderingen. Controleer nog even goed de telpatronen om te kijken of je niet iets over het hoofd hebt gezien.
16.04.2020 - 12:17
![]() Ellis wrote:
Ellis wrote:
A3B is not aligning properly when I knit row 2 of that section; because the graph is not perfectly symmetrical, there is one fewer knit before I do the purl in row 2. Is there a fix for this? Or do we just knit that graph backwards on the wrong rows?
02.04.2020 - 00:55DROPS Design answered:
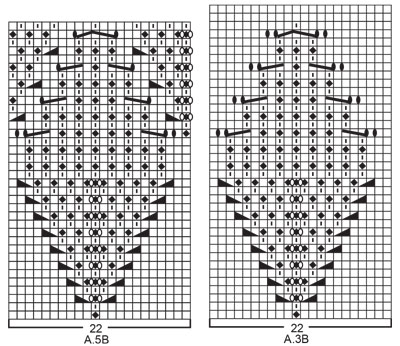
Dear Ellis, not sure to understand what you mean here sorry, you should have in each A.3B: 11 stitches in stocking st, knit 1 in stitch under the next stitch on first row/ purl from WS on 2nd row, 10 stitches in stocking stitch so that there will be 21 sts between each leaf+ after the leaf in A.3A : 10 sts = 21 sts before next leaf in first A.3B and before the leaf in A.3C you have 11 sts + 10 sts after leaf in last A.3B = 21 sts between each leaf. Hope this helps. Happy knitting!
02.04.2020 - 08:36
![]() Ellis wrote:
Ellis wrote:
On the shawl row where one increases to 119, what style of increase should they use? a yarn over? thanks!
29.03.2020 - 16:50DROPS Design answered:
Dear Ellis, increase by making yarnovers and then knitting them twisted in the next row. Happy Knitting!
29.03.2020 - 22:27
![]() Melanie wrote:
Melanie wrote:
Bonjour, j'aimerai savoir si les corrections sont directement présentes sur les Diagrammes concernés ou faut-il vous les demander et vous nous les envoyez par mail ? Merci pour votre réponse. Melanie
24.03.2020 - 20:45DROPS Design answered:
Bonjour Mélanie, si vous aviez déjà imprimé les explications avant la date des corrections, il est recommandé de les imprimer à nouveau (ou imprimez seulement les corrections, au choix), sinon, les explications contiennent les corrections. Bon tricot!
25.03.2020 - 09:50
![]() Ingrid wrote:
Ingrid wrote:
Ik heb nog nooit eerder met een rondbreinaald gewerkt. Aan het begin van het patroon wordt geadviseerd om meerdere rondbreinaalden te gebruiken i.v.m. het grote aantal steken. Ik zie dat het totale breiwerk 825 steken gaat tellen. Hoeveel rondbreinaalden heb ik dan nodig, of zijn er dan nog andere mogelijkheden om deze grote hoeveelheid steken te kunnen hanteren. Alvast bedankt, Ingrid
20.03.2020 - 20:15DROPS Design answered:
Dag Ingrid,
Er zijn zogenaamde kabelverbinders verkrijgbaar om meerdere rondbreikabels aan elkaar te zetten, zodat je een hele lange draad kunt maken waar je veel steken op kunt zetten. Dit is waarschijnlijk de meest geschikte oplossing hiervoor. Op deze pagina kun je diverse kabells en verbinders vinden om een lange rondbreinaald te kunnen maken.
27.03.2020 - 13:48
![]() Jacqueline wrote:
Jacqueline wrote:
Bonjour, je pense qu’il y a un problème avec la grille A.4C dès le premier rang. En effet, lorsqu’on termine les 44 mailles de À.3B et que l’on suit avec la grille À.4C, il manque 1 maille (10 mailles du diagramme À.3B et 10 mailles du diagramme À.4C = 20 mailles) alors qu’il en faudrait 21 . Qu’en pensez-vous ? Bien à vous. Jacqueline
12.01.2020 - 21:51DROPS Design answered:
Bonjour Jacqueline, je ne suis pas bien sûre de comprendre, avant de tricoter A.3/A.4 vous devez avoir 151 m et donc tricoter ainsi: 2 m end, A.3A (14 m), A.3B (44 m), A.3C (15 m), 1 m cenrale, A.4A (15 m), A.3B (44 m), A.4C (14 m), 2 m end = 2+14+44+15+1+15+44+14+2= 151 m. Donc, dès le 1er rang, on a le bon nombre de mailles. Bon tricot!
13.01.2020 - 10:14
![]() Stassinopoulos wrote:
Stassinopoulos wrote:
Bonjour, j'ai un doute sur le début du châle. Il y a 2 mailles, au point mousse, et ensuite c'est du jersey endroit ? Merci.
26.12.2019 - 14:48DROPS Design answered:
Bonjour Mme Stassinopoulos! Au debut de l'ouvrage, sur l'endroit vous avez 2 mailles de bordure au point mousse, les autres mailles sont en jersey endroit. Sur l'envers vous avez 2 mailles de bordure au point mousse, les autres mailles sont en jersey envers. Bon tricot!
30.12.2019 - 14:51
|
|||||||||||||||||||||||||||||||
Lacey Laurels#laceylaurelsshawl |
|||||||||||||||||||||||||||||||
 |
 |
||||||||||||||||||||||||||||||
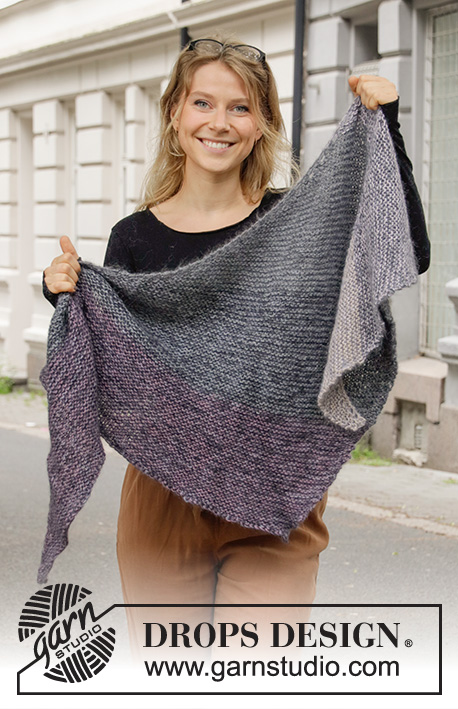
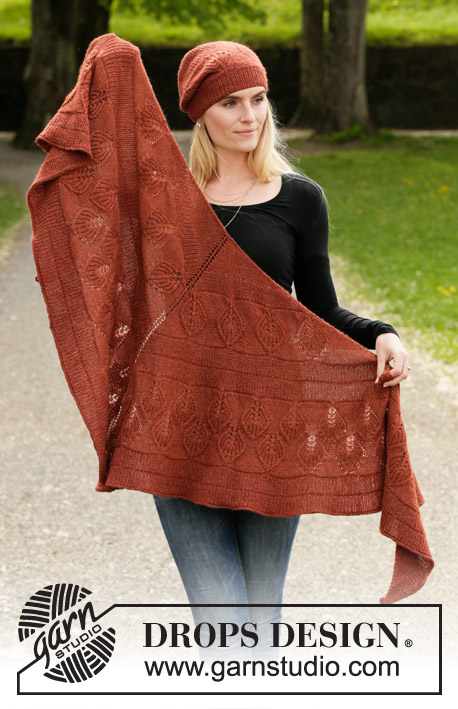
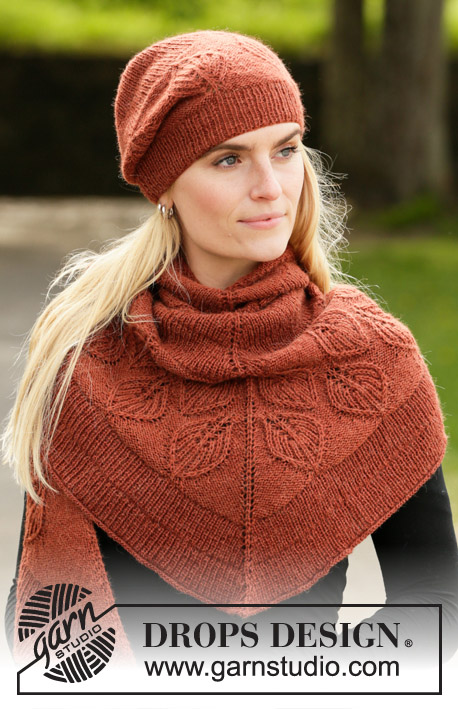
Knitted hat and shawl in DROPS Alpaca. The piece is worked with rib and leaf pattern in Fisherman’s rib.
DROPS 203-14 |
|||||||||||||||||||||||||||||||
|
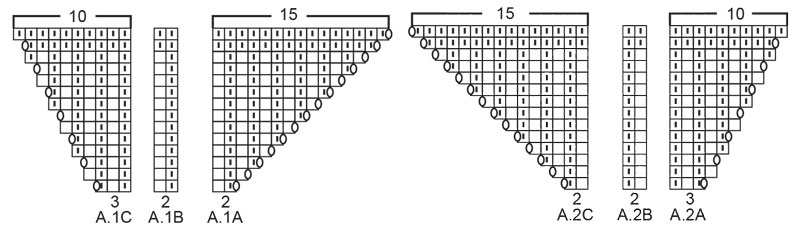
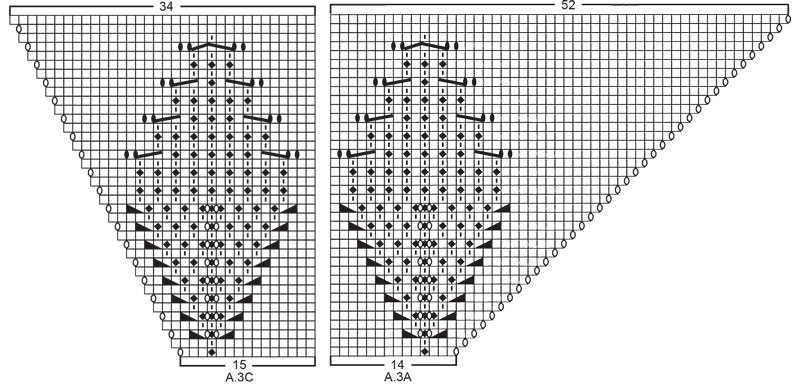
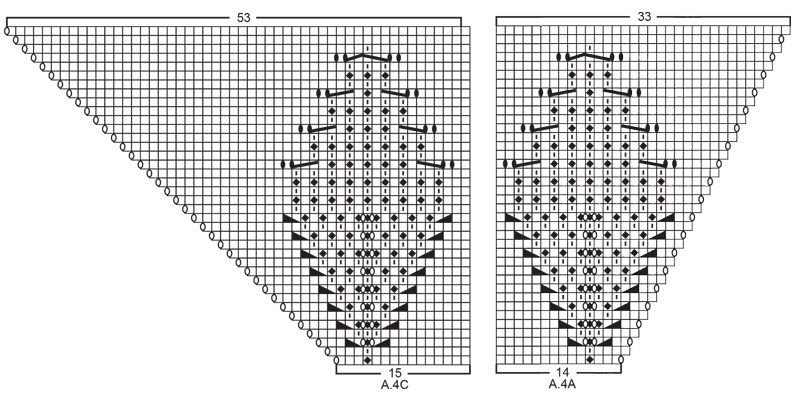
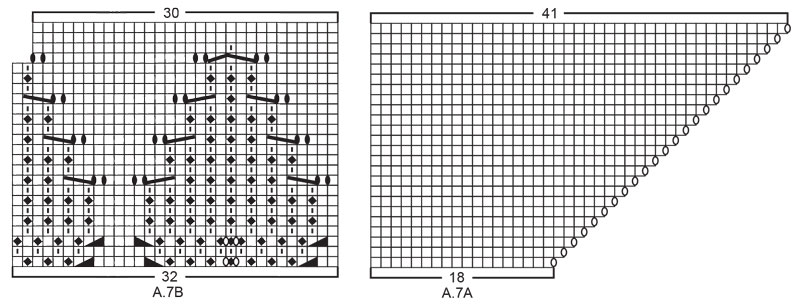
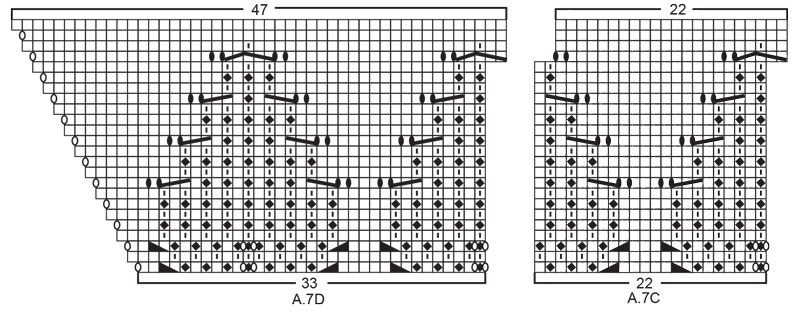
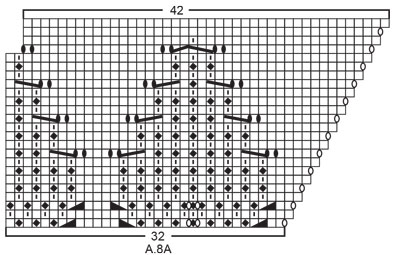
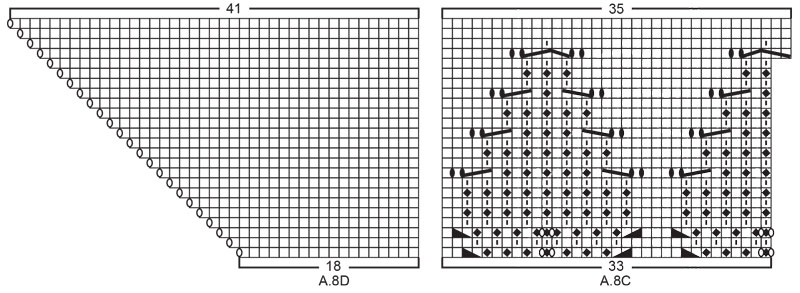
------------------------------------------------------- EXPLANATIONS FOR THE PATTERN: ------------------------------------------------------- RIDGE/GARTER STITCH (worked back and forth): Knit all rows. 1 ridge in height = Knit 2 rows. PATTERN: Hat: See diagrams A.1B and A.3B. Shawl: See diagrams A.1 to A.8. The diagrams show all rows in the pattern seen from the right side. DIAGRAM TIP: This pattern contains many diagrams; it might be a good idea to cut out all the diagrams and arrange them in the right order (see the order given in the text). INCREASE/DECREASE TIP (evenly spaced on hat): To work out how to increase/decrease evenly, count the total number of stitches on needle (e.g. 122 stitches) and divide by the number of increases/decreases to be made (e.g. 10) = 12.2. In this example, increase by making 1 yarn over after approx. each 12th stitch. On the next round work the yarn overs twisted to avoid holes. When decreasing, work together approx. each 11th and 12th stitch. INCREASE/DECREASE TIP (evenly spaced on shawl): To work out how to increase/decrease evenly on each side of the middle stitch, count the total number of stitches on needle (e.g. 81 stitches) minus the edge stitches and middle stitch (5 stitches) and divide the remaining stitches by 2 ( to find the number of stitches on each side of the middle stitch). Then divide these stitches by the number of increases/decreases to be made on each side (e.g. 18) = 2.1. In this example, increase by making 1 yarn over after approx. each 2nd stitch. Do not increase over edge stitches or middle stitch. When decreasing, work approximately all stitches together 2 and 2. ------------------------------------------------------- START THE PIECE HERE: ------------------------------------------------------- HAT – SHORT OVERVIEW OF THE PIECE: The piece is worked in the round with short circular needle, bottom up. Change to double pointed needles when necessary. HAT: Cast on 120-126 stitches with short circular needle size 2.5 mm = US 1,5 and Alpaca. Knit 1 round. Then work rib in the round (= knit 1 / purl 1) for 5-6 cm = 2"-2⅜". Knit 1 round where you increase 12-28 stitches evenly spaced – read INCREASE/DECREASE TIP = 132-154 stitches. Change to circular needle size 3 mm = US 2,5 and work A.3B in the round (= 6-7 repeats of 22 stitches). REMEMBER THE KNITTING GAUGE! When A.3B has been completed the piece measures approx. 16-17 cm = 6¼"-6¾" from the cast-on edge. Knit 1 round where you increase 12-14 stitches evenly spaced = 144-168 stitches. Work A.1B. AT THE SAME TIME on the last round in A.1B decrease 16-24 stitches evenly spaced = 128-144 stitches. Work A.1B one more time in height. AT THE SAME TIME on the last round in A.1B knit all stitches together 2 and 2 = 64-72 stitches. Then work stockinette stitch. AT THE SAME TIME, on every 2nd round, knit all stitches together 2 and 2 until there are 8 stitches left. Cut the strand, pull it through the remaining stitches, tighten and fasten well. The hat measures approx. 26-27 cm = 10¼"-10⅝" from the top down. ------------------------------------------------------- SHAWL - SHORT OVERVIEW OF THE PIECE: The piece is worked back and forth with circular needle, top down. Due to the number of stitches it might be a good idea to divide the piece onto several needles of the same size. SHAWL: Cast on 7 stitches with circular needle size 3 mm = US 2,5 and Alpaca. Knit 1 row (= wrong side). Then work and increase as follows: ROW 1 (= right side): Work 2 edge stitches in GARTER STITCH – read description above, 1 yarn over, work 1 stitch in stockinette stitch, 1 yarn over, 1 stitch in stockinette stitch (= middle stitch), 1 yarn over, 1 stitch in stockinette stitch, 1 yarn over and finish with2 edge stitches in garter stitch (= 4 stitches increased). ROW 2 (= wrong side): Work 2 edge stitches in garter stitch, 1 yarn over, work stockinette stitch until there are 2 stitches left on the row (yarn overs purled to leave holes), 1 yarn over and finish with 2 edge stitches in garter stitch (= 2 stitches increased). ROW 3 (= right side): 2 edge stitches in garter stitch, 1 yarn over, work stockinette stitch as far as the middle stitch, 1 yarn over, 1 stitch in stockinette stitch (= middle stitch), 1 yarn over, work stockinette stitch until there are 2 stitches left on the row, 1 yarn over and finish with 2 edge stitches in garter stitch (= 4 stitches increased). ROW 4 (= wrong side): 2 edge stitches in garter stitch, 1 yarn over, work stockinette stitch until there are 2 stitches left on the row (yarn overs purled to leave holes), 1 yarn over and finish with 2 edge stitches in garter stitch (= 2 stitches increased). Repeat rows 3 and 4 until there are 83 stitches on the needle and the last row was worked from the right side. REMEMBER THE KNITTING GAUGE! Work the next row in the same way as row 4 (= wrong side) and increase at the same time 17 stitches evenly spaced on each side of the middle stitch (34 stitches increased on row in addition to the increase worked inside the 2 edge stitches on each side) – read INCREASE/DECREASE TIP = 119 stitches on the needle. Work diagrams A.1 and A.2 as follows from the right side: Work 2 edge stitches in garter stitch, A.1A over 2 stitches (1 time in width), A.1B over 52 stitches (26 times in width), A.1C over 3 stitches (1 time in width), 1 stitch in stockinette stitch (= middle stitch), work A.2A over 3 stitches, A.2B over 52 stitches (26 times in width), A.2C over 2 stitches and finish with 2 edge stitches in garter stitch. Continue this pattern. When the last row in A.1 and A.2 remains there are 159 stitches on the needle. Work the last row and at the same time decrease 5 stitches evenly spaced on each side of the middle stitch (10 stitches decreased evenly + 2 stitches increased in diagrams) – read INCREASE/DECREASE TIP = 151 stitches. Work diagrams A.3 and A.4 as follows from the right side: Work 2 edge stitches in garter stitch, A.3A over 14 stitches (1 time in width), A.3B over 44 stitches (2 times in width), work A.3C over 15 stitches (1 time in width), 1 stitch in stockinette stitch (= middle stitch), work A.4A over 14 stitches, A.3B over 44 stitches (2 times in width), A.4C over 15 stitches and finish with 2 edge stitches in garter stitch. Continue this pattern. When the last row in A.3 and A.4 remains there are 263 stitches on the needle. Work the last row and, at the same time, increase 43 stitches evenly spaced on each side of the middle stitch (86 stitches increased evenly and 2 stitches increased in diagrams) = 351 stitches. Work diagrams A.1 and A.2 as follows from the right side: Work 2 edge stitches in garter stitch, A.1A over 2 stitches (1 time in width), A.1B over 168 stitches (84 times in width), work A.1C over 3 stitches (1 time in width), 1 stitch in stockinette stitch (= middle stitch), A.2A over 3 stitches, A.2B over 168 stitches (84 times in width), work A.2C over 2 stitches and finish with 2 edge stitches in garter stitch. Continue this pattern. When the last row in A.1 and A.2 remains there are 391 stitches on the needle. Work the last row and increase at the same time 1 stitch on each side of the middle stitch (2 stitches increased evenly and 2 stitches increased in diagrams) = 395 stitches. Now work A.1 and A.2 one more time in height; i.e. work the next row from the right side as follows: 2 edge stitches in garter stitch, A.1A over 2 stitches (1 time in width), A.1B over 190 stitches (95 times in width), work A.1C over 3 stitches (1 time in width), 1 stitch in stockinette stitch (= middle stitch), A.2A over 3 stitches, A.2B over 190 stitches (95 times in width), A.2C over 2 stitches and finish with 2 edge stitches in garter stitch. Continue this pattern. When the last row in A.1 and A.2 remains there are 435 stitches on the needle. Work the last row and decrease at the same time 11 stitches evenly spaced on each side of the middle stitch (22 stitches decreased evenly and 2 stitches increased in diagrams) = 415 stitches. Work diagrams A.5 and A.6 as follows from the right side: 2 edge stitches in garter stitch, A.5A over 14 stitches (1 time in width), work A.5B over 176 stitches (8 times in width), A.5C over 15 stitches (1 time in width), 1 stitch in stockinette stitch (= middle stitch), A.6A over 14 stitches, A.5B over 176 stitches (8 times in width), A.6C over 15 stitches and finish with 2 edge stitches in garter stitch. Continue this pattern. When the last row in A.5 and A.6 is finished there are 523 stitches on the row. Work diagrams A.7 and A.8 as follows from the right side: 2 edge stitches in garter stitch, A.7A over 18 stitches (1 time in width), A.7B over 32 stitches (1 time in width), A.7C over 176 stitches (8 times in width), work A.7D over 33 stitches (1 time in width), 1 stitch in stockinette stitch (= middle stitch), A.8A over 32 stitches, A.7C over 176 stitches (8 times in width), A.8C over 33 stitches, A.8D over 18 stitches and finish with 2 edge stitches in garter stitch. Continue this pattern. When the last row in A.7 and A.8 remain there are 593 stitches on the needle. Work the last row and increase at the same time 72 stitches evenly spaced on each side of the middle stitch (144 stitches increased evenly and 2 stitches increased in diagrams) = 739 stitches. Work diagrams A.1 and A.2 as follows from the right side: 2 edge stitches in garter stitch, A.1A over 2 stitches (1 time in width), A.1B over 362 stitches (181 times in width), A.1C over 3 stitches (1 time in width), 1 stitch in stockinette stitch (= middle stitch), A.2A over 3 stitches, work A.2B over 362 stitches (181 times in width), A.2C over 2 stitches and finish with 2 edge stitches in garter stitch. Continue this pattern. When the last row in A.1 and A.2 remains there are 779 stitches on the row. Work the last row and increase at the same time 1 on each side of the middle stitch (2 stitches increased evenly and 2 stitches increased in diagrams) = 783 stitches. Now work A.1 and A.2 one more time in height; i.e. work as follows from the right side: 2 edge stitches in garter stitch, A.1A over 2 stitches (1 time in width), A.1B over 384 stitches (192 times in width), A.1C over 3 stitches (1 time in width), 1 stitch in stockinette stitch (= middle stitch), A.2A over 3 stitches, work A.2B over 384 stitches (192 times in width), A.2C over 2 stitches and finish with 2 edge stitches in garter stitch. Continue this pattern. When the last row in A.1 and A.2 has been completed there are 825 stitches on the row. The piece measures approx. 65 cm = 25½" measured along the middle stitch. Bind off as described below. ELASTIC BIND-OFF EDGE: To avoid the bind-off edge being tight, bind off with knit from the right side as follows: Knit 2, * insert the left needle in the 2 stitches on the right needle, from left to right and knit them together, knit 1 *, work from *-* until there is 1 stitch left on the row. Cut the strand and pull it through the last stitch. Fasten strands. SHAPING TIP: Moisten the piece and shape to the right measurements. |
|||||||||||||||||||||||||||||||
Diagram explanations |
|||||||||||||||||||||||||||||||
|
|||||||||||||||||||||||||||||||
 |
|||||||||||||||||||||||||||||||
 |
|||||||||||||||||||||||||||||||
 |
|||||||||||||||||||||||||||||||
 |
|||||||||||||||||||||||||||||||
 |
|||||||||||||||||||||||||||||||
 |
|||||||||||||||||||||||||||||||
 |
|||||||||||||||||||||||||||||||
 |
|||||||||||||||||||||||||||||||
 |
|||||||||||||||||||||||||||||||
 |
|||||||||||||||||||||||||||||||
Have you finished this pattern?Tag your pictures with #dropspattern #laceylaurelsshawl or submit them to the #dropsfan gallery. Do you need help with this pattern?You'll find 16 tutorial videos, a Comments/Questions area and more by visiting the pattern on garnstudio.com. © 1982-2026 DROPS Design A/S. We reserve all rights. This document, including all its sub-sections, has copyrights. Read more about what you can do with our patterns at the bottom of each pattern on our site. |
|||||||||||||||||||||||||||||||


With over 40 years in knitting and crochet design, DROPS Design offers one of the most extensive collections of free patterns on the internet - translated to 17 languages. As of today we count 325 catalogs and 12298 patterns - 12288 of which are translated into English (US/in).
We work hard to bring you the best knitting and crochet have to offer, inspiration and advice as well as great quality yarns at incredible prices! Would you like to use our patterns for other than personal use? You can read what you are allowed to do in the Copyright text at the bottom of all our patterns. Happy crafting!
Post a comment to pattern DROPS 203-14
We would love to hear what you have to say about this pattern!
If you want to leave a question, please make sure you select the correct category in the form below, to speed up the answering process. Required fields are marked *.