
Popular categories
Looking for a yarn?


Comments / Questions (58)
![]() Marit Hjelmeland wrote:
Marit Hjelmeland wrote:
Hei, jeg stusser over enda en ting i denne oppskriften. Ser at dere har svart at mønsteret skal strikkes frem og tilbake. Slik jeg leser oppskriften skal alle 352 m inn på rundpinne. Det passer jo med fellingsbeskrivelsen og at alt skal over på en tynnere rundpinne senere. Tar jeg feil?
23.03.2023 - 11:42DROPS Design answered:
Hei Marit, Ja, du strikker fram og tilbake, selv om du bruker rundpinne. Rundpinnen er brukt fordi det er for mange masker til vanlige pinner. God fornøyelse!
24.03.2023 - 06:50
![]() Marit Hjelmeland wrote:
Marit Hjelmeland wrote:
Hei,har. Problemer med å plukke opp masker på skrå. Hvor langt inne starter js fra toppen og hvor mange tråder hopper jeg over mellom hver maske jeg tar opp. Klarer det fint på en rett linje, men ser ikke helt løsningen når det er skrått.
22.03.2023 - 12:48DROPS Design answered:
Hei Marit. Ingen fasit på hva som er riktig eller galt. Det må bare plukkes opp slik at det ikke blir "hull" / minst mulig "hull", og at det blir ca likt på begge sider. mvh DROPS Design
27.03.2023 - 11:00
![]() Mette Schnitler wrote:
Mette Schnitler wrote:
Hei, spørsmålet gjelder bolen. 1) Nå strikkes høyre og venstre del ferdig for seg - det felles mot halsen 1 m i hver ende av hver p 3 ganger og deretter 1 p uten å felle. Betyr det å felle 1 maske på begynnelsen og slutten av hver pinne eller bare i begynnelsen av pinnen? 2) Når arbeidet måler 28 (32) cm deles det til ermhull på midten av atbeidet og hver del strikkes for seg. Hvor mange masker skal felles til ermhullet?
07.01.2023 - 11:07DROPS Design answered:
Hej Mette, På hver pind betyder både begyndelsen og slutten af hver pind. Du deler bare arbejdet, det skal altså ikke felles til ærmehull :)
10.01.2023 - 12:19
![]() Jacqueline wrote:
Jacqueline wrote:
Hola buenas tardes, saben quiero ocupar el ícono para poder cambiar el hilo para el mismo patrón pero no funciona, no hace la conversión.\\r\\nGracias un abrazo desde CHILE
23.08.2022 - 00:41
![]() Bjørg Hildre Pedersen wrote:
Bjørg Hildre Pedersen wrote:
Må man strikke mønster frem og tilbake? Altså 1 omg rett og 1 vrang? Synes det er vanskelig med mønster...
12.06.2022 - 15:52DROPS Design answered:
Hei Bjørg. På denne modellen må det strikkes slik som det står på oppskriften, altså frem og tilbake når det strikkes mønster. mvh DROPS Design
13.06.2022 - 13:08
![]() Torunn Sørvik wrote:
Torunn Sørvik wrote:
Finner ikke i oppskriften Drops 14-9 hvor jeg skal begynne på mønsteret . Mvh Torunn
25.04.2022 - 20:48DROPS Design answered:
Hej Torunn, selve mønsteret begynder nede hvor det står Montering :)
26.04.2022 - 14:55
![]() Vicki wrote:
Vicki wrote:
Thank you. I really appreciate your kind response. But I do not understand your answer. The height is the row count. I am talking about the width. As I decrease left and right of center I no longer have 8 stitches to complete the 8 stitch repeat on each side and it gets smaller and smaller until now I am down to 10 repeats on each side instead of 11 and so on. How should I adjust the 8 stitch repeat in the center as I decrease so that I have the pattern or a pattern?
21.03.2022 - 16:23DROPS Design answered:
Dear Vicki, let's say you have decreased the first stitch in the diagram, on the next row you will continue working diagram over the last 7 sts only (skip first stitch), when you have decreased the first 2 sts in the diagram, you continue working only the last 6 sts and so on, ie diagram will continue in height over less and less stitches, but it shouldn't be displaced (so that the remaining diagrams continue in height as before/in diagram).Can this helpe?
22.03.2022 - 09:39
![]() Vicki wrote:
Vicki wrote:
I am doing the Yoke. As I decrease midpoint front and back I also have less stitches for the 8-stitch repeats. How do you suggest changing the design? For example when there are only 6 stitches on each side do I do the first 6 stitches of the pattern on one side and again on the left (if though it will be offset) or do I improvise, and make slight adjustments so that it looks good, which is what I am doing? I've been reading and watching videos but can't find the answer.
21.03.2022 - 15:24DROPS Design answered:
Dear Vicki, continue working pattern in height as before, ie there will be always less stitches on each side of the decreases that are worked in the pattern since they will be "eaten" by the decreases, but the pattern should always fit in height as before. Happy knitting!
21.03.2022 - 15:37
![]() Vicki wrote:
Vicki wrote:
At a critical point. The English version says "Dec to shape the V-neck towards mid front and towards mid back like this: dec 1 st in each end on every row 3 times, 1 row without dec, repeat until you have dec 124 (124) sts – 62 (62) sts on each side." Should I dec one stitch at the end of row 1, 2 & 3 only or one stitch each end of 1, 2 & 3? Thanks.
06.03.2022 - 05:11DROPS Design answered:
Dear Vicki, you need to decrease one stitch at each end of the rows (one for each V-neck, in the front and in the back). Happy knitting!
06.03.2022 - 13:37
![]() Vicki Greene wrote:
Vicki Greene wrote:
I do not understand what to do when it is time to create the space for opening for the armholes. The pattern seems to have a word or two missing and I have no idea what to do at that point. Please help, I am enjoying the pattern and don't want to ruin it at that point. Thank you,
26.02.2022 - 02:46DROPS Design answered:
Dear Vicki, for the armhole, you divide the garment for the back and front after 18-32 cm (you don't cast off for the armhole). Happy knitting!
27.02.2022 - 17:15
|
|||||||||||||
Bluescape |
|||||||||||||
|
|
|||||||||||||
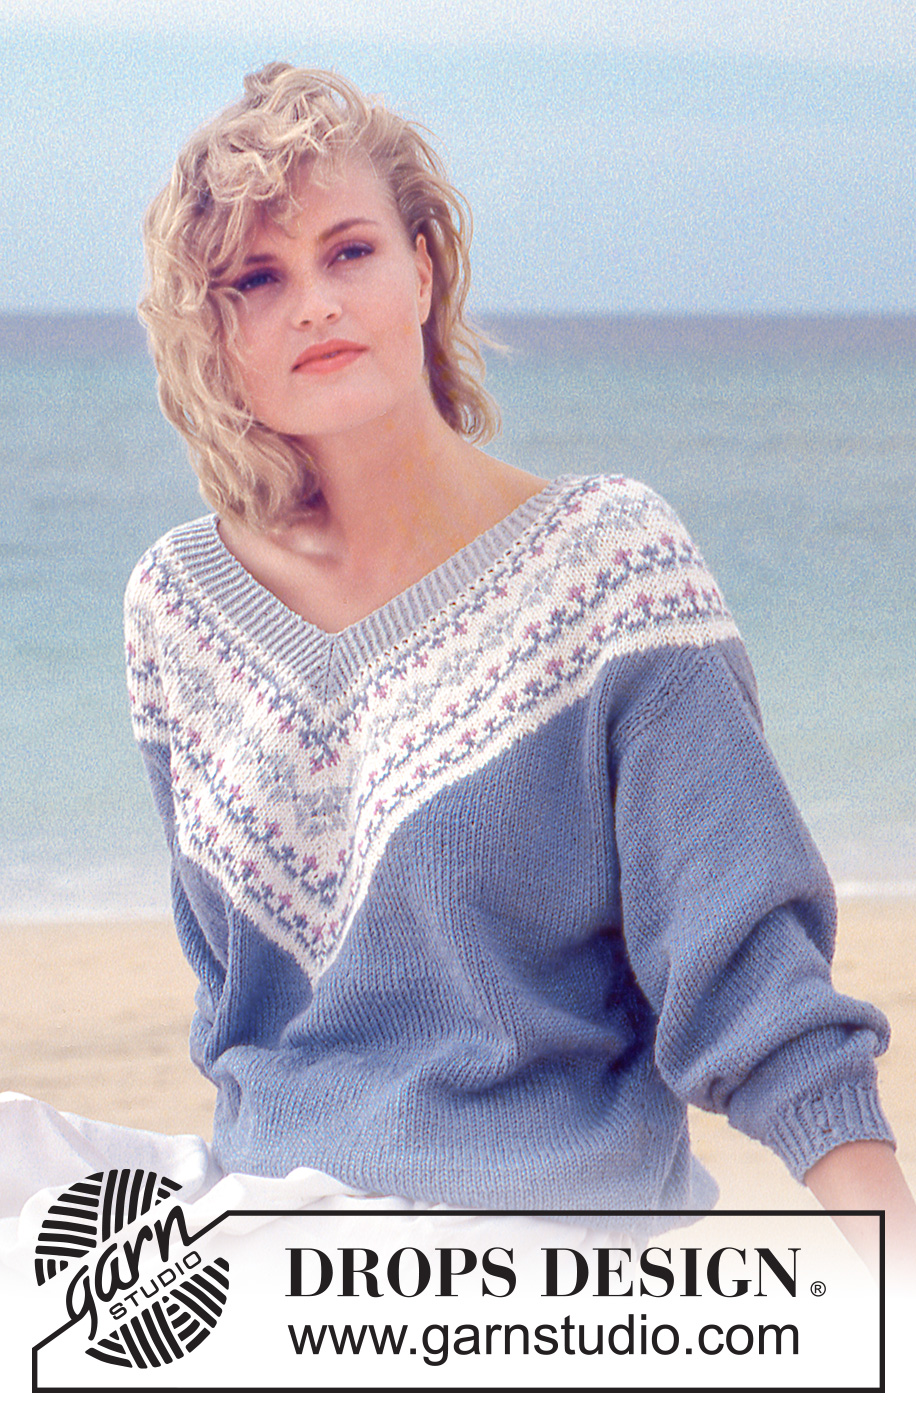
DROPS jumper with flower pattern border on V-neck in Muskat or Lima.
DROPS 14-9 |
|||||||||||||
|
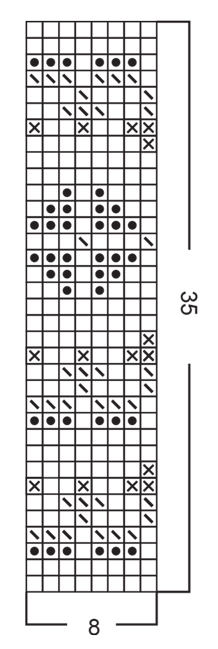
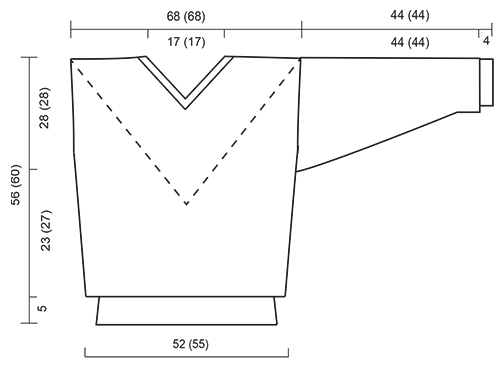
Pattern: See diagram. The diagram shows the pattern from the RS side and the entire pattern is worked in stocking st. Rib: *K1 into back of loop, P1*, repeat from *-*. Body: The jumper is worked in the round on circular needle, bottom up. Cast on 170-178 sts on circular needle size 2.5 mm with blue / grey blue and work 5 cm rib. Change to circular needle size 4.5 mm and continue in stocking st, at the same time inc 28-32 sts evenly on the first round = 198-210 sts. Remember the knitting tension. Now inc 2 sts in each side a total of 15-12 times like this: for size S/M: inc on every 3 rd , 4 th and 4 th round alternately, for size M/L : inc on every 5th and 6th round alternately = 258-258 sts. When the piece measures 22-26 cm cast off the middle st on both the front and back piece and continue working the left and right side separately. Dec to shape the V-neck towards mid front and towards mid back like this: dec 1 st in each end on every row 3 times, 1 row without dec, repeat until you have dec 124 (124) sts – 62 (62) sts on each side. At the same time; when piece measures 28-32 cm divide for armholes in the middle of the on each side. Complete the front and back pieces separately. After the final dec for V-neck there are 2 sts left on the needle for each piece, cast these off. The piece measures approx 56-60 cm. Sleeve: Cast on 40-42 sts on double pointed needles size 2.5 mm with blue / grey blue and work 5 cm rib. Change to double pointed needles size 4.5 mm and continue in stocking st, at the same time inc 15-13 sts evenly on the first round = 55-55 sts. At the same time; after the rib inc 1 sts on each side of the centre sts mid under arm a total of 26-26 times on every 3rd and 4th round alternately = 107-107 sts. When the piece measures 41-41 cm cast off 10 sts mid under arm and complete the piece back and forth on the needle. Cast off 10 sts at the beg of every row until the piece measures 44-44 cm. Cast off remaining sts. Assembly: Sew the shoulder seams. Pick up 88 sts along each side of the V-neck on needle size 4.5 mm with white = 352 sts. Work pattern (11 repeats on each side of V- neck), at the same time dec mid front and mid back like this: *K tog the 2 sts before middle st into back of loop and K tog the 2 sts after middle st on 3 rounds, and no dec on the 4 th round*. Continue *-* until the piece is complete. After the last pattern row change to needle size 2.5 mm and light blue, work 3 cm rib (continue the dec) and cast off. Sew sleeve to body. |
|||||||||||||
Diagram explanations |
|||||||||||||
|
|||||||||||||
 |
|||||||||||||
 |
|||||||||||||
Have you finished this pattern?Tag your pictures with #dropspattern or submit them to the #dropsfan gallery. Do you need help with this pattern?You'll find 25 tutorial videos, a Comments/Questions area and more by visiting the pattern on garnstudio.com. © 1982-2026 DROPS Design A/S. We reserve all rights. This document, including all its sub-sections, has copyrights. Read more about what you can do with our patterns at the bottom of each pattern on our site. |
|||||||||||||


With over 40 years in knitting and crochet design, DROPS Design offers one of the most extensive collections of free patterns on the internet - translated to 17 languages. As of today we count 324 catalogs and 12290 patterns - 12280 of which are translated into English (US/in).
We work hard to bring you the best knitting and crochet have to offer, inspiration and advice as well as great quality yarns at incredible prices! Would you like to use our patterns for other than personal use? You can read what you are allowed to do in the Copyright text at the bottom of all our patterns. Happy crafting!
Post a comment to pattern DROPS 14-9
We would love to hear what you have to say about this pattern!
If you want to leave a question, please make sure you select the correct category in the form below, to speed up the answering process. Required fields are marked *.