Snuggly Bunny by DROPS Design

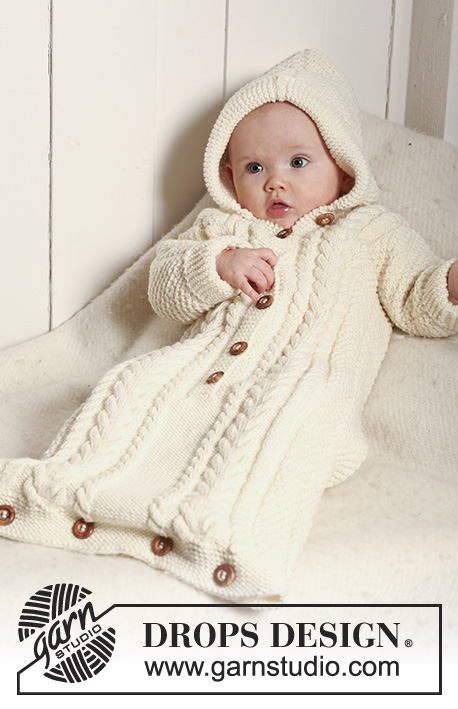
Kötött babazsák, rizs-, struktúra- és csavartmintával DROPS Merino Extra fine fonalból. DROPS design: me-042-by jelű minta

DROPS Baby 19-10
Méret: 1/3 - 6/9 - 12/2 - 3/4 éveseknek.
A méret cm-ben: 50/56 - 62/68 - 74/80 (86/92 - -98/104)

Alapanyagok: DROPS MERINO EXTRA FINE a Garnstudiótól
450-500-550 (650-700) gramm a 01 sz. törtfehér színből

DROPS KÖRKÖTŐTŰ (60 és 80 cm hosszú) 4 mm-es - vagy olyan vastagságú, amellyel 21 szem X 28 sor = 10 X 10 cm harisnyakötéses (színén sima, fonákoldalán fordított) próbadarabot tudunk készíteni.
DROPS FAGOMBOK, világos 511 számú: 10-10-10 (12-12) darab

-------------------------------------------------------

Kötéspróba – Nézze meg hogyan és miért kell megmárni ITT
Választható más fonalak – Nézze meg hogyan helyettesítheti be a fonalat ITT.
A_F fonalcsoportok – Használja ugyanazt a mintát és helyettesítse be a fonalat ITT.
Fonalhasználat más, behelyettesített fonalnál – Hazsnálja a fonalátváltónkat.

-------------------------------------------------------


100% gyapjú
minimum 1530.00 Ft /50g
DROPS Merino Extra Fine uni colour DROPS Merino Extra Fine uni colour 1530.00 Ft /50g
Nordfonal.hu
Rendelés
DROPS Merino Extra Fine mix DROPS Merino Extra Fine mix 1530.00 Ft /50g
Nordfonal.hu
Rendelés
needles Kötőtűk & Horgolótűk Rendelés
Ehhez a darabhoz, megvásárolhatja a fonalat már 13770Ft. Olvasson tovább.

Mintaleírás

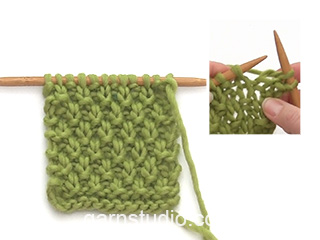
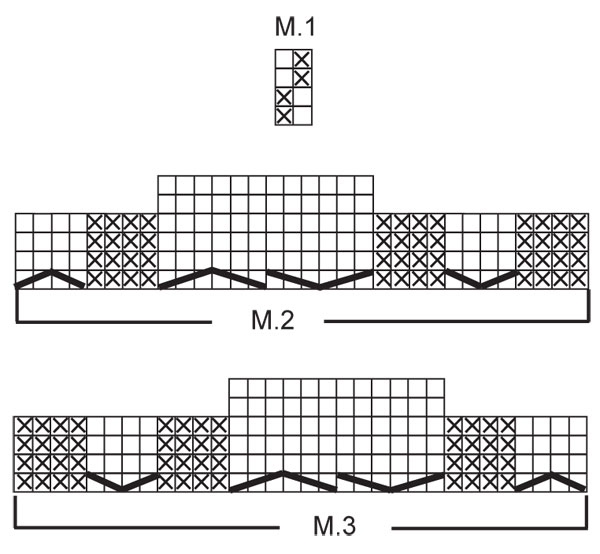
BABAZSÁK:

LUSTAKÖTÉS (a kötőtűn oda-vissza):
Minden sorban sima szemekkel kötünk.
MINTA:
Lásd az M.1- M.3-as diagramot A diagram a mintát a színe oldal felől mutatja. Az M.2 és M.3 jelű minta 1. sora = SZOO.
LYUK AZ AUTÓS GYERMEKÜLÉS BIZTONSÁGI ÖVÉHEZ:
A babazsákot készíthetjük az elején és a hátán lyukkal a biztonsági öv átvezetéséhez. Az első lyukat a darab hátán akkor készítjük, amikor az körülbelül 16-20-23 (28-33) cm.es (vagy a kívánt méretű), a tűn levő szemek közül a középső 10-et leláncolva. A következő sorban szedjünk fel 10 új szemet a leláncolt szemek fölött, és a korábbiaknak megfelelően folytassuk a munkát.
GOMBLYUKAK:
A gomblyukakat a jobboldali gomboláspánton készítjük el. 1 gomblyuk= kössük össze a 2. és a 3. szemet az eleje közepénél, majd 1RH.
A gomblyukakat akkor készítsük, amikor a darabunk:
1/3 hónapos méretnél: 25, 30, 35, 40, 45 és 50 cm.
6/9 hónapos méretnél: 28, 34, 41, 47, 54 és 60 cm.
12/18 hónapos méretnél: 30, 38, 46, 54, 62 és 70 cm.
2 éveseknek való méretnél: 37, 44, 51, 58, 65, 72 és 79 cm:
A 3/4 éveseknek való méretnél: 40, 48, 57, 65, 74, 82 és 91 cm:
--------------------------------------------------------
--------------------------------------------------------
BABAZSÁK:
A babazsákot 2 részben készítjük, az alsó szélétől, felfelé haladva varrjuk össze. Mindkét részt oda-vissza kötjük körkötőtűn, hogy legyen elég hely a szemeknek.
MEGJEGYZÉS: Ha szükség van lyukra a biztonsági öv elvezetésére- olvassuk el a fenti magyarázatot.

HÁTA:
A kezdéshez szedjünk fel 68-74-82 (86-94) szemet (ebben benne van mindkét oldalon 1 szélszem) a 4 mm vastag körkötőtűre a Merino Extra Fine fonallal. Kössünk lustakötéssel (olvassuk el a fenti magyarázatot) 4-4-4 (5-5) cm-ig, úgy, higy FO sor után fejezzük be. Kössünk 1 sort a FO felől, majd folyt az M.1 jelű mintával, és mindkét oldalon 1-1 lustakötéses szélszemmel (aszélszem mellett 1 S szemmel kezdünk). Amikor a darabunk 44-53-62 (71-82) cm, az ujjához új szemeket szedünk fel, mindkét oldalon, a köv. módon: Minden sor végén szedjünk fel szemeket a köv módon: 4 szemet 2-2-3 (3-3) alkalommal, 8 szemet 1-1-1 (1-3) alkalommal, 10 szemet 1-1-1 (2-1) alkalommal, 12-14-15 (15-16) szemet 1 alkalommal = 144-154-172 (196-218) szemünk lesz a kötőtűn. MEGJEGYZÉS: Az új szemeket az M.1 jelű mintába illesztve kötjük tovább. Amikor minden szemet felszedtünk, az M.1 jelű mintával folyt a kötést, de mindkét oldalon a szélső 10 szemet lustakötéssel kötjük (= az ujjak alsó szegélye). Amikor a darabunk 54-64-74 (84-96) cm-es láncoljuk le a középső 16-16-18-22 (24-24) szemet a nyakkivágás kialakításához és a két vállrészt / ujját külön-külön fejezzük be. Láncoljunk le 1 szemet a nyakkivágás kialakításához a köv sorban = 63-67-74 (85-96) szem marad a sorban (= vállrész + ujja). Amikor a darabunk 56-66-76 (86-98) cm-es, láncoljuk le a darabot. ismételjük meg a másik oldalon.

ELEJE:
A kezdéshez szedjünk fel 68-74-8286-94 szemet a kötőtűre. Kössünk lustakötéssel 2-2-2 (2.5-2.5) cm-t. A következő színe oldali sorban így kössünk: 12-13-14 (14-16) S szem, *2 szemet S összekötünk, 1 rh, 12-13-15 (12-13) S szem. * Ism a *-* közötti részt, összesen 3-3-3 (4-4) alkalommal, 2 szemet S összekötünk, 1 rh, és 12-14-15 (14-16) szemmel fejezzük be a sort (= 4-4-4 (5-5) gomblyuk). Folytassuk lustakötéssel, amíg a darabunk körülbelül 4-4-4 (5-5) cm-es, és 1 FO sor után járunk. Kössünk 1 sort fordított szemekkel a fonákoldal felől, miközben, UGYANAKKOR, egyenletesen elosztva fogyasszunk 22 szemet (minden méretben) = 90-96-104 (108-116) szem marad a kötőtűn. A következő SZO sorban így haladjunk: 1 szélszem, az M.1 jelű minta az első 5-8-12 (14-18) szemen (az oldalán 1 S szemmel kezdjünk, így illeszkedik majd a háta mintájához), az M.2 jelű minta (= 32 szem), 14 F szem, az M.3 jelű minta (= 32 szem), az M.1 jelű minta a következő 5-8-12 (14-18) szemen (a mintát úgy kössük, hogy az oldalán a szélszem mellett 1 F szemet kössünk, így illeszkedik majd a háta mintájához, és 1 szélszemmel fejezzük be. Amikor a darabunk 23-25-28 (33-37) cm-es, csúsztassuk az első 42-45-49 (51-55) szemet 1 szemtartóra = 48-51-55 (57-61) szem marad a kötőtűn.

JOBB ELEJE:
= 48-51-55 (57-61) szem. Folytassuk a mintával a korábbiaknak megfelelően, de az eleje közepén 6 szemen lustakörtéssel kötünk - NE FELEDKEZZÜNK MEG A GOMBLYUKAKRÓL- olvassuk el a fenti magyarázatot. Amikor a darabunk 44-53-62 (71-82) cm-es, minden sor végén szedjünk fel új szemeket az ujjához, ahogy azt a hátánál tettük = 86-91-100 (112-123) szem. Miután minden szemet felszedtünk, folytassuk a mintával a korábbiaknak megfelelően, de az ujja szélén a 10 szélső szemet lustakötéssel kötjük. Amikor 1 sor kell ahhoz, hogy a darabunk 51-61-71 (80-92) cm -es legyen (ez a sor legyen FO sor), az eleje közepénél a csav mintán fogy 4 szemet (vagyis fogy 2 szemet a csav mintán, és 1-1 szemet a csav minta mindkét oldalán. A következő színe oldali sorban először lekötjük az első 6-7-8 (9-9) szemet, majd szemtartóra csúsztatjuk őket a nyakkivágáshoz. A nyakkivágás kialakításához minden sor elején a köv módon láncoljunk le szemeket: 2 szemet 2 alkalommal, majd 1 szemet 2-2-3 (3-3) alkalommal= 70-74-81 (92-103) szem marad a sorban a vállrészhez és az ujjához. Folytassuk a mintával a korábbiaknak megfelelően. Amikor 1 sor kell ahhoz, hogy a darabunk 56-66-76 (86-98) cm-es legyen, egyenletesen elosztva fogyasszunk 7 szemet az M.3 jelű mintán = 63-67-74 (85-96) szem marad a kötőtűn. A köv sorban lazán láncoljuk le a megmaradt szemeket.

BAL ELEJE:
Csúsztassuk a szemtartóra félretett szemeket vissza a kötőtűre, és szedjünk fel 6 szemet a jobb gomb pánt 6 lustakötéses szeme mögött = 48-51-55 (57-61) szem. Folytassuk a jobb elejénél eírt módon, de annak tükörképeként. MEGJEGYZÉS: az eleje pánton nem készítünk gomblyukakat.

ÖSSZEÁLLÍTÁS:
Varrjuk össze a vállvarrásokat, és az ujjak varrásait. Varrjuk össze az ujjak alsó varrását, és folytassuk az oldalán, az 1 szélszem mellett. Hajtsunk fel 5-5 centit a két ujja alsó szélén, és néhányapró öltéssel r9gzítsük. Varrjunk 4-4-4 (5-5) gombot a zsák alsó szélén. varrjuk a megmaradt gombokat a bal eleje szélére.

KAPUCNI:
A színe oldal felől szedjünk fel körülbelül 58-78 szemet (az elején szemtartóra félretett szemekkel együtt) a 4 mm-es körkötőtűre a Merino Extra Fine fonallal. Kössünk 1 sort S szemekkel a FO felől, majd 1 sort S szemekkel a SZO felől. UGYANAKKOR, egyenletesen elosztva fogy annyi szemet, hogy 85-89-93 (97-101) szem maradjon a kötőtűn. Folytassuk az M.1 jelű mintával, mindkét oldalon 6 lustakötéses szemmel. UGYANAKKOR, a köv 2 sor végén szedjünk fel 6 új szemet a visszahajtott szélhez = 97-101-105 (109-113) szem. Ezeket szemek lustakötéssel kötjük. Folytassuk az M.1 jelű mintával, és 12 lustakötéses szemmel a két oldalon, amíg a kapucni 21-23-25 (27-28) cm-es. Láncoljuk le a szemeket. Hajtsuk félbe a kapucnit, és varrjunk össze a tetején. Hajtsuk a kapucni széle körül a 6 lustakötéses szemet a SZO felé, és apró öltésekkel rögzítsük a nyakkivágáshoz.

Diagram

symbols = Sima a színe oldal felől, fordított a fonákoldal felől
symbols = Fordított a színe oldal felől, sima a fonákoldal felől
symbols = Csúsztassunk 3 szemet a segédtűre, tegyük a munka mögé, 3 sima, 3 sima a segédtűről.
symbols = Csúsztassunk 3 szemet a segédtűre, tegyük a munka elé, 3 S, 3 sima a segédtűről.
symbols = Csúsztassunk 2 szemet a segédtűre, tegyük a munka mögé, 2 sima, 2 sima a segédtűről.
symbols = Csúsztassunk 2 szemet a segédtűre, tegyük a munka elé, 2 S, 3 sima a segédtűről.
diagram
diagram

Segítségre van szüksége a mintával kapcsolatban?

Köszönjük, hogy a DROPS Design mintáját választotta! Sokat dolgozunk azért, hogy mintáink könnyen érthetőek és hibamentesek legyenek. Minden mintát Norvégból fordítunk, és a méreteket, számításokat mindig ellenőrizheti az eredeti mintán (DROPS Baby 19-10) .

Gondja van a minta követésével? Az alábbiakban talál egy listát, olyan helyekről, amik segíthetenek abban, hogy a projektet hamr befjezze, vagy akár - miért ne?- tanuljon valami újat.

signature-image signature

Gondja van a minta követésével? Az alábbiakban talál egy listát, olyan helyekről, amik segíthetenek abban, hogy a projektet hamr befjezze, vagy akár - miért ne?- tanuljon valami újat.

Minden mintánkhoz tartoznak oktató-videók, amik segítenek.

Vannak olyan útmutatóink is, amelyek lépésről lépésre mutatják meg a különféle technikákat, ezeket itt találhatják meg.

1) Why is the knitting/crochet tension so important?

Knitting tension is what determines the final measurements of your work, and is usually measured per 10 x 10 cm. It is provided like so: number of stitches in width x number of rows in height - eg: 19 stitches x 26 rows = 10 x 10 cm.

The knitting tension is very individual; some people knit/crochet loosely while others work tightly. You adjust the knitting tension with the needle size, which is why the suggested needle size only serve as a guide! You need to adjust this (up or down) to ensure that YOUR knitting tension matches the knitting tension provided in the pattern. If you work with a different knitting tension than provided you will have a different yarn consumption, and your work will have different measurements than what the pattern suggests.

The knitting tension also determines which yarns can replace each other. As long as you achieve the same knitting tension you can replace one yarn with another.

See DROPS lesson: How to measure your tension/gauge

See DROPS video: How to make a gauge tension swatch

fel

2) Fonalcsoportok - Mik ezek, és hogyan használjuk őket?

A fonalakat vastagságuk, és a velük elérhető kötéspróba szerint csoportokba rendeztük, így könnyebben találhat mintát a kedvenc fonalához. Vagy könnyebben találhat egy mintához fonal-alternatívákat. Az ugyanabban a fonalcsoportban levő fonalak hasonló kötéspróbát adnak, így egymással behelyettesíthetőek. Azonban, ettől függetlenül a minőségük, a struktúrájuk eltérő, így az elkészült darab különleges és egyedi lesz. Az egyes fonalcsoportok áttekintéséhez kattintson ide!.

A fonalcsoport = a csoporton belül minden fonallal 26 -23 szemet tudunk 10 cm-en kötni.

B fonalcsoport = a csoporton belül minden fonallal 22 -20 szemet tudunk 10 cm-en kötni.

C fonalcsoport = a csoporton belül minden fonallal 19 -16 szemet tudunk 10 cm-en kötni.

D fonalcsoport = a csoporton belül minden fonallal 15 -12 szemet tudunk 10 cm-en kötni.

E fonalcsoport = a csoporton belül minden fonallal 11 -9 szemet tudunk 10 cm-en kötni.

E fonalcsoport = a csoporton belül minden fonallal 8 -5,5 szemet tudunk 10 cm-en kötni.

Amennyiben több szál fonalat összefogva szeretne dolgozni, ehhez a következőket érdemes tudni: A C fonalcsoport 1 szálával hasonló kötéspróbát tudunk készíteni, mint az A. fonalcsoport 2 szálát összefogva, Az A fonalcsoportból tehát bármely fonalból 2 szálat, vagy bármely 2 fonalból 1-1 szálat összefogva megfelel a C fonal 1-1 szálának, ezt a mintákban így jeleztük: A + A = C.

Az alábbiakban áttekintjük, hogyan működnek a fonalaink, ha 1 szálnál többel dolgozunk:

2 szál az A fonalcsoportból megfelel a C fonalcsoport 1 szálának. Ezt a mintában így jeleztük: A + A = C

3 szál az A fonalcsoportból megfelel a D fonalcsoport 1 szálának. Ezt a mintában így jeleztük: A+A+A = D

4 szál az A fonalcsoportból megfelel az E fonalcsoport 1 szálának. Ezt a mintában így jeleztük: A + A+A+A = D

8 szál az A fonalcsoportból megfelel az F fonalcsoport 1 szálának. Ezt a mintában így jeleztük: A+A+A+A +A+A+A+A = F

2 szál az B fonalcsoportból megfelel a D fonalcsoport 1 szálának. Ezt a mintában így jeleztük: B+B =D

2 szál a C fonalcsoportból megfelel az E fonalcsoport 1 szálának. Ezt a mintában így jeleztük: C+C = E

4 szál a C fonalcsoportból megfelel az F fonalcsoport 1 szálának. Ezt a mintában így jeleztük: C+C+C+C = F

2 szál az E fonalcsoportból megfelel az F fonalcsoport 1 szálának. Ezt a mintában így jeleztük: E+E= F

A fonalak ilyen cseréjével új minőségeket, új struktúrákat érhetünk el, a választott kombinációktól függően. Kifejlesztettünk egy fonal-kalkulátort, amivel kiszámolhatja, mennyi fonalra van szüksége, ha 1 szál fonal helyett 2 vagy több szál kombinációját választja. A kalkulátorhoz a linket minden minta oldalán megtalálja. Ne feledje, hogy a megadott kötéspróba határozza meg, melyik fonalakat használhatjuk. Feltétlenül készítsünk próbadarabot a választott fonalkombinációval, és ellenőrizzük, hogy be tudjuk-e tartani a megfelelő kötéspróbát.

fel

3) Can I use a different yarn than what the pattern suggests?

The important thing when changing from one yarn to another is that the knitting/crochet tension remains the same. This is so that the measurements of the finished piece will be the same as on the sketch provided. It is easier to achieve the same knitting tension using yarns from the same yarn group. It is also possible to work with multiple strands of a thinner yarn to achieve the knitting tension of a thicker one. Please try our yarn converter. We recommend you to always work a test swatch.

Please NOTE: when changing yarn the garment might have a different look and feel to the garment in the photo, due to individual properties and qualities of each yarn.

See DROPS lesson: Can I use a different yarn than the one mentioned in the pattern?

fel

4) How do I use the yarn converter?

At the top of all our patterns you’ll find a link to our yarn converter, which is a helpful tool should you wish to use a different yarn than suggested. By filling in the yarn quality you wish to replace, the amount (in your size) and number of strands, the converter will present good alternative yarns with the same knitting tension. Additionally it will tell you how much you’ll require in the new qualities and whether you’ll need to work with multiple strands. Most skeins are 50g (some are 25g or 100g).

If the pattern is worked with multiple colours, every colour will have to be converted separately. Similarly, if the pattern is worked with several strands of different yarns (for example 1 strand Alpaca and 1 strand Kid-Silk) you will have to find alternatives for each, individually.

Click here to see our yarn converter

fel

5) Why do I get the wrong knitting tension with the suggested needle size?

The needle size provided in the pattern serves only as a guide, the important thing is to follow the knitting tension. And since knitting tension is very individual, you will have to adjust the needle size to ensure that YOUR tension is the same as in the pattern – maybe you’ll have to adjust 1, or even 2 needle sizes, up or down to achieve the correct tension. For this, we recommend that you work test swatches.

Should you work with a different knitting tension than the one provided, the measurements of the finished garment might deviate from the measurement sketch.

See DROPS lesson: How to measure your tension/gauge

See DROPS video: How to make a gauge tension swatch

fel

6) Why is the pattern worked top-down?

Working a garment top-down provides more flexibility and room for personal adjustment. For example it is easier to try the garment on while working, as well as making adjustments to length of yoke and shoulder caps.

The instructions are carefully explaining every step, in the correct order. Diagrams are adjusted to the knitting direction and are worked as usual.

fel

7) Why are the sleeves shorter in larger sizes?

The total width of the garment (from wrist-to-wrist) will be larger in the larger sizes, despite the actual sleeves being shorter. The larger sizes have longer sleeve caps and wider shoulders, so there will be a good fit in all sizes.

fel

8) What is a repeat?

Diagrams are often repeated on the round or in height. 1 repeat is the diagram the way it appears in the pattern. If it says to work 5 repeats of A.1 in the round, then you work A.1 a total of 5 times after/next to each other in the round. If it says to work 2 repeats of A.1 vertically/in height you work the entire diagram once, then begin again at the start and work the entire diagram one more time.

fel

9) How do I work according to a knitting diagram?

The diagram depicts all rows/rounds, and every stitch seen from the right side. It is read from bottom to top, from right to left. 1 square = 1 stitch.

When working back and forth, every other row is worked from the right side and every other row is worked from the wrong side. When working from the wrong side, the diagram will have to be worked reversed: from left to right, knit stitches are purled, purl stitches are knit etc.

When working in the round every round is worked from the right side and the diagram are worked from right to left on all rounds.

See DROPS lesson: How to read knitting diagrams

fel

10) How do I work according to a crochet diagram?

The diagram depicts all rows/rounds, and every stitch seen from the right side. It is worked from bottom to top, from right to left.

When working back and forth every other row is worked from the right side: from right to left and every other row is worked from the wrong side: from left to right.

When working in the round, every row in the diagram are worked from the right side, from right to left.

When working a circular diagram you start in the middle and work your way outwards, counter clockwise, row by row.

The rows usually start with a given number of chain stitches (equivalent to the height of the following stitch), this will either be depicted in the diagram or explained in the pattern.

See DROPS lesson: How to read crochet diagrams

fel

11) How do I work several diagrams simultaneously on the same row/round?

Instructions for working several diagrams after each other on the same row/round, will often be written like so: “work A.1, A.2, A.3 a total of 0-0-2-3-4 times". This means you work A.1 once, then A.2 is worked once, and A.3 is repeated (in width) the number of times provided for your size – in this case like so: S = 0 times, M = 0 times, L=2 times, XL= 3 times and XXL = 4 times.

The diagrams are worked as usual: begin with the first row in A.1, then work the first row in A.2 etc.

See DROPS lesson: How to read knitting diagrams

See DROPS lesson: How to read crochet diagrams

fel

12) Why does the piece start with more chain stitches than it’s worked with?

Chain stitches are slightly narrower than other stitches and to avoid working the cast-on edge too tight, we simply chain more stitches to begin with. The stitch count will be adjusted on the following row to fit the pattern and measurement sketch.

fel

13) Why increase before the rib edge when the piece is worked top-down?

The rib edge is more elastic and will contract slightly compared to, for example, stocking stitch. By increasing before the rib edge, you avoid a visible difference in width between the rib edge and the rest of the body.

fel

14) Why increase in the cast-off edge?

It’s very easy to cast off too tightly, and by making yarn overs while casting off (and simultaneously casting these off) you avoid a too tight cast off edge.

See DROPS video: How to bind off with yarn overs (yo)

fel

15) How do I increase/decrease on every 3rd and 4th row/round alternately?

To achieve an even increase (or decrease) you can increase on, for example: every 3rd and 4th row alternately, like so: work 2 rows and increase on the 3rd row, work 3 rows and increase on the 4th. Repeat this until the increase is complete.

See DROPS lesson: Increase or decrease 1 st on every 3rd and 4th row alternately

fel

16) Why is the pattern slightly different than what I see in the photo?

Pattern repeats can vary slightly in the different sizes, in order to get the correct proportions. If you’re not working the exact same size as the garment in the photo, yours might deviate slightly. This has been carefully developed and adjusted so that the complete impression of the garment is the same in all sizes.

Make sure to follow instructions and diagrams for your size!

fel

17) How can I work a jacket in the round instead of back and forth?

Should you prefer to work in the round instead of back and forth, you may of course adjust the pattern. You’ll need to add steeks mid-front (usually 5 stitches), and follow the instructions. When you would normally turn and work from the wrong side, simply work across the steek and continue in the round. At the end you’ll cut the piece open, pick up stitches to work bands, and cover the cut edges.

See DROPS video: How to knit steeks and cut open

fel

18) Can I work a jumper back and forth instead of in the round?

Should you prefer to work back and forth instead of in the round, you may of course adjust the pattern so you work the pieces separately and then assemble them at the end. Divide the stitches for the body in 2, add 1 edge stitch in each side (for sewing) and work the front and back pieces separately.

See DROPS lesson: Can I adapt a pattern for circular needles into straight needles?

fel

19) Why do you show discontinued yarns in the patterns?

Since different yarns have different qualities and textures we have chosen to keep the original yarn in our patterns. However, you can easily find options among our available qualities by using our yarn converter, or simply pick a yarn from the same yarn group.

It is possible that some retailers still have discontinued yarns in stock, or that someone has a few skeins at home that they would like to find patterns for.

The yarn converter will provide both alternative yarn as well as required amount in the new quality.

fel

20) How do I make a women’s size garment into a men’s size one?

If you have found a pattern you like which is available in women’s size it’s not very difficult to convert it to men’s size. The biggest difference will be the length of sleeves and body. Start working on the women size that you think would fit across the chest. The additional length will be worked right before you cast off for the armhole/sleeve cap. If the pattern is worked top-down you can add the length right after the armhole or before the first decrease on sleeve.

Regarding additional yarn amount, this will depend on how much length you add, but it is better with a skein too many than too few.

fel

21) How do I prevent a hairy garment from shedding?

All yarns will have excess fibres (from production) that might come off as lint or shedding. Brushed yarns (ie hairier yarns) have more of these loose, excess fibres, causing more shedding.

Shedding also depends on what is worn under or over the garment, and whether this pulls at the yarn fibres. It’s therefore not possible to guarantee that there will be no shedding

Below are some tips on how to get the best result when working with hairier yarns:

1. When the garment is finished (before you wash it) shake it vigorously so the looser hairs come off. NOTE: do NOT use a lint roller, brush or any method that pulls at the yarn.

2. Place the garment in a plastic bag and put it in your freezer - the temperature will cause the fibres to become less attached to each other, and excess fibres will come off easier.

3. Leave in the freezer for a few hours before taking it out and shaking it again.

4. Wash the garment according to the instructions on the yarn label.

fel

22) Where on the garment is the length measured?

The measurement sketch/schematic drawing provides information regarding the full length of the garment. If it’s a jumper or a jacket the length is measured from the highest point on the shoulder closest to the neckline, and straight down to the bottom of the garment. It is NOT measured from the tip of shoulder. Similarly, the length of yoke is measured from the highest point on the shoulder and down to where yoke is split into body and sleeves.

On a jacket measures are never taken along bands, unless specifically stated. Always measure inside band stitches when measuring the length.

See DROPS lesson: How to read a schematic drawing

fel

23) How do I know how many balls of yarn I need?

The required amount of yarn is provided in grams, eg: 450 g. To calculate how many balls you’ll need you first need to know how many grams are in 1 ball (25g, 50g or 100g). This information is available if you click on the individual yarn quality on our pages. Divide the amount required with the amount of each ball. For example, if each ball is 50g (the most common amount), the calculation will be as follows: 450 / 50 = 9 balls.

fel

DROPS fonalat vásárolt a minta elkészítéséhez? akkor, abban a boltban, ahol a fonalat vásárolta, joga van segítséget kérni és kapni. A DROPS üzletek listáját ITT találja!
Még mindig nem találta meg a választ, amire szüksége van? Görgessen lejjebb, és tegye fel kérdését, és szakembereink megpróbálnak segíteni. Ez általában 5-10 munkanapon beül megtörténik.. Addig is elolvashatja a korábban, mások által feltett kérdéseket és a válaszokat, vagy csatlakozhat a Facebook-on a DROPS Workshophoz, hogy kézimunkázó társaitól kaphasson segítséget.

Megjegyzések / Kérdések (286)

country flag Jacqui wrote:

I am wondering about the first cast off for the neck. It states to dec 4 on WS on cable. One before, 2 over and one after. How do you continue the cable pattern after this? Thank you

24.05.2023 - 14:37

DROPS Design answered:

Dear Jacqui, decrease 4 stitches in the cable working for example P2 tog int he cable stitches, on next row from right side, work K over K, P over P and slip the stitches on a thread for neckline. Happy knitting!

24.05.2023 kl. 15:09

country flag Pépita wrote:

Bonjour je ne comprend pas comment il faut faire moi je vous parle du côté gauche et vous du côté droit comment je doit monter ses 6 mailles sur le bord je suis vraiment bloqué, je ne suis pas une professionnelle merci de votre réponse passé une bonne journée

14.03.2023 - 05:35

DROPS Design answered:

Bonjour Pépita, j'étais bien sur le devant gauche aussi, tricotez votre premier rang du devant gauche sur l'endroit et montez vos 6 mailles (côté milieu de l'ouvrage, derrière le devant droit) en fin de rang, ou bien si votre 1er rang du devant gauche doit être tricoté sur l'envers, montez d'abord 6 mailles, puis tricotez les mailles du devant gauche sur l'envers. Bon tricot!

14.03.2023 kl. 10:06

country flag Pépita wrote:

Bonsoir merci pour votre réponse est ce que je doit monter les 6m comme pour les manches à la fin du rang bonne soirée

13.03.2023 - 20:46

DROPS Design answered:

Bonjour Pépita, tout à fait, montez ces mailles à la fin du premier rang sur l'endroit du devant gauche, lorsque vous reprenez les mailles. Bon tricot!

14.03.2023 kl. 09:37

country flag Dantonnet wrote:

Bonjour je suis au devant gauche, j’ai regardé la vidéo pour monter les 6ms derrière les 6ms point mousse et je n’ai rien compris très compliqué il aurait il un autre moyen de monter ses mailles merci a vous bonne journée

11.03.2023 - 12:40

DROPS Design answered:

Bonjour Mme Dantonnet, dans cette vidéo, time code 0:56, on montre où relever ces mailles: dans la maille du rang précédent des mailles concernées. Autrement dit, reprenez les mailles du devant gauche et tricotez-les sur l'endroit (comme avant),et, à la fin du rang, relevez 1 maille sur l'envers de chacune des 6 premières mailles du devant droit. Si vous n'y arrivez pas, vous pouvez monter ces 6 m à la fin du rang, et les coudre ensuite le long des 6 m de la bordure du devant droit. Bon tricot!

13.03.2023 kl. 09:27

country flag Pépita wrote:

Merci pour vos réponses très rapides bonne après-midi

27.02.2023 - 14:44

country flag Pépita wrote:

Bonjour je suis arrivé aux diminutions du côté droit on me demande de diminuer de 4 m dans la torsade côté milieu est ce celle qui se trouve à côté de la manche ou celle a côté des boutonnières pouvez-vous m’expliquer comment faire merci de votre réponse bonne journée

27.02.2023 - 12:44

DROPS Design answered:

Bonjour Pépita, comme il faut plus de mailles pour une torsade que pour du jersey, on doit diminuer le nombre de mailles de cette torsades pour éviter que le bord ne gondole. Vous allez ainsi diminuer 1 maille avant la torsade + 2 mailles dans la torsade et 1 maille après la torsade (= 4 m au total) - pour diminuer 1 maille, tricotez 2 mailles ensemble à l'endroit ou à l'envers (= comme avant) sur l'envers. Bon tricot!

27.02.2023 kl. 13:56

country flag Pépita wrote:

Bonjour pouvez-vous m’expliquer comment relever 6m derrière les 6m points mousse, côté gauche merci beaucoup et bonne journée

26.02.2023 - 11:42

DROPS Design answered:

Bonjour Pépita, volontiers: cette vidéo montre (pour un autre type d'ouvrage), comment on va relever les mailles derrière celles sur l'aiguille (à partir du time code 0:56 environ). Bon tricot!

27.02.2023 kl. 10:26

country flag Pépita wrote:

Bonjour ,je fais le nid d’ange pour 3,4 ans pouvez vous m’expliqué pour la capuche vous dite de relever entre 58 a 78m autour de l’encolure, a 28cm rabattre, plier la capuche en double et assembler .pourquoi assemblée alors qu’on la monte directement sur l’encolure, et elle faite en 2 parties merci de votre réponse

13.02.2023 - 06:29

DROPS Design answered:

Bonjour Pépita, pour tricoter la capuche, on relève les mailles autour de l'encolure, puis on va les rabattre au niveau du dessus de la tête, tout en haut de la capuche, il faudra alors plier la capuche en double pour faire la couture - comme dans cette vidéo. Bon tricot!

13.02.2023 kl. 11:26

country flag PRADNYA PRAMOD BAPAT wrote:

MYSELF NOT COMFORTABLE IN on circular needle . CAN I USE STRAIGHT NEEDLES FOR THE SAME?THANKS

09.12.2022 - 07:36

DROPS Design answered:

Dear Mrs Pramod Bapat, sure you can, we are working here with a circular needle to get enough room for all stitches, you can simply use straight needles instead - read even more here. Happy knitting!

09.12.2022 kl. 08:59

country flag Anki Sundberg wrote:

Hej! Jag stickar Snuggly Bunny, en åkpåse. Jag förstår inte hur jag ska sticka framstycket enligt diagrammet M2 och M3. De fyra första varven är inga problem, men hur ska jag tänka med de 12 tomma rutorna för varv 5 och 6. Jag förstår inte och är tacksam om jag kan få en förklaring så att jag kan fortsätta. Tack på förhand! Med vänlig hälsning, Anki Sundberg

16.11.2022 - 11:11

DROPS Design answered:

Hej Anki. När du kommer till varv 5 så börjar du om nedifrån på diagrammet på de ställen där diagrammet tagit slut. Där diagrammet fortsätter stickar du enligt det. Du ska alltså ha 3 varv mellan "flätvarven" på de små flätorna och 5 varv mellan "flätvarven" på de stora flätorna. Mvh DROPS Design

16.11.2022 kl. 13:36

Post a comment to pattern DROPS Baby 19-10

Szívesen vesszük, ha megosztja velünk gondolatait erről a mintáról.

Ha kérdést szeretne feltenni, ügyeljen arra, hogy a megfelelő kategóriát válassza ki, így fegyorsíthatja a válaszadás folyamatát. Það verður að merkja við svæði merktri með *.

#dropsfan gallery

Snuggly Bunny

MissTawnyOwl, Finland

Bunt the Baby

Linda, Canada