Avery by DROPS Design

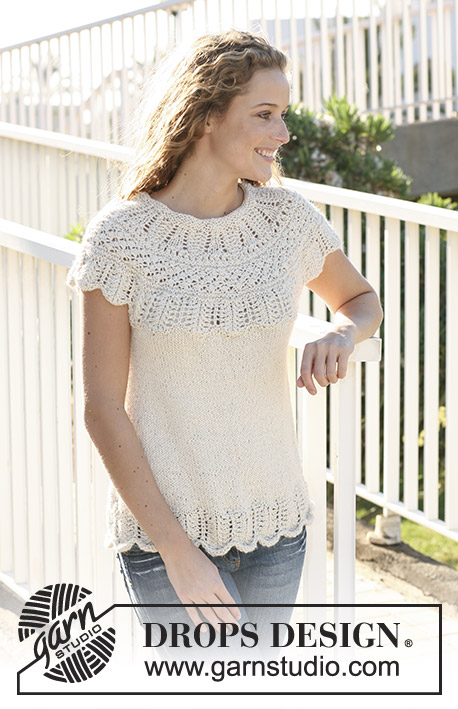
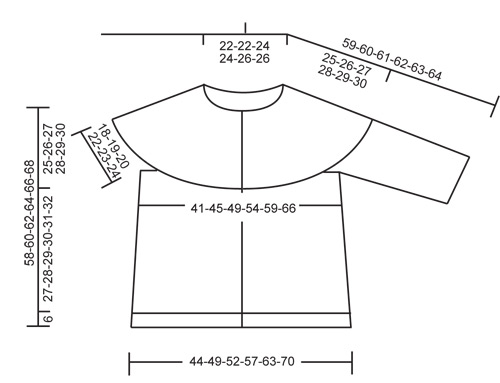
Kötött DROPS kardigán kerek vállrésszel és struktúra mintával " Silke Alpaca " fonalból S - XXXL

DROPS 113-17
Méret: S - M - L - XL - XXL - XXXL
Alapanyagok:
DROPS SILKE ALPACA a Garnstudiótól
550-600-650-750-800-900 g a 1340-os világos bézs színből:
DROPS KÉTHEGYŰ KÖTŐTŰ KÉSZLET ÉS KÖRKÖTŐTŰ (40 és 80 cm hosszú) 4,5 mm-es - vagy olyan vastagságú, amellyel 17 szem X 22 sor = 10 X 10 cm-es próbadarabot tudunk készíteni harisnyakötéssel (színén sima, fonákoldalán fordított)
DROPS SÖTÉT AGANCS GOMB 537-ÖS SZÁMÚ: 6-7-7-7-8-8 darab

-------------------------------------------------------

Kötéspróba – Nézze meg hogyan és miért kell megmárni ITT
Választható más fonalak – Nézze meg hogyan helyettesítheti be a fonalat ITT.
A_F fonalcsoportok – Használja ugyanazt a mintát és helyettesítse be a fonalat ITT.
Fonalhasználat más, behelyettesített fonalnál – Hazsnálja a fonalátváltónkat.

-------------------------------------------------------

Mintaleírás

Rizsminta:
1. sor: * 3 F 1 S. *. Ism a *-* közötti részt, majd 1 F szemmel fejezzük be.
2. sor: A fordított szemek felett simával kötünk, a sima szemek felett fordítottal. Ismételjük a 2. sort.
LUSTAKÖTÉS (a kötőtűn oda-vissza): Minden sorban sima szemekkel kötünk.
LUSTAKÖTÉS (körben): 1 sima kör, 1 fordított kör.
TANÁCS A MÉRÉSHEZ:
A minta textúrája, és a fonal súlya miatt minden mérést a darabot függőlegesen tartva kell elvégeznünk.
GOMBLYUKAK:
A gomblyukakat a jobboldali gomboláspánton készítjük el.
1 gomblyuk = láncoljuk le az eleje közepétől számolt 3. szemet. A következő sorban szedjünk fel egy új szemet a leláncolt szem fölött.
A gomblyukakat akkor készítsük, amikor a darabunk:
S méretben: 7, 16, 26, 36, 46 és 56 cm
M méretben: 7, 15, 23, 31, 40, 49 és 58 cm
L méretben: 7, 15, 24, 33, 42, 51 és 60 cm
XL méretben: 7, 16, 25, 34, 43, 52 és 62 cm
xXL méretben: 7, 15, 23, 31, 39, 47, 55 és 64 cm
xXxL méretben: 7, 15, 23, 31, 39, 47, 55 és 64 cm:

Minta:
Lásd az M.1 jelű mintát, a diagram a mintát a színe oldal felől mutatja.
Válasszuk a méretünknek megfelelő diagramot.
---------------------------------------------------------------------

TESTRÉSZ:
Körkötőtűn kötjük, oda-vissza.
A kezdéshez szedjük fel 159-173-187-203-223-245 szemet (ebben benne van mindkét oldalon 5 szem a gomb pánthoz) a 4,5 mm-es körkötőtűre a Silke Alpaca fonallal.
Kössünk 1 sort F szemekkel a FO felől, majd folytassuk RIZSMINTÁVAL - olvassuk el a fenti magyarázatot - mindkét oldalon 5 lustakötéses szemmel a gomb pánthoz - olvassuk el a fenti magyarázatot.
Az eleje gomb pánt szemeit végig 2 szállal és lustakötéssel kötjük.
Amikor a darabunk 6 cm-es, folytassuk harisnyakötéssel-minden szemen. A gomb pánt szemeit a korábbiaknak megfelelően lustakötéssel kötjük.
Tegyünk 2 jelölőt a darabba, mindkét oldaltól 42-45-49-53-58-63 szemnyire (= 75-83-89-97-107-119 szem marad a két jelölő között a hátához).
Ne felejtsük elkészíteni a GOMBLYUKAKAT a jobboldali gomb pánton - lásd a fenti magyarázatot!
Amikor a darabunk 10 cm-es mindkét jelölő mindkét oldalán fogy 1-1 szemet (= 4 szemet fogy körönként. Ismételjük meg a fogy-t 9-9,5-10-10,5-11-11,5 cm-ként, összesen 3 alkalommal = 147-161-175-191-211-233 szem.
2 szemet simán összekötve fogyasztunk.
Folytassuk a kötést, amíg a darabunk 33-34-35-36-37-38 cm-es lesz. OLVASSUK EL A FENTI TANÁCSOT A MÉRÉSHEZ!
Most láncoljunk le 8 szemet mindkét oldalon a karöltő kialakításához (vagyis mindkét jelölő mindkét oldalán 4-4 szemet) = 131-145-159-175-195-217 szem marad a kötőtűn.
Tegyük félre a darabot és kössük meg a két ujját.
UJJA:
Körben kötjük a kéthegyű kötőtű-készleten.
A kezdéshez szedjünk fel 49-51-51-55-57-59 szemet az 4,5 mm-es kéthegyű kötőtű készletre, a Silke Alpaca fonalból.
Kössünk 6 kört lustakötéssel- lásd a fenti magyarázatot.
Tegyünk 1 kötésjelölőt a kör kezdetéhez= az ujja alsó középvonala.
Amikor a darabunk 10 cm-es, a jelölő mindkét oldalán szaporítsunk 1 szemet. Ismételjük meg a szaporításokat 9-4,5.5-2-1,5-1.5-1.5 cm-ként, összesen 2-3-5-6-7-8 alkalommal = 53-57-61-67-71-75 szem.
Amikor a darabunk 23-23-22-22-21-31 cm-es ( a nagyon méreteknél a szélesebb vállak, és az ujja felsőbb ívének nagyobb hossza miatt rövidebb az ujja) láncoljunk le 8 szemet az ujja alatt középen (= a jelölő mindkét oldalán 4 szemet) = 45-49-53-59-63-67 szem.
Tegyük félre a darabot és kössük meg a másik ujját.
VÁLLRÉSZ:
Csúsztassuk az ujjak szemeit ugyanarra a 4,5 mm-es körkötőtűre, amin a testrész szemei vannak, ahol a szemeket leláncoltuk a karöltőhöz =221-243-265-293-321-351 szem a kötőtűn.
Kössünk 1 sort sima szemekkel a SZO felől (a gomb pántokon a korábbiaknak megfelelően folyt), miközben UGYANAKKOR a sorban egyenletesen elosztva fogy 11-13-15-3-11-21 szemet= 210-230-250-290-310-330 szem.
Kössünk 1 sort S szemekkel a FO felől, majd folyt az M.1 jelű mintával a SZO felől (a megfelelő méretet keressük a diagramon), mindkét oldalon 5-5 lustakötéses szemmel a gomb pánthoz.
Az M.1-es minta sorainak 1 ismétlése után 100-109-118-122-130-138 szem marad a kötőtűn.
Kössünk 1 sort sima szemekkel a SZO felől, miközben UGYANAKKOR egyenletesen elosztva fogy 8-17-20-24-24-32 szemet= 92-92-98-98-106-106 szem.
Kössünk 5 sort sima szemekkel, minden szemen, majd lazán láncoljunk le a szemeket.
ÖSSZEÁLLÍTÁS:
Varrjuk össze a nyílást az ujjak alatt.
Varrjuk fel a gombokat.

Ezt a mintát javítottuk. .

Online frissítve: 17.04.2009
Diagram szöveg: a 4. és az 5. szimbólumokhoz tartozó szövegeket megcseréltük. M.1 jelű mintában az S+M+L méretekben új, 19. sor.

Diagram

symbols = Sima a színe oldal felől, fordított a fonákoldal felől
symbols = Fordított a színe oldal felől, sima a fonákoldal felől
symbols = Kössünk egy szembe 2 szemet
symbols = 2 szemet simán összekötünk.
symbols = 1 szemet simán leemelünk, 1 sima, és a leemelt szemet az lekötött szemen áthúzzuk
symbols = 1 ráhajtás két szem között
symbols = 2 szemet F összekötünk a SZO felől, 2 szemet S összekötünk a FO felől.
symbols = Kössünk egy szembe 3 szemet a következő módon:
1 F, 1 S, 1 F
symbols = 3 szemet fordítottan összekötünk.
symbols = Egy szemet simán leemelünk.
symbols = tegyük a fonalat a darab elé (magunk felé), 1 szemet F leemelünk, majd tegyük a fonalat a darab mögé
diagram
diagram

Segítségre van szüksége a mintával kapcsolatban?

Köszönjük, hogy a DROPS Design mintáját választotta! Sokat dolgozunk azért, hogy mintáink könnyen érthetőek és hibamentesek legyenek. Minden mintát Norvégból fordítunk, és a méreteket, számításokat mindig ellenőrizheti az eredeti mintán (DROPS 113-17) .

Gondja van a minta követésével? Az alábbiakban talál egy listát, olyan helyekről, amik segíthetenek abban, hogy a projektet hamr befjezze, vagy akár - miért ne?- tanuljon valami újat.

signature-image signature

Gondja van a minta követésével? Az alábbiakban talál egy listát, olyan helyekről, amik segíthetenek abban, hogy a projektet hamr befjezze, vagy akár - miért ne?- tanuljon valami újat.

Minden mintánkhoz tartoznak oktató-videók, amik segítenek.

Vannak olyan útmutatóink is, amelyek lépésről lépésre mutatják meg a különféle technikákat, ezeket itt találhatják meg.

1) Why is the knitting/crochet tension so important?

Knitting tension is what determines the final measurements of your work, and is usually measured per 10 x 10 cm. It is provided like so: number of stitches in width x number of rows in height - eg: 19 stitches x 26 rows = 10 x 10 cm.

The knitting tension is very individual; some people knit/crochet loosely while others work tightly. You adjust the knitting tension with the needle size, which is why the suggested needle size only serve as a guide! You need to adjust this (up or down) to ensure that YOUR knitting tension matches the knitting tension provided in the pattern. If you work with a different knitting tension than provided you will have a different yarn consumption, and your work will have different measurements than what the pattern suggests.

The knitting tension also determines which yarns can replace each other. As long as you achieve the same knitting tension you can replace one yarn with another.

See DROPS lesson: How to measure your tension/gauge

See DROPS video: How to make a gauge tension swatch

fel

2) Fonalcsoportok - Mik ezek, és hogyan használjuk őket?

A fonalakat vastagságuk, és a velük elérhető kötéspróba szerint csoportokba rendeztük, így könnyebben találhat mintát a kedvenc fonalához. Vagy könnyebben találhat egy mintához fonal-alternatívákat. Az ugyanabban a fonalcsoportban levő fonalak hasonló kötéspróbát adnak, így egymással behelyettesíthetőek. Azonban, ettől függetlenül a minőségük, a struktúrájuk eltérő, így az elkészült darab különleges és egyedi lesz. Az egyes fonalcsoportok áttekintéséhez kattintson ide!.

A fonalcsoport = a csoporton belül minden fonallal 26 -23 szemet tudunk 10 cm-en kötni.

B fonalcsoport = a csoporton belül minden fonallal 22 -20 szemet tudunk 10 cm-en kötni.

C fonalcsoport = a csoporton belül minden fonallal 19 -16 szemet tudunk 10 cm-en kötni.

D fonalcsoport = a csoporton belül minden fonallal 15 -12 szemet tudunk 10 cm-en kötni.

E fonalcsoport = a csoporton belül minden fonallal 11 -9 szemet tudunk 10 cm-en kötni.

E fonalcsoport = a csoporton belül minden fonallal 8 -5,5 szemet tudunk 10 cm-en kötni.

Amennyiben több szál fonalat összefogva szeretne dolgozni, ehhez a következőket érdemes tudni: A C fonalcsoport 1 szálával hasonló kötéspróbát tudunk készíteni, mint az A. fonalcsoport 2 szálát összefogva, Az A fonalcsoportból tehát bármely fonalból 2 szálat, vagy bármely 2 fonalból 1-1 szálat összefogva megfelel a C fonal 1-1 szálának, ezt a mintákban így jeleztük: A + A = C.

Az alábbiakban áttekintjük, hogyan működnek a fonalaink, ha 1 szálnál többel dolgozunk:

2 szál az A fonalcsoportból megfelel a C fonalcsoport 1 szálának. Ezt a mintában így jeleztük: A + A = C

3 szál az A fonalcsoportból megfelel a D fonalcsoport 1 szálának. Ezt a mintában így jeleztük: A+A+A = D

4 szál az A fonalcsoportból megfelel az E fonalcsoport 1 szálának. Ezt a mintában így jeleztük: A + A+A+A = D

8 szál az A fonalcsoportból megfelel az F fonalcsoport 1 szálának. Ezt a mintában így jeleztük: A+A+A+A +A+A+A+A = F

2 szál az B fonalcsoportból megfelel a D fonalcsoport 1 szálának. Ezt a mintában így jeleztük: B+B =D

2 szál a C fonalcsoportból megfelel az E fonalcsoport 1 szálának. Ezt a mintában így jeleztük: C+C = E

4 szál a C fonalcsoportból megfelel az F fonalcsoport 1 szálának. Ezt a mintában így jeleztük: C+C+C+C = F

2 szál az E fonalcsoportból megfelel az F fonalcsoport 1 szálának. Ezt a mintában így jeleztük: E+E= F

A fonalak ilyen cseréjével új minőségeket, új struktúrákat érhetünk el, a választott kombinációktól függően. Kifejlesztettünk egy fonal-kalkulátort, amivel kiszámolhatja, mennyi fonalra van szüksége, ha 1 szál fonal helyett 2 vagy több szál kombinációját választja. A kalkulátorhoz a linket minden minta oldalán megtalálja. Ne feledje, hogy a megadott kötéspróba határozza meg, melyik fonalakat használhatjuk. Feltétlenül készítsünk próbadarabot a választott fonalkombinációval, és ellenőrizzük, hogy be tudjuk-e tartani a megfelelő kötéspróbát.

fel

3) Can I use a different yarn than what the pattern suggests?

The important thing when changing from one yarn to another is that the knitting/crochet tension remains the same. This is so that the measurements of the finished piece will be the same as on the sketch provided. It is easier to achieve the same knitting tension using yarns from the same yarn group. It is also possible to work with multiple strands of a thinner yarn to achieve the knitting tension of a thicker one. Please try our yarn converter. We recommend you to always work a test swatch.

Please NOTE: when changing yarn the garment might have a different look and feel to the garment in the photo, due to individual properties and qualities of each yarn.

See DROPS lesson: Can I use a different yarn than the one mentioned in the pattern?

fel

4) How do I use the yarn converter?

At the top of all our patterns you’ll find a link to our yarn converter, which is a helpful tool should you wish to use a different yarn than suggested. By filling in the yarn quality you wish to replace, the amount (in your size) and number of strands, the converter will present good alternative yarns with the same knitting tension. Additionally it will tell you how much you’ll require in the new qualities and whether you’ll need to work with multiple strands. Most skeins are 50g (some are 25g or 100g).

If the pattern is worked with multiple colours, every colour will have to be converted separately. Similarly, if the pattern is worked with several strands of different yarns (for example 1 strand Alpaca and 1 strand Kid-Silk) you will have to find alternatives for each, individually.

Click here to see our yarn converter

fel

5) Why do I get the wrong knitting tension with the suggested needle size?

The needle size provided in the pattern serves only as a guide, the important thing is to follow the knitting tension. And since knitting tension is very individual, you will have to adjust the needle size to ensure that YOUR tension is the same as in the pattern – maybe you’ll have to adjust 1, or even 2 needle sizes, up or down to achieve the correct tension. For this, we recommend that you work test swatches.

Should you work with a different knitting tension than the one provided, the measurements of the finished garment might deviate from the measurement sketch.

See DROPS lesson: How to measure your tension/gauge

See DROPS video: How to make a gauge tension swatch

fel

6) Why is the pattern worked top-down?

Working a garment top-down provides more flexibility and room for personal adjustment. For example it is easier to try the garment on while working, as well as making adjustments to length of yoke and shoulder caps.

The instructions are carefully explaining every step, in the correct order. Diagrams are adjusted to the knitting direction and are worked as usual.

fel

7) Why are the sleeves shorter in larger sizes?

The total width of the garment (from wrist-to-wrist) will be larger in the larger sizes, despite the actual sleeves being shorter. The larger sizes have longer sleeve caps and wider shoulders, so there will be a good fit in all sizes.

fel

8) What is a repeat?

Diagrams are often repeated on the round or in height. 1 repeat is the diagram the way it appears in the pattern. If it says to work 5 repeats of A.1 in the round, then you work A.1 a total of 5 times after/next to each other in the round. If it says to work 2 repeats of A.1 vertically/in height you work the entire diagram once, then begin again at the start and work the entire diagram one more time.

fel

9) How do I work according to a knitting diagram?

The diagram depicts all rows/rounds, and every stitch seen from the right side. It is read from bottom to top, from right to left. 1 square = 1 stitch.

When working back and forth, every other row is worked from the right side and every other row is worked from the wrong side. When working from the wrong side, the diagram will have to be worked reversed: from left to right, knit stitches are purled, purl stitches are knit etc.

When working in the round every round is worked from the right side and the diagram are worked from right to left on all rounds.

See DROPS lesson: How to read knitting diagrams

fel

10) How do I work according to a crochet diagram?

The diagram depicts all rows/rounds, and every stitch seen from the right side. It is worked from bottom to top, from right to left.

When working back and forth every other row is worked from the right side: from right to left and every other row is worked from the wrong side: from left to right.

When working in the round, every row in the diagram are worked from the right side, from right to left.

When working a circular diagram you start in the middle and work your way outwards, counter clockwise, row by row.

The rows usually start with a given number of chain stitches (equivalent to the height of the following stitch), this will either be depicted in the diagram or explained in the pattern.

See DROPS lesson: How to read crochet diagrams

fel

11) How do I work several diagrams simultaneously on the same row/round?

Instructions for working several diagrams after each other on the same row/round, will often be written like so: “work A.1, A.2, A.3 a total of 0-0-2-3-4 times". This means you work A.1 once, then A.2 is worked once, and A.3 is repeated (in width) the number of times provided for your size – in this case like so: S = 0 times, M = 0 times, L=2 times, XL= 3 times and XXL = 4 times.

The diagrams are worked as usual: begin with the first row in A.1, then work the first row in A.2 etc.

See DROPS lesson: How to read knitting diagrams

See DROPS lesson: How to read crochet diagrams

fel

12) Why does the piece start with more chain stitches than it’s worked with?

Chain stitches are slightly narrower than other stitches and to avoid working the cast-on edge too tight, we simply chain more stitches to begin with. The stitch count will be adjusted on the following row to fit the pattern and measurement sketch.

fel

13) Why increase before the rib edge when the piece is worked top-down?

The rib edge is more elastic and will contract slightly compared to, for example, stocking stitch. By increasing before the rib edge, you avoid a visible difference in width between the rib edge and the rest of the body.

fel

14) Why increase in the cast-off edge?

It’s very easy to cast off too tightly, and by making yarn overs while casting off (and simultaneously casting these off) you avoid a too tight cast off edge.

See DROPS video: How to bind off with yarn overs (yo)

fel

15) How do I increase/decrease on every 3rd and 4th row/round alternately?

To achieve an even increase (or decrease) you can increase on, for example: every 3rd and 4th row alternately, like so: work 2 rows and increase on the 3rd row, work 3 rows and increase on the 4th. Repeat this until the increase is complete.

See DROPS lesson: Increase or decrease 1 st on every 3rd and 4th row alternately

fel

16) Why is the pattern slightly different than what I see in the photo?

Pattern repeats can vary slightly in the different sizes, in order to get the correct proportions. If you’re not working the exact same size as the garment in the photo, yours might deviate slightly. This has been carefully developed and adjusted so that the complete impression of the garment is the same in all sizes.

Make sure to follow instructions and diagrams for your size!

fel

17) How can I work a jacket in the round instead of back and forth?

Should you prefer to work in the round instead of back and forth, you may of course adjust the pattern. You’ll need to add steeks mid-front (usually 5 stitches), and follow the instructions. When you would normally turn and work from the wrong side, simply work across the steek and continue in the round. At the end you’ll cut the piece open, pick up stitches to work bands, and cover the cut edges.

See DROPS video: How to knit steeks and cut open

fel

18) Can I work a jumper back and forth instead of in the round?

Should you prefer to work back and forth instead of in the round, you may of course adjust the pattern so you work the pieces separately and then assemble them at the end. Divide the stitches for the body in 2, add 1 edge stitch in each side (for sewing) and work the front and back pieces separately.

See DROPS lesson: Can I adapt a pattern for circular needles into straight needles?

fel

19) Why do you show discontinued yarns in the patterns?

Since different yarns have different qualities and textures we have chosen to keep the original yarn in our patterns. However, you can easily find options among our available qualities by using our yarn converter, or simply pick a yarn from the same yarn group.

It is possible that some retailers still have discontinued yarns in stock, or that someone has a few skeins at home that they would like to find patterns for.

The yarn converter will provide both alternative yarn as well as required amount in the new quality.

fel

20) How do I make a women’s size garment into a men’s size one?

If you have found a pattern you like which is available in women’s size it’s not very difficult to convert it to men’s size. The biggest difference will be the length of sleeves and body. Start working on the women size that you think would fit across the chest. The additional length will be worked right before you cast off for the armhole/sleeve cap. If the pattern is worked top-down you can add the length right after the armhole or before the first decrease on sleeve.

Regarding additional yarn amount, this will depend on how much length you add, but it is better with a skein too many than too few.

fel

21) How do I prevent a hairy garment from shedding?

All yarns will have excess fibres (from production) that might come off as lint or shedding. Brushed yarns (ie hairier yarns) have more of these loose, excess fibres, causing more shedding.

Shedding also depends on what is worn under or over the garment, and whether this pulls at the yarn fibres. It’s therefore not possible to guarantee that there will be no shedding

Below are some tips on how to get the best result when working with hairier yarns:

1. When the garment is finished (before you wash it) shake it vigorously so the looser hairs come off. NOTE: do NOT use a lint roller, brush or any method that pulls at the yarn.

2. Place the garment in a plastic bag and put it in your freezer - the temperature will cause the fibres to become less attached to each other, and excess fibres will come off easier.

3. Leave in the freezer for a few hours before taking it out and shaking it again.

4. Wash the garment according to the instructions on the yarn label.

fel

22) Where on the garment is the length measured?

The measurement sketch/schematic drawing provides information regarding the full length of the garment. If it’s a jumper or a jacket the length is measured from the highest point on the shoulder closest to the neckline, and straight down to the bottom of the garment. It is NOT measured from the tip of shoulder. Similarly, the length of yoke is measured from the highest point on the shoulder and down to where yoke is split into body and sleeves.

On a jacket measures are never taken along bands, unless specifically stated. Always measure inside band stitches when measuring the length.

See DROPS lesson: How to read a schematic drawing

fel

23) How do I know how many balls of yarn I need?

The required amount of yarn is provided in grams, eg: 450 g. To calculate how many balls you’ll need you first need to know how many grams are in 1 ball (25g, 50g or 100g). This information is available if you click on the individual yarn quality on our pages. Divide the amount required with the amount of each ball. For example, if each ball is 50g (the most common amount), the calculation will be as follows: 450 / 50 = 9 balls.

fel

DROPS fonalat vásárolt a minta elkészítéséhez? akkor, abban a boltban, ahol a fonalat vásárolta, joga van segítséget kérni és kapni. A DROPS üzletek listáját ITT találja!
Még mindig nem találta meg a választ, amire szüksége van? Görgessen lejjebb, és tegye fel kérdését, és szakembereink megpróbálnak segíteni. Ez általában 5-10 munkanapon beül megtörténik.. Addig is elolvashatja a korábban, mások által feltett kérdéseket és a válaszokat, vagy csatlakozhat a Facebook-on a DROPS Workshophoz, hogy kézimunkázó társaitól kaphasson segítséget.

Megjegyzések / Kérdések (61)

country flag Elizabeth Dolan wrote:

Is there a stitch count listed somewhere for this pattern? I am at the end of the second pattern section of M1 chart and seem to be out 3 stitches after decreasing (k2tog. K14 row). Would love to know how many stitches I should have on needles for this row. I am knitting the largest size.

25.07.2020 - 08:36

DROPS Design answered:

Dear Mrs Dolan, do not hesitate to add markers between each repeat this will help you to check the number of stitches on each row as in diagram - Diagram is repeated 16 times in total in size XXXL. Happy knitting!

29.07.2020 kl. 08:50

country flag Elizabeth Dolan wrote:

I have the correct St count for XXXL (330) starting M1 chart. I am doing kf&b as the increase but I cannot get the increases to work out with the chart. Do I do the increase on the 10th stitch? I wish there was a row by row stitch count.

22.07.2020 - 09:17

DROPS Design answered:

Dear Mrs Dolan, on first row in M.1 you will work diagram like this: (knit front and back 1st stitch, knit next 9 sts), repeat from (to) for 1 repeat in M.1 (= adding markers between each repeat can help). and repeat to the end of the row. You will first increase stitches then work and decrease as shown in diagram - read more about diagrams here). Happy knititng!

29.07.2020 kl. 08:47

Kira wrote:

Hello, it said my comment was too long so again: Chart M1 is there a decrease between row 11 and 12 as the row gets shorter in the graphic? Also row 13, p2tog purl 16, so a repeat of 18 st or p2tog at the start of row and then purl the rest of row? Same for row 15, k 15 st slip 1 stitch, repeat all 17 stitches? Or only a final slip 1 stitch at very end of row? Thank You!

18.10.2018 - 14:57

DROPS Design answered:

Dear Kira, when working M.1 you will repeat the sts in M.1 as shown in diagram (you can insert a marker to separate each diagram on your needle so that you can always check the number of sts). You will then increase 2 sts in each M.1 on the first row. Then, on row 11 you will decrease 8 times but work only 4 yo's = you will decrease 4 sts in each repeat. On row 13, work: *P2 tog, P16*and repeat from *-* over each repeat. And so on for each row in M.1. Happy knitting!

18.10.2018 kl. 16:01

country flag Dominique wrote:

Bonjour, pour l\'empiècement, avant de commencer le diagramme il reste pour la taille L 250 mailles, les 10 mailles de bordure sont elles comprises dans ces 150 mailles \r\nmerci pour votre réponse \r\ncordialement

06.06.2018 - 08:28

DROPS Design answered:

Bonjour Dominique, les 10 m de bordure devant sont comprises dans les 250 mailles, mais vous ne devez pas diminuer au-dessus des 5 m de chaque côté, tricotez-les simplement comme avant. Bon tricot!

06.06.2018 kl. 10:08

country flag Rebecca wrote:

Would you be able to tell me the measurements for the sleeves if I wanted them long, to my wrists and not 3/4 length? Thank you!

16.01.2018 - 04:27

DROPS Design answered:

Dear Rebecca, we are unfortunately not able to adjust every pattern to each individual request but you can adjust sleeve length to your own measurements getting help from similar patterns with same tension. Happy knitting!

16.01.2018 kl. 09:19

country flag Jessica wrote:

Bonjour je ne comprends pas bien l'EMPIECEMENT des manches. Auriez vous une vidéo pour m'aider ? Merci

28.09.2016 - 21:11

DROPS Design answered:

Bonjour Jessica, quand les manches sont faites, on les remet sur la même aiguille circulaire que le dos et les devants (cf vidéo ci-dessous) et on va tricoter 1 rang sur l'end en répartissant des dim, 1 rang end sur l'env puis on continue ainsi: 5 m point mousse, on répète M.1 en largeur jusqu'à ce qu'il reste 5 m, 5 m point mousse. Bon tricot!

29.09.2016 kl. 09:08

country flag Anja wrote:

Kan ik dit patroon ook breien van BRUSHED ALPACA SILK?

12.04.2016 - 15:42

DROPS Design answered:

Hoi Anja. Ja, dat kan. Je kan hier lezen hoe je de hoeveelheid materiaal berekent en vergeet niet om een proeflapje te breien.

13.04.2016 kl. 16:40

Véro wrote:

Bonjour, Je trouve ce modèle très joli. Existe-t-il en français car moi et l'anglais ... heum heum ! Merci d'avance de la réponse. Véro

07.04.2016 - 19:32

DROPS Design answered:

Bonjour Vero, changez la langue du modèle en cliquant sur le menu déroulant sous la photo "Choose your language:English" et sélectionnez "Français". Bon tricot!

08.04.2016 kl. 08:32

Jessica wrote:

Bonjour, Je suis bloquée dès le début. Je ne comprend pas si les 223 mailles montées (je fais le xxl) comprennent le 5 mailles bordures ou je dois les rajouter ? Merci de votre réponse

02.09.2015 - 22:14

DROPS Design answered:

Bonjour Jessica, les mailles de bordure des devants de chaque côté sont comprises dans le nombre de mailles à monter. Bon tricot!

03.09.2015 kl. 09:18

country flag Celine wrote:

Bonjour,quelques questions : une maille envers sur l'envers =une maille envers ? une maille envers sur l'endroit =une maille envers? une maille endroit sur l'endroit =1 maille endroit? et enfin 1 maille endroit sur l'envers= 1 maille envers? Merci de votre aide !

25.04.2014 - 20:18

DROPS Design answered:

Bonjour Céline, 1 case blanche = 1 m jersey end (à tricoter à l'end sur l'end et à l'env sur l'env), 1 case avec une x = 1 m jersey env (à tricoter à l'env sur l'end et à l'end sur l'env). Ainsi, au 1er rang, tricotez les m à l'end, au 2ème rang, tricotez les m à l'end également (car rang sur l'env, ainsi elles apparaîtront à l'env sur l'end). Bon tricot!

26.04.2014 kl. 09:58

Post a comment to pattern DROPS 113-17

Szívesen vesszük, ha megosztja velünk gondolatait erről a mintáról.

Ha kérdést szeretne feltenni, ügyeljen arra, hogy a megfelelő kategóriát válassza ki, így fegyorsíthatja a válaszadás folyamatát. Það verður að merkja við svæði merktri með *.

#dropsfan gallery

Avery

nadammm, Japan

113-17 Avery

Kinapau, Italy

Whistlebare Avery

Elaine, United Kingdom