
Populaire categorieën
Op zoek naar garen?


Opmerkingen / Vragen (50)
![]() Niva schreef:
Niva schreef:
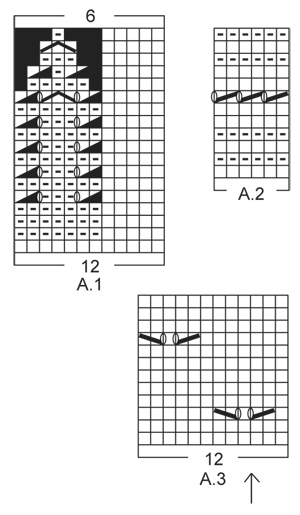
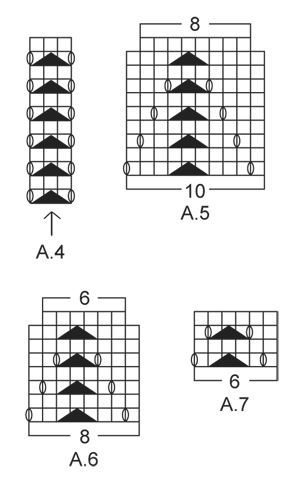
Must admit this is the most confusing pattern I’ve ever tried and I’m an accomplished knitter. I’ve read it so many times to work it out and I’m almost there. Does the A4 pattern stop after the 12 rows in the graph?
08.04.2021 - 04:33DROPS Design antwoorde:
Dear Niva, A.4 will be repeated in height until all decreases for raglan are done. Happy knitting!
08.04.2021 - 07:51
![]() Nova schreef:
Nova schreef:
At the beginning of the A4 graph is the YO between the last stitch on the body and the first stitch on the sleeve?
07.04.2021 - 13:43DROPS Design antwoorde:
Dear Nova, the stitch with the arrow in A.4 should be the one with the marker at the transitions, so that you will have 1 yarn over, the double decrease with marker in the middle stitch, 1 yarn over; this means there will be one hole (yarn over) on body and on sleeve. Happy knitting!
07.04.2021 - 14:26
![]() Nova schreef:
Nova schreef:
After attaching the sleeves for size L and beginning middle back for the first round, it says to start on the same row for the sleeve as for the body. Does this mean if I’m on row 4 on the body (A1) that I start on row 4 for the sleeves (A3)? Also A1 the arrow designates the middle of the sleeve but the graph starts with A4 which is 3 stitches and A3 is another 3 sts total 6 sts wouldn't the middle be half of 68 sts which is 34 sts?
06.04.2021 - 14:03DROPS Design antwoorde:
Dear Nova, you should finish the sleeves 8adjust its length) so you will end up in the same row if the pattern as on the body, so you can continue the pattern without disrupting it. The arrow should match the middle of the sleeves, the upper middle line, put the stitch marked there, and count outwards to find out where you should start. Happy Knitting!
06.04.2021 - 14:26
![]() Nova schreef:
Nova schreef:
This is becoming a real challenge but I’m not going to give up! I am attaching the sleeves to the body but notice you don’t mention double pointed needles in your materials needed for this project. How are you supposed to knit these sleeves together with the body without them? It won’t work.
25.03.2021 - 01:52DROPS Design antwoorde:
Dear Nova, when you have knitted the sleeves, you put all the stitches on one curcular needle, (back, sleeve, fron, sleeve), and knot the circular needle on the round. You don't knit "together" as a three needle bind off, but along with the body, in one big circle, that is getting decreased as you get to the neckline. Happy Knitting!
25.03.2021 - 02:26
![]() Nova schreef:
Nova schreef:
Hi again. I’m up to the yoke and I’m really confused about this section of the pattern. The fact that there are 3 graphs to be worked is a challenge in itself. The confusion is in the A4 graph between the body and the sleeves, does this have to do with the shaping of the raglan?
09.03.2021 - 13:31DROPS Design antwoorde:
Dear Nova, pattern A.4 is between each body and sleeve, right at the raglan line. Shaping happens before and after this pattern. Happy Knitting!
09.03.2021 - 13:57
![]() Nova schreef:
Nova schreef:
When you get to the side where the first increases have been worked you have two extra stitches so to keep the eyelet pattern uniform, the space between the next eyelet is 9 stitches and that throws the whole eyelet pattern out. I don’t know how you can keep the eyelet pattern 7 stitches between with these increases on the side. The new repeat would make more sense at the beginning of the round.
26.02.2021 - 23:15DROPS Design antwoorde:
See answer below - if you can't work a part of decrease (K2 tog, YO), over the new stitches, just work these stitches in stocking stitch without the lace pattern. You shoulud have the correct number of sts between each eyelet in width. Hope this will help. Happy knitting!
01.03.2021 - 08:00
![]() Nova schreef:
Nova schreef:
The beginning of the round the increases can be worked out but it’s the increases halfway on the side marker those stitches throw the whole eyelet pattern out. You can’t do 7 stitches between the pattern it doesn’t work out I’ve tried it
26.02.2021 - 22:52DROPS Design antwoorde:
Dear Nova, if you don't have enough stitches to work the whole lace pattern on the side, this means there are not enough stitches yet, just work these stitches in stocking stitch. Work the lace pattern over the new stitches only if you have enough stitches to work them. This means each lace pattern should be worked with 7 knit stitches in between. Happy knitting!
01.03.2021 - 07:58
![]() Nova schreef:
Nova schreef:
Are you saying to read the graph from left to right and then right to left alternately and the added stitches will work out with the eyelet pattern?
26.02.2021 - 16:33DROPS Design antwoorde:
Hi Nova, when working in the round all rounds are worked from the right side, and the diagram is read solely from right to left. When starting a new round, simply start working the first symbol on the next row in diagram. Happy knitting!
28.02.2021 - 21:14
![]() Nova schreef:
Nova schreef:
For example on the 3rd round after the first increases there are 4 stitches left at the end of the round and I’m not sure whether to knit those stitches as normal or do the pattern.
26.02.2021 - 15:19DROPS Design antwoorde:
Dear Nova, see previous answer, make always sure that the eyelet pattern fit in height, it shouldn't be displaced. Happy knitting!
26.02.2021 - 16:17
![]() Nova schreef:
Nova schreef:
When doing the body and the A3 and making the increases on either side of the markers I notice that those extra stitches will throw the alternate pattern out where the holes should be. Is that how it’s supposed to be?
26.02.2021 - 15:08DROPS Design antwoorde:
Dear Nova, the increased stitches should be worked in A.3, this means at the beg of A.3 work the new stitches as a new repeat reading diagram from the left towards the right (= there should be always 7 sts before the next K2 tog, YO in the lace pattern. And at the end of A.3, work the new stitches as a new repeat of A.3 (reading from the right towards the left). Hope this will help. Happy knitting!
26.02.2021 - 16:16
|
||||||||||||||||||||||||||||
White Romance#whiteromancetop |
||||||||||||||||||||||||||||
 |
 |
|||||||||||||||||||||||||||
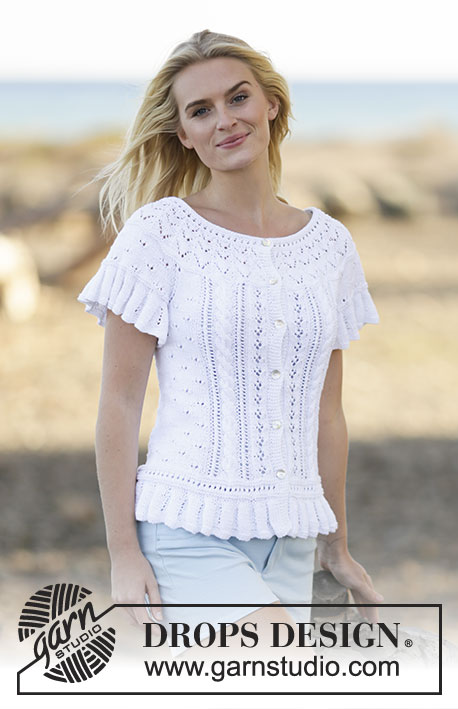
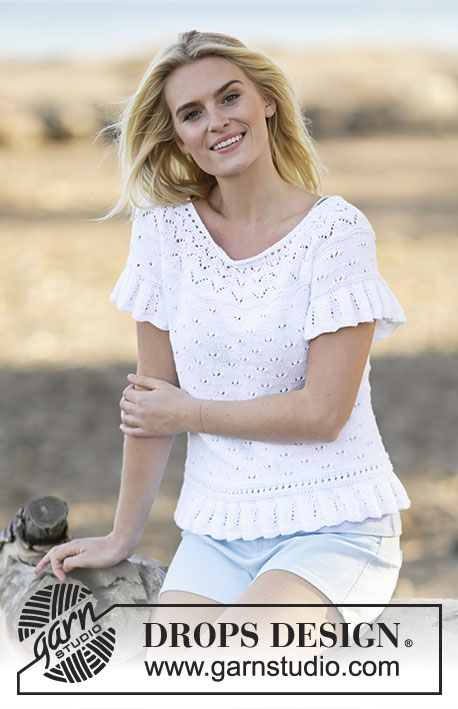
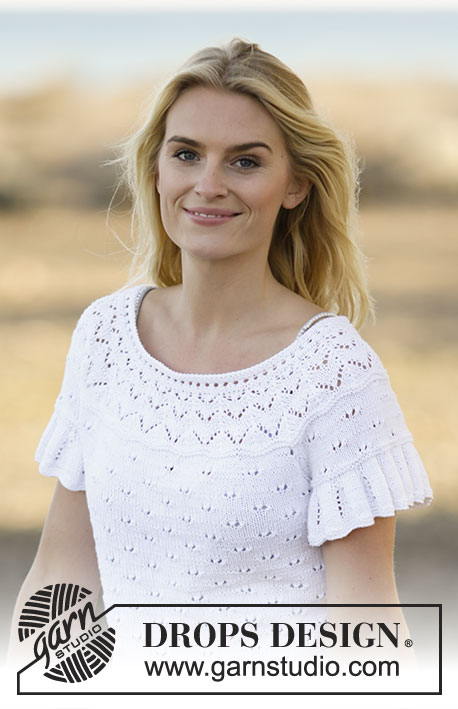
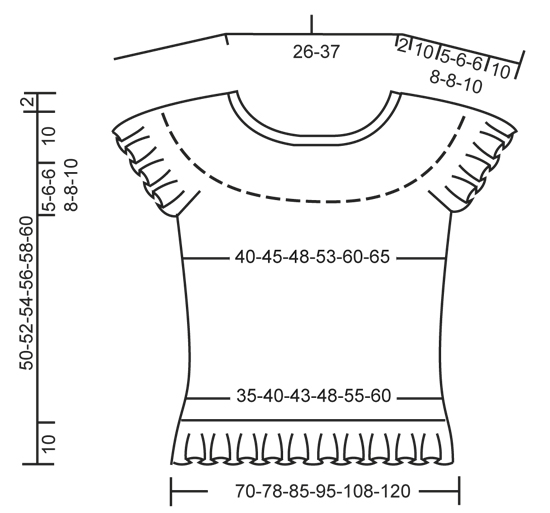
Gebreide DROPS trui met kantpatroon, korte mouwen en ronde pas van ”Safran”. Maat: S - XXXL.
DROPS 159-12 |
||||||||||||||||||||||||||||
|
RIBBELST (in de rondte op rondbreinld): * brei 1 nld recht en brei 1 nld av *, herhaal van *-*. 1 ribbel = 2 nld. PATROON: Zie telpatronen A.1 tot en met A.7. De telpatronen laten het patroon aan de goede kant zien. Zowel de heengaande als de teruggaande naalden zijn weergegeven. TIP VOOR HET MEERDEREN: Meerder 1 st door 1 omsl te maken. Brei in de volgende nld de omsl gedraaid (dus brei achter in de steek in plaats van voor in de steek) om gaatjes te voorkomen – brei de gemeerderde st in tricotst. RAGLAN: Minder voor de raglan aan elke kant van A.4 in elke overgang tussen mouwen en lijf. Minder als volgt na A.4: 1 r afh, 1 r, afgeh st overh. Minder als volgt 2 st voor A.4: 2 r samen. ---------------------------------------------------------- LIJF: Wordt in de rondte gebreid op de rondbreinld. Zet 336-372-408-456-516-576 st op met rondbreinld 2,5 mm en Safran. Brei 2 ribbels in RIBBELST - zie uitleg boven. Ga verder met rondbreinld 3 mm en brei in patroon volgens telpatroon A.1. Als A.1 een keer in de hoogte is gebreid, staan er 168-186-204-228-258-288 st op de nld. Ga dan verder in patroon volgens telpatroon A.2. Brei na A.2 2 nld recht en meerder TEGELIJKERTIJD 0-6-0-0-6-0 st gelijkmatig in de laatste nld = 168-192-204-228-264-288 st. Plaats 1 markeerder aan het begin van de nld en 1 markeerder na 84-96-102-114-132-144 st (= de zijkanten). Ga dan verder in patroon volgens telpatroon A.3. DENK OM DE STEKENVERHOUDING. Meerder TEGELIJKERTIJD bij een hoogte van 12 cm 1 st aan elke kant van beide markeerders - LEES TIP VOOR HET MEERDEREN (= 4 st gemeerderd). Herhaal dit meerderen elke 4-4-4-5-5-5 cm in totaal 6 keer aan elke kant = 192-216-228-252-288-312 st – LET OP: brei de gemeerderde st in tricotst. Ga verder en brei tot het werk 35-36-38-38-40-40 cm meet. Brei de volgende nld als volgt: kant 5-5-5-6-6-6 st af voor het armsgat, brei 86-98-104-114-132-144 st (= voorpand), kant 10-10-10-12-12-12 st af voor het armsgat (dus 5-5-5-6-6-6 st aan elke kant van de markeerder), brei 86-98-104-114-132-144 st (= achterpand) en kant de overgebleven 5-5-5-6-6-6 st af. Laat het werk rusten en brei de mouwen. MOUW: Wordt in de rondte gebreid op de rondbreinld. Zet 144-156-156-168-168-180 st op met rondbreinld 2,5 mm en Safran. Brei 2 ribbels in RIBBELST - zie uitleg boven. Ga verder met rondbreinld 3 mm en brei in patroon volgens telpatroon A.1. Als A.1 klaar is, staan er 72-78-78-84-84-90 st op de nld. Brei 2 ribbels. Kant TEGELIJKERTIJD in de laatste nld de middelste 10-10-10-12-12-12 st af midden onder de mouw = 62-68-68-72-72-78 st over op de nld. Laat het werk rusten en brei nog een mouw. PAS: Zet de mouwen op dezelfde rondbreinld als het lijf waar afgekant is voor de armsgaten (zonder ze eerst te breien) = 296-332-344-372-408-444 st. Plaats TEGELIJKERTIJD 1 markeerder in de eerste en laatste st van beide mouwen (= 4 markeerders). Begin middenachter en brei verder in patroon als hiervoor op het lijf en brei TEGELIJKERTIJD A.3 op de mouwen (de pijl in het telpatroon komt overeen met het midden van de mouw, begin op dezelfde nld in het telpatroon als op het lijf). Brei daarnaast ook A.4 in elke overgang tussen lijf en mouwen (de pijl in het telpatroon komt overeen met de st met de markeerder). Begin als er 2 nld in de rondte zijn gebreid over alle st met minderen voor de RAGLAN - zie uitleg boven (= 8 st geminderd). Herhaal dit minderen elke 4e nld 4-5-5-7-7-8 keer in totaal = 264-292-304-316-352-380 st. Brei 2 ribbels over alle st en minder TEGELIJKERTIJD 4-12-4-6-12-10 st gelijkmatig in de 1e nld = 260-280-300-310-340-370 st. Brei 2 nld recht. Begin nu met minderen voor de ronde pas en brei in patroon in de rondte volgens telpatroon A.5 (= 26-28-30-31-34-37 patroonherhalingen in de rondte – LET OP: Ga verder met een kortere rondbreinld indien nodig). Brei als A.5 een keer in de hoogte is gebreid A.6 in plaats van A.5. Als A.6 een keer in de hoogte is gebreid, staan er 156-168-180-186-204-222 st op de nld. Brei nu A.7 in plaats van A.6. Brei als A.7 een keer in de hoogte is gebreid een ronding op het achterpand voor de hals. Plaats 1 markeerder middenvoor. Begin middenachter en brei r tot er 14-14-16-16-18-20 st over zijn voor de markeerder. Keer, brei r terug tot er 14-14-16-16-18-20 st over zijn voor de markeerder aan de andere kant. Keer, brei r tot er 30-30-34-34-38-42 st over zijn voor de markeerder. Keer, brei r terug tot er 30-30-34-34-38-42 st over zijn voor de markeerder aan de andere kant. Keer, brei r tot er 46-46-52-52-58-64 st over zijn voor de markeerder. Keer, brei r terug tot er 46-46-52-52-58-64 st over zijn voor de markeerder aan de andere kant. Keer, brei r tot er 62-62-70-70-76-86 st over zijn voor de markeerder. Keer, brei r terug tot er 62-62-70-70-76-86 st over zijn voor de markeerder aan de andere kant. Keer en brei r terug tot het begin van de nld. HALSRAND: Ga verder met rondbreinld 2,5 mm en brei in patroon in de rondte over alle st volgens telpatroon A.2. Minder TEGELIJKERTIJD in de 1e nld 22-24-24-26-30-32 st gelijkmatig = 134-144-156-160-174-190 st. Kant na A.2 losjes af met r aan de goede kant. De trui meet ongeveer 52-54-56-58-60-62 cm vanaf de schouder naar beneden. AFWERKING: Naai de openingen onder de mouwen dicht. |
||||||||||||||||||||||||||||
Uitleg van het telpatroon |
||||||||||||||||||||||||||||
|
||||||||||||||||||||||||||||
 |
||||||||||||||||||||||||||||
 |
||||||||||||||||||||||||||||
 |
||||||||||||||||||||||||||||
Heeft u dit patroon gemaakt?Tag dan uw afbeeldingen met #dropspattern #whiteromancetop of stuur ze naar de #dropsfan galerij. Heeft u hulp nodig voor dit patroon?U vind 30 instructievideo's, een commentaar/vragengedeelte en nog veel meer, als u naar het patroon gaat op garnstudio.com © 1982-2026 DROPS Design A/S. Alle rechten voorbehouden. Op dit document, inclusief alle subdocumenten, rust copyright. Lees meer over wat u kunt doen met onze patronen onderaan elk patroon op onze site |
||||||||||||||||||||||||||||


Met meer dan 40 jaar ervaring in brei- en haakdesign biedt DROPS Design één van de meest uitgebreide collecties van gratis patronen aan op internet vertaald in 324 talen. Tot en met vandaag hebben wij 12290 boeken en 11997 patronen gepubliceerd.
Wij werken hard om u het beste van haken en breien te bieden; patronen, inspiratie, advies en natuurlijk garens van uitstekende kwaliteit voor de allerbeste prijzen! Wilt u onze patronen gebruiken voor meer dan privégebruik? U kunt lezen wat wel en niet is toegestaan is in de Copyright tekst, die u onderaan elk patroon kunt vinden. Veel handwerkplezier!
Laat een opmerking achter voor DROPS 159-12
Wij horen graag wat u vindt van dit patroon!
Wilt u een vraag stellen, kies dan de juiste categorie in het formulier hieronder om sneller een antwoord te krijgen. Verplichte velden zijn gemarkeerd met een *.