
Populaire categorieën
Op zoek naar garen?


Opmerkingen / Vragen (52)
![]() Scholiams schreef:
Scholiams schreef:
Would this be achievable to me , I am an absolute beginner at knitting?
14.06.2015 - 14:37DROPS Design antwoorde:
Dear Mrs Scholiams, you will find under the tab "videos" some related videos to the techniques used in that pattern. Should you need any further assistance remember you can get help from your DROPS store or ask your question here. Happy knitting!
15.06.2015 - 10:32
![]() Andrea schreef:
Andrea schreef:
Hi there, Thank you for replay this, but I still don't know what to do... In order to start right front piece do I have to cut the yarn? Because the yarn is on the another edge right?
12.05.2015 - 22:08DROPS Design antwoorde:
Dear Andrea, that's correct, when you have worked left front piece, cut the yarn and put sts onto a st holder. Slip sts from right front piece onto needle and join yarn to work right front piece, cut the yarn and put sts onto a st holder. Repeat for back piece. Then work all sts together joining yarn again. Happy knitting!
13.05.2015 - 10:33Andrea schreef:
I just finished working on the left front piece. It says to move that piece to a stich holder and work on theright front piece. I don't really understand how because the left front piece has the yarns do I cast of and work on the right front piece or?
12.05.2015 - 00:37DROPS Design antwoorde:
Dear Andrea, after you have worked the sts on left front piece, put the sts on a st holder and work the front piece as left piece and put sts on another st holder. Work then back sts from back piece the same height as both front pieces and then move all sts back onto needle and work all pieces together. Happy knitting!
12.05.2015 - 09:35
![]() Helen schreef:
Helen schreef:
Do you have a size guide anywhere on the web site?
27.04.2015 - 10:52DROPS Design antwoorde:
Dear Helen, you will find at the bottom of the pattern a measurement chart with all measures for each size in cm taken flat from side to side. Compare these to a similar garment you have and like the shape to find out the matching size. Happy knitting!
27.04.2015 - 11:51Andrea Alejandra Silveira De Anton schreef:
Hola escribo desde uruguay, si no tengo agujas circulares como puedo adaptarlo a 2 agujas? Muchas grcs
18.04.2015 - 20:03DROPS Design antwoorde:
Hola Andrea, la única razón para usar ag circular con este patrón es que en ag rectas es muy incomodo trabajar porque son muchos pts para distribuir y es dificil que quepan. Por lo demás se trabajaría igual.
20.04.2015 - 10:37Martha May schreef:
I have question on 158-28 In armhole area. I have 84 stitches on needles and 144 stitches on holder. Then I knitted 7 garter stitches and 54 stockinette Then 7 garter stitches for armhole. But all of this does not add up to 84 stitches. What did I do wrong?
14.04.2015 - 15:27DROPS Design antwoorde:
Dear Mrs May, when you work on the 84 sts for left front piece (the 144 sts for right front piece and back piece are onto a st holder), you continue on these 84 sts with 3 sts in garter st towards armhole (= towards sts on st holder) and 2 garter sts towards mid front (as before). The 7 sts worked in garter sts under each armhole are worked before dividing work. Happy knitting!
14.04.2015 - 16:17
![]() Mamiou schreef:
Mamiou schreef:
Ich finde die Jacke seeehr schön! Ich bin mir aber mit der Größe nicht sicher ... normalerweise trage ich Gr.42 - wäre das L oder XL ? Danke schonmal für die Hilfe !
14.02.2015 - 22:37DROPS Design antwoorde:
Am besten schauen Sie sich die Maße ganz unten in der Maßskizze an und entscheiden damit, welche Größe Ihnen am besten passt. Viel Spaß beim Stricken!
15.02.2015 - 19:14Donna W. Hall schreef:
Question in JACKET section: The last sentence says....."On next row from RS bind off the middle of the 7 sts in garter st for armhole and work each part separately to make an opening for the armhole." I am not sure WHICH sts to bind off because I have worked 2 sections of 7 sts in garter. I am very unsure about the instructions to "bind off the MIDDLE of the 7 sts". Please help! I love the jacket and can't wait to finish it. Thank you so much! Donna
05.02.2015 - 22:06DROPS Design antwoorde:
Dear Mrs Hall, you will bind off the middle st in each of the 7 sts garter sts (under armhole), you will then have 3 separate parts: right front piece, (1 st bound off), back piece, (1 st bound off), left front piece (seen from RS). Continue each part separately. Happy knitting!
06.02.2015 - 11:22
![]() Maya schreef:
Maya schreef:
Bonjour à tous, après avoit tricoté bonnets; écharpes et snood, je souhaite enfin me lancer sur de plus gros ouvrages. Les instructions ne sont pas très claires pour moi à ce niveau là (excusez, je débute :)) : "tricoter 2 côtes au POINT MOUSSE. Continuer avec l'aiguille circulaire 5 et tricoter en jersey avec 2 m lis au point mousse de chaque côté jusqu'à la fin. Est-ce que cela signifie que sur mon rang je vais avoir : 2 lis - 2 cotes mousses - le reste en jersey ?
18.01.2015 - 16:56DROPS Design antwoorde:
Bonjour Maya, 1 côte mousse = 2 rangs endroit - vous tricotez 4 rangs endroit sur toutes les mailles puis continuez ainsi: 2 m point mousse, jersey sur les mailles suivantes et vous terminez par 2 m point mousse. Ces 2 m de chaque côté se tricotent au point mousse tout le temps jusqu'à la fin. Bon tricot!
19.01.2015 - 11:52Priti Parihar schreef:
Hi, I live in India and am not able to get this wool. Can you please tell me the gauge for this article so that I can substitute some other wool for this project. I have been looking for this style and would love to make it. Thanks I hope you will reply
10.01.2015 - 12:08
|
|
Ballade#balladecardigan |
|
 |
 |
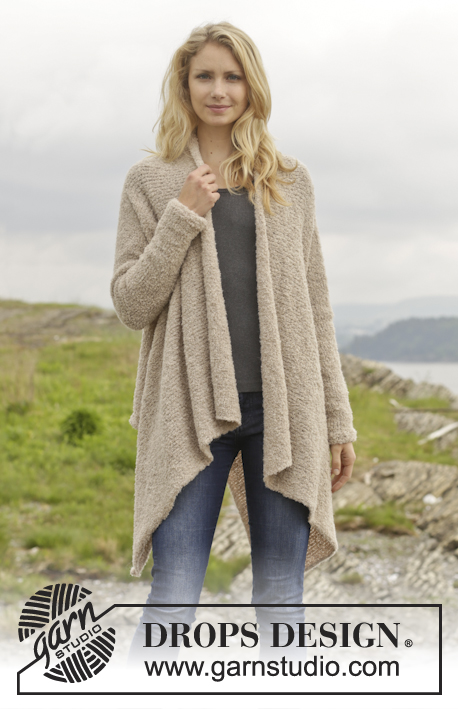
Gebreid DROPS vest van ”Alpaca Bouclé.” Maat: S - XXXL.
DROPS 158-28 |
|
|
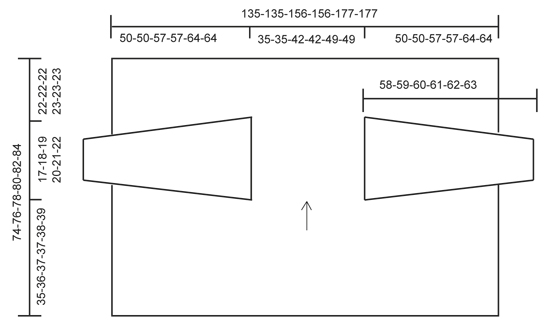
RIBBELST (heen en weer gebreid op de nld): Brei alle nld recht. 1 ribbel = 2 nld r. ---------------------------------------------------------- VEST: Wordt heen en weer gebreid op de rondbreinld zodat alle st goed op de nld passen. Zet 230-230-266-266-302-302 st op met rondbreinld 4 mm en Alpaca Bouclé. Brei 2 ribbels in RIBBELST - zie uitleg boven. Ga verder met rondbreinld 5 mm en brei in tricotst met 2 kant st in ribbelst aan elke kant tot het werk klaar is. DENK OM DE STEKENVERHOUDING! Brei tot het werk 34-35-36-36-37-38 cm meet. Brei in de volgende nld aan de goede kant als hiervoor over de eerste 81-81-93-93-105-105 st, 7 st in ribbelst, 54-54-66-66-78-78 st in tricotst, 7 st in ribbelst en brei als hiervoor over de laatste 81-81-93-93-105-105 st. Brei aan de verkeerde kant als hiervoor met 7 st in ribbelst als aan de goede kant. Kant in de volgende nld aan de goede kant de middelste van elk van de 7 st in ribbelst af voor het armsgat en brei elk deel apart verder zodat openingen voor de armsgaten ontstaan. LINKERVOORPAND: Houd de eerste 84-84-96-96-108-108 st op de nld en zet de overgebleven 144-144-168-168-192-192 st op een hulpdraad. Brei in tricotst met 3 st in ribbelst richting het armsgat en 2 kant st in ribbelst middenvoor. Brei tot het werk 51-53-55-56-58-60 cm meet. Zet de st op een hulpdraad en brei het rechtervoorpand. RECHTERVOORPAND: Zet de buitenste 84-84-96-96-108-108 st terug op de nld en brei als het linkervoorpand. Zorg dat het rechtervoorpand even lang wordt als het linkervoorpand. Zet de st op een hulpdraad en brei het achterpand. ACHTERPAND: Zet de middelste 60-60-72-72-84-84 st terug op de nld. Brei in tricotst met 3 st in ribbelst aan elke kant. Brei tot het werk 51-53-55-56-58-60 cm meet – zorg dat het achterpand even lang wordt als de voorpanden. Zet alle drie delen terug op de nld en brei als volgt: tricotst met 2 kant st in ribbelst over de eerste 81-81-93-93-105-105 st, 3 st in ribbelst, zet 1 nieuwe st op, 3 st in ribbelst, tricotst over 54-54-66-66-78-78 st, 3 st in ribbelst, zet 1 nieuwe st, 3 st in ribbelst, tricotst en 2 kant st in ribbelst over de laatste 81-81-93-93-105-105 st. Brei in ribbelst en tricotst op dezelfde manier aan de verkeerde kant. Brei dan in tricotst met 2 kant st in ribbelst aan elke kant tot het werk 73-75-77-79-81-84 cm meet. Ga verder met rondbreinld 4 mm en brei 2 ribbels. Kant losjes af aan de goede kant. MOUW: Wordt heen en weer gebreid op de rondbreinld. Zet 32-35-37-38-39-41 st op met rondbreinld 4 mm en Alpaca Bouclé. Brei 4 ribbels. Ga verder met rondbreinld 5 mm en brei in tricotst met 1 kant st in ribbelst aan elke kant tot het werk klaar is. Meerder bij een hoogte van 9 cm 1 st naast de kant st aan elke kant van het werk. Herhaal dit meerderen elke 3-3-3-2½-2½-2½ cm nog 13-13-14-15-16-17 keer = 60-63-67-70-73-77 st op de nld. Brei in tricotst tot het werk 52-53-54-55-56-57 cm meet. Kant 1 kant st af aan elke kant van het werk aan het begin van de volgende 2 nld = 58-61-65-68-71-75 st over op de nld. Kant dan af voor de mouwkop aan elke kant van het werk aan het begin van elke nld als volgt: 5 keer 4 st in totaal = 18-21-25-28-31-35 st over op de nld. Kant de overgebleven st af. Het werk meet ongeveer 58-59-60-61-62-63 cm. AFWERKING: Naai de mouwen in het vest. Naai de onderarmnaden dicht naast de kant st. |
|
 |
|
Heeft u dit patroon gemaakt?Tag dan uw afbeeldingen met #dropspattern #balladecardigan of stuur ze naar de #dropsfan galerij. Heeft u hulp nodig voor dit patroon?U vind 16 instructievideo's, een commentaar/vragengedeelte en nog veel meer, als u naar het patroon gaat op garnstudio.com © 1982-2026 DROPS Design A/S. Alle rechten voorbehouden. Op dit document, inclusief alle subdocumenten, rust copyright. Lees meer over wat u kunt doen met onze patronen onderaan elk patroon op onze site |
|


Met meer dan 40 jaar ervaring in brei- en haakdesign biedt DROPS Design één van de meest uitgebreide collecties van gratis patronen aan op internet vertaald in 324 talen. Tot en met vandaag hebben wij 12290 boeken en 11997 patronen gepubliceerd.
Wij werken hard om u het beste van haken en breien te bieden; patronen, inspiratie, advies en natuurlijk garens van uitstekende kwaliteit voor de allerbeste prijzen! Wilt u onze patronen gebruiken voor meer dan privégebruik? U kunt lezen wat wel en niet is toegestaan is in de Copyright tekst, die u onderaan elk patroon kunt vinden. Veel handwerkplezier!
Laat een opmerking achter voor DROPS 158-28
Wij horen graag wat u vindt van dit patroon!
Wilt u een vraag stellen, kies dan de juiste categorie in het formulier hieronder om sneller een antwoord te krijgen. Verplichte velden zijn gemarkeerd met een *.