
Popular categories
Looking for a yarn?


Comments / Questions (94)
![]() Stefan wrote:
Stefan wrote:
Can I incorporate German short rows at the back when working in the round? If yes, how do I manage the saddle-back increases during the short rows? Should increases be made only on the right-side rounds, or also on the short-row return passes?
21.04.2026 - 08:59DROPS Design answered:
Dear Stefan, you can probably add some short rows, maybe you can take inspiration from this video showing how to work short rows for a raglan worked top down? Note that the shoulder increases are worked on every round here, this means if you add some short rows, don't forget to increase from the wrong side too = on every row. Happy knitting!
21.04.2026 - 09:49
![]() Ariane wrote:
Ariane wrote:
Laine DROPS NEPAL bleu océan, aig. 5,5 et 5. J\'ai tout tricoté d\'une pièce, du coup l\'encolure est droite devant comme derrière, pour une femme la poitrine tire sur le tricot devant, pour un homme c\'est ras le cou !... Consignes très bien pour les épaules , seuls les conseils pour les manches sont pas à suivre ils forment des poches aux diminutions, perso j\\\'alterne une fois à dr et une fois à g du marqueur tous les 4rg. (ou 3 ou 2 selon tailles, à mesurer)
11.04.2026 - 10:28
![]() Annette wrote:
Annette wrote:
I am making this for a guy who is very tall and trim. His chest at armpits is 40 inches/ 101 cm and is 40.5 inches at the hip. . Shoulder to shoulder across the back is 19"/ 48 1/4 cm. I am not sure how much ease is built into the pattern. What size do you suggest, and what ease is typically built into the pattern? Thank you
03.04.2026 - 23:12DROPS Design answered:
Dear Annette, read more on how to choose size and desired ease here. Happy knitting!
08.04.2026 - 08:57
![]() Laura wrote:
Laura wrote:
Gentilissimi, Sto decidendo la taglia e vorrei sapere se le misure dell'ultima pagina del modello si riferiscono al maglione finito o alle misure di chi li dovrà indossare. Mio figlio ha torace 100 e distanza tra gli acromion di 47 cm. Che taglia mi ci si? Grazie! Laura
28.12.2025 - 19:00DROPS Design answered:
Buonasera Laura, le misure dello schema sono del capo finito. Buon lavoro!
28.12.2025 - 21:51
![]() Laurence wrote:
Laurence wrote:
Modèle réalisé en Alaska. Mais une fois fini, le pull gondole sur le devant sous l’encolure. C’est fort dommage, mais je vois que c’est aussi le cas sur la photo du modèle, donc j’en déduis qu’il y a un problème de conception du modèle. Mais cela gâche beaucoup le rendu. C’est dommage car sinon il aurait été très joli.
28.12.2025 - 02:32
![]() Alina wrote:
Alina wrote:
Zunahmen: in jede Runde wird am Schulter zugenommen, oder in jede zweite?
16.11.2025 - 17:41DROPS Design answered:
Liebe Alina, die Sattelschulterzunahmen arbeiten Sie in jeder Runde. Viel Spaß beim Stricken!
18.11.2025 - 20:00
![]() Zarechna wrote:
Zarechna wrote:
Hej, jeg kan ikke forstå dette: Flyt de 4 mærker fra ærmeudtagningen, så hver af de 4 mærkerne sidder i den yderste maske i hver side på hvert ærme. Det er 36-40-44-48-46-46 masker mellem maskerne med mærke i på hvert ærme. På næste omgang tages der 8 masker ud til bærestykke ved at tage ud både før og efter hver af de 4 masker med mærke i? Kan I hjælpe? Tak.
30.10.2025 - 07:08DROPS Design answered:
Hei Zarechna. Ta en titt på hjelpevideoene til denne genseren. Du finner videoene ved å klikke på Videoer til høyre / eller under bildet. Fremdeles problemer med å forstå, send et nytt spørsmål og da gjerne med hvilken str. du strikker, så skal vi hjelpe deg så godt vi kan. mvh DROPS Design
10.11.2025 - 13:30
![]() Marit wrote:
Marit wrote:
Hi, ik werk momenteel aan het lichaam in een maat XL. in het patroon staat dat het lichaam vanaf de scheiding, dus vanaf de oksel 28 cm moet zijn. ik heb dat nu, maar het ziet er veel te kort uit om al te beginnen aan de onderboord. Heb ik het patroon verkeerd gelezen bij dit gedeelte of moet ik nog langer door breien? Ik hoor graag van jullie!
04.10.2025 - 08:24DROPS Design answered:
Dag Marit,
Het moet inderdaad 28 cm zijn (indien je de grootste maat breit). Er komt nog 5 cm bij voor de boord. Je bent natuurlijk vrij om het lijf wat langer te maken 😊)
08.10.2025 - 20:13
![]() Josée wrote:
Josée wrote:
Bonjour J'aimerais faire ce magnifique pull pour mon mari mais très souvent le bas du dos est très court. Je sais que je peux faire des rangs raccourcis mais je me demande a quelle hauteur et a combien de mailles et combien de rangs. Je fait la grandeur 5 Merci de votre précieuse aide
29.09.2025 - 22:53DROPS Design answered:
Bonjour Josée, pour ce modèle, nous n'avons pas de réhausse, l'encolure dos et devant sont identiques; il peut être plus simple d'adapter des rangs raccourcis sur un modèle avec empiècement arrondi ou un raglan. Bon tricot!
08.10.2025 - 08:03
![]() Hvornår Skal Jeg Skifte Til 80cm Rundpinde? wrote:
Hvornår Skal Jeg Skifte Til 80cm Rundpinde? wrote:
Jeg kan ikke finde info om skift til rundpind 80 cm. i opskriften. Kan I hjælpe?
30.03.2025 - 13:48DROPS Design answered:
Hei. Du skifter til 80 cm etter behov. Blir det for mange masker på 40 cm skifter du til 80 cm. mvh DROPS Design
31.03.2025 - 13:52
|
|||||||||||||
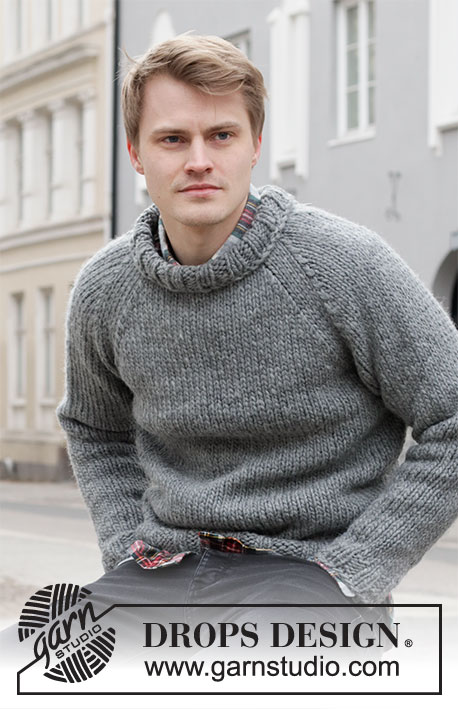
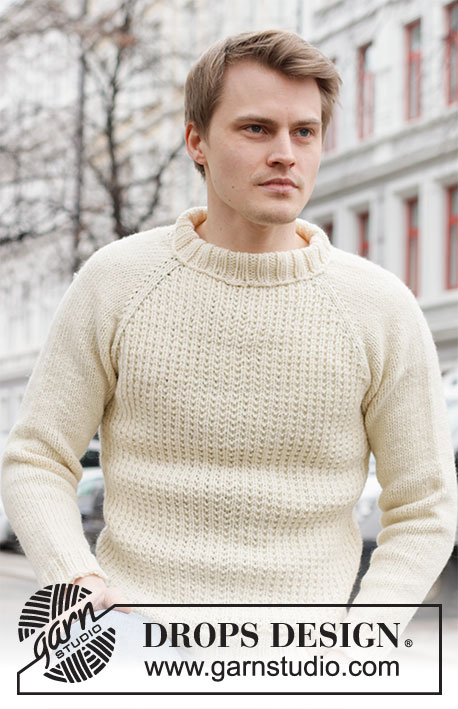
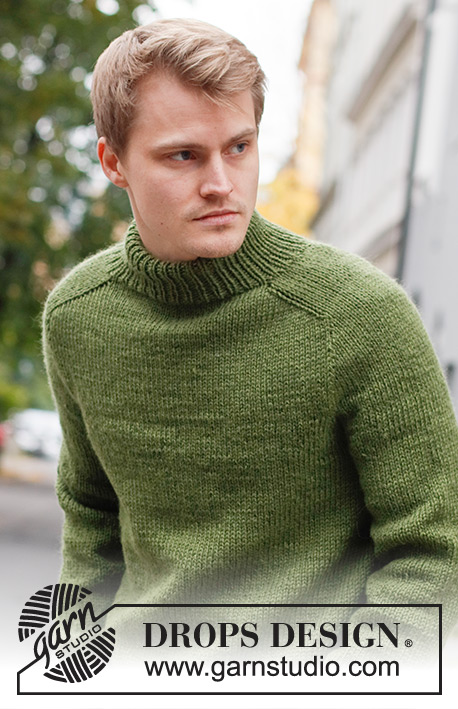
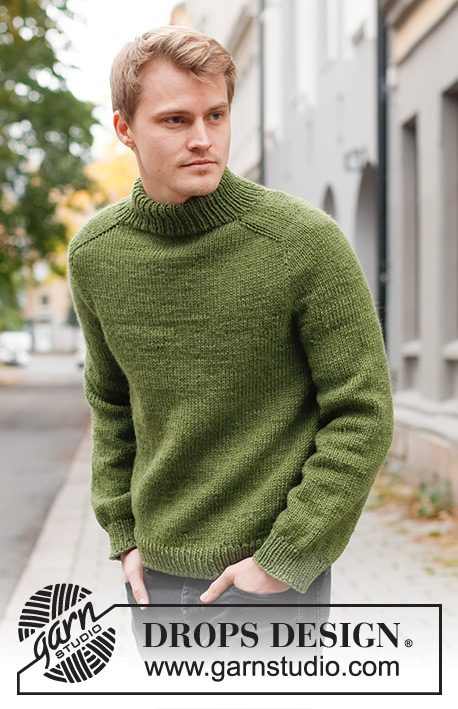
Urban Forest#urbanforestsweater |
|||||||||||||
 |
 |
||||||||||||
Knitted sweater for men in DROPS Alaska. The piece is worked top down, with double neck and saddle shoulders. Sizes S - XXXL.
DROPS 219-16 |
|||||||||||||
|
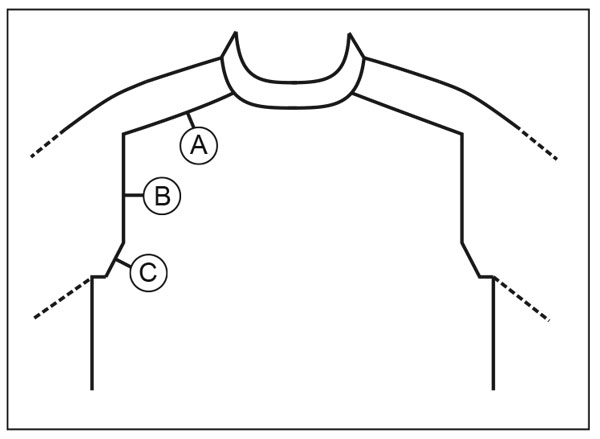
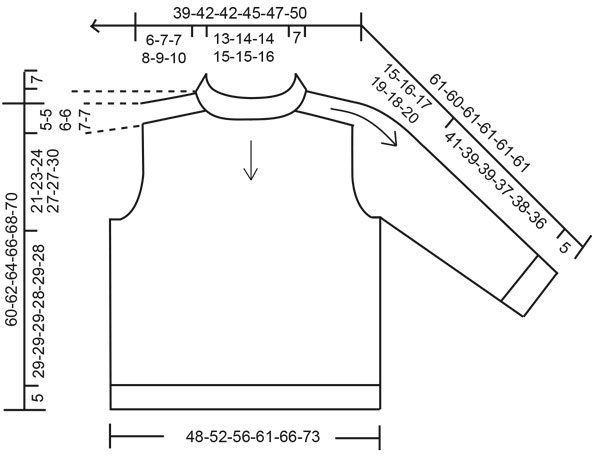
------------------------------------------------------- EXPLANATIONS FOR THE PATTERN: ------------------------------------------------------- INCREASE/DECREASE TIP (evenly spaced): To work out how to increase/decrease evenly, count the total number of stitches on needle (e.g. 78 stitches), and divide by the number of increases/decreases to be made (e.g. 22) = 3.5. In this example, increase by making 1 yarn over after alternately each 3rd and 4th stitch. On the next round work the yarn overs twisted to avoid holes. When decreasing, knit together alternately each 2nd and 3rd stitch and each 3rd and 4th stitch. INCREASE TIP: BEFORE MARKER: The new stitch twists to the right. Use the left needle to pick up the strand between 2 stitches from the previous round; pick up the back strand and knit in the front loop. AFTER MARKER: The new stitch twists to the left. Use the left needle to pick up the strand between 2 stitches from the previous round; pick up the front strand and knit in the back loop. DECREASE TIP (for sleeves): Decrease 1 stitch on either side of the marker thread as follows: Work until there are 3 stitches left before the marker thread, knit 2 together, knit 2 (marker thread sits between these 2 stitches), slip 1 stitch as if to knit, knit 1 and pass the slipped stitch over the knitted stitch. BINDING-OFF TIP: To avoid the bind-off edge being tight you can bind off with a larger size needle. If the edge is still tight, make 1 yarn over after approx. each 4th stitch at the same time as binding off; the yarn overs are bind off as normal stitches. ------------------------------------------------------- START THE PIECE HERE: ------------------------------------------------------- SWEATER – SHORT OVERVIEW OF THE PIECE: The neck and yoke are worked in the round with circular needle, top down from mid back. The yoke is divided for body and sleeves and the body continued in the round with circular needle. The sleeves are worked in the round with short circular needle/double pointed needles, top down. NECK: Cast on 78-82-88-92-98-102 stitches with circular needle size 4 mm = US 6 and Alaska. Knit 1 round, then work rib (knit 1, purl 1) in the round for 14½ cm = 5⅝". Knit 1 round where you increase 22-22-32-32-34-38 stitches evenly spaced – read INCREASE/DECREASE TIP = 100-104-120-124-132-140 stitches. Change to circular needle size 5 mm = US 8. YOKE: Insert a marker at the beginning of the round (= mid-back) – THE PIECE IS MEASURED FROM HERE! In addition, insert 4 new markers as described below – without working the stitches and inserting the markers between 2 stitches. Marker 1: Start mid-back, count 17-18-20-21-21-23 stitches (= ½ back piece), insert marker before the next stitch. Marker 2: Count 16-16-20-20-24-24 stitches from marker 1 (= shoulder), insert marker before the next stitch. Marker 3: Count 34-36-40-42-42-46 stitches from marker 2 (= front piece), insert marker before the next stitch. Marker 4: Count 16-16-20-20-24-24 stitches from marker 3 (= shoulder), insert marker before the next stitch. There are 17-18-20-21-21-23 stitches left on the back piece after marker 4. Allow the markers to follow your work onwards; they are used when increasing for the shoulders. INCREASES FOR SADDLE SHOULDERS: Work stockinette stitch in the round. AT THE SAME TIME, on the first round, increase 4 stitches for the shoulders as follows: Increase BEFORE markers 1 and 3 and increase AFTER markers 2 and 4 – read INCREASE TIP. Here you are only increasing on the front and back pieces and the number of shoulder stitches remains the same. Increase like this every round a total of 14-16-16-18-20-22 times = 156-168-184-196-212-228 stitches. REMEMBER THE KNITTING GAUGE! After the last increase the piece measures approx. 6-7-7-8-9-10 cm = 2⅜"-2¾"-2¾"-3⅛"-3½"-4" from the marker on the neck. Now increase for the sleeves as follows. INCREASES FOR SLEEVES: Work stockinette stitch in the round. AT THE SAME TIME, on the next round, increase 4 stitches for the sleeves as follows: Increase AFTER markers 1 and 3 and increase BEFORE markers 2 and 4 – remember INCREASE TIP. Here you are only increasing on the shoulders and the number of stitches on the front and back pieces remains the same. Increase like this every 2nd round a total of 11-13-13-15-12-12 times = 200-220-236-256-260-276 stitches. The piece should now measure 16-19-19-22-20-21 cm = 6¼"-7½"-7½"-8¾"-8"-8¼" from the marker on the neck. In size S continue working until the piece measures 17 cm = 6¾". If the length is shorter than the above in sizes M, L, XL, XXL and XXXL, continue to the correct length without further increases. Now increase for the yoke as described below. INCREASES FOR YOKE: Move the 4 markers so each marker sits in the outermost sleeve stitches on each side. There are 36-40-44-48-46-46 stitches between the marker-stitches on each sleeve. On the next round, increase 8 stitches for the yoke by increasing on both sides of all 4 marker-stitches – remember INCREASE TIP. Here you increase on the front and back pieces and on the sleeves; the increased stitches are worked in stockinette stitch. Increase like this every 2nd round a total of 4-4-6-6-8-10 times = 232-252-284-304-324-356 stitches. When all the increases are finished, the piece should measure 21-23-24-27-27-30 cm = 8¼"-9"-9½"-10⅝"-10⅝"-11¾". If the length is shorter than this, continue working to the correct length without further increases. Now divide the yoke for the body and sleeves on the next round as follows: Work the first 35-38-42-45-49-55 stitches (= ½ back piece), place the next 46-50-58-62-64-68 stitches on a thread for the sleeve, cast on 12-12-12-14-14-14 new stitches on the needle (= in side under sleeve), work the next 70-76-84-90-98-110 stitches (= front piece), place the next 46-50-58-62-64-68 stitches on a thread for the sleeve, cast on 12-12-12-14-14-14 new stitches on the needle (= in side under sleeve) and work the last 35-38-42-45-49-55 stitches (= ½ back piece). Body and sleeves are finished separately. THE PIECE IS NOW MEASURED FROM HERE. BODY: = 164-176-192-208-224-248 stitches. Work stockinette stitch in the round. When the piece measures 29-29-29-28-29-28 cm = 11⅜"-11⅜"-11⅜"-11"-11⅜"-11" from the division, increase 16-18-20-20-22-26 stitches evenly spaced = 180-194-212-228-246-274 stitches. Change to circular needle size 4 mm = US 6 and work rib (knit 1, purl 1) for 5 cm = 2". Bind off with knit over knit and purl over purl – read BINDING-OFF TIP. The sweater measures approx. 60-62-64-66-68-70 cm = 23⅝"-24⅜"-25¼"-26"-26¾"-27½" from the shoulder down. SLEEVE: Place the 46-50-58-62-64-68 stitches from the thread on the one side of the piece on double pointed needles/short circular needle size 5 mm = US 8 and knit up 1 stitch in each of the 12-12-12-14-14-14 stitches cast on under the sleeve = 58-62-70-76-78-82 stitches. Insert a marker in the middle of the new stitches under the sleeve. Work stockinette stitch in the round. When the sleeve measures 4 cm = 1½" from the division, decrease 1 stitch on each side of the marker – read DECREASE TIP. Decrease like this every 11-6-3½-3-3-2½ cm = 4⅜"-2⅜"-1¼"-1⅛"-1⅛"-1" a total of 4-6-9-11-11-13 times = 50-50-52-54-56-56 stitches. Continue working until the sleeve measures 41-39-39-37-38-36 cm = 16⅛"-15¼"-15¼"-14½"-15"-14¼" from the division. Knit 1 round where you decrease 10-8-8-8-10-8 stitches evenly spaced = 40-42-44-46-46-48 stitches. Change to double pointed needles size 4 mm = US 6 and work rib (knit 1, purl 1) for 5 cm = 2". Bind off with knit over knit and purl over purl – remember BINDING-OFF TIP. Work the other sleeve in the same way. ASSEMBLY: Fold the neck double to the wrong side and sew down. To avoid the neck being tight and rolling outwards, it is important the seam is elastic. |
|||||||||||||
Diagram explanations |
|||||||||||||
|
|||||||||||||
 |
|||||||||||||
 |
|||||||||||||
Have you finished this pattern?Tag your pictures with #dropspattern #urbanforestsweater or submit them to the #dropsfan gallery. Do you need help with this pattern?You'll find 27 tutorial videos, a Comments/Questions area and more by visiting the pattern on garnstudio.com. © 1982-2026 DROPS Design A/S. We reserve all rights. This document, including all its sub-sections, has copyrights. Read more about what you can do with our patterns at the bottom of each pattern on our site. |
|||||||||||||


With over 40 years in knitting and crochet design, DROPS Design offers one of the most extensive collections of free patterns on the internet - translated to 17 languages. As of today we count 324 catalogs and 12290 patterns - 12280 of which are translated into English (US/in).
We work hard to bring you the best knitting and crochet have to offer, inspiration and advice as well as great quality yarns at incredible prices! Would you like to use our patterns for other than personal use? You can read what you are allowed to do in the Copyright text at the bottom of all our patterns. Happy crafting!
Post a comment to pattern DROPS 219-16
We would love to hear what you have to say about this pattern!
If you want to leave a question, please make sure you select the correct category in the form below, to speed up the answering process. Required fields are marked *.