
Popular categories
Looking for a yarn?


Comments / Questions (98)
![]() Nathalie wrote:
Nathalie wrote:
Bonjour, C'est le 2e châle que je tente et ça ne fonctionne toujours pas dès le démarrage. Rang 1, on augmente de 4 mailles, ce qui donne 11 mailles; Rang 2 on augmente de 2 mailles = 13. Rang 3, on augmente de 4 mailles = 17 mailles; Rang 4, on augmente de 2 mailles = 19 mailles. Or, si on poursuit les rangs 3 et 4 (augmentation de 6 mailles à chaque fois), on arrive à 79 ou en core à 85 mailles, mais pas 83 mailles.
05.04.2026 - 04:36DROPS Design answered:
Bonjour Nathalie, notez que le dernier rang tricoté doit être un rang sur l'envers, ce sera le rang 25 où vous augmentez 4 m = 83 m au total; au rang suivant sur l'envers, augmentez 2 m comme avant et augmentez en plus 17 m de chaque côté de la m centrale soit 34 m au total = 83+5+34=119 mailles. Bon tricot!
08.04.2026 - 10:21
![]() Darcy wrote:
Darcy wrote:
Bonjour, Au risque de paraître stupide, je préfère poser la question. 😶🌫️ Je suis aux diagrammes A1 et A2. Vous indiquez que les diagrammes se tricotent, comme indiqué, sur l'endroit. Dans ce cas, comment tricoter l'envers de l'ouvrage, si les rangs ne sont pas représentés sur les diagrammes ? Faut-il tricoter les mailles comme elles se présentent ? Merci d'avance pour votre réponse.
18.11.2025 - 00:05DROPS Design answered:
Bonjour Mme Darcy, les diagrammes représentent tous les rangs du point fantaisie, vus sur l'endroit, sur l'endroit, on lit les diagrammes de droite à gauche et sur l'envers de gauche à droite, ainsi, dans A.1 vous continuerez les côtes en tricotant les mailles endroit à l'endroit et les mailles envers à l'envers (suivez la légende "sur l'envers" des symboles), et les jetés seront tricotés soit à l'endroit, soit à l'envers en fonction du rang. Bon tricot!
18.11.2025 - 09:06
![]() PATRICIA wrote:
PATRICIA wrote:
Bonjour et merci beaucoup pour votre réponse Cordialement bonne journée
16.10.2025 - 08:05
![]() JACOBS wrote:
JACOBS wrote:
Bonjour, pourriez-vous me répondre assez vite s’il vous plaît car j’attends depuis trois jours votre réponse bien entendu, je sais que je suis pas tout seule Je vous remercie d’avance. Bonne soirée.
14.10.2025 - 20:37
![]() PATRICIA wrote:
PATRICIA wrote:
Bonjour, je ne comprends toujours pas, j’ai defait mon travail on était revenu à 191. je l’ai refait jusqu’a faire le A3 et le A4, sans compter les points de mousse j’en ai 147 si je fais les quatre augmentations, je me retrouve avec quatre points en trop, j’attends vos réponses car je ne peux pas continuer comme ça, il doit certainement y avoir une erreur Cordialement madame Jacobs
13.10.2025 - 07:22DROPS Design answered:
Bonjour Patricia, regardez la réponse ci-dessous, on y a repris le dernier rang de A.1/A.2 avec le nombre de mailles à la fin des diagrammes + après le dernier rang et les augmentations/diminutions, qui doit vous préparer pour A.3/A.4. Bon tricot!
15.10.2025 - 08:38
![]() JACOBS wrote:
JACOBS wrote:
Bonjour, ayant chercher dans tous lessens, je me suis aperçue qu’à la fin tu as un à deux, on doit avoir 147 points et non pas 151 car quand vous prenez le A3 et le A4 vous avez 151 points avec les augmentations! Donc on peut pas avoir 151 points en finissant le A1 et le A2 Car quand vous faites le A3 et le A4, vous avez 151. Aussi avec les augmentations donc c’est pas possible. Cordialement bien entendu j’ai compté les deux points mousse de chaque côté.
12.10.2025 - 07:47DROPS Design answered:
Bonjour Mme Jacobs, quand vous avez terminé A.1 et A.2 vous devez avoir 159 mailles: (2 m point mousse, 15 m A.1A, 52 m A.1B, 10 m A.1C, 1 m jersey, 10 mA.2A, 52 m A.2B, 15 m A.2C, 2 m point mousse) soit 2+15+52+10+1+10+52+15+2=159; vous tricotez 1 rang sur l'endroit en augmentant 2 m comme avant (1 de chaque côté) et en diminuant 10 m (5 de chaque côté) = vous avez: 159-+2-10= 151 m pour A.3/A.4. Bon tricot!
15.10.2025 - 08:12
![]() PATRICIA Jacobs wrote:
PATRICIA Jacobs wrote:
Bonjour, je ne comprends pas le A3 B sur la description c’est gris au-dessus des 44 m suivantes et moi j’en ai pas 44 et j’arrive tout de suite au point Jersey. Pouvez-vous m’expliquer merci bonne journée
10.10.2025 - 09:29DROPS Design answered:
Bonjour Patricia, après A.1 et A.2 vous devez avoir 73 m entre les 2 m point mousse et la m centrale de chaque côté du châle (151 m au total), tricotez ces 73 m ainsi;: 13 m de A.3A, 44 m de A.3B et 15 m de A.3C (=13+44+15=73). Bon tricot!
15.10.2025 - 07:12
![]() Jacobs Ginky wrote:
Jacobs Ginky wrote:
Bonjour, comment fait-on quand on est au 6 rang de A1A sur l’avant le Jersey et après le Jersey car on se retrouve avec deux points à l’envers avant le Jersey quand on tripote la jetée précédente. Est-ce que c’est comme ça qu’il faut faire ou autrement car je me retrouve avec deux points à l’envers au lieu de à l’envers à l’endroit. Merci. Cordialement. Madame jacobs dit Ginky en fait Mme Jacob c’est qui c’est moi, mais c’est mon pseudo, ginky 😉
30.09.2025 - 12:00DROPS Design answered:
Bonjour Mme Jacobs, le diagramme A.1 (tout comme le diagramme A.2) se tricotent en côtes 1/1, sur l'envers, vous tricotez le 6ème rang ainsi: A.1C = 1 m env, 1 m end, 1 m env, 1 m end, 1 m env, 1 m end (6 m), puis vous répétez les 2 m de A.1B (1 m env, 1 m end) et vous terminez par les 7 m de A.1A (1 m env, 1 m end, 1 m env, 1 m end, 1 m env, 1 m end, 1 m env + 1 jeté). Vous allez en fait tricoter les mailles comme elles se présentent, et incorporer les augmentations aux côtes. Bon tricot!
30.09.2025 - 17:39
![]() Ginky wrote:
Ginky wrote:
Bonjour, j’aimerais savoir que veut dire leA1A 1 fois en largeur et le A1B 26 fois en Largeur je suis arrêté au 119 points car je ne comprends pas la suite, j’ai pas l’habitude de travailler avec vous pourtant je suis tricoteuses expert faut-il que j’imprime les diagrammes ? Merci pour vos réponses j’arrête en attendant votre réponse. Merci d’avance.
23.09.2025 - 12:24DROPS Design answered:
Bonjour Mme Ginky, vous allez répéter le diagramme en largeur le nombre de fois indiqué, autrement dit, après vos 119 m, vous tricotez ainsi: 2 m point mousse, 1 x A.1A (= 2 m), 26 x A.1B (= 26x 2 = 52 m au total), A.1C (= 3 m), 1 m jersey, A.1A (= 2 m), A.1B = 26 x 2 m (= 52 m au total), A.1C (= 3m), et 2 m point mousse soit 2+2+52+3+1+2+52+3+2=119 mailles. Bon tricot!
24.09.2025 - 16:56
![]() Jacobs wrote:
Jacobs wrote:
Bonjour, ne me répondez pas à ma question, j’ai trouvé pour le rang trois et le rang quatre il y a bien qu’une maille centrale et une jetée de chaque côté avec une jetée après les trois mousses de chaque côté aussi. Merci beaucoup d’avance quand même.
21.09.2025 - 16:29
|
|||||||||||||||||||||||||||||||
Lacey Laurels#laceylaurelsshawl |
|||||||||||||||||||||||||||||||
 |
 |
||||||||||||||||||||||||||||||
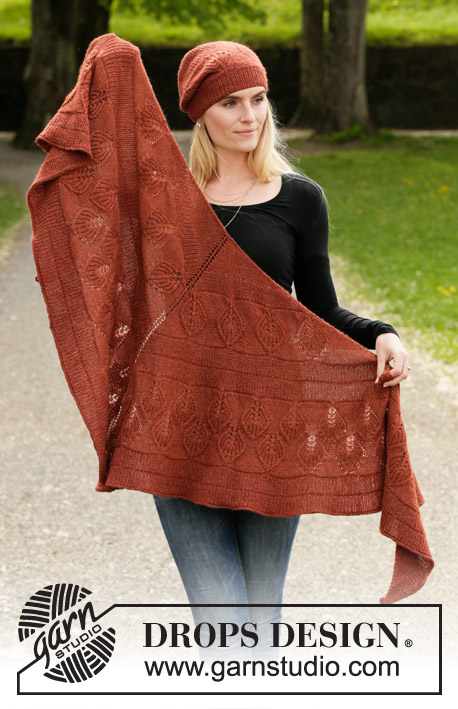
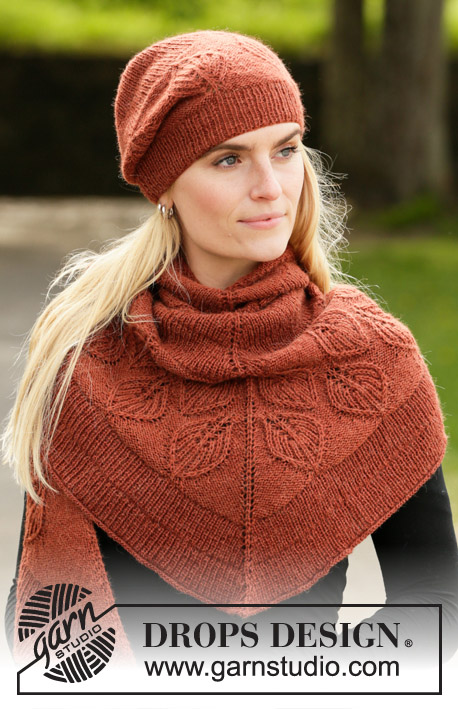
Knitted hat and shawl in DROPS Alpaca. The piece is worked with rib and leaf pattern in Fisherman’s rib.
DROPS 203-14 |
|||||||||||||||||||||||||||||||
|
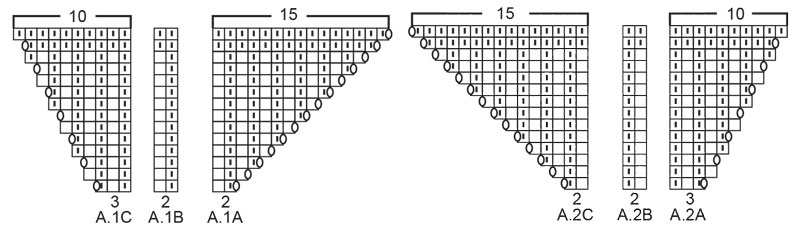
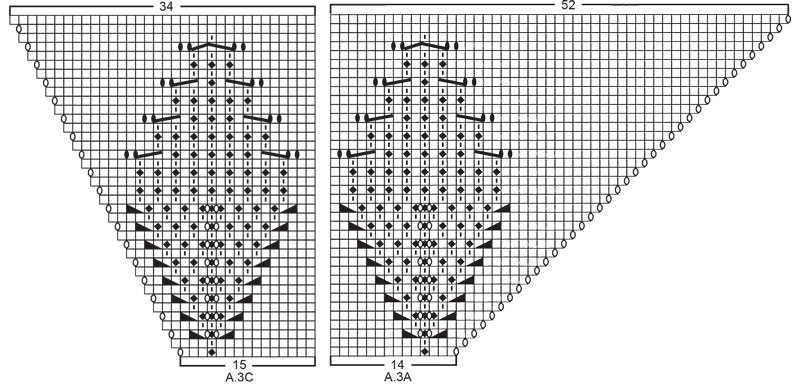
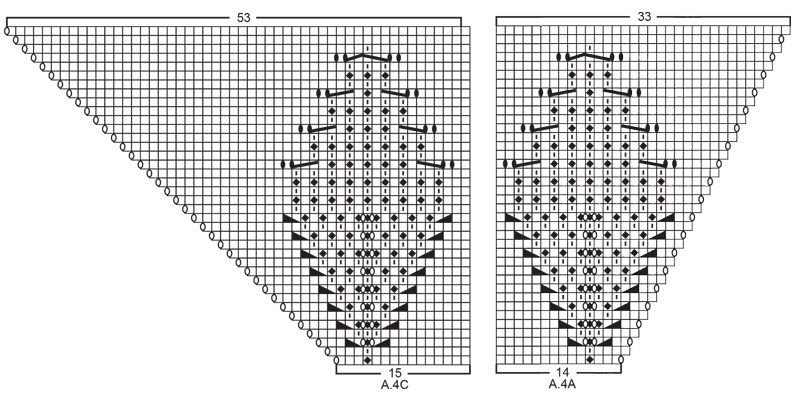
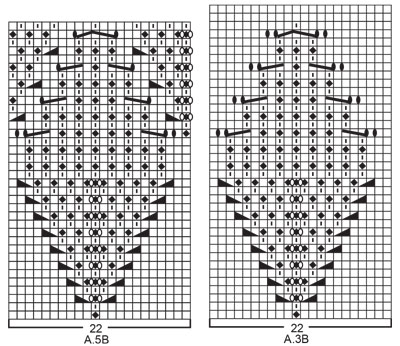
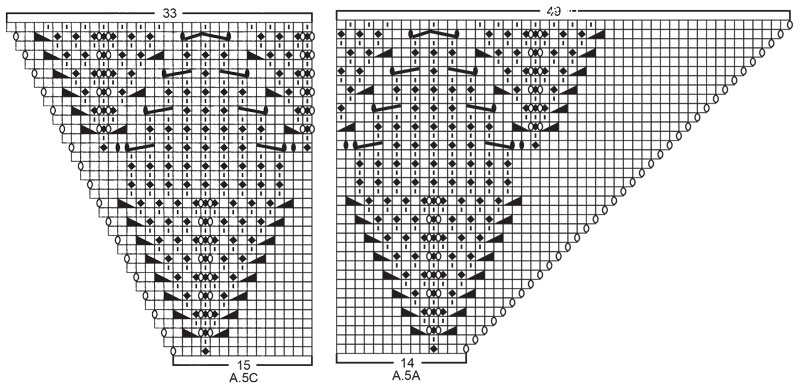
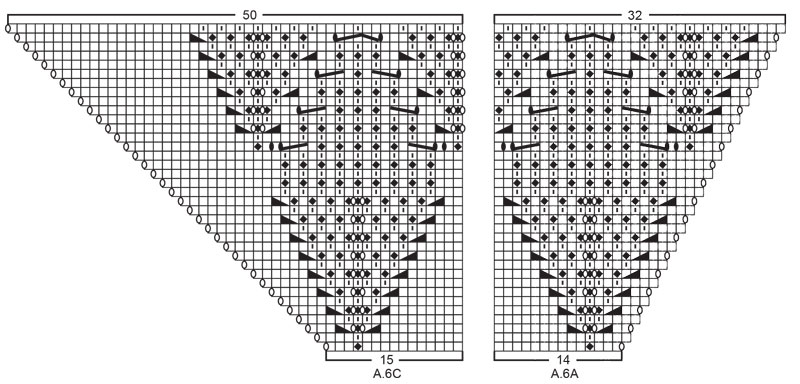
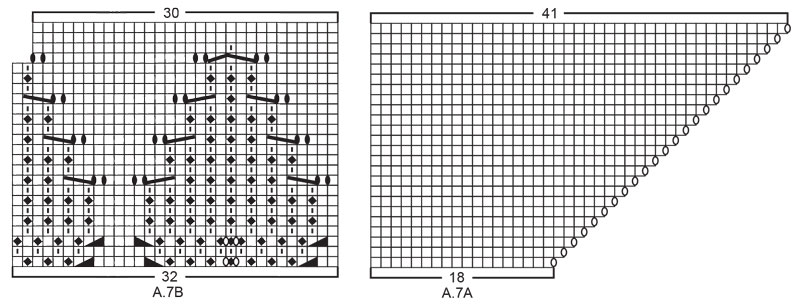
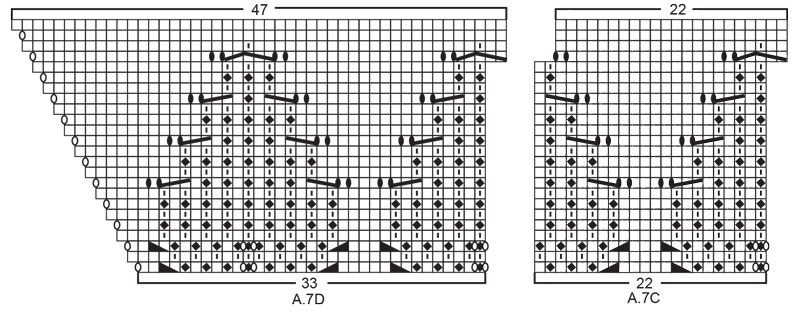
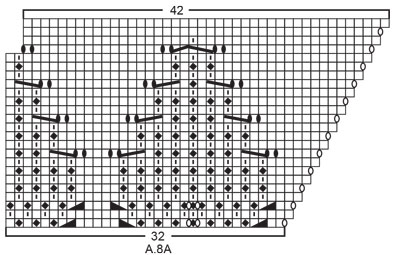
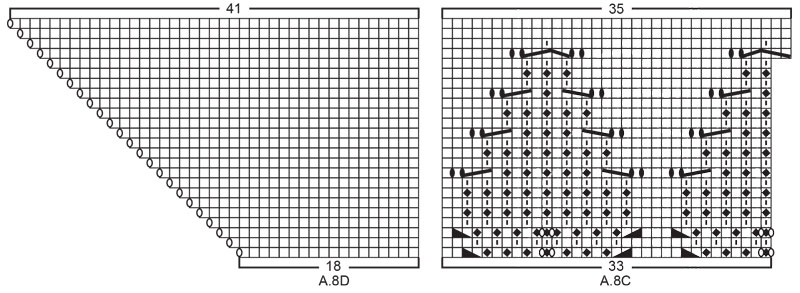
------------------------------------------------------- EXPLANATIONS FOR THE PATTERN: ------------------------------------------------------- RIDGE/GARTER STITCH (worked back and forth): Knit all rows. 1 ridge in height = Knit 2 rows. PATTERN: Hat: See diagrams A.1B and A.3B. Shawl: See diagrams A.1 to A.8. The diagrams show all rows in the pattern seen from the right side. DIAGRAM TIP: This pattern contains many diagrams; it might be a good idea to cut out all the diagrams and arrange them in the right order (see the order given in the text). INCREASE/DECREASE TIP (evenly spaced on hat): To work out how to increase/decrease evenly, count the total number of stitches on needle (e.g. 122 stitches) and divide by the number of increases/decreases to be made (e.g. 10) = 12.2. In this example, increase by making 1 yarn over after approx. each 12th stitch. On the next round work the yarn overs twisted to avoid holes. When decreasing, work together approx. each 11th and 12th stitch. INCREASE/DECREASE TIP (evenly spaced on shawl): To work out how to increase/decrease evenly on each side of the middle stitch, count the total number of stitches on needle (e.g. 81 stitches) minus the edge stitches and middle stitch (5 stitches) and divide the remaining stitches by 2 ( to find the number of stitches on each side of the middle stitch). Then divide these stitches by the number of increases/decreases to be made on each side (e.g. 18) = 2.1. In this example, increase by making 1 yarn over after approx. each 2nd stitch. Do not increase over edge stitches or middle stitch. When decreasing, work approximately all stitches together 2 and 2. ------------------------------------------------------- START THE PIECE HERE: ------------------------------------------------------- HAT – SHORT OVERVIEW OF THE PIECE: The piece is worked in the round with short circular needle, bottom up. Change to double pointed needles when necessary. HAT: Cast on 120-126 stitches with short circular needle size 2.5 mm = US 1,5 and Alpaca. Knit 1 round. Then work rib in the round (= knit 1 / purl 1) for 5-6 cm = 2"-2⅜". Knit 1 round where you increase 12-28 stitches evenly spaced – read INCREASE/DECREASE TIP = 132-154 stitches. Change to circular needle size 3 mm = US 2,5 and work A.3B in the round (= 6-7 repeats of 22 stitches). REMEMBER THE KNITTING GAUGE! When A.3B has been completed the piece measures approx. 16-17 cm = 6¼"-6¾" from the cast-on edge. Knit 1 round where you increase 12-14 stitches evenly spaced = 144-168 stitches. Work A.1B. AT THE SAME TIME on the last round in A.1B decrease 16-24 stitches evenly spaced = 128-144 stitches. Work A.1B one more time in height. AT THE SAME TIME on the last round in A.1B knit all stitches together 2 and 2 = 64-72 stitches. Then work stockinette stitch. AT THE SAME TIME, on every 2nd round, knit all stitches together 2 and 2 until there are 8 stitches left. Cut the strand, pull it through the remaining stitches, tighten and fasten well. The hat measures approx. 26-27 cm = 10¼"-10⅝" from the top down. ------------------------------------------------------- SHAWL - SHORT OVERVIEW OF THE PIECE: The piece is worked back and forth with circular needle, top down. Due to the number of stitches it might be a good idea to divide the piece onto several needles of the same size. SHAWL: Cast on 7 stitches with circular needle size 3 mm = US 2,5 and Alpaca. Knit 1 row (= wrong side). Then work and increase as follows: ROW 1 (= right side): Work 2 edge stitches in GARTER STITCH – read description above, 1 yarn over, work 1 stitch in stockinette stitch, 1 yarn over, 1 stitch in stockinette stitch (= middle stitch), 1 yarn over, 1 stitch in stockinette stitch, 1 yarn over and finish with2 edge stitches in garter stitch (= 4 stitches increased). ROW 2 (= wrong side): Work 2 edge stitches in garter stitch, 1 yarn over, work stockinette stitch until there are 2 stitches left on the row (yarn overs purled to leave holes), 1 yarn over and finish with 2 edge stitches in garter stitch (= 2 stitches increased). ROW 3 (= right side): 2 edge stitches in garter stitch, 1 yarn over, work stockinette stitch as far as the middle stitch, 1 yarn over, 1 stitch in stockinette stitch (= middle stitch), 1 yarn over, work stockinette stitch until there are 2 stitches left on the row, 1 yarn over and finish with 2 edge stitches in garter stitch (= 4 stitches increased). ROW 4 (= wrong side): 2 edge stitches in garter stitch, 1 yarn over, work stockinette stitch until there are 2 stitches left on the row (yarn overs purled to leave holes), 1 yarn over and finish with 2 edge stitches in garter stitch (= 2 stitches increased). Repeat rows 3 and 4 until there are 83 stitches on the needle and the last row was worked from the right side. REMEMBER THE KNITTING GAUGE! Work the next row in the same way as row 4 (= wrong side) and increase at the same time 17 stitches evenly spaced on each side of the middle stitch (34 stitches increased on row in addition to the increase worked inside the 2 edge stitches on each side) – read INCREASE/DECREASE TIP = 119 stitches on the needle. Work diagrams A.1 and A.2 as follows from the right side: Work 2 edge stitches in garter stitch, A.1A over 2 stitches (1 time in width), A.1B over 52 stitches (26 times in width), A.1C over 3 stitches (1 time in width), 1 stitch in stockinette stitch (= middle stitch), work A.2A over 3 stitches, A.2B over 52 stitches (26 times in width), A.2C over 2 stitches and finish with 2 edge stitches in garter stitch. Continue this pattern. When the last row in A.1 and A.2 remains there are 159 stitches on the needle. Work the last row and at the same time decrease 5 stitches evenly spaced on each side of the middle stitch (10 stitches decreased evenly + 2 stitches increased in diagrams) – read INCREASE/DECREASE TIP = 151 stitches. Work diagrams A.3 and A.4 as follows from the right side: Work 2 edge stitches in garter stitch, A.3A over 14 stitches (1 time in width), A.3B over 44 stitches (2 times in width), work A.3C over 15 stitches (1 time in width), 1 stitch in stockinette stitch (= middle stitch), work A.4A over 14 stitches, A.3B over 44 stitches (2 times in width), A.4C over 15 stitches and finish with 2 edge stitches in garter stitch. Continue this pattern. When the last row in A.3 and A.4 remains there are 263 stitches on the needle. Work the last row and, at the same time, increase 43 stitches evenly spaced on each side of the middle stitch (86 stitches increased evenly and 2 stitches increased in diagrams) = 351 stitches. Work diagrams A.1 and A.2 as follows from the right side: Work 2 edge stitches in garter stitch, A.1A over 2 stitches (1 time in width), A.1B over 168 stitches (84 times in width), work A.1C over 3 stitches (1 time in width), 1 stitch in stockinette stitch (= middle stitch), A.2A over 3 stitches, A.2B over 168 stitches (84 times in width), work A.2C over 2 stitches and finish with 2 edge stitches in garter stitch. Continue this pattern. When the last row in A.1 and A.2 remains there are 391 stitches on the needle. Work the last row and increase at the same time 1 stitch on each side of the middle stitch (2 stitches increased evenly and 2 stitches increased in diagrams) = 395 stitches. Now work A.1 and A.2 one more time in height; i.e. work the next row from the right side as follows: 2 edge stitches in garter stitch, A.1A over 2 stitches (1 time in width), A.1B over 190 stitches (95 times in width), work A.1C over 3 stitches (1 time in width), 1 stitch in stockinette stitch (= middle stitch), A.2A over 3 stitches, A.2B over 190 stitches (95 times in width), A.2C over 2 stitches and finish with 2 edge stitches in garter stitch. Continue this pattern. When the last row in A.1 and A.2 remains there are 435 stitches on the needle. Work the last row and decrease at the same time 11 stitches evenly spaced on each side of the middle stitch (22 stitches decreased evenly and 2 stitches increased in diagrams) = 415 stitches. Work diagrams A.5 and A.6 as follows from the right side: 2 edge stitches in garter stitch, A.5A over 14 stitches (1 time in width), work A.5B over 176 stitches (8 times in width), A.5C over 15 stitches (1 time in width), 1 stitch in stockinette stitch (= middle stitch), A.6A over 14 stitches, A.5B over 176 stitches (8 times in width), A.6C over 15 stitches and finish with 2 edge stitches in garter stitch. Continue this pattern. When the last row in A.5 and A.6 is finished there are 523 stitches on the row. Work diagrams A.7 and A.8 as follows from the right side: 2 edge stitches in garter stitch, A.7A over 18 stitches (1 time in width), A.7B over 32 stitches (1 time in width), A.7C over 176 stitches (8 times in width), work A.7D over 33 stitches (1 time in width), 1 stitch in stockinette stitch (= middle stitch), A.8A over 32 stitches, A.7C over 176 stitches (8 times in width), A.8C over 33 stitches, A.8D over 18 stitches and finish with 2 edge stitches in garter stitch. Continue this pattern. When the last row in A.7 and A.8 remain there are 593 stitches on the needle. Work the last row and increase at the same time 72 stitches evenly spaced on each side of the middle stitch (144 stitches increased evenly and 2 stitches increased in diagrams) = 739 stitches. Work diagrams A.1 and A.2 as follows from the right side: 2 edge stitches in garter stitch, A.1A over 2 stitches (1 time in width), A.1B over 362 stitches (181 times in width), A.1C over 3 stitches (1 time in width), 1 stitch in stockinette stitch (= middle stitch), A.2A over 3 stitches, work A.2B over 362 stitches (181 times in width), A.2C over 2 stitches and finish with 2 edge stitches in garter stitch. Continue this pattern. When the last row in A.1 and A.2 remains there are 779 stitches on the row. Work the last row and increase at the same time 1 on each side of the middle stitch (2 stitches increased evenly and 2 stitches increased in diagrams) = 783 stitches. Now work A.1 and A.2 one more time in height; i.e. work as follows from the right side: 2 edge stitches in garter stitch, A.1A over 2 stitches (1 time in width), A.1B over 384 stitches (192 times in width), A.1C over 3 stitches (1 time in width), 1 stitch in stockinette stitch (= middle stitch), A.2A over 3 stitches, work A.2B over 384 stitches (192 times in width), A.2C over 2 stitches and finish with 2 edge stitches in garter stitch. Continue this pattern. When the last row in A.1 and A.2 has been completed there are 825 stitches on the row. The piece measures approx. 65 cm = 25½" measured along the middle stitch. Bind off as described below. ELASTIC BIND-OFF EDGE: To avoid the bind-off edge being tight, bind off with knit from the right side as follows: Knit 2, * insert the left needle in the 2 stitches on the right needle, from left to right and knit them together, knit 1 *, work from *-* until there is 1 stitch left on the row. Cut the strand and pull it through the last stitch. Fasten strands. SHAPING TIP: Moisten the piece and shape to the right measurements. |
|||||||||||||||||||||||||||||||
Diagram explanations |
|||||||||||||||||||||||||||||||
|
|||||||||||||||||||||||||||||||
 |
|||||||||||||||||||||||||||||||
 |
|||||||||||||||||||||||||||||||
 |
|||||||||||||||||||||||||||||||
 |
|||||||||||||||||||||||||||||||
 |
|||||||||||||||||||||||||||||||
 |
|||||||||||||||||||||||||||||||
 |
|||||||||||||||||||||||||||||||
 |
|||||||||||||||||||||||||||||||
 |
|||||||||||||||||||||||||||||||
 |
|||||||||||||||||||||||||||||||
Have you finished this pattern?Tag your pictures with #dropspattern #laceylaurelsshawl or submit them to the #dropsfan gallery. Do you need help with this pattern?You'll find 16 tutorial videos, a Comments/Questions area and more by visiting the pattern on garnstudio.com. © 1982-2026 DROPS Design A/S. We reserve all rights. This document, including all its sub-sections, has copyrights. Read more about what you can do with our patterns at the bottom of each pattern on our site. |
|||||||||||||||||||||||||||||||


With over 40 years in knitting and crochet design, DROPS Design offers one of the most extensive collections of free patterns on the internet - translated to 17 languages. As of today we count 325 catalogs and 12298 patterns - 12288 of which are translated into English (US/in).
We work hard to bring you the best knitting and crochet have to offer, inspiration and advice as well as great quality yarns at incredible prices! Would you like to use our patterns for other than personal use? You can read what you are allowed to do in the Copyright text at the bottom of all our patterns. Happy crafting!
Post a comment to pattern DROPS 203-14
We would love to hear what you have to say about this pattern!
If you want to leave a question, please make sure you select the correct category in the form below, to speed up the answering process. Required fields are marked *.