Comments / Questions (27)
![]() Bettina wrote:
Bettina wrote:
Wenn ich mit dem magischen Kreis beginne, arbeite ich von oben nach unten? Entsprechend muss ich die Diagramme auch von oben nach unten lesen. Oder ?
12.01.2026 - 16:24DROPS Design answered:
Liebe Bettina, die Fäustlingen sowie die Daumen werden ab der Spitze gestrickt, die Diagramme lesen Sie von oben nach unten und von rechts nach links jeder Runde. Viel Spaß beim Stricken!
14.01.2026 - 08:07
![]() Avril wrote:
Avril wrote:
I wanted to knit these mittens in a small size but the pattern is one size. I take it that means a large size. The hat is in varied sizes. How can I work the mittens in pattern to fit a small size? Thank you.
08.01.2026 - 16:24DROPS Design answered:
Dear Avril, these mittens measure approx. 22 cm circumference with 26 sts = 10 cm, so you can try with smaller needles / more sts for 10 cm if this can fit a smaller size in both width and height. Happy knitting!
09.01.2026 - 08:26
![]() Sandra wrote:
Sandra wrote:
Hi, I’ve noticed in the beginning the instructions say YARN GROUP A and then further down DROPS FABEL from Garnstudio (belongs to yarn group B). A typo?
28.07.2025 - 23:58DROPS Design answered:
Dear Sandra, Fabel belongs to yarn group A, a correction will be added, thanks for noticing. Happy knitting!
29.07.2025 - 09:20
![]() Diane Laplaine wrote:
Diane Laplaine wrote:
Je ne comprends pas comment joindre le pouce à la mufle, vous pourriez faire un video svp, ce serait plus facile de comprendre. Merci
27.01.2025 - 17:19DROPS Design answered:
Bonjour Mme Laplaine, le pouce va être ajouté ici à la mitaine, comme on ajoute la manche pour un raglan dans cette vidéo; autrement dit, mettez les mailles du pouce sur les aiguilles en plaçant les mailles rabattues à la fin du pouce au-dessus des mailles rabattues pour le pouce au dernier tour de la moufle. Bon tricot!
28.01.2025 - 08:53
![]() Doris Axelsson wrote:
Doris Axelsson wrote:
Hej, varför krångla till beskrivningen och börja uppifrån. Svårt att förstå hur man lägger till tummen och tumkilen. En video där ni visar detta krångliga sätt att lägga till tummen vore bra. Dessutom blir vanten väldigt liten och smal.
13.03.2023 - 08:09
![]() Maree wrote:
Maree wrote:
Can I start this pattern from the bottom rather than the top?
20.02.2023 - 17:23DROPS Design answered:
Dear Maree, probably, but you will then have to change all description/explanation to start with the end and read the diagrams top down - knit first a swatch to check if you like the coloured pattern worked from top down. Happy knitting!
21.02.2023 - 09:58
![]() KAREE B GANDER wrote:
KAREE B GANDER wrote:
I’m still struggling with how to start these mittens. I don’t understand your response So, I’ve got the 8 beginning stitches on my magic loop. What do I do next? Please help step by step or refer me to another source that could help. I appreciate your assistance. Thank you.
14.02.2023 - 05:55DROPS Design answered:
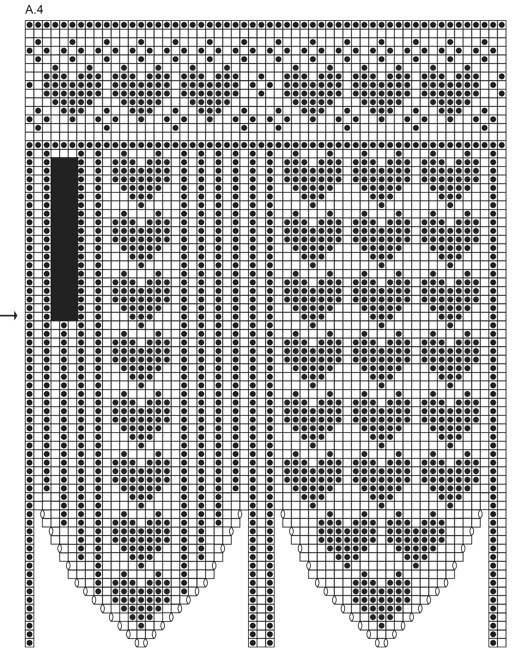
Dear Mrs Gander, read the diagram A.3/A.4 from the bottom corner on the right side towards the left on every round, for ex on first round work: K1 with MC, K1 with CC, (YO, K1, YO) with MC, K1 with CC, K1 with MC, K1 with CC, (YO, K1, YO) with MC, K1 with CC (you have increased 4 sts). Hope it will help. Happy knitting!
14.02.2023 - 14:17
![]() Karee Gander wrote:
Karee Gander wrote:
I’m starting 183-23. I’ve got the eight stitches on my needles. Now I’m to go to A3 who’s appears to be the bottom of the mitten band which has many more than 8 stitches. What am I supposed to do?
11.02.2023 - 20:43DROPS Design answered:
Dear Karee, there are 8 stitches in the first row of A.3; there is a lot of blank space between the stitches which is represented in this way so that the later rows are better visualized. Start as follows: 1 st in grand canyon, yarn over, 1 st in black, yarn over, 1 st in grand canyon, 1 st in black, 1 st in grand canyon, yarn over, 1 st in black, yarn over, 1 st in grand canyon, 1 st in black. So, you worked over 8 stitches and worked 4 yarn overs. Happy knitting!
12.02.2023 - 20:58
![]() Lilian wrote:
Lilian wrote:
Could i use 3,5mm needles and thicker yarn and downsize the stitches?
02.02.2023 - 02:49DROPS Design answered:
Hi Lilian, You will need to downsize the number of stitches (and rows) quite considerable if you both increase the yarn thickness and the needle size. Recommend that you work a swatch and adjust all stitch-numbers before you start working. Good luck and happy knitting!
02.02.2023 - 06:48
![]() Ghislaine Guay wrote:
Ghislaine Guay wrote:
Pourquoi que le diagramme est séparé en deux dans la grandeur s/m
27.02.2022 - 21:27DROPS Design answered:
Bonjour Mme Guay, lorsque A.1 est terminé, vous tricotez A.2, et vous devez répéter le diagramme A.2 tel qu'indiqué autrement dit, vous diminuez avant les 2 premiers coeurs, après ces 2 coeurs, puis après les 2 suivants, et continuez ainsi en répétant toutes les mailles de A.2 en largeur (ceci pour que les diminutions soient adaptées au jacquard). Bon tricot!
28.02.2022 - 10:34
Queen of Hearts#queenofheartsset |
||||||||||||||||||||||
 |
 |
|||||||||||||||||||||
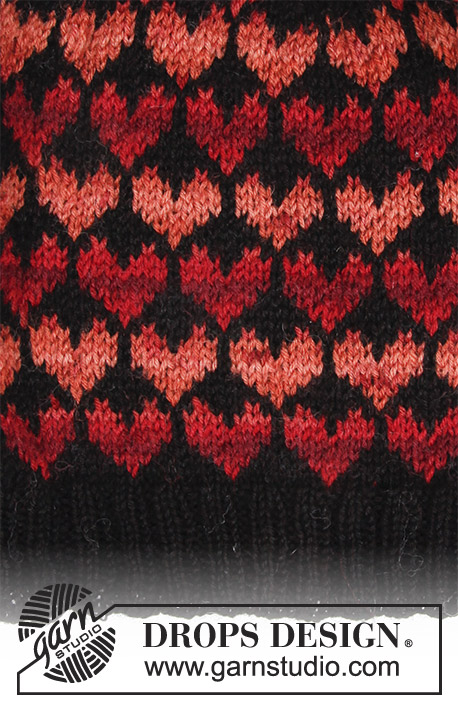
Set consists of: Hat and mittens with hearts. Piece is knitted in DROPS Fabel.
DROPS 183-23 |
||||||||||||||||||||||
|
INFORMATION FOR PATTERN: MAGIC CIRCLE: To avoid hole in the middle beg with this technique: Hold yarn end in the left hand and make a loop around left index finger (from left to right). Hold the loop with left thumb and index finger. Insert needle through loop, get yarn from ball (i.e. place yarn 1 time over needle from you), pull yarn back through loop, 1 yarn over (now place yarn from the back and towards you) and pull yarn over through stitches on needle, * insert needle through loop, 1 yarn over (place yarn from the back and towards you), pull yarn over through loop, 1 yarn over (from the back and towards you) and pull yarn over through outermost stitch on right needle (i.e. the last stitch made) *, repeat from *-* until there are 8 stitches on needle. Distribute stitches on 4 double pointed needles size 2.5 mm / US 1.5 as explained in pattern. Then work as explained in pattern – AT THE SAME TIME pull yarn end so that loop is tighten tog and the hole disappears. PATTERN: See diagrams A.1 to A.5. Diagrams show all rows in pattern seen from the right side. See diagrams A.1 and A.2 - choose diagram for your size. ---------------------------------------------------------- HAT: Worked in the round on circular needle, switch to double pointed needles when decreasing at the top of hat. Due to the pattern on the hat, it is available in sizes XS/S and M/L. Should you wish to make a size S/M (fits head size 54/56 cm = 21⅝"/22") you can follow instructions for XS/S but increase ½ needle size. Cast on 128-152 stitches on circular needle size 2 mm/ US 0 with black and knit 1 round. On next round work rib knit 2 and purl 2 until piece measures approx. 4 cm / 1½". Switch to circular needle size 2.5 mm / US 1.5, knit 1 round while decreasing 8 stitches evenly on round = 120-144 stitches. Work diagram A.1 (pattern in diagram is divisible with 8 stitches, but since the diagrams should fit above each other you must start on different part of the pattern depending on size). Work A.1 3-6 times in width. REMEMBER THE GAUGE! Work diagram 3 times vertically, piece measures approx. 17 cm / 6¾". Then work A.2 over A.1. When diagram has been worked vertically, 12 stitches remain on needle. Knit stitches together 2 by 2 = 6 stitches. Cut the yarn. Pull yarn through the remaining stitches a couple of times and fasten. ---------------------------------------------------------- MITTENS: Work mittens in the round on double pointed needles. Work hand from fingers and upwards to thumb gusset. Thumb is worked in the round from the top before binding off for thumb gusset and slip it together with the rest of mitten. Then continue in the round. MITTEN PART 1: Start with black and MAGIC CIRCLE - see explanation above = 8 stitches distributed on 4 double pointed needles 2.5 mm/ US 1.5 - NOTE: If you do not want to start with a magic circle cast on 8 stitches with black (when mitten is done baste a yarn up and down through stitches around hole at the tip and tighten tog). Then work pattern in the round according to diagram A.3 for left mitten and A.4 for right mitten. When increases in diagram are done, there are 56 stitches on round. REMEMBER THE GAUGE! Continue until round marked with arrow in diagram (piece measures approx. 12 from tip), on this round bind off 3 stitches for thumb gusset (the black squares in diagram shows where to bind off). Put mitten aside and work the thumb. THUMB: Start with black and MAGIC CIRCLE = 8 stitches distributed on double pointed needles 2.5 mm/ US 1.5. Work in the round according to diagram A.5. When increases in diagram are done, there are 20 stitches on round. On last round in diagram bind off 3 stitches for thumb gusset on round (the black squares in diagram shows where to bind off). 17 stitches remain on thumb. The thumb is now done. MITTEN PART 2: Now work thumb together with mitten, place thumb on needles where stitches for thumb gusset were bind off on mitten. Continue in the round according to diagram A.3/A.4 over stitches on mitten as before, skip the black squares, here work diagram A.6 (= thumb gusset). Star in A.6 should fit star in A.5 to continue pattern. When diagram A.6 is done, there are 56 stitches on round. Continue according to A.3/A.4. When diagram has been worked, switch to double pointed needle size 2 mm/US 0 and knit 1 round, then work rib knit 2 and purl 2 for 5 rounds. Loosely bind off stitches with K over K and P over P. Sew the opening between thumb and mitten. Cut the yarn and fasten yarn ends. |
||||||||||||||||||||||
Diagram explanations |
||||||||||||||||||||||
|
||||||||||||||||||||||
 |
||||||||||||||||||||||
 |
||||||||||||||||||||||
 |
||||||||||||||||||||||
 |
||||||||||||||||||||||
Have you finished this pattern?Tag your pictures with #dropspattern #queenofheartsset or submit them to the #dropsfan gallery. Do you need help with this pattern?You'll find 21 tutorial videos, a Comments/Questions area and more by visiting the pattern on garnstudio.com. © 1982-2026 DROPS Design A/S. We reserve all rights. This document, including all its sub-sections, has copyrights. Read more about what you can do with our patterns at the bottom of each pattern on our site. |
||||||||||||||||||||||


Post a comment to pattern DROPS 183-23
We would love to hear what you have to say about this pattern!
If you want to leave a question, please make sure you select the correct category in the form below, to speed up the answering process. Required fields are marked *.