
Oblíbené kategorie
Hledáte přízi?


|
||||||||||||||||||||||
Queen of Hearts |
||||||||||||||||||||||
 |
 |
|||||||||||||||||||||
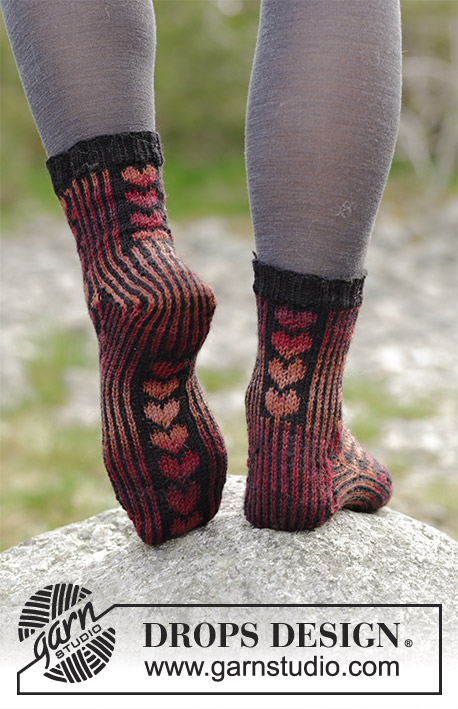
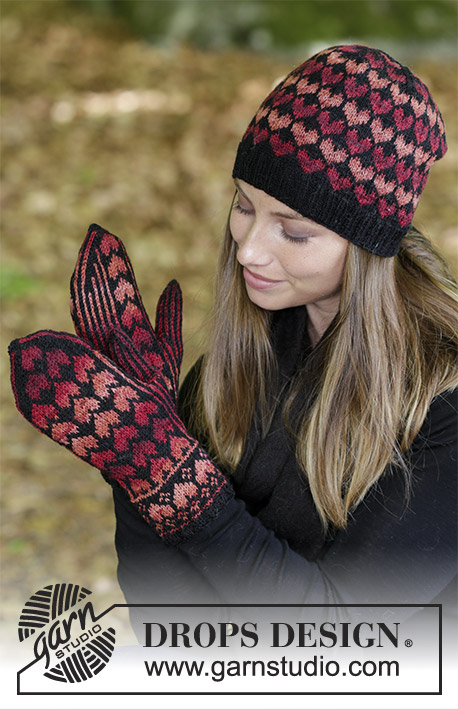
Souprava: čepice a rukavice – palčáky se srdíčky pletené z příze DROPS Fabel.
DROPS 183-23 |
||||||||||||||||||||||
|
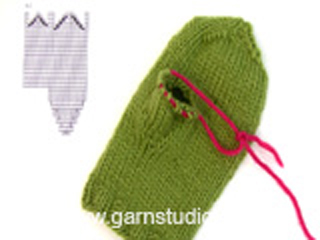
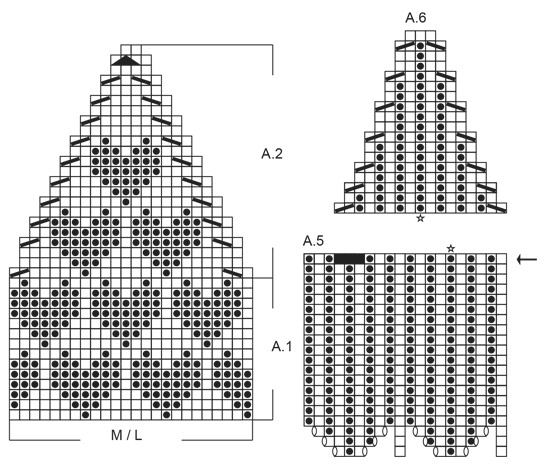
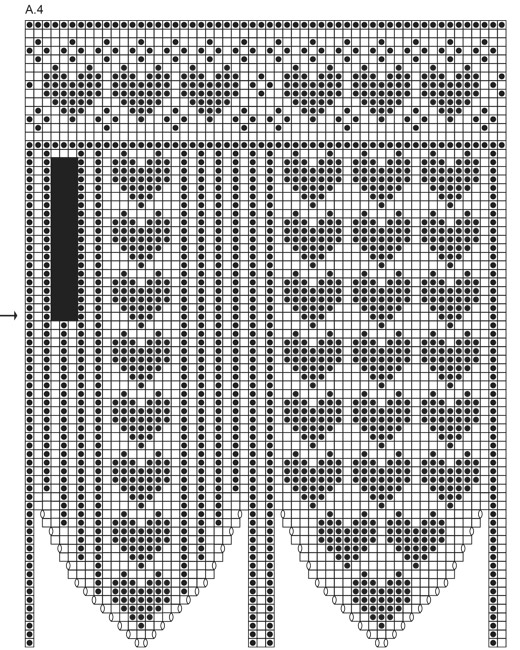
STAHOVACÍ SMYČKA, KOUZELNÝ KROUŽEK: Abychom zabránili vzniku velké dírky uprostřed pleteniny, začínáme touto stahovací smyčkou – je pohyblivá a tak díky ní můžeme velikost dírky upravit: uchopíme konec příze a obtočíme ji kolem ukazováku levé ruky (zleva doprava), čímž vytvoříme smyčku. Smyčku stáhneme z prstu a podržíme ji palcem a ukazovákem levé ruky. Pak do smyčky vsuneme jehlici, nabereme přízi a protáhneme ji smyčkou (= na jehlici nám vznikne oko), 1x nahodíme (přízi vedeme zezadu dopředu přes jehlici) a nahození protáhneme okem na jehlici, *jehlici vpíchneme do smyčky, nabereme přízi a protáhneme ji smyčkou (= na jehlici nám vznikne oko), 1x nahodíme (přízi vedeme zezadu dopředu přes jehlici) a nahození protáhneme novým okem na jehlici*, *-* opakujeme až do chvíle, kdy máme na jehlici 8 ok. Oka rozdělíme na 4 ponožkové jehlice č.2,5 a pleteme dle popisu v návodu. SOUČASNĚ zatáhneme za konec příze a smyčku stáhneme. VZOR: Viz schémata A.1 až A.5 – zobrazeny jsou všechny řady vzoru nahlížené z lícové strany. U schémat A.1 a A.2 si zvolte schéma pro požadovanou velikost. ---------------------------------------------------------- ČEPICE: Pleteme v kruhových řadách na kruhové jehlici, s ubývajícím počtem ok převedeme pleteninu na ponožkové jehlice. Na krátkou kruhovou jehlici č.2 nahodíme černou přízí 128-152 ok a upleteme 1 kruhovou řadu hladce. V následující kruhové řadě začneme plést lem pružným vzorem 2/2, tj. střídáme 2 oka hladce, 2 obrace. Ve výši asi 4 cm převedeme pleteninu na krátkou kruhovou jehlici č.2,5. Pleteme 1 kruhovou řadu hladce a SOUČASNĚ ujmeme rovnoměrně 8 ok = 120-144 ok. Pleteme vzor A.1 (počet ok ve vzoru je dělitelný 8, ale jelikož by schémata měla navazovat jedno na druhé – nad sebou – musíme začít v různých místech vzoru, podle jednotlivých velikostí). Sekvenci vzoru A.1 pleteme v kruhové řadě celkem 3-6x. Když dokončíme 3 celé sekvence vzoru (na výšku), měří díl asi 17 cm. Pak pleteme namísto vzoru A.1 vzor A.2. Po dokončení celé sekvence vzour (na výšku) zbývá na jehlici 12 ok. Všechna oka spleteme po 2 dohromady = 6 ok. Přízi odstřihneme, několikrát protáhneme zbylými oky, stáhneme a zapošijeme. ---------------------------------------------------------- RUKAVICE - PALČÁKY: Pleteme v kruhových řadách na ponožkových jehlicích. Začneme špičkou a postupujeme od prstů přes dlaň ke klínu pro palec. Palec upleteme v kruhových řadách také shora ještě před tím, než začneme tvarovat klín, a oba díly pak spojíme dohromady. Dál pleteme v kruhových řadách. RUKAVICE - 1. ČÁST: Začínáme černou přízí a STAHOVACÍ SMYČKOU – viz výše = 8 ok rozdělíme na 4 ponožkové jehlice č.2,5 – POZN.: pokud nechcete začínat stahovací smyčkou, nahoďte černou přízí 8 ok (po dokončení rukavice pak provlečte konec příze oky počáteční, nahozené řady, stáhněte je a přízi zapošijte). Pleteme v kruhových řadách vzor A.3 pro levou rukavici a vzor A.4 pro pravou rukavici. Když je dokončeno přidávání podle schématu, máme v kruhové řadě 56 ok. Pokračujeme v pletení až ke kruhové řadě označené ve schématu šipkou (díl měří asi 12 od špičky) – v této kruhové řadě uzavřeme 3 oka pro klín pro palec (= černé čtverečky ve schématu). Díl odložíme a upleteme palec. PALEC: Začínáme černou přízí a STAHOVACÍ SMYČKOU = 8 ok rozdělíme na 4 ponožkové jehlice č.2,5. Pleteme v kruhových řadách podle schématu A.5. Když je dokončeno přidávání podle schématu, máme v kruhové řadě 20 ok. V poslední kruhové řadě schématu uzavřeme pro klín 3 oka (= černé čtverečky ve schématu) = zbývá 17 ok palce. RUKAVICE - 2. ČÁST: Palec teď spojíme s rukavicí – oba díly převedeme na společné jehlice, palec umístíme tam, kde jsou uzavřená oka pro klín. Pokračujeme v kruhových řadách vzorem A.3/A.4 jako dříve, černé čtverečky ve schématech přeskočíme – namísto nich pleteme vzor A.6 (= klín pro palec). Hvězdička ve schématu A.6 musí být zarovnaná s hvězdičkou ve schématu A.5, aby vzor správně navazoval. Po dokončení celé sekvence vzoru A.6 (na výšku) máme v kruhové řadě 56 ok. Pokračujeme vzorem A.3/A.4. Po dokončení celé sekvence vzorů převedeme pleteninu na ponožkové jehlice č.2 upleteme 1 kruhovou řadu hladce. Pak upleteme 5 kruhových řad pružným vzorem 2/2 a poté všechna oka dle vzoru uzavřeme. Sešijeme otvor pro palec. Přízi odstřihneme a zapošijeme. |
||||||||||||||||||||||
Vysvětlivky ke schématu |
||||||||||||||||||||||
|
||||||||||||||||||||||

|
||||||||||||||||||||||
|
||||||||||||||||||||||

|
||||||||||||||||||||||
|
||||||||||||||||||||||
|
Vyrobili jste si tento nebo nějaký jiný z našich modelů? Přidejte ke svým fotkám na sociálních sítích tag #dropsdesign - díky tomu je uvidíme i my! Potřebujete s tímto návodem poradit?Otevřete-li si návod na stránce garnstudio.com, najdete tam výukových video-ukázek, Komentáře/Dotazy a další užitečné informace. © 1982-2024 DROPS Design A/S. Vyhrazujeme si veškerá práva. Tento dokument, včetně všech jeho dílčích částí, podléhá autorským právům. Podrobnější komentář k možnostem užití našich návodů najdete dole pod každým návodem na našich stránkách. |
||||||||||||||||||||||


V oblasti pletené a háčkované módy působí DROPS Design více než 40 let. Díky tomu vám můžeme nabídnout jednu z nejrozsáhlejších kolekcí modelů s bezplatnými návody dostupnými na internetu - navíc v 17 jazycích. K dnešnímu dni máme na 304 katalogů a 11422 návodů celkem - z nich je už 6292 dostupných v češtině.
Komentáře / Otázky (23)
Hej, varför krångla till beskrivningen och börja uppifrån. Svårt att förstå hur man lägger till tummen och tumkilen. En video där ni visar detta krångliga sätt att lägga till tummen vore bra. Dessutom blir vanten väldigt liten och smal.
13.03.2023 - 08:09Can I start this pattern from the bottom rather than the top?
20.02.2023 - 17:23DROPS Design answered:
Dear Maree, probably, but you will then have to change all description/explanation to start with the end and read the diagrams top down - knit first a swatch to check if you like the coloured pattern worked from top down. Happy knitting!
21.02.2023 - 09:58I’m still struggling with how to start these mittens. I don’t understand your response So, I’ve got the 8 beginning stitches on my magic loop. What do I do next? Please help step by step or refer me to another source that could help. I appreciate your assistance. Thank you.
14.02.2023 - 05:55DROPS Design answered:
Dear Mrs Gander, read the diagram A.3/A.4 from the bottom corner on the right side towards the left on every round, for ex on first round work: K1 with MC, K1 with CC, (YO, K1, YO) with MC, K1 with CC, K1 with MC, K1 with CC, (YO, K1, YO) with MC, K1 with CC (you have increased 4 sts). Hope it will help. Happy knitting!
14.02.2023 - 14:17I’m starting 183-23. I’ve got the eight stitches on my needles. Now I’m to go to A3 who’s appears to be the bottom of the mitten band which has many more than 8 stitches. What am I supposed to do?
11.02.2023 - 20:43DROPS Design answered:
Dear Karee, there are 8 stitches in the first row of A.3; there is a lot of blank space between the stitches which is represented in this way so that the later rows are better visualized. Start as follows: 1 st in grand canyon, yarn over, 1 st in black, yarn over, 1 st in grand canyon, 1 st in black, 1 st in grand canyon, yarn over, 1 st in black, yarn over, 1 st in grand canyon, 1 st in black. So, you worked over 8 stitches and worked 4 yarn overs. Happy knitting!
12.02.2023 - 20:58Could i use 3,5mm needles and thicker yarn and downsize the stitches?
02.02.2023 - 02:49DROPS Design answered:
Hi Lilian, You will need to downsize the number of stitches (and rows) quite considerable if you both increase the yarn thickness and the needle size. Recommend that you work a swatch and adjust all stitch-numbers before you start working. Good luck and happy knitting!
02.02.2023 - 06:48Pourquoi que le diagramme est séparé en deux dans la grandeur s/m
27.02.2022 - 21:27DROPS Design answered:
Bonjour Mme Guay, lorsque A.1 est terminé, vous tricotez A.2, et vous devez répéter le diagramme A.2 tel qu'indiqué autrement dit, vous diminuez avant les 2 premiers coeurs, après ces 2 coeurs, puis après les 2 suivants, et continuez ainsi en répétant toutes les mailles de A.2 en largeur (ceci pour que les diminutions soient adaptées au jacquard). Bon tricot!
28.02.2022 - 10:34Det er størrelse M/L eg prøved meg på fikk ikkje den til
19.10.2020 - 14:31DROPS Design answered:
Hej Therese, når du kommer til fellingen kan du ikke strikke lige så mange hjerter, efter de 2 hjerter får du 15 masker (mellem hjerterne) som tages ind til 13 masker. Sørg for at spidserne på de 2 hjerter kommer imellem hjerterne på rækken nedenfor. God fornøjelse!
22.10.2020 - 15:14Eg trur oppskriften på luen er ikkje heilt riktige og det.får ikkje heilt til
16.10.2020 - 11:21Eg får ikkje mønster til å stemme på luen
16.10.2020 - 09:16Eg får ikkje mønster til å stemme når eg skal begynne å fellingen
16.10.2020 - 08:46DROPS Design answered:
Hei Therese. Hvilken størrelse strikker du? Når du skal starte med fellingene, 4. omgang av A.2 vil det være ulike sorte masker mellom hvert hjerte. Husk å hake av for "Spørsmål" når du har spørsmål til en oppskrift, hakes det av for "Kommentarer" vil det ikke bli besvart. mvh DROPS design
19.10.2020 - 11:37