
Popular categories
Looking for a yarn?


Comments / Questions (32)
![]() Rosanne wrote:
Rosanne wrote:
Dank u wel. Als ik de verhoging heb gemaakt moet ik 4 steken minderen over elk van de A2 en A3. Echter: dit is tevens de 9e naald van A2 en A3, en moet ik de kabels maken. Hoe combineer ik dit? Waar plaats ik de minderingen?
06.02.2020 - 16:12DROPS Design answered:
Dag Rosanne,
Het idee is dat je aan het einde van de kabels, dus vlak voordat je de hals rand maakt en klaar bent met de kabels, 4 steken boven elke kabel mindert. Dit doe je door 4 keer 2 steken samen te breien.
09.02.2020 - 11:10
![]() Rosanne wrote:
Rosanne wrote:
En graag ook advies over de minderingen vervolgens in A2 en A3: hoe verdeel ik de 4 minderingen? Over de kabels of ook in de 2 x 2 avrechte steken? Hartelijk dank!
29.01.2020 - 09:31DROPS Design answered:
Dag Rosanne,
Deze zou ik zo veel mogelijk over de kabels zelf verdelen en niet over de averechte steken.
24.02.2020 - 08:25
![]() Rosanne wrote:
Rosanne wrote:
Hallo. Dank voor het mooie filmpje! De pas is me gelukt. Ik loop echter vast bij de verhoging. Ik moet voor de verhoging vanaf midden achter 36 steken breien (maat S) en dan keren. Ik kom dan halverwege A3 uit, halverwege de kabelrand op de mouw voor. Moet ik daar echt keren? Idem voor de teruggaande steken: 73 steken terug komt uit bij de kabelrand op de andere mouw voor. Dan worden de kabelranden toch vreemd uitgerekt? Kunt u mij helpen? Hartelijk dank.
27.01.2020 - 16:40DROPS Design answered:
Dag Rosanne,
Ja, het is inderdaad de bedoeling om daar te keren. Er staat trouwens dat je tricotsteek moet breien, maar je kunt bij de kabel de steken averecht breien, die in de kabel ook averecht zijn gebreid. Op die manier sluit het patroon beter aan.
04.02.2020 - 22:59
![]() Anne Marie wrote:
Anne Marie wrote:
Obs, mener dette må være en feil i oppskriften. Under "erme" : "Når arbeidet måler 8 cm økes det 2 masker på hver side av merketråden – les ØKETIPS.". Vil tro det er meningen at man skal øke 1 maske på hver side av merketråden? Altså 2 masker på en omgang.
30.10.2019 - 19:32DROPS Design answered:
Hej. Tack för info, oppskriften kommer att rättas. Mvh DROPS Design
31.10.2019 - 06:52
![]() Coraline wrote:
Coraline wrote:
Bonjour . J’ai fini le pull il est parfait . Par contre ma taille (je suis petite et mince) j’ai du tricoter avec des aiguilles n•4 donc j’ai pu suivre parfaitement le nombre de maille du modèle mais je n’ai pas pu avoir l’échantillon . Est ce que c’est une erreur ? Ou est ce je dois utiliser toujours une taille d’aiguille plus petite que celle proposée dans les modèles pour ma taille ? Tous les autres modèles en taille small sont toujours trop grands ..,.
21.06.2019 - 14:48DROPS Design answered:
Bonjour Coraline, en prenant une aiguille plus fine (et donc sans l'échantillon), vous modifiez automatiquement les mesures finales du schéma, toutefois, la texture de votre ouvrage peut être également plus dense (car la tension est plus serrée) que dans le modèle présenté. N'hésitez pas à demander conseil à votre magasin si besoin - même par mail ou téléphone, on pourra également vous aider à ajuster à votre taille. Bon tricot!
24.06.2019 - 08:43
![]() Coraline wrote:
Coraline wrote:
Vraiment un grand merci pour votre aide détaillée ! C’est très apprécié car ce n’est pas toujours facile quand on débute et grâce à vos conseils c’est encourageant et on peut petit à petit gagner en confiance en soi . Merci infiniment!
19.06.2019 - 13:08
![]() Coraline wrote:
Coraline wrote:
Et concernant l’étape « Au tour suivant, diminuer 4 mailles au-dessus de chaque A.2 et A.3 = 98 mailles » Comment diminue t on ? A2 exemple a 16 mailles ? Est ce que toutes les 4 mailles on tricote 2 mailles ensemble ? Même si ça concerne les mailles envers ? Ou juste des mailles endroits ? Merci beaucoup
19.06.2019 - 03:33DROPS Design answered:
Bonjour Coraline, vous devez diminuer 4 m dans les torsades de A.2 et A.3 pour bien conserver la bonne largeur (les torsades nécessitent plus de mailles pour la même largeur), diminuez en tricotant 4 fois 2 m ens à l'end au-dessus des 12 m endroit de A.2/A.3. Bon tricot!
19.06.2019 - 08:04
![]() Coraline wrote:
Coraline wrote:
En essayant à partir de 16 mailles dans le dos , j’ai tricoté 36 mailles et je suis arrivé à 11 mailles du diagramme de A3 après les 7 maille jersey du dos les 16 mailles de A2 et les 2 mailles de manche et donc 11 mailles de A3 avant de tourner et aller dans l’autre sens ? Est ce que c’est correct ?
19.06.2019 - 03:20DROPS Design answered:
Bonjour Coraline, j'ai trouvé comme vous, donc c'est ce que j'aurai à priori fait, en attendant une réponse de nos stylistes.
19.06.2019 - 08:03
![]() Coraline wrote:
Coraline wrote:
Bonjour merci pour votre aide je suis rendue à la rehausse et j’ai des difficultés . J’ai bien 114 mailles après l’etape raglan dont 23 mailles pour le dos et 23 pour le devant et il y a les 4 A2 de 16 mailles = 64 mailles et 2 mailles pour chaque manche . Pour la rehausse il faut commencer à 16 mailles milieu dos mais comme le dos a 23 mailles 16 mailles n’est pas le milieu ... est ce normal ?
19.06.2019 - 01:18DROPS Design answered:
Bonjour Coraline, nos stylistes vont vérifier le nombre de mailles de la réhausse, merci pour votre retour.
19.06.2019 - 08:02
![]() Coraline wrote:
Coraline wrote:
Merci je comprends . Pour les manches on fonctionne de la même façon ? On commence par rabattre 4 mailles après le fil marqueur on continue la manche et on termine par 4 rabats et on rentre le fil ? Merci beaucoup
14.06.2019 - 14:24DROPS Design answered:
Bonjour Coraline, tout à fait. Bon tricot!
14.06.2019 - 15:16
|
||||||||||||||||
Solfest#solfestsweater |
||||||||||||||||
 |
 |
|||||||||||||||
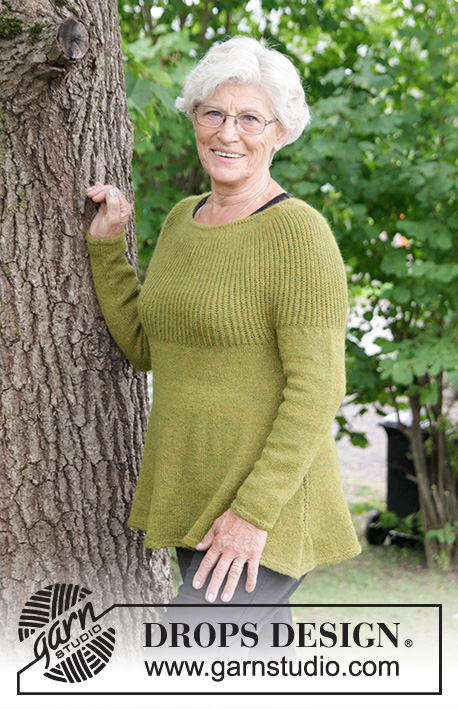
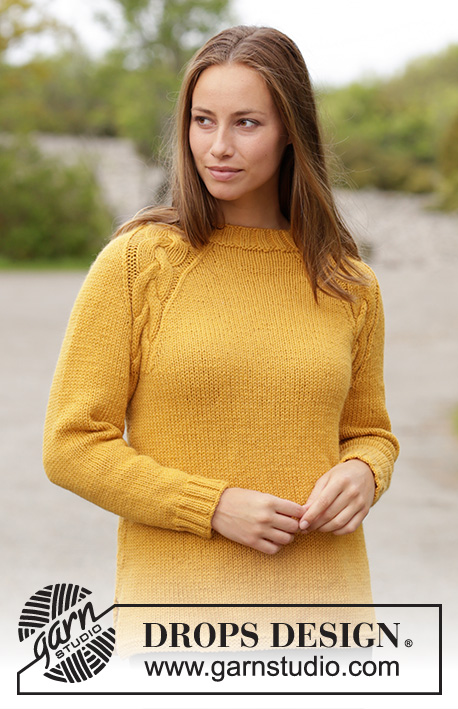
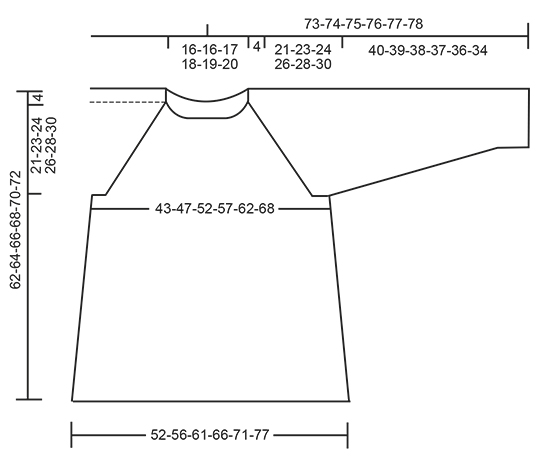
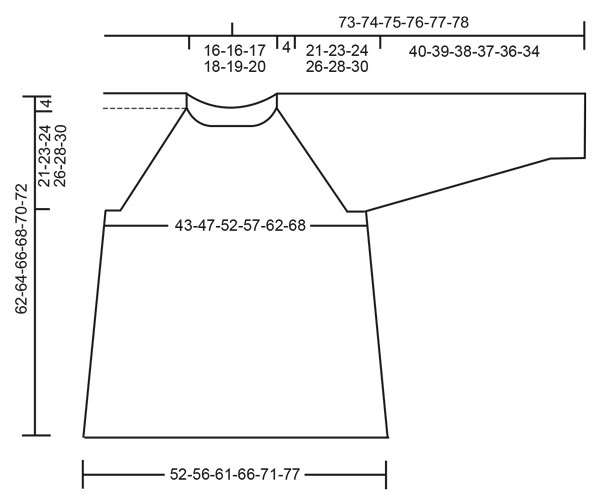
Knitted jumper with cables and raglan. Sizes S - XXXL. The piece is worked in DROPS Nepal.
DROPS 180-16 |
||||||||||||||||
|
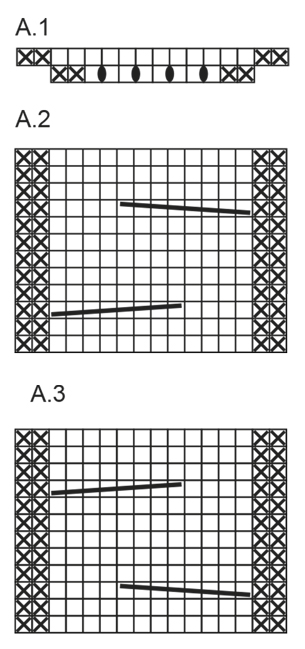
INFORMATION FOR THE PATTERN: RIDGE/GARTER STITCH (worked in the round): 1 ridge = 2 rounds. Knit 1 round and purl 1 round. DECREASE TIP (for body): Decrease as follows by both marker threads: Work until there are 3 stitches left before the marker thread: Knit 2 together, knit 2 (the marker thread sits in the middle of these stitches), slip 1 stitch as if to knit, knit 1, pass the slipped stitch over the knitted stitch. INCREASE TIP (for sleeves): Increase as follows mid under the sleeve – start 1 stitch before the marker thread: Make 1 yarn over, knit 2 stitches (the marker thread sits in the middle of these 2 stitches), make 1 yarn over (= 2 stitches increased). On the next round, knit the yarn overs twisted to prevent holes. RAGLAN: Decrease 2 stitches in each transition between body and sleeves. Start 2 stitches before A.2/A.3, knit 2 together, work A.2/A.3, slip 1 stitch as if to knit, knit 1, pass the slipped stitch over the knitted stitch. ELEVATION (for back of neck): Cut the strand. Continue working as follows – starting after 11-13-16-18-19-20 stitches on the back piece (= mid back): Work stockinette stitch, A.2 and A.3 as before. Insert 1 marker in the next stitch on the row (= mid back). Start from the right side and work 36-37-39-41-43-45 stitches past the marker, turn, tighten the strand and work 73-75-79-83-87-91 stitches. Turn, tighten the strand and work 67-69-73-77-81-85 stitches, turn, tighten the strand and work 61-63-67-71-75-79 stitches. Turn, tighten the strand and work to mid back. Cut the strand. The round now starts at the same place as before, i.e. 16-17-19-21-23-25 stitches towards the right (seen from the right side) at the marker mid back. PATTERN: See diagrams A.1 to A.3. ---------------------------------------------------------- JUMPER: The piece is worked bottom up. The body is worked in the round with circular needle and the sleeves are worked in the round with double pointed needles before they are worked together and you work the yoke in the round with circular needle. BODY: Cast on 166-178-194-210-226-246 stitches with circular needle size 4.5 mm / US 7 and Nepal. Work 3 RIDGES – see description above. Change to circular needle SIZE 5.5 mm/ US 9 and work stockinette stitch. Insert 1 marker thread at the beginning of the round and 1 marker thread after 83-89-97-105-113-123 stitches (the marker threads mark the sides of the garment). REMEMBER THE GAUGE! When the piece measures 11 cm / 4½" decrease 1 stitch on each side of each marker thread (= 4 stitches decreased) – read DECREASE TIP. Decrease in this way every 4 cm / 1½" a total of 7 times = 138-150-166-182-198-218 stitches. When the piece measures 37-37-38-38-38-38 cm / 14½"-14½"-15"-15"-15"-15" bind off 4-4-5-5-6-7 stitches on each side of each marker thread (= 8-8-10-10-12-14 stitches in each side) = 61-67-73-81-87-95 stitches on the front/back piece. Lay the piece to one side and work the sleeves. SLEEVES: The piece is worked in the round with double pointed needles. Cast on 44-44-48-48-52-52 stitches with double pointed needles size 4.5 mm / US 7 and Nepal. Knit 1 round, then work rib (= knit 2/ purl 2). When the piece measures 6 cm / 2⅜" change to double pointed needles SIZE 5.5 mm/US 9 / US 9. Knit 1 round and decrease 8-8-8-6-8-8 stitches evenly on round = 36-36-40-42-44-44 stitches. Work stockinette stitch. Insert 1 marker thread at the beginning of the round (= mid under the sleeve). When the piece measures 8 cm / 3⅛" increase 1 stitch on each side of the marker thread – read INCREASE TIP. Increase in this way every 4-3-2½-2-2-1½ cm / 1½"-1"-⅞"-¾"-¾"-½" a total of 8-11-12-13-13-15 times = 52-58-64-68-70-74 stitches. When the piece measures 40-39-38-37-36-34 cm / 15¾"-15¼"-15"-14½"-14¼"-13½" (shorter measurements in larger sizes because of longer yoke) bind off the middle 8-8-10-10-12-14 stitches under the sleeve (= 4-4-5-5-6-7 stitches on each side of the marker thread) = 44-50-54-58-58-60 stitches. Lay the piece to one side and work 1 more sleeve. YOKE: Place the sleeves on the same circular needle SIZE 5.5 mm/US 9 as the body where you have bind off stitches for the armholes = 210-234-254-278-290-310 stitches. Continue working as follows – start the round after 5-4-3-3-4-5 stitches on the back piece: Work * 51-59-67-75-79-85 stitches stockinette stitch, A.1 (= 12 stitches), 30-34-36-40-42-46 stitches stockinette stitch, A.1 over the next 12 stitches *, work from *-* a total of 2 times. When A.1 has been completed in height 1 time, there are 226-250-270-294-306-326 stitches on the needle. Now continue working as follows: Work * 51-59-67-75-79-85 stitches stockinette stitch, A.2 (= 16 stitches), 30-34-36-40-42-46 stitches stockinette stitch, A.3 (= 16 stitches) *, work from *-* a total of 2 times. Continue with pattern and decrease to RAGLAN – see description above. Decrease every 4th round 6-6-6-6-7-7 times, then every 2nd round 8-10-11-13-13-15 times (= a total of 14-16-17-19-20-22 times). After all the decreases, there are 114-122-134-142-146-150 stitches on the round. For a better fit, you can now work an ELEVATION in the back of the neck – see description above. On the next round, decrease 4 stitches over each of A.2 and A.3 = 98-106-118-126-130-134 stitches. The next round is worked as follows: Work * 33-35-39-43-47-51 stitches stockinette stitch and decrease 3-4-7-9-10-11 stitches evenly on round, knit the next 16-18-20-20-18-16 stitches together 2 and 2, *, work from *-* a total of 2 times = 76-80-84-88-92-96 stitches. Purl 1 round. The yoke measures approx. 21-23-24-26-28-30 cm / 8¼"-9"-9½"-10¼"-11"-11¾". NECK: Knit 1 round and increase 8 stitches evenly on round = 84-88-92-96-100-104 stitches. Change to short circular needle size 4.5 mm / US 7. Work rib (= knit 2 / purl 2) for 4 cm / 1½", then bind off with knit over knit and purl over purl. |
||||||||||||||||
Diagram explanations |
||||||||||||||||
|
||||||||||||||||
 |
||||||||||||||||
 |
||||||||||||||||
 |
||||||||||||||||
Have you finished this pattern?Tag your pictures with #dropspattern #solfestsweater or submit them to the #dropsfan gallery. Do you need help with this pattern?You'll find 31 tutorial videos, a Comments/Questions area and more by visiting the pattern on garnstudio.com. © 1982-2026 DROPS Design A/S. We reserve all rights. This document, including all its sub-sections, has copyrights. Read more about what you can do with our patterns at the bottom of each pattern on our site. |
||||||||||||||||


With over 40 years in knitting and crochet design, DROPS Design offers one of the most extensive collections of free patterns on the internet - translated to 17 languages. As of today we count 324 catalogs and 12290 patterns - 12280 of which are translated into English (US/in).
We work hard to bring you the best knitting and crochet have to offer, inspiration and advice as well as great quality yarns at incredible prices! Would you like to use our patterns for other than personal use? You can read what you are allowed to do in the Copyright text at the bottom of all our patterns. Happy crafting!
Post a comment to pattern DROPS 180-16
We would love to hear what you have to say about this pattern!
If you want to leave a question, please make sure you select the correct category in the form below, to speed up the answering process. Required fields are marked *.