DROPS Alpaca
DROPS Alpaca
100% Alpaca
from 4.85 $ /50g
Get the yarn to make this pattern from 38.80$.

The yarn cost is calculated from the pattern’s smallest size and the yarn’s cheapest product type. Looking for an even better price? You might find it on the DROPS Deals!

DROPS SS24

Evergreen

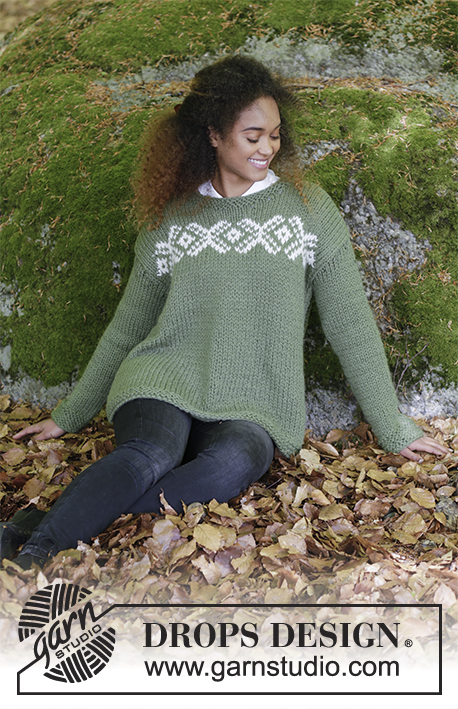
Knitted jumper with round yoke, English rib and A-shape, worked top down. Sizes S - XXXL. The piece is worked in DROPS Alpaca.

DROPS 180-11
DROPS Design: Pattern no z-800
Yarn group A
-----------------------------------------------------------
Sizes: S - M - L - XL - XXL - XXXL
Materials:
DROPS ALPACA from Garnstudio (belongs to yarn group A)
400-450-500-550-600-650 g color 7233, olive

The piece can also be knitted with yarn from:
"Alternative yarn (Yarn group A)" – see the link below.

DROPS DOUBLE POINTED NEEDLES AND CIRCULAR NEEDLE (40 + 80 cm / 16" + 32") SIZE 3 mm/US 2.5 – or the size needed to get 24 stitches and 32 rows stockinette stitch on 10 cm / 4" in width and 10 cm / 4" in height. And 20 stitches English rib on 10 cm / 4" in width.

DROPS DOUBLE POINTED NEEDLES AND CIRCULAR NEEDLE (40 + 80 cm / 16" + 32") SIZE 2.5 mm/ US 1.5 – for rib edges and the first part of the yoke.

-------------------------------------------------------

Alternative Yarn – See how to change yarns here
Yarn Groups A to F – Use the same pattern and change the yarn here
Yarn usage using an alternative yarn – Use our yarn converter here

-------------------------------------------------------

DROPS Alpaca
DROPS Alpaca
100% Alpaca
from 4.85 $ /50g
Get the yarn to make this pattern from 38.80$.

The yarn cost is calculated from the pattern’s smallest size and the yarn’s cheapest product type. Looking for an even better price? You might find it on the DROPS Deals!

Pattern instructions

NOTE: This pattern is written in American English. All measurements in charts are in cm. For conversion from inches to cm - click here. There are different terms for crocheting in American and British English. If this pattern includes crochet, click for "crochet terms" here. For this pattern in British English, please click here.
INFORMATION FOR THE PATTERN:

RIDGE/GARTER STITCH (worked in the round):
1 ridge = 2 rounds. Knit 1 round and purl 1 round.

INCREASE TIP:
To work out how to increase evenly, count the total number of stitches on the needle (e.g. 140 stitches) and divide by the number of increases to be made (e.g. 20) = 7. In this example, increase after every 7th stitch by making 1 yarn over. On the next round knit the yarn overs twisted to prevent holes.

ELEVATION:
Insert 1 marker at the beginning of the round = mid back. Start from the right side and knit 8-8-9-9-10-11 stitches past the marker, turn, tighten the strand and purl 16-16-18-18-20-22 stitches. Turn, tighten the strand and knit 24-24-27-27-30-33 stitches, turn, tighten the strand and purl 32-32-36-36-40-44 stitches. Continue back and forth in this way by working 8-8-9-9-10-11 stitches more each time you turn (remember to tighten the strand each time you turn) until you have worked back and forth over a total of 64-64-72-72-80-88 stitches and the last row is worked from the wrong side. Turn, tighten the strand and knit to mid back.

ENGLISH RIB:
ROUND 1: * make 1 yarn over, slip 1 stitch as if to purl (insert the right needle into the stitch on the left needle, from right to left), knit 1 *, repeat from *-* to end of round.
ROUND 2: * Purl the yarn over and slipped stitch together, make 1 yarn over, slip 1 stitch as if to purl *, repeat from *-* to end of round.
ROUND 3: * Make 1 yarn over, slip 1 stitch as if to purl, knit the yarn over and the slipped stitch together *, repeat from *-* to end of round.
Repeat round 2 and 3.

DECREASE TIP (for mid under the sleeve):
Start 3 stitches before the marker thread, knit 2 together, knit 2 (the marker thread sits between these 2 stitches), slip 1 stitch as if to knit, knit 1, pass the slipped stitch over the knitted stitch (= 2 stitches decreased).
----------------------------------------------------------

JUMPER:
The piece is worked in the round with circular needle, top down. The sleeves are worked in the round with short circular needle, top down. Change to double pointed needles when necessary.

NECKLINE:
Cast on 108-116-122-128-134-140 stitches with circular needle size 2.5 mm / US 1.5 and Alpaca. Work 3 RIDGES – see description above. Then knit 1 round where you increase 2-4-8-12-16-20 stitches evenly on round – read INCREASE TIP = 110-120-130-140-150-160 stitches. Continue the yoke as described below.

YOKE:
Keep the stitches on circular needle size 2.5 mm / US 1.5. For a better fit, you can now work an ELEVATION in the back of the neck – see description above.
When the elevation has been completed, work stockinette stitch in the round. When the piece measures 2 cm / ¾" from the cast-on edge mid front, increase 110-120-130-140-150-160 stitches evenly on round by making 1 yarn over after every stitch on the needle = 220-240-260-280-300-320 stitches.
Continue working stockinette stitch, but on the first round, knit the yarn overs twisted to prevent holes. REMEMBER THE GAUGE!
When the piece measures 3 cm / 1" from the cast-on edge mid front, work the next round as follows: * purl 1, knit 1 *, repeat from *-* to end of round.
When you have worked 4-4-4-6-6-6 rounds of rib, continue with ENGLISH RIB – see description above. When the piece measures 6-6-6-7-7-7 cm / 2⅜"-2⅜"-2⅜"-2¾"-2¾"-2¾" from the cast-on edge mid front, change to circular needle size 3 mm / US 2.5. Continue with English rib.
When the piece measures 21-23-25-27-29-31 cm / 8¼"-9"-9¾"-10⅝"-11⅜"-12¼" from the cast-on edge mid front (adjust so that last round is 2nd round of English rib) and work the next round as follows: * Purl the yarn over and slipped stitch together, knit 1 *, repeat from *-* to end of round. Then knit 1 round where you increase 112-132-140-152-168-176 stitches evenly on round – remember INCREASE TIP = 332-372-400-432-468-496 stitches. The next round is worked as follows: Knit 49-54-57-63-70-76 stitches (= ½ back piece), place the next 68-78-86-90-94-96 stitches on a thread for sleeve, cast on 8-8-10-10-12-14 new stitches on the needle (= in the side under the sleeve), knit 98-108-114-126-140-152 stitches (= front piece), place the next 68-78-86-90-94-96 stitches on a thread for sleeve, cast on 8-8-10-10-12-14 stitches on the needle (= in the side under the sleeve) and knit the remaining 49-54-57-63-70-76 stitches (= ½ back piece). Cut the strand. Body and sleeves are now finished separately. THE PIECE IS NOW MEASURED FROM HERE!

BODY:
= 212-232-248-272-304-332 stitches. Insert 1 marker thread in the middle of the 8-8-10-10-12-14 stitches which were cast on under the sleeve in each side and allow the marker threads to follow your work upwards. Start the round by one of the marker threads and work stockinette stitch in the round. When the piece measures 2 cm / ¾" from the separation, work A.1 over the middle 4 stitches in each side, i.e. start 2 stitches before the marker thread at the beginning of the round, work A.1, work stockinette stitch until there are 2 stitches left before the marker thread in the other side, work A.1 and work stockinette stitch to end of round = 4 stitches increased. Continue in this way with stockinette stitch and A.1 in each side, i.e. you will get a row of holes in each side of the body and increase 2 stitches in each side every 4th round. When the piece measures 37 cm / 14½" from the separation there are approx. 324-344-360-384-416-444 stitches on the needle (if the knitting gauge is right, this will be the equivalent of 28 increase-rounds in each side).
Work 3 ridges in the round. Then bind off with knit, but to avoid the bind-off edge being tight, make 1 yarn over after approx. every 8th stitch at the same time as you bind off (the yarn overs are bind off as normal stitches). The jumper measures approx. 60-62-64-66-68-70 cm / 23⅝"-24⅜"-25¼"-26"-26¾"-27½" from the shoulder down.

SLEEVES:
Place the 68-78-86-90-94-96 stitches from the thread in the one side of the piece on short circular needle size 3 mm / US 2.5, in addition knit up 1 stitch in each of the 8-8-10-10-12-14 stitches which were cast on under the sleeve = 76-86-96-100-106-110 stitches. Insert 1 marker thread in the middle of the 8-8-10-10-12-14 stitches. Start the round by the marker thread and work stockinette stitch in the round. When the piece measures 2-2-3-3-4-4 cm / ¾"-¾"-1⅛"-1⅛"1½"-1½" from the separation, decrease 2 stitches mid under the sleeve – read DECREASE TIP. Decrease in this way every 3-2-1½-1½-1-1 cm / 1"-¾"-½"-½"-⅜"-⅜" a total of 13-17-20-21-22-22 times = 50-52-56-58-62-66 stitches. Continue working until the sleeve measures 42-40-39-37-35-34 cm / 16½"-15¾"-15¼"-14½"-13¾"-13½" from the separation (shorter measurements in larger sizes because of longer yoke). Change to double pointed needles size 2.5 mm / US 1.5 and work 3 ridges in the round. Then bind off with knit, but to avoid the bind-off edge being tight, make 1 yarn over after every 8th stitch at the same time as you bind off. The sleeve measures approx. 43-41-40-38-36-35 cm / 17"-16"-15¾"-15"-14¼"-13¾" from the separation. Work the other sleeve in the same way.

SHAPING:
To get an even texture to the English rib, dampen the whole garment. Gently press out the extra water (without twisting the garment). Then lay the jumper flat, in shape and according to measurements until it is dry.

Diagram

All measurements in charts are in cm.

symbols = knit
symbols = between 2 stitches make 1 yarn over
symbols = knit 2 together
symbols = slip 1 stitch as if to knit, knit 1, pass the slipped stitch over the knitted stitch
diagram

Each of our patterns has specific tutorial videos to help you.

Do you have a question? See a list of frequently asked questions (FAQ)

Knitting tension is what determines the final measurements of your work, and is usually measured per 10 x 10 cm. It is provided like so: number of stitches in width x number of rows in height - eg: 19 stitches x 26 rows = 10 x 10 cm.

The knitting tension is very individual; some people knit/crochet loosely while others work tightly. You adjust the knitting tension with the needle size, which is why the suggested needle size only serve as a guide! You need to adjust this (up or down) to ensure that YOUR knitting tension matches the knitting tension provided in the pattern. If you work with a different knitting tension than provided you will have a different yarn consumption, and your work will have different measurements than what the pattern suggests.

The knitting tension also determines which yarns can replace each other. As long as you achieve the same knitting tension you can replace one yarn with another.

See DROPS lesson: How to measure your tension/gauge

See DROPS video: How to make a gauge tension swatch

The required amount of yarn is provided in grams, eg: 450 g. To calculate how many balls you’ll need you first need to know how many grams are in 1 ball (25g, 50g or 100g). This information is available if you click on the individual yarn quality on our pages. Divide the amount required with the amount of each ball. For example, if each ball is 50g (the most common amount), the calculation will be as follows: 450 / 50 = 9 balls.

The important thing when changing from one yarn to another is that the knitting/crochet tension remains the same. This is so that the measurements of the finished piece will be the same as on the sketch provided. It is easier to achieve the same knitting tension using yarns from the same yarn group. It is also possible to work with multiple strands of a thinner yarn to achieve the knitting tension of a thicker one. Please try our yarn converter. We recommend you to always work a test swatch.

Please NOTE: when changing yarn the garment might have a different look and feel to the garment in the photo, due to individual properties and qualities of each yarn.

See DROPS lesson: Can I use a different yarn than the one mentioned in the pattern?

All our yarns are categorised into yarn groups (from A to F) according to thickness and knitting tension – group A contains the thinnest yarns and group F the thickest. This makes it easier for you to find alternative yarns to our patterns, should you wish to switch yarn. All yarns within the same group have a similar knitting tension and can easily replace each other. However, different yarn qualities have different structures and properties which will give the finished work a unique look and feel.

Click here for an overview of the yarns in each yarn group

At the top of all our patterns you’ll find a link to our yarn converter, which is a helpful tool should you wish to use a different yarn than suggested. By filling in the yarn quality you wish to replace, the amount (in your size) and number of strands, the converter will present good alternative yarns with the same knitting tension. Additionally it will tell you how much you’ll require in the new qualities and whether you’ll need to work with multiple strands. Most skeins are 50g (some are 25g or 100g).

If the pattern is worked with multiple colours, every colour will have to be converted separately. Similarly, if the pattern is worked with several strands of different yarns (for example 1 strand Alpaca and 1 strand Kid-Silk) you will have to find alternatives for each, individually.

Click here to see our yarn converter

Since different yarns have different qualities and textures we have chosen to keep the original yarn in our patterns. However, you can easily find options among our available qualities by using our yarn converter, or simply pick a yarn from the same yarn group.

It is possible that some retailers still have discontinued yarns in stock, or that someone has a few skeins at home that they would like to find patterns for.

The yarn converter will provide both alternative yarn as well as required amount in the new quality.

If you think it's hard to decide what size to make, it can be a good idea to measure a garment you own already and like the size of. Then you can pick the size by comparing those measures with the ones available in the pattern's size chart.

You'll find the size chart at the bottom of the pattern.

See DROPS lesson: How to read size chart

The needle size provided in the pattern serves only as a guide, the important thing is to follow the knitting tension. And since knitting tension is very individual, you will have to adjust the needle size to ensure that YOUR tension is the same as in the pattern – maybe you’ll have to adjust 1, or even 2 needle sizes, up or down to achieve the correct tension. For this, we recommend that you work test swatches.

Should you work with a different knitting tension than the one provided, the measurements of the finished garment might deviate from the measurement sketch.

See DROPS lesson: How to measure your tension/gauge

See DROPS video: How to make a gauge tension swatch

Working a garment top-down provides more flexibility and room for personal adjustment. For example it is easier to try the garment on while working, as well as making adjustments to length of yoke and shoulder caps.

The instructions are carefully explaining every step, in the correct order. Diagrams are adjusted to the knitting direction and are worked as usual.

The diagram depicts all rows/rounds, and every stitch seen from the right side. It is read from bottom to top, from right to left. 1 square = 1 stitch.

When working back and forth, every other row is worked from the right side and every other row is worked from the wrong side. When working from the wrong side, the diagram will have to be worked reversed: from left to right, knit stitches are purled, purl stitches are knit etc.

When working in the round every round is worked from the right side and the diagram are worked from right to left on all rounds.

See DROPS lesson: How to read knitting diagrams

The diagram depicts all rows/rounds, and every stitch seen from the right side. It is worked from bottom to top, from right to left.

When working back and forth every other row is worked from the right side: from right to left and every other row is worked from the wrong side: from left to right.

When working in the round, every row in the diagram are worked from the right side, from right to left.

When working a circular diagram you start in the middle and work your way outwards, counter clockwise, row by row.

The rows usually start with a given number of chain stitches (equivalent to the height of the following stitch), this will either be depicted in the diagram or explained in the pattern.

See DROPS lesson: How to read crochet diagrams

Instructions for working several diagrams after each other on the same row/round, will often be written like so: “work A.1, A.2, A.3 a total of 0-0-2-3-4 times". This means you work A.1 once, then A.2 is worked once, and A.3 is repeated (in width) the number of times provided for your size – in this case like so: S = 0 times, M = 0 times, L=2 times, XL= 3 times and XXL = 4 times.

The diagrams are worked as usual: begin with the first row in A.1, then work the first row in A.2 etc.

See DROPS lesson: How to read knitting diagrams

See DROPS lesson: How to read crochet diagrams

The total width of the garment (from wrist-to-wrist) will be larger in the larger sizes, despite the actual sleeves being shorter. The larger sizes have longer sleeve caps and wider shoulders, so there will be a good fit in all sizes.

The measurement sketch/schematic drawing provides information regarding the full length of the garment. If it’s a jumper or a jacket the length is measured from the highest point on the shoulder (usually closest to the neckline), and straight down to the bottom of the garment. It is NOT measured from the tip of shoulder. Similarly, the length of yoke is measured from the highest point on the shoulder and down to where yoke is split into body and sleeves.

See DROPS lesson: How to read a schematic drawing

Diagrams are often repeated on the round or in height. 1 repeat is the diagram the way it appears in the pattern. If it says to work 5 repeats of A.1 in the round, then you work A.1 a total of 5 times after/next to each other in the round. If it says to work 2 repeats of A.1 vertically/in height you work the entire diagram once, then begin again at the start and work the entire diagram one more time.

Chain stitches are slightly narrower than other stitches and to avoid working the cast-on edge too tight, we simply chain more stitches to begin with. The stitch count will be adjusted on the following row to fit the pattern and measurement sketch.

The rib edge is more elastic and will contract slightly compared to, for example, stocking stitch. By increasing before the rib edge, you avoid a visible difference in width between the rib edge and the rest of the body.

It’s very easy to cast off too tightly, and by making yarn overs while casting off (and simultaneously casting these off) you avoid a too tight cast off edge.

See DROPS video: How to bind off with yarn overs (yo)

To achieve an even increase (or decrease) you can increase on, for example: every 3rd and 4th row alternately, like so: work 2 rows and increase on the 3rd row, work 3 rows and increase on the 4th. Repeat this until the increase is complete.

See DROPS lesson: Increase or decrease 1 st on every 3rd and 4th row alternately

Should you prefer to work in the round instead of back and forth, you may of course adjust the pattern. You’ll need to add steeks mid-front (usually 5 stitches), and follow the instructions. When you would normally turn and work from the wrong side, simply work across the steek and continue in the round. At the end you’ll cut the piece open, pick up stitches to work bands, and cover the cut edges.

See DROPS video: How to knit steeks and cut open

Should you prefer to work back and forth instead of in the round, you may of course adjust the pattern so you work the pieces separately and then assemble them at the end. Divide the stitches for the body in 2, add 1 edge stitch in each side (for sewing) and work the front and back pieces separately.

See DROPS lesson: Can I adapt a pattern for circular needles into straight needles?

Pattern repeats can vary slightly in the different sizes, in order to get the correct proportions. If you’re not working the exact same size as the garment in the photo, yours might deviate slightly. This has been carefully developed and adjusted so that the complete impression of the garment is the same in all sizes.

Make sure to follow instructions and diagrams for your size!

If you have found a pattern you like which is available in women’s size it’s not very difficult to convert it to men’s size. The biggest difference will be the length of sleeves and body. Start working on the women size that you think would fit across the chest. The additional length will be worked right before you cast off for the armhole/sleeve cap. If the pattern is worked top-down you can add the length right after the armhole or before the first decrease on sleeve.

Regarding additional yarn amount, this will depend on how much length you add, but it is better with a skein too many than too few.

All yarns will have excess fibres (from production) that might come off as lint or shedding. Brushed yarns (ie hairier yarns) have more of these loose, excess fibres, causing more shedding.

Shedding also depends on what is worn under or over the garment, and whether this pulls at the yarn fibres. It’s therefore not possible to guarantee that there will be no shedding

Below are some tips on how to get the best result when working with hairier yarns:

1. When the garment is finished (before you wash it) shake it vigorously so the looser hairs come off. NOTE: do NOT use a lint roller, brush or any method that pulls at the yarn.

2. Place the garment in a plastic bag and put it in your freezer - the temperature will cause the fibres to become less attached to each other, and excess fibres will come off easier.

3. Leave in the freezer for a few hours before taking it out and shaking it again.

4. Wash the garment according to the instructions on the yarn label.

Pilling is a natural process that happens to even the most exclusive of fibers. It's a natural sign of wear and tear that is hard to avoid, and that is most visible in high friction areas of your garment like a sweater's arms and cuffs.

You can make your garment look as new by removing the pilling, using a fabric comb or a pill/lint remover.

Still can't find the answer you need? Then scroll down and leave your question so one of our experts can try to help you. This will be done normally within 5 to 10 working days.
In the meantime, you can read the questions and answers that others have left to this pattern or join the DROPS Workshop on Facebook to get help from fellow knitters/crocheters!

You might also like...

Post a comment to pattern DROPS 180-11

We would love to hear what you have to say about this pattern!

If you want to leave a question, please make sure you select the correct category in the form below, to speed up the answering process. Required fields are marked *.

Comments / Questions (14)

country flag Nicole wrote:

Hallo zusammen, ich habe angefangen 7 cm gestrickt. Die 6 Reihen kraus am Kragen legen sich auf die Vorderseite um. Ist das normal, geht das durchs Tragen weg? Bin schon am Überlegen alles nochmal aufzuziehen und gleich als rechts/links-Bündchen zu machen . Herzlichen Dank vorab und viele Grüße, Nicole

09.03.2024 - 09:14

DROPS Design answered:

Libe Nicole, ie können den Pullover danach mit Stecknadeln auf einer geeigneten Unterlage spannen, anfeuchten (z.B. mit einer Sprühflasche für Blumen) und trocknen lassen, danach entfernen Sie die Stecknadeln, dann sollte sich der Kragen nicht mehr rollen.

11.03.2024 - 07:49

country flag Desvignes Victoria wrote:

J'ai besoin de faire la taille XXXL mais pour l'empiècement je dois augmenter de 176 mailles à intervalles réguliers en partant de 320 mailles pour en obtenir 476. La division ne donne pas un nombre entier: 1.81 . Je fais comment?

15.03.2021 - 17:02

DROPS Design answered:

Bonjour Mme Desvignes, cette leçon explique comment répartir des augmentations à intervalles réguliers en fonction du nombre de mailles/de diminutions et du résultat, comment arrondir, etc... Bon tricot!

16.03.2021 - 08:25

country flag Winnie Albrecht wrote:

Maschenprobe stimmte, Genau nach Anleitung gestrickt, Leider eine furchtbare Passform, der Pullover sieht nur im Stehen gut aus. Sobald ich sitze oder mich bewege rutscht alles hoch. Schade um die Arbeit

06.01.2020 - 19:38

DROPS Design answered:

Liebe Frau Albrecht, Ihr Strickstück Ihrem DROPS Laden bitte zeigen (auch mal im Foto), gerne bekommen Sie dann persönnliche Hilfe. Viel Spaß beim stricken!

07.01.2020 - 09:14

country flag De Lee Gina wrote:

Evergreen by DROPS Design Gebreide trui met ronde pas, Valse patentsteek en A-lijn, van boven naar beneden gebreid. Maten S - XXXL. Het werk wordt gebreid in DROPS Alpaca. Hoe kan ik dit bestellen in maat M met het nodige materiaal ?

30.01.2019 - 10:18

DROPS Design answered:

Dag De Lee Gina,

Voor maat M heb je 450 g Alpaca van kleur 7233, geel/groen nodig. Deze kun je bijvoorbeeld bestellen via een van onze verkooppunten

30.01.2019 - 16:12

country flag Nanna Thune Andersen wrote:

Hejsa Hvordan downloader jeg denne opskrift? Evergreen Mvh Nanna

22.12.2018 - 14:53

DROPS Design answered:

Hei Nanna. Vi har dessverre ikke noen downloadfunksjon på vår side, da må du kopiere og så lagre den selv, eventuelt ta en screen shot. Vi har en funksjon for å printe den ut om du ønsker det. God fornøyelse

02.01.2019 - 10:06

country flag Bettina Baudach wrote:

Hallo liebes Dropsteam, ich finde das Modell ganz toll, bekomme aber nicht einen so großen Ausschnitt wie auf dem Foto. Müssen mehr Maschen aufgenommen werden? Meine Maschenprobe war korrekt.

29.07.2018 - 17:38

DROPS Design answered:

Liebe Frau Badach, sollte Ihre Maschenprobe stimmen, dann sollen Sie die genaue Maßen wie in der Maßskizze bekommen. Beachten Sie, daß Sie auch beim stricken immer noch die gleiche Maschenprobe haben. Viel Spaß beim stricken!

31.07.2018 - 09:20

country flag Ingrid Cardinaels wrote:

Dit is mijn eerste trui breien van boven naar beneden. Is er een filmpje over het breien met een half achterpand. Ik vind wel filmpjes over raglan mouwen, maar niet dit soort mouw. Ik zit nu vast in de pas bij de laatste meerdering.

27.03.2018 - 13:38

DROPS Design answered:

Hallo Ingrid, Bedoel je de meerderingen die je maakt voordat de steken verdeeld worden voor mouwen en lijf? Je kunt dan zien bij 'Tip voor meerderen'. De meerderingen maak je door een omslag te maken.

02.04.2018 - 14:37

country flag Nicole wrote:

Hallo liebes Drops-Team Ich habe im PAtent einen Fehler entdeckt und nun die beiden betreffenden Maschen „fallenlassen“. Aber ich kann sie jetzt doch nicht mehr richtig hochholen. Habt ihr dafür auch ein Video? Lieben Dank

08.01.2018 - 21:40

DROPS Design answered:

Liebe Nicole, vielleicht kann Ihnen dieses Video helfen. Viel Spaß beim stricken!

09.01.2018 - 09:37

country flag Christine Roderick wrote:

Love this and your 2 beautiful models. Ordering my yarn today

18.12.2017 - 14:53

country flag Sylvie Deschenes wrote:

Combien de balle de laine je dois acheter si je veux faire la grandeur moyenne avec drops alpaca uni

07.12.2017 - 14:05

DROPS Design answered:

Bonjour Mme Deschenes, en taille M, il vous faudra 450 g DROPS Alpaca / 50 g la pelote Alpaca = 9 pelotes. Bon tricot!

07.12.2017 - 15:21