
Popular categories
Looking for a yarn?


Comments / Questions (121)
![]() Duthoit Bénédicte wrote:
Duthoit Bénédicte wrote:
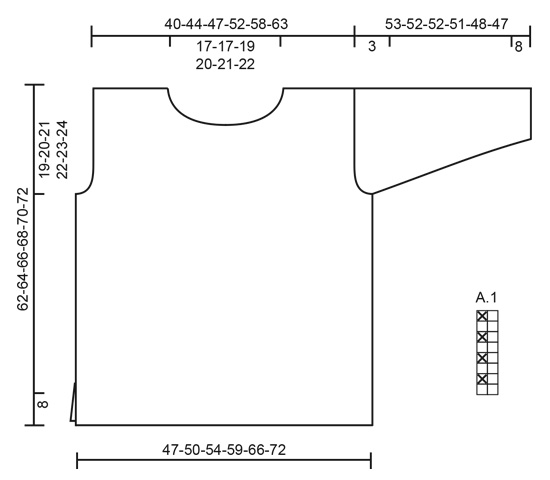
Bonjour, Dans le patron vous parlez d'un diagramme A1 mais je ne le vois pas. Est-ce que quelqu'un peut m'aider ? Merci d'avance.
18.10.2022 - 21:03DROPS Design answered:
Bonjour Mme Duthoit, vous trouverez le diagramme A.1 à droite du schéma des mesures, sous la manche, c'est un diagramme de 2 mailles x 8 rangs. Bon tricot!
19.10.2022 - 09:27
![]() Lone Kramer wrote:
Lone Kramer wrote:
Jeg kan ikke få indtagning til ærmer til at passe jeg har 89 m og der skal ifølge opskriften lukkes 3m1 gang , 2 m 1 gang , 1 maske 1 gang dette får jeg til 12 m med der skal ifølge opskriften være 65 m tilbage så der mangler beskrivelse af hvordan de sidste 12 m skal lukkes af ?
15.10.2022 - 14:46DROPS Design answered:
Hei Lone. Vi skal hjelpe deg så godt vi kan, men kan du opplyse hvilken str du strikker? mvh DROPS Design
24.10.2022 - 11:53
![]() Kerstin Lindh wrote:
Kerstin Lindh wrote:
Var hittar jag diagram 1 ? Tacksam för svar
22.09.2022 - 20:38DROPS Design answered:
Hej Kerstin. Du hittar diagrammet längst ner på mönstret, till höger om måttskissen. Mvh DROPS Design
23.09.2022 - 10:15
![]() Marina Tortorella wrote:
Marina Tortorella wrote:
Non riesco a capire il punto da eseguire. potreste spiegare meglio il punto legaccio e lo schema come si alternano? sembra un punto a coste dalla foto. grazie
09.09.2022 - 23:18DROPS Design answered:
Buonasera Marina, in quale punto del modello trova difficoltà? La maglia legaccio si lavora sulle maglie di vivagno, per il resto segue le altre indicazioni. Buon lavoro!
12.09.2022 - 21:46
![]() Anna wrote:
Anna wrote:
Hittade diagrammet! Svårhittat...
30.08.2022 - 14:16
![]() Anna wrote:
Anna wrote:
Diagram A1 tycks ha ramlat bort från sidan, kan inte se det.
30.08.2022 - 13:28
![]() Gina wrote:
Gina wrote:
Molto bello
01.04.2022 - 17:40
![]() Allyson Doyle wrote:
Allyson Doyle wrote:
Is it correct that there are only 6 rows from the armhole decrease to cast off for the sleeve? The picture indicates 3cm for this part but 6 rows doesn’t make 3cm. Also the sleeve seems to come to a very abrupt end.
31.03.2022 - 10:40DROPS Design answered:
Dear Mrs Doyle, if your tension in height (20 rows = 10 cm) is right, then the last 6 rows at the top of the sleeve should be 3 cm. Happy knitting!
31.03.2022 - 11:50
![]() Addy wrote:
Addy wrote:
Having been a knitter for some 50 years I am totally confused by the instructions of the pattern 210-5. I have no idea what the bulk of the body is supposed to be in stitch form. Garter stitch is every stitch a knit stitch on both the right and wrong side of the work. Stocking stitch is a row of knit and a row or purl. what on earth does A1 mean. what is the method used for the sweater. the rib rows are fine, do you have a name for the stitches created in the bulk. I am truly disappointed .
22.03.2022 - 10:17DROPS Design answered:
Dear Addy, work A.1 as follows: on row 1 (= right side) work: knit 2; on row 2 (wrong side, reading from the left towards the right): knit 1, purl 1 - repeat these 2 rows, ie you will work alternately 1 stitch in stocking stitch (= 1st stitch in A.1) and 1 stitch in garter stitch (=2nd stitch in A.1). To make the pattern symmetrical on each side, you finish with the first stitch in A.1, so that, from WS you will first purl 1, then repeat (K1, P1). Hope it can help. Happy knitting!
22.03.2022 - 10:32
![]() Petra wrote:
Petra wrote:
Betrifft die Abnahmen am Vorderteil. Wenn von der linken Schulter die Rede ist, ist das dann so gemeint, wie ich das Strickstück vor mir liegen habe, oder wie ich es später trage?
01.03.2022 - 19:25DROPS Design answered:
Liebe Petra, die linke Schulter ist die linke Seite, wenn der Pullover getragen wird, also die Linke Schulter wird dann die rechte Schulter wenn Sie das Strickstück vor Ihnen liegt. Diese Abnahmen sollen gegen Halsausschnitt gestrickt werden, dh wenn die Reihen vom Halsausschnitt beginnen, nehmen Sie nach den 3 ersten Maschen ab; wenn die Reihen vom Armausschnitt/von der Seite beginnen, nehmen Sie vor den 3 letzten Maschen ab (immer bei einer Hin-Reihe). Viel Spaß beim stricken!
02.03.2022 - 09:35
|
|||||||
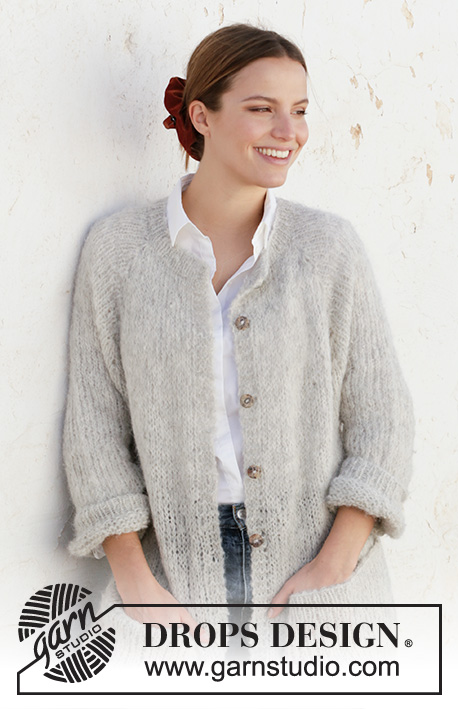
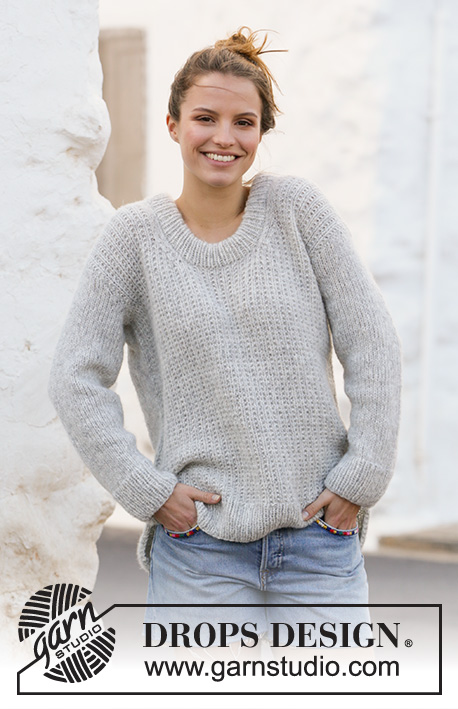
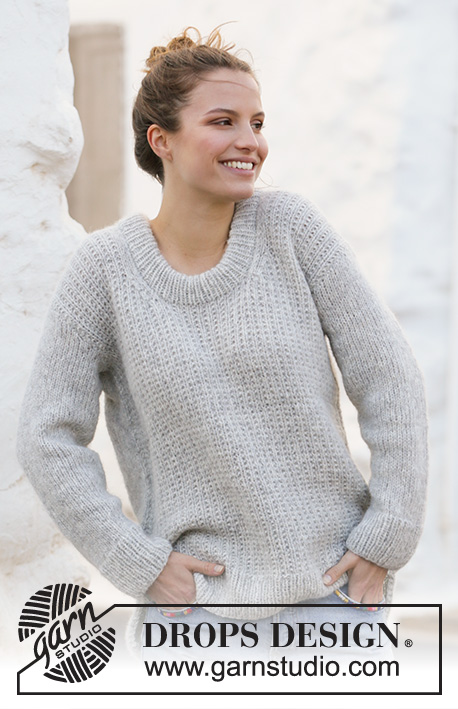
Rainy Day Sweater#rainydaysweater |
|||||||
 |
 |
||||||
Knitted sweater with textured pattern in DROPS Air. Size: S - XXXL
DROPS 210-5 |
|||||||
|
---------------------------------------------------------- EXPLANATION FOR THE PATTERN: ---------------------------------------------------------- GARTER STITCH (back and forth): Knit all rows. 1 ridge vertically = knit 2 rows. PATTERN: See diagram A.1. DECREASE TIP-1 (evenly): To calculate how to decrease evenly, use the total number of stitches on row (e.g. 89 stitches) and divide stitches by number of decreases to be done (e.g. 12) = 7.4. In this example decrease by knitting approx. every 6th and 7th stitch together. DECREASE TIP–2 applies to neck decrease front piece. Decrease inside 3 stitches, continue these 3 stitches in stockinette stitch up along neck edge. All decreases are done from the right side. Decrease as follows before stitches slipped on a stitch holder for neck (left shoulder). Work until 5 stitches on needle (towards stitches slipped on a stitch holder), knit 2 together, work the last 3 stitches on needle in stockinette stitch. Decrease as follows after stitches slipped on a stitch holder for neck (right shoulder). Work 3 stitches in stockinette stitch, slip next stitch knitwise, knit next stitch, pass slipped stitch over, work the rest of row. INCREASE TIP (applies to sleeves): Begin 1 stitch before marker thread, make 1 yarn over, 2 stitches (marker thread is in the middle of these stitches), make 1 yarn over. On next round knit yarns over twisted to avoid holes. ---------------------------------------------------------- START THE PIECE HERE: ---------------------------------------------------------- SWEATER - SHORT OVERVIEW OF THE PIECE: Work sweater back and forth in 2 parts that are sewn together when finished. Work sleeves in the round on double pointed needles. BACK PIECE: Cast on 89-97-103-113-125-137 stitches on circular needle size 4.5 mm = US 7 with Air. Purl 1 row from wrong side, then work as follows from right side: 2 edge stitches in in GARTER STITCH – see explanation above, * knit 1/purl 1 *, repeat from *-* until 3 stitches remain, knit 1 and 2 stitches in garter stitch. Continue like this until piece measures 8 cm = 3⅛". Switch to circular needle size 5.5 mm = US 9. Knit 1 row from right side while decreasing 12-14-14-16-18-20 stitches evenly - READ DECREASE TIP-1 = 77-83-89-97-107-117 stitches. Work A.1 with 1 edge stitch in garter stitch in each side. When piece measures 43-44-45-46-47-48 cm = 17"-17¼"-17¾"-18"-18½"-19", bind off for armholes in each side. Bind off stitches at beginning of every row in each side: Bind off 3 stitches 1-1-1-1-1-1 time, 2 stitches 1-1-1-1-1-1 time and 1 stitch 1-1-2-2-2-3 times = 65-71-75-83-93-101 stitches. Continue in A.1 until piece measures 60-62-64-66-68-70 cm = 23⅝"-24⅜"-25¼"-26"-26¾"-27½". Now bind off the middle 27-27-29-31-33-35 stitches for neck, and finish each shoulder separately. Then decrease on next row from the neck as follows: 1 stitch 1 time = 18-21-22-25-29-32 stitches remain for shoulder. Continue until piece measures 62-64-66-68-70-72 cm = 24⅜"-25¼"-26"-26¾"-27½"-28⅜", and bind off. Work the other shoulder the same way. FRONT PIECE: Cast on and work as on back piece until piece measures 54-56-58-60-62-64 cm = 21¼"-22"-22¾"-23⅝"-24⅜"-25¼". Now slip the middle 17-17-19-21-23-25 stitches on 1 stitch holder for neck, and finish each shoulder separately. Then decrease every row from the right side as follows: 1 stitch 6 times - READ DECREASE TIP-2 (applies to neck) = 18-21-22-25-29-32 stitches remain for shoulder. Continue until piece measures 62-64-66-68-70-72 cm = 24⅜"-25¼"-26"-26¾"-27½"-28⅜", and bind off. Work the other shoulder the same way. SLEEVE: Work sleeves in the round on double pointed needles/ circular needle, bottom up. Divide piece when decreasing for sleeve cap and work back and forth on needle. Cast on 46-48-50-52-52-56 stitches on double pointed needles size 4.5 mm = US 7 with Air. Knit 1 round, then work rib, knit 1/purl 1. When piece measures 8 cm = 3⅛", switch to double pointed needles size 5.5 mm = US 9, and work in stockinette stitch On first round in in stockinette stitch decrease 8-8-8-8-8-10 stitches evenly = 38-40-42-44-44-46 stitches. Insert a marker thread at beginning of round = mid under sleeve. Continue in stockinette stitch, AT THE SAME TIME when piece measures 10-10-10-10-12-12 cm = 4"-4"-4"-4"-4¾"-4¾", increase 1 stitch on each side of marker thread - READ INCREASE TIP. Work yarn overs twisted on next round to avoid holes. Increase every 3½-3½-3-3-2-2 cm = 1¼"-1¼"-1⅛"-1⅛"-¾"-¾" 11-12-13-13-15-15 times in total = 60-64-68-70-74-76 stitches. When piece measures 50-49-49-48-45-44 cm = 19¾"-19¼"-19¼"-19"-17¾"-17¼", bind off 3 stitches on each side of marker thread (= 6 stitches bind off mid under sleeve), then work sleeve back and forth. Bind off for sleeve cap at beginning of every row in each side as follows: 2 stitches 1 time, 3 stitches 1 time, then bind off the remaining stitches. Work another sleeve the same way. ASSEMBLY: Sew the shoulder seams. Sew in sleeves. Sew side seams inside 1 edge stitch until 8 cm = 3⅛" remain = vent. NECK EDGE: Pick up approx. 92-106 stitches around the neck (including stitches on stitch holder and adapt so that the number of stitches is divisible by 2). Work rib knit 1/purl 1 for 9 cm = 3½". Bind off. Fold rib at the top of neck down on the inside of garment. Fasten rib to form a folding edge. To avoid a tight neck edge and avoiding the edge to tip outwards, it is important to make the seam elastic. |
|||||||
Diagram explanations |
|||||||
|
|||||||
 |
|||||||
Have you finished this pattern?Tag your pictures with #dropspattern #rainydaysweater or submit them to the #dropsfan gallery. Do you need help with this pattern?You'll find 26 tutorial videos, a Comments/Questions area and more by visiting the pattern on garnstudio.com. © 1982-2026 DROPS Design A/S. We reserve all rights. This document, including all its sub-sections, has copyrights. Read more about what you can do with our patterns at the bottom of each pattern on our site. |
|||||||


With over 40 years in knitting and crochet design, DROPS Design offers one of the most extensive collections of free patterns on the internet - translated to 17 languages. As of today we count 324 catalogs and 12278 patterns - 12268 of which are translated into English (US/in).
We work hard to bring you the best knitting and crochet have to offer, inspiration and advice as well as great quality yarns at incredible prices! Would you like to use our patterns for other than personal use? You can read what you are allowed to do in the Copyright text at the bottom of all our patterns. Happy crafting!
Post a comment to pattern DROPS 210-5
We would love to hear what you have to say about this pattern!
If you want to leave a question, please make sure you select the correct category in the form below, to speed up the answering process. Required fields are marked *.