
Popular categories
Looking for a yarn?


Comments / Questions (151)
![]() Irène wrote:
Irène wrote:
Bonjour. Vous allez finir par me trouver pénible... Est-ce bien l'avant-dernière et la dernière maille qui sont tricotées ensemble à chaque rang ? ou l'avant-avant-dernière et l'avant-dernière ? Encore mille fois merci !
13.10.2015 - 14:35DROPS Design answered:
Bonjour Irène, aucun souci :) ce sont bien les 2 avant-dernières mailles, soit 2 m ens à l'end juste avant la dernière m du rang. Bon tricot!
13.10.2015 - 14:59
![]() Irène wrote:
Irène wrote:
Euh pardon, je m'embrouille : 2 premières m et 2 dernières tricotées ensemble tous les 2 rangs !
12.10.2015 - 16:41
![]() Irène wrote:
Irène wrote:
Ne faudrait-il pas corriger aussi l'avant-dernière ligne ? "Ensuite, diminuer de chaque côté en tricotant ens les 2 dernières m tous les 2 rangs jusqu’à ce qu’il reste 4 m. Rabattre toutes les m." Si j'ai bien compris, on devra tricoter ensemble les 2 premières, et les 2 dernières m de chaque rang.
12.10.2015 - 16:39DROPS Design answered:
Bonjour Irène, cette phrase était effectivement aussi erronée, il fallait lire de tricoter ens à l'end les 2 avant-dernières m à la fin de chaque rang (1 seul côté, à la fin de chaque rang, tous les rangs, on diminue ainsi de chaque côté) - correction faite. Merci. Bon tricot!
13.10.2015 - 09:32
![]() Irène wrote:
Irène wrote:
Merci encore. Vous répondez très vite en plus. Alors une autre petite question : ici, vaut-il mieux augmenter en tricotant 2 fois la même maille ou avec un jeté ? Spontanément, je prendrais la 1re solution, pour que l'augmentation soit invisible ou presque.
12.10.2015 - 16:32DROPS Design answered:
Bonjour Irène, vous pouvez utiliser la méthode avec laquelle vous êtes le plus à l'aise pour les augmentations. Bon tricot!
13.10.2015 - 09:31
![]() Irène wrote:
Irène wrote:
Ma question ne porte pas du tout sur le bonnet... comme celles de "Preteux" et "Marion" auparavant, mais sur l'écharpe. Pourriez-vous vérifier réellement si le début des explications de l'écharpe en français est correct ?
12.10.2015 - 14:20DROPS Design answered:
Bonjour Irène, effectivement, les augmentations de l'écharpe n'étaient pas juste, on augmente à droite et à gauche (= début et fin de rang) au tout début. La correction a été faite, merci. Bon tricot!
12.10.2015 - 15:27
![]() Irène wrote:
Irène wrote:
Oups, j'ai oublié de changer le pays dans le mail précédent. Merci pour vos vidéos absolument indispensables !
12.10.2015 - 11:38
![]() Christa wrote:
Christa wrote:
Ang. huen, hvor måler man de 6 1/2 cm fra? Lige op fra bunden og op til pinden eller skråt fra hjørnet i bunden og op?
30.09.2015 - 14:22DROPS Design answered:
Hej, Du måler lige op fra bunden mod pinden. God fornøjelse!
01.10.2015 - 16:45
![]() Ren wrote:
Ren wrote:
Would you have dimensions for finished size of hat? It seems to be a bit small. I've used larger needles. I thought the largest size would measure at least 17inches to fit toddler. Can you use DK wool to knit this pattern?
23.06.2015 - 04:17DROPS Design answered:
Dear Mrs Ren, you will find the related sizes to this pattern at the right side of the picture - remember to check and keep the correct tension (= 26 sts x 52 rows in garter st = 10 x 10 cm) to get the correct dimensions. DROPS Alpaca is a 5 ply yarn (sport) - see also here. Happy knitting!
23.06.2015 - 10:10
![]() Lisa Jensen wrote:
Lisa Jensen wrote:
Efter at have strikket 3cm. Rib på vanterne så der at der tages ud til 30masker Kan det passe at der kun skal tages ud fra 28masker til 30masker . Det lyder ikke rigtigt. V.H. Lisa
03.05.2015 - 16:22DROPS Design answered:
Hej Lisa. Det er korrekt, du kan roligt strikke som der staar.
04.05.2015 - 16:05
![]() Annika wrote:
Annika wrote:
Hej! På mössan står det att man ska öka och minska på varje varv i början. Mot slutet ska man öka och minska på vartannat varv. Då får väl mössa inte samma vinkel i början och slutet, är det meningen? Ska inte mössa var spegelvänd?? Mvh/Annika
29.04.2015 - 14:04DROPS Design answered:
Hej Annika, Nej du ökar och minskar även på vartannat varv i början på mössan. Vi beskriver de 2 førsta varven! Lycka till!
13.05.2015 - 12:22
|
|
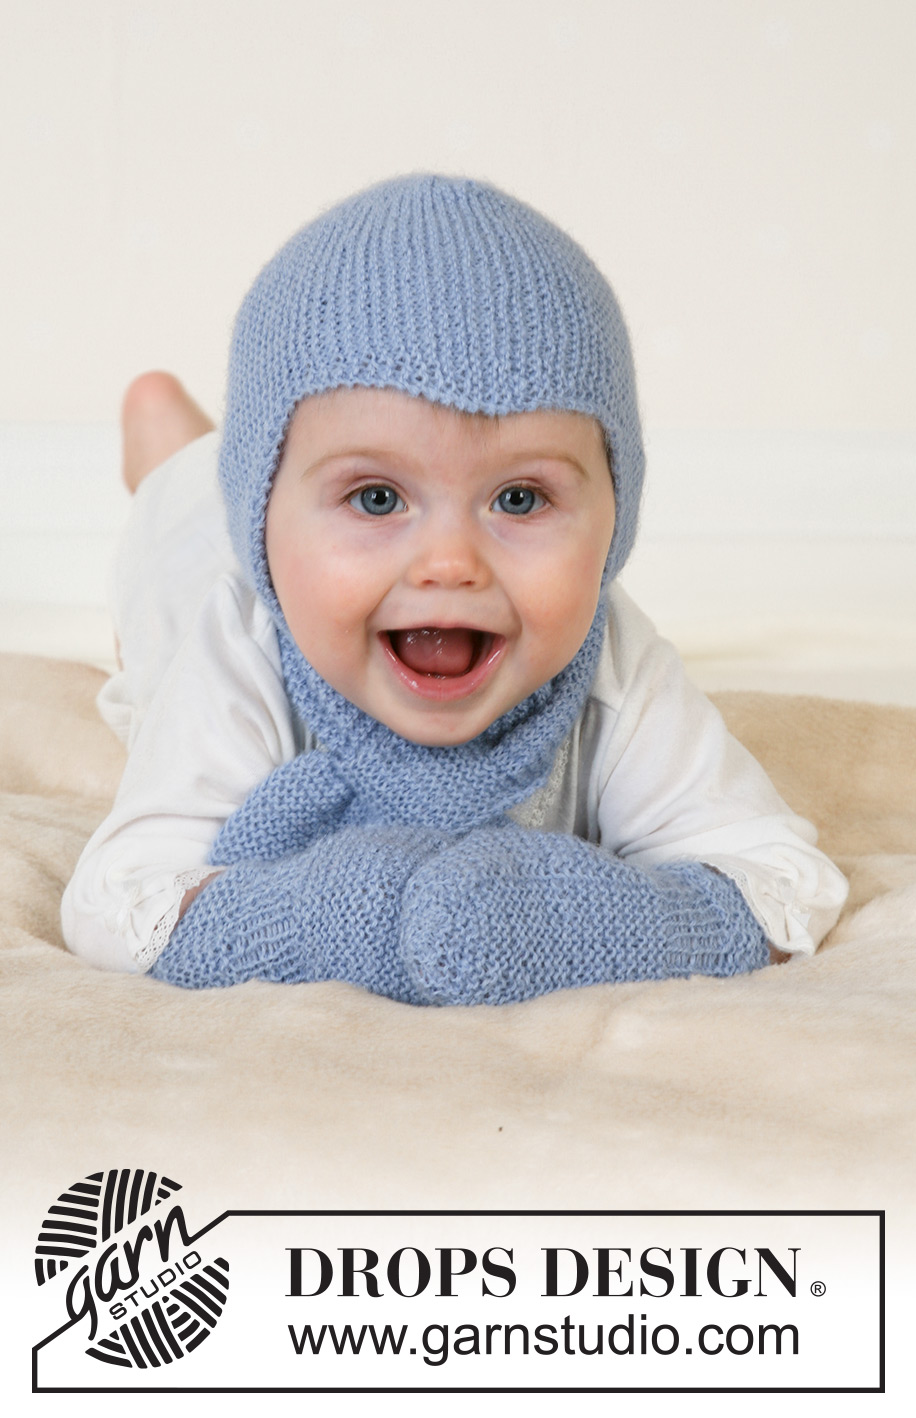
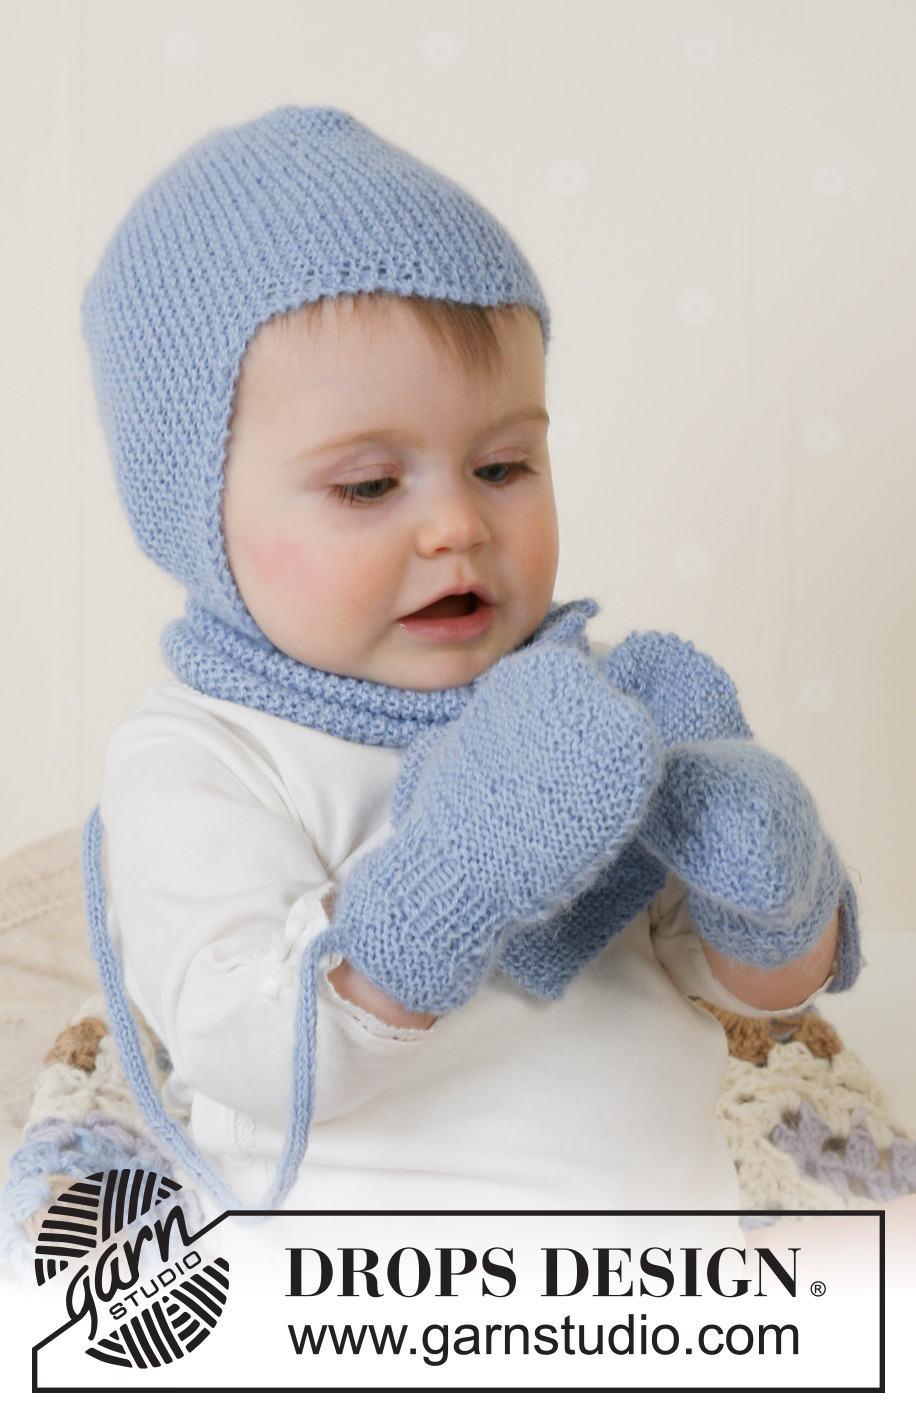
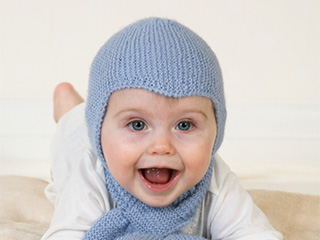
Baby Aviator Hat#babyaviatorhat |
|
 |
 |
Set of knitted helm hat, scarf and gloves for baby in DROPS Alpaca. Sizes from 1 month to 4 years.
DROPS Baby 14-16 |
|
|
Tube knitting: *K1, put thread in front of piece, slip 1 st as if to purl, put thread behind piece*, repeat from *-* on all rows. This creates a round string. HAT: Cast on 33-38-42 (46-50) sts on needle size 2.5 mm [US 1]. Knit garter sts, at the same time inc 1 st at the right side and dec 1 st at the left side as follows: 1st row (=right side): K2, yo (= 1 inc), knit until there are 4 sts left on row and K2 tog, K2. 2nd row (=wrong side): Knit (knit yo into back of st). Repeat these two rows until piece measures 5.5-6-6.5 (7-8) cm [2,2"- 2,4"- 2,6" (2,75"-2,2")]. Now dec 1 st at the right side and inc 1 st at the left side as follows: Right side: K1, slip 1 st as if to knit, K1, psso, knit until there are 2 sts left, yo, K2 Wrong side: Knit (knit yo into back of st). Repeat these two rows until piece measures 11-12-13 (14-16) cm [4,4"- 4,75"- 5,2" (5½"-6,25")]. Continue to inc 1 st at the right side on every 4th row and dec 1 st at the left side on every other row until piece measures 15.5-16.5-17.5 (18-19) cm [6,1"- 6½"- 6,9" (7"-7½")]. Insert a marking thread each side. Continue as follows: Dec 1 st at the right side on every 4th row and inc 1 st at the left side on every other row until piece measures 20-21-22 (22-22) cm [8"- 8,25"- 8,75" (8,75"-8,75")]. Now dec 1 st at the left side on every other row and inc 1 st at the right side on every other row until piece measures 25.5-27-28.5 (29-30) cm [10"- 10,6"- 11,2" (11,4"-11,75")]. Dec 1 st at the right side on every other row and inc 1 st at the left side on every other row until finished measurements. = 31-33-35 (36-38) cm [12,25"- 13"- 13,75" (14,25"-15")]. Bind off. Assembly: Back of hat = the side of piece with 2 whole points and 2 half points. The middle of the 3 whole points on the other side of the hat = point sitting at the middle of the forehead. Sew seams together with small, neat sts as follows: Sew tog back of hat by sewing tog the first half point with the first half of the first whole point. Now sew tog the other half of the first whole point with the first half of the second whole point. Now sew tog the other half of the second whole point with the last half of point. Sew hat tog mid back. String: Cast on 4 sts on needle size 2.5 mm [US 1]. Knit tube as described above. bind off when tube measures approx 16-18-20 (22-24) cm [6,25"- 7"- 8" (8,75"-9½")]. Knit another tube and attach strings to each side of hat. ________________________________________ SCARF: Cast on 4 sts on needle size 2.5 mm [US 1] and knit garter sts, at the same time increasing as follows: Right side: Knit 2 sts in first st Left side: Knit 2 sts in last but one st. Inc on every other row a total of 10-11-12 (13-14) times = 24-26-28 (30-32) sts. Knit garter sts until piece measures 8-9-10 (11-12) cm [3,2"- 3½"- 4" (4,4"-4,75")]. Knit next row as follows: *K1, put 1 st on safety pin (or cable needle) behind the piece*, repeat from *-* until the end of row. There are now 12-13-14 (15-16) sts on row and 12-13-14 (15-15) sts on safety pin/cable needle. Knit 4-4-4 (5-5) cm [1½"- 1½"- 1½" (2"-2")] garter sts over sts on needle and put these on a new safety pin/cable needle. Put sts from the first safety pin/cable needle back on needle and knit garter sts over these until this piece is of the same length. Put the 2 pieces together again by knitting 1 st from needle and 1 st from safety pin/cable needle alternately until all sts are back on needle = 24-26-28 (30-32) sts. Knit garter sts until piece measures 40-42-46 (50-54) cm [15,75"- 16½"- 18" (19,75"-21,25")]. Continue in garter stitch at the same time as decreasing in each side by knitting the 2 second outermost sts together. Dec like this on every 2nd row until there are 4 sts left on needle. Bind off. The scarf measures approx 44-47-51 (55-60) cm [17,25"- 18½"- 20" (21,6"-23,6")]. ________________________________________ MITTENS: Garter sts (on circular needle): Knit 1st round, purl 2nd row. The 3 bigger sizes with thumbs, the 2 smaller sizes without. The mitten is knitted round on double pointed needles. Loosely cast on 34-36-38 (40-42) sts with Alpaca on needles size 2.5 mm [US 1] and knit 12 rounds garter sts – see explanation above – at the same time on the last round dec evenly to 28-30-32 (34-36) sts. Continue in Rib with K1/P1. When piece measures 3-3-3 (4-4) cm [1,1"- 1,1"- 1,1" (1½"-1½")] knit garter sts, at the same time on 1st round increasing evenly to 30-33-36 (39-42) sts – insert a marker and measure piece from here from now on. The 3 bigger sizes: After 1 (2-3) cm [0,4" (0,75"-1,1")], put the last 5 (5-6) sts on round on a thread for thumb. Cast on 5 (5-6) new sts over the thread on next row. All sizes: When piece measures 6-7-8 (9-10) cm [2,4"- 2,75"- 3,1" (3½"-4")] dec as follows on next knitted round: *K1, K2 tog*, repeat from *-* until the end of round = 20-22-24 (26-28) sts. *Purl 1 round, on next round knit tog all sts 2 and 2*, repeat from *-* 1 more time. Pull a double strand of Alpaca through remaining sts, pull tight and sew. Thumb: Put the 5 (5-6) sts from thread back on double pointed needles size 2.5 mm [US 1] and pick up 6 (6-7) sts behind these = 11 (11-13) sts. Knit garter sts until thumb measures 3 (4-5) cm [1,1" (1½"-2")]. Now knit all sts tog 2 and 2. Pull thread through remaining sts and sew. Knit another mitten, but knit the thumb the other side (applies to the 3 bigger sizes). String: Cast on 4 sts using Alpaca on needles size 2.5 mm [US 1] and knit a tube as follows: *K1, put thread in front of piece, slip 1 st as if to purl, put thread behind piece*, repeat from *-* on all rows until string measures approx 62-67-74 (86-96) cm [24"- 26"- 29" (34"-38")] (length between child’s wrists). Bind off and attach string to each mitten. |
|
Have you finished this pattern?Tag your pictures with #dropspattern #babyaviatorhat or submit them to the #dropsfan gallery. Do you need help with this pattern?You'll find 19 tutorial videos, a Comments/Questions area and more by visiting the pattern on garnstudio.com. © 1982-2026 DROPS Design A/S. We reserve all rights. This document, including all its sub-sections, has copyrights. Read more about what you can do with our patterns at the bottom of each pattern on our site. |
|


With over 40 years in knitting and crochet design, DROPS Design offers one of the most extensive collections of free patterns on the internet - translated to 17 languages. As of today we count 325 catalogs and 12298 patterns - 12288 of which are translated into English (US/in).
We work hard to bring you the best knitting and crochet have to offer, inspiration and advice as well as great quality yarns at incredible prices! Would you like to use our patterns for other than personal use? You can read what you are allowed to do in the Copyright text at the bottom of all our patterns. Happy crafting!
Post a comment to pattern DROPS Baby 14-16
We would love to hear what you have to say about this pattern!
If you want to leave a question, please make sure you select the correct category in the form below, to speed up the answering process. Required fields are marked *.