Baby Aviator Hat by DROPS Design

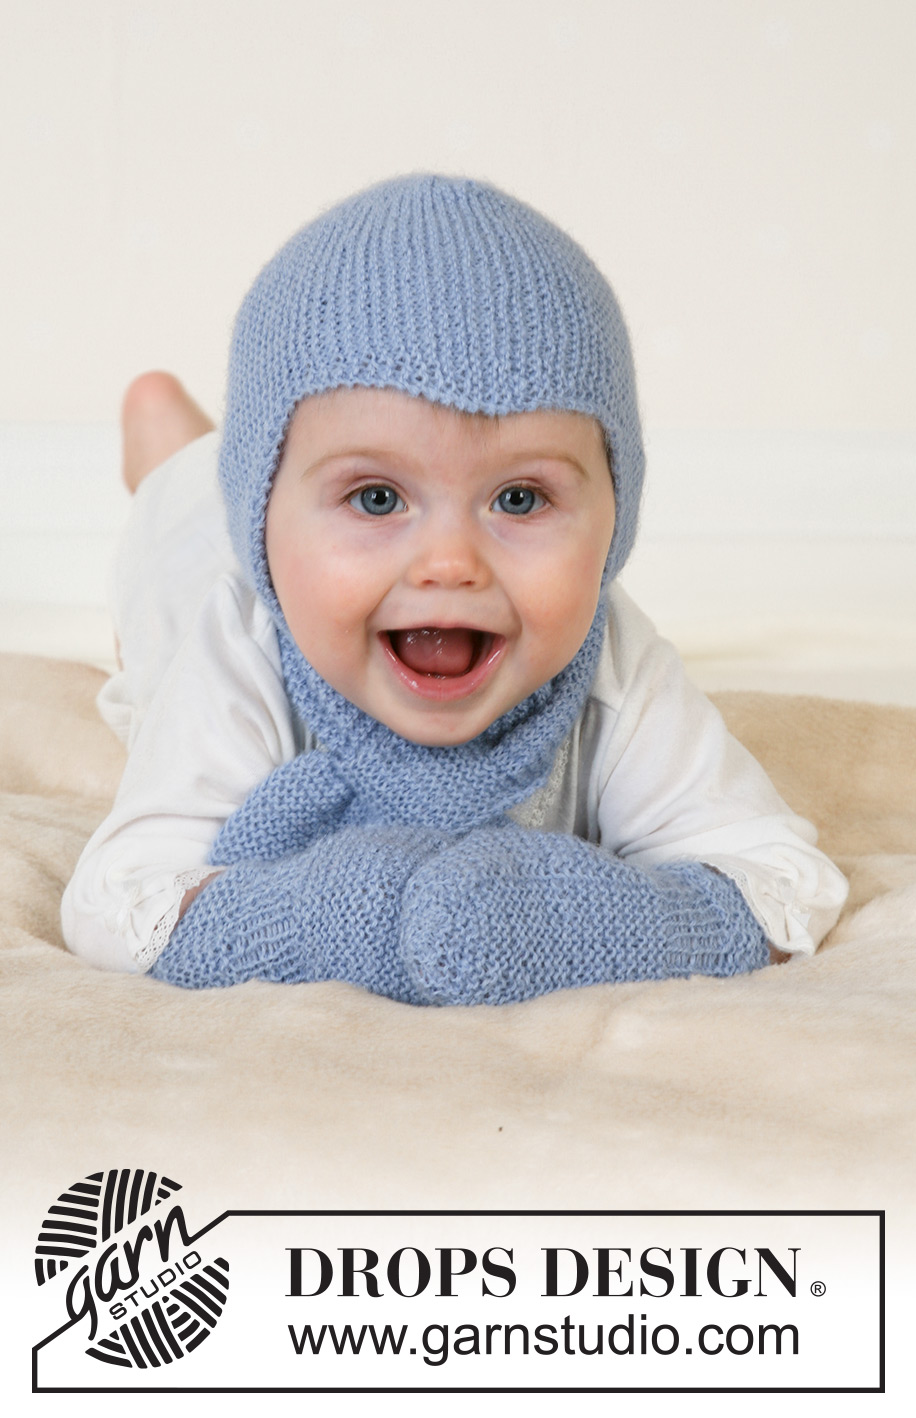
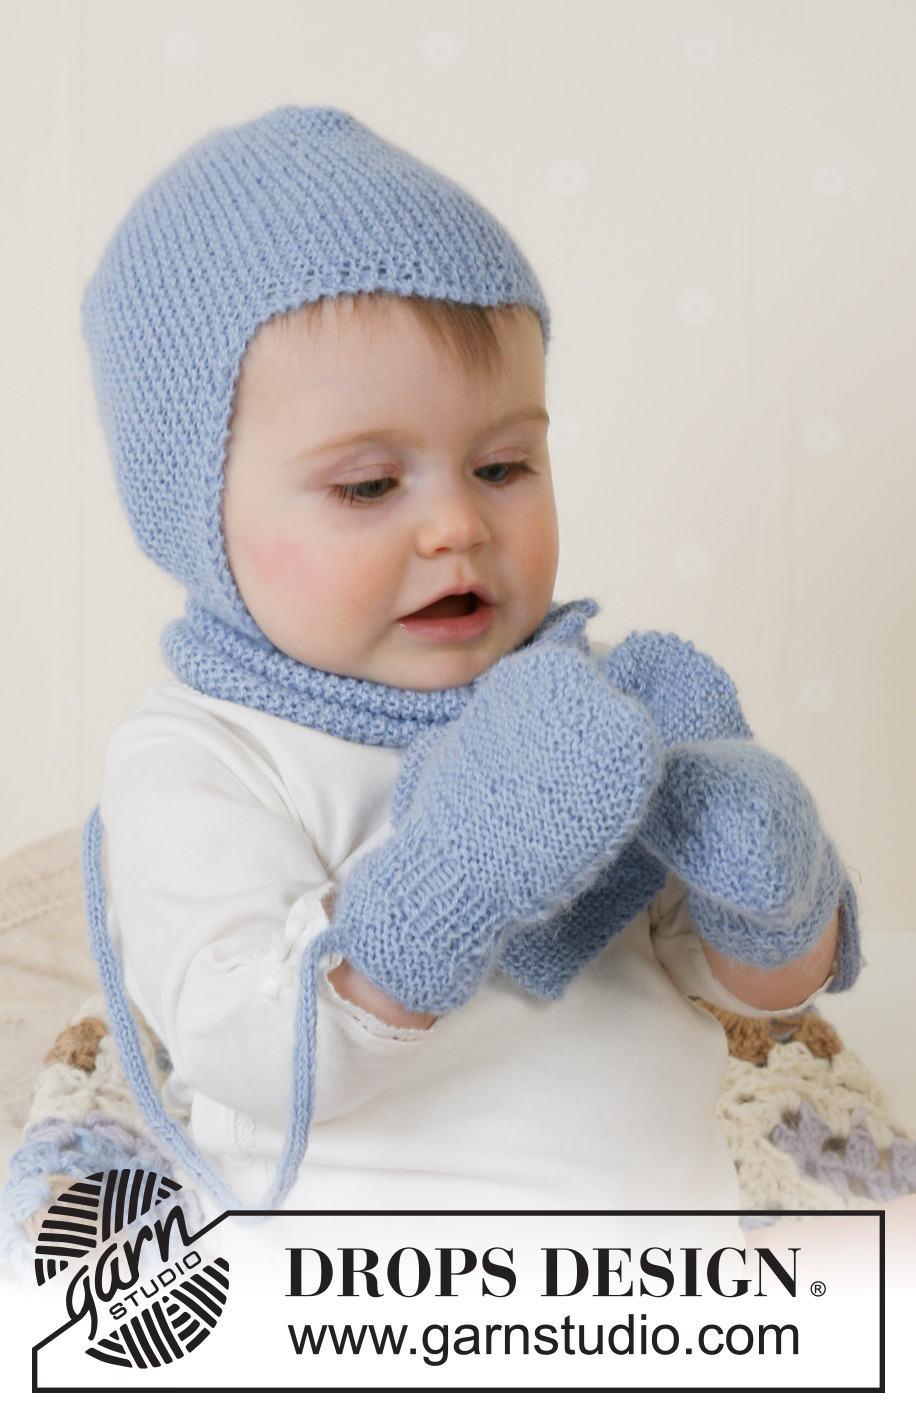
Souprava: čepice se špičkou, šála a rukavice z pletené příze DROPS Alpaca. Velikosti pro miminka i děti, od 1 měsíce do 4 let.

DROPS Baby 14-16
Velikost: 1/3 - 6/9 - 12/18 měsíců (2 – 3/4 roky)

Materiál: DROPS ALPACA firmy Garnstudio
100-100-100 (150-150) g barva č.6205, světlá modrá

DROPS SADA PONOŽKOVÝCH JEHLIC A JEHLICE č.2,5 – nebo velikosti potřebné k upletení zkušebního vzorku o rozměrech 26 ok x 52 řad vroubkovým vzorem = 10 x 10 cm.

-------------------------------------------------------

Zkušební vzorek – Podívejte se, jak ho měřit a proč
Náhradní příze – Podívejte se, jak změnit přízi
Skupina přízí A až F – Neměňte návod, změňte přízi
Spotřeba příze při použití náhradní příze – Využijte náš převodník

-------------------------------------------------------


100% alpaka
od 102.00 Kč /50g
DROPS Alpaca uni colour DROPS Alpaca uni colour 102.00 Kč /50g
Ganella
Objednat
DROPS Alpaca mix DROPS Alpaca mix 107.00 Kč /50g
Ganella
Objednat
needles Jehlice a háčky Objednat
Přízi na tento model můžete mít už za 204Kč. Více zde.

Návod

VROUBKOVÝ VZOR:
Pleteme stále hladce, lícové i rubové řady.

DUTINKA:
*1 oko hladce, přízi dáme před práci, 1 oko sejmeme obrace, přízi vrátíme za práci*, *-* opakujeme ve všech řadách. Takto nám vznikne kulatá šňůrka.
----------------------------------------------------------------------

ČEPIČKA:
Na jehlice č.2,5 nahodíme 33-38-42 (46-50) ok. Pleteme vroubkovým vzorem, SOUČASNĚ přidáváme na pravé straně 1 oko a na levé 1 oko ujímáme, takto:
1. řada (= lícová): 2 oka hladce, 1x nahodíme, pleteme po poslední 4 oka v řadě: 2 oka spleteme hladce, 2 oka upleteme hladce.
2. řada (= rubová): hladce, nahození pleteme za zadní nit.
Tyto dvě řady opakujeme do výše pleteniny 5,5-6-6,5 (7-8) cm. Nyní ujímáme 1 oko na pravé straně a na levé straně 1 oko přidáváme, takto:
Lícová řada: 1 hladce, 1 sejmeme hladce, 1 upleteme hladce a sejmuté přes ně přetáhneme, hladce až po poslední 2 oka v řadě, 1x nahodíme, 2 hladce.
Rubová řada: hladce, nahození pleteme za zadní nit.
Tyto dvě řady opakujeme do výše pleteniny 11-12-13 (14-16) cm. Dále přidáváme 1 oko na pravé straně – v každé 4. řadě a ujímáme 1 oko na levé – v každé 2. řadě, a to až do výše pleteniny 15,5-16,5-17,5 (18-19) cm. Obě strany si označíme. Pokračujeme takto: na pravé straně ujímáme 1 oko v každé 4. řadě a přidáváme na levé straně 1 oko v každé 2. řadě, a to až do výše pleteniny 21-21-22 (22-22) cm. Nyní ujímáme opět na levé straně – v každé 2. řadě, přidáváme na pravé straně – v každé 2. řadě, a to až do výše pleteniny 25,5-27-28,5 (29-30) cm. Na pravé straně teď budeme ujímat v každé 2. řadě a na levé straně přidávat, také v každé 2. řadě, a to až do výše pleteniny = 31-33-35 (36-38) cm. Poté oka uzavřeme.

DOKONČENÍ:
Zadní část čepice = strana se dvěma celými a dvěma polovičními špičkami. Prostřední ze tří celých špiček na protilehlé straně leží uprostřed čela.
Sešíváme takto: zadní strana – stranu první poloviční špičky přišijeme ke straně první celé špičky, druhou stranu celé špičky sešijeme s následující stranou druhé celé špičky a druhou stranu druhé celé špičky přišijeme ke straně poslední poloviční špičky. Nakonec sešijeme zadní šev.

VÁZAČKA:
Na jehlice č.2,5 nahodíme 4 oka a pleteme dutinku – viz výše – dlouhou asi 16-18-20 (22-24) cm. Pak oka uzavřeme a upleteme stejným způsobem ještě jednu. Vzniklé šňůrky přišijeme po stranách čepičky.

----------------------------------------------------------------------

ŠÁLA:
Na jehlice č.2,5 nahodíme 4 oka a pleteme vroubkovým vzorem. SOUČASNĚ přidáváme, takto:
Pravá strana: první oko rozpleteme na dvě.
Levá strana: předposlední oko rozpleteme na dvě.
Přidáváme takto v každé 2. řadě, celkem 10-11-12 (13-14)x = 24-26-28 (30-32) ok. Pleteme vroubkovým vzorem do výše pleteniny 8-9-10 (11-12) cm.
Následující řadu pleteme takto:
*1 oko hladce, 1 oko odložíme na pomocnou jehlici za práci*, *-* opakujeme až do konce řady. Nyní máme 12-13-14 (15-16) ok v řadě a 12-13-14 (15-15) ok na pomocné jehlici za prací. Upleteme 4-4-4 (5-5) cm výšky pleteniny vroubkovým vzorem nad oky na jehlici a pak tato oka odložíme. Odložená oka z pomocné jehlice vrátíme zpět na jehlici a upleteme stejný počet řad vroubkovým vzorem i nad těmito oky. Obě části pleteniny opět spojíme: pleteme střídavě 1 oko na jehlici a 1 oko z pomocné jehlice – na konci řady máme všechna oka na jedné jehlici = 24-26-28 (30-32) ok.
Pleteme vroubkovým vzorem do výše pleteniny 40-42-46 (50-54) cm.
Nyní ujímáme na obou stranách v každé řadě splétáním předposledních 2 ok hladce, a to až do chvíle, kdy nám zbudou 4 oka. Tato oka pak uzavřeme. Šála měří asi 44-47-51 (55-60) cm.
----------------------------------------------------------------------

RUKAVICE:
VROUBKOVÝ VZOR (v kruhových řadách):
Střídáme 1 kruhovou řadu hladce, 1 obrace.

3 větší velikosti rukavic pleteme jako palčáky, 2 menší jen jako „tlapky“ bez prstů.
Pleteme v kruhových řadách na sadě ponožkových jehlic.
Na jehlice č.2,5 volně nahodíme 34-36-38 (40-42) ok a upleteme 12 kruhových řad vroubkovým vzorem. SOUČASNĚ v poslední kruhové řadě ujmeme rovnoměrně na celkový počet 28-30-32 (34-36) ok. Pokračujeme patentem (tj. střídáme 1 oko hladce, 1 obrace).
Ve výši 3-3-3 (4-4) cm pleteme vroubkovým vzorem a SOUČASNĚ v 1. kruhové řadě přidáme rovnoměrně na celkový počet 30-33-36 (39-42) ok – umístíme značku a nadále budeme pleteninu měřit od tohoto místa.

3 větší velikosti: po 1 (2-3) cm výšky odložíme posledních 5 (5-6) ok v kruhové řadě na pomocnou jehlici = palec. Za odloženými oky nahodíme v následující řadě 5 (5-6) nových ok.

Všechny velikosti: ve výši 6-7-8 (9-10) cm ujímáme v následující kruhové řadě, takto: *1 oko hladce, 2 oka spleteme hladce*, *-* opakujeme až do konce kruhové řady = 20-22-24 (26-28) ok.
*Upleteme 1 kruhovou řadu obrace, v následující kruhové řadě splétáme každá 2 oka hladce*, *-* opakujeme ještě 1x. Zbylými oky protáhneme dvojitou přízi Alpaca, stáhneme a zapošijeme.

Palec: odložených 5 (5-6) ok z pomocné jehlice vrátíme zpět na ponožkovou jehlici č.2,5 a za nimi nabereme ještě 6 (6-7) ok = 11 (11-13) ok. Pleteme vroubkovým vzorem do výšky palce 3 (4-5) cm. Pak splétáme každá 2 oka hladce. Zbylými oky protáhneme přízi, utáhneme a zapošijeme.

Upleteme stejným způsobem druhou rukavici, jen palec vyplétáme na opačné straně.

ŠŇŮRKA: Na jehlice č.2,5 nahodíme přízí Alpaca 4 oka a pleteme dutinku: *1 oko hladce, přízi dáme před práci, 1 oko sejmeme obrace, přízi vrátíme za práci*, *-* opakujeme ve všech řadách. Jakmile dutinka měří asi 62-67-74 (86-96) cm (délka mezi oběma zápěstími), všechna oka uzavřeme a šňůrku přišijeme k rukavicím.

Potřebujete poradit s tímto návodem?

Děkujeme, že jste si vybrali návod DROPS Design. Zakládáme si na tom, že dáváme k dispozici návody ověřené a snadno srozumitelné. Všechny návody jsou přeložené z norského originálu a tak si můžete kdykoli srovnat rozměry a počty s původním návodem (DROPS Baby 14-16) .

Máte s návodem potíže? Níže najdete seznam odkazů, které vám pomohou dokončit vaše dílo co nejdříve - nebo se třeba přiučit něco nového.

signature-image signature

Máte s návodem potíže? Níže najdete seznam odkazů, které vám pomohou dokončit vaše dílo co nejdříve - nebo se třeba přiučit něco nového.

Každý náš návod je doprovázen speciálními video-ukázkami, které vás navedou.

Máme takopodrobné rozpisy různých technik a postupů krok za krokem - najdete je zde.

1) Why is the knitting/crochet tension so important?

Knitting tension is what determines the final measurements of your work, and is usually measured per 10 x 10 cm. It is provided like so: number of stitches in width x number of rows in height - eg: 19 stitches x 26 rows = 10 x 10 cm.

The knitting tension is very individual; some people knit/crochet loosely while others work tightly. You adjust the knitting tension with the needle size, which is why the suggested needle size only serve as a guide! You need to adjust this (up or down) to ensure that YOUR knitting tension matches the knitting tension provided in the pattern. If you work with a different knitting tension than provided you will have a different yarn consumption, and your work will have different measurements than what the pattern suggests.

The knitting tension also determines which yarns can replace each other. As long as you achieve the same knitting tension you can replace one yarn with another.

See DROPS lesson: How to measure your tension/gauge

See DROPS video: How to make a gauge tension swatch

nahoru

2) What are the yarn groups?

All our yarns are categorised into yarn groups (from A to F) according to thickness and knitting tension – group A contains the thinnest yarns and group F the thickest. This makes it easier for you to find alternative yarns to our patterns, should you wish to switch yarn. All yarns within the same group have a similar knitting tension and can easily replace each other. However, different yarn qualities have different structures and properties which will give the finished work a unique look and feel.

Click here for an overview of the yarns in each yarn group

nahoru

3) Can I use a different yarn than what the pattern suggests?

The important thing when changing from one yarn to another is that the knitting/crochet tension remains the same. This is so that the measurements of the finished piece will be the same as on the sketch provided. It is easier to achieve the same knitting tension using yarns from the same yarn group. It is also possible to work with multiple strands of a thinner yarn to achieve the knitting tension of a thicker one. Please try our yarn converter. We recommend you to always work a test swatch.

Please NOTE: when changing yarn the garment might have a different look and feel to the garment in the photo, due to individual properties and qualities of each yarn.

See DROPS lesson: Can I use a different yarn than the one mentioned in the pattern?

nahoru

4) How do I use the yarn converter?

At the top of all our patterns you’ll find a link to our yarn converter, which is a helpful tool should you wish to use a different yarn than suggested. By filling in the yarn quality you wish to replace, the amount (in your size) and number of strands, the converter will present good alternative yarns with the same knitting tension. Additionally it will tell you how much you’ll require in the new qualities and whether you’ll need to work with multiple strands. Most skeins are 50g (some are 25g or 100g).

If the pattern is worked with multiple colours, every colour will have to be converted separately. Similarly, if the pattern is worked with several strands of different yarns (for example 1 strand Alpaca and 1 strand Kid-Silk) you will have to find alternatives for each, individually.

Click here to see our yarn converter

nahoru

5) Why do I get the wrong knitting tension with the suggested needle size?

The needle size provided in the pattern serves only as a guide, the important thing is to follow the knitting tension. And since knitting tension is very individual, you will have to adjust the needle size to ensure that YOUR tension is the same as in the pattern – maybe you’ll have to adjust 1, or even 2 needle sizes, up or down to achieve the correct tension. For this, we recommend that you work test swatches.

Should you work with a different knitting tension than the one provided, the measurements of the finished garment might deviate from the measurement sketch.

See DROPS lesson: How to measure your tension/gauge

See DROPS video: How to make a gauge tension swatch

nahoru

6) Why is the pattern worked top-down?

Working a garment top-down provides more flexibility and room for personal adjustment. For example it is easier to try the garment on while working, as well as making adjustments to length of yoke and shoulder caps.

The instructions are carefully explaining every step, in the correct order. Diagrams are adjusted to the knitting direction and are worked as usual.

nahoru

7) Why are the sleeves shorter in larger sizes?

The total width of the garment (from wrist-to-wrist) will be larger in the larger sizes, despite the actual sleeves being shorter. The larger sizes have longer sleeve caps and wider shoulders, so there will be a good fit in all sizes.

nahoru

8) What is a repeat?

Diagrams are often repeated on the round or in height. 1 repeat is the diagram the way it appears in the pattern. If it says to work 5 repeats of A.1 in the round, then you work A.1 a total of 5 times after/next to each other in the round. If it says to work 2 repeats of A.1 vertically/in height you work the entire diagram once, then begin again at the start and work the entire diagram one more time.

nahoru

9) How do I work according to a knitting diagram?

The diagram depicts all rows/rounds, and every stitch seen from the right side. It is read from bottom to top, from right to left. 1 square = 1 stitch.

When working back and forth, every other row is worked from the right side and every other row is worked from the wrong side. When working from the wrong side, the diagram will have to be worked reversed: from left to right, knit stitches are purled, purl stitches are knit etc.

When working in the round every round is worked from the right side and the diagram are worked from right to left on all rounds.

See DROPS lesson: How to read knitting diagrams

nahoru

10) How do I work according to a crochet diagram?

The diagram depicts all rows/rounds, and every stitch seen from the right side. It is worked from bottom to top, from right to left.

When working back and forth every other row is worked from the right side: from right to left and every other row is worked from the wrong side: from left to right.

When working in the round, every row in the diagram are worked from the right side, from right to left.

When working a circular diagram you start in the middle and work your way outwards, counter clockwise, row by row.

The rows usually start with a given number of chain stitches (equivalent to the height of the following stitch), this will either be depicted in the diagram or explained in the pattern.

See DROPS lesson: How to read crochet diagrams

nahoru

11) How do I work several diagrams simultaneously on the same row/round?

Instructions for working several diagrams after each other on the same row/round, will often be written like so: “work A.1, A.2, A.3 a total of 0-0-2-3-4 times". This means you work A.1 once, then A.2 is worked once, and A.3 is repeated (in width) the number of times provided for your size – in this case like so: S = 0 times, M = 0 times, L=2 times, XL= 3 times and XXL = 4 times.

The diagrams are worked as usual: begin with the first row in A.1, then work the first row in A.2 etc.

See DROPS lesson: How to read knitting diagrams

See DROPS lesson: How to read crochet diagrams

nahoru

12) Why does the piece start with more chain stitches than it’s worked with?

Chain stitches are slightly narrower than other stitches and to avoid working the cast-on edge too tight, we simply chain more stitches to begin with. The stitch count will be adjusted on the following row to fit the pattern and measurement sketch.

nahoru

13) Why increase before the rib edge when the piece is worked top-down?

The rib edge is more elastic and will contract slightly compared to, for example, stocking stitch. By increasing before the rib edge, you avoid a visible difference in width between the rib edge and the rest of the body.

nahoru

14) Why increase in the cast-off edge?

It’s very easy to cast off too tightly, and by making yarn overs while casting off (and simultaneously casting these off) you avoid a too tight cast off edge.

See DROPS video: How to bind off with yarn overs (yo)

nahoru

15) How do I increase/decrease on every 3rd and 4th row/round alternately?

To achieve an even increase (or decrease) you can increase on, for example: every 3rd and 4th row alternately, like so: work 2 rows and increase on the 3rd row, work 3 rows and increase on the 4th. Repeat this until the increase is complete.

See DROPS lesson: Increase or decrease 1 st on every 3rd and 4th row alternately

nahoru

16) Why is the pattern slightly different than what I see in the photo?

Pattern repeats can vary slightly in the different sizes, in order to get the correct proportions. If you’re not working the exact same size as the garment in the photo, yours might deviate slightly. This has been carefully developed and adjusted so that the complete impression of the garment is the same in all sizes.

Make sure to follow instructions and diagrams for your size!

nahoru

17) How can I work a jacket in the round instead of back and forth?

Should you prefer to work in the round instead of back and forth, you may of course adjust the pattern. You’ll need to add steeks mid-front (usually 5 stitches), and follow the instructions. When you would normally turn and work from the wrong side, simply work across the steek and continue in the round. At the end you’ll cut the piece open, pick up stitches to work bands, and cover the cut edges.

See DROPS video: How to knit steeks and cut open

nahoru

18) Can I work a jumper back and forth instead of in the round?

Should you prefer to work back and forth instead of in the round, you may of course adjust the pattern so you work the pieces separately and then assemble them at the end. Divide the stitches for the body in 2, add 1 edge stitch in each side (for sewing) and work the front and back pieces separately.

See DROPS lesson: Can I adapt a pattern for circular needles into straight needles?

nahoru

19) Why do you show discontinued yarns in the patterns?

Since different yarns have different qualities and textures we have chosen to keep the original yarn in our patterns. However, you can easily find options among our available qualities by using our yarn converter, or simply pick a yarn from the same yarn group.

It is possible that some retailers still have discontinued yarns in stock, or that someone has a few skeins at home that they would like to find patterns for.

The yarn converter will provide both alternative yarn as well as required amount in the new quality.

nahoru

20) How do I make a women’s size garment into a men’s size one?

If you have found a pattern you like which is available in women’s size it’s not very difficult to convert it to men’s size. The biggest difference will be the length of sleeves and body. Start working on the women size that you think would fit across the chest. The additional length will be worked right before you cast off for the armhole/sleeve cap. If the pattern is worked top-down you can add the length right after the armhole or before the first decrease on sleeve.

Regarding additional yarn amount, this will depend on how much length you add, but it is better with a skein too many than too few.

nahoru

21) How do I prevent a hairy garment from shedding?

All yarns will have excess fibres (from production) that might come off as lint or shedding. Brushed yarns (ie hairier yarns) have more of these loose, excess fibres, causing more shedding.

Shedding also depends on what is worn under or over the garment, and whether this pulls at the yarn fibres. It’s therefore not possible to guarantee that there will be no shedding

Below are some tips on how to get the best result when working with hairier yarns:

1. When the garment is finished (before you wash it) shake it vigorously so the looser hairs come off. NOTE: do NOT use a lint roller, brush or any method that pulls at the yarn.

2. Place the garment in a plastic bag and put it in your freezer - the temperature will cause the fibres to become less attached to each other, and excess fibres will come off easier.

3. Leave in the freezer for a few hours before taking it out and shaking it again.

4. Wash the garment according to the instructions on the yarn label.

nahoru

22) Where on the garment is the length measured?

The measurement sketch/schematic drawing provides information regarding the full length of the garment. If it’s a jumper or a jacket the length is measured from the highest point on the shoulder closest to the neckline, and straight down to the bottom of the garment. It is NOT measured from the tip of shoulder. Similarly, the length of yoke is measured from the highest point on the shoulder and down to where yoke is split into body and sleeves.

On a jacket measures are never taken along bands, unless specifically stated. Always measure inside band stitches when measuring the length.

See DROPS lesson: How to read a schematic drawing

nahoru

23) How do I know how many balls of yarn I need?

The required amount of yarn is provided in grams, eg: 450 g. To calculate how many balls you’ll need you first need to know how many grams are in 1 ball (25g, 50g or 100g). This information is available if you click on the individual yarn quality on our pages. Divide the amount required with the amount of each ball. For example, if each ball is 50g (the most common amount), the calculation will be as follows: 450 / 50 = 9 balls.

nahoru

Pořídili jste si přízi DROPS na tento model? Pak máte taky právo žádat po svém prodejci, u něhož jste nakoupili, pomoc a rady. Seznam DROPS obchodů najdete tady!
Pořád se nemůžete dobrat odpovědi, kterou hledáte? Pak posuňte stránku dolů a napište nám svůj dotaz, naši specialisté se vám pokusí poradit. Obvykle to zvládneme během 5 až 10 pracovních dnů.. Mezitím si můžete pročíst otázky a odpovědi, které k tomuto modelu položili ostatní, nebo navštívit skupinu DROPS Workshop na Facebooku, kde vám může poradit některá spřízněná duše!

Komentáře / Otázky (155)

country flag Rixt wrote:

Hello I am relatively new to knitting, but already finished one of your beautiful baby sock patterns! Now I wanted to make something else for our baby, this hat with mittens, but looking at the wool I saw that you have the same amount of stitches in the gauge as with the socks I made, but almost the double amount of rows. (with the same needle size) How is that possible, somehow that does not make sense to me. Thank you very much for helping :)

23.01.2023 - 20:32

DROPS Design answered:

Dear Mrs Rixt, your socks might have been worked in stocking stitch, while the hat is here worked in garter stitch, so that you will get another number of rows (you need more rows in garter stitch than in stocking stitch for the same height), ie you need here 52 rows (26 ridges) in garter stitch to get 10 cm. Happy knitting!

24.01.2023 kl. 12:02

country flag Gillian wrote:

Can you advice pattern for Adult sizes please ?? As would like to make one for myself thanks Gillian

03.01.2023 - 08:59

DROPS Design answered:

Dear Gillian, sure you will find all our patterns for similar hats here including patterns for adult, children and baby. Happy knitting!

03.01.2023 kl. 09:44

country flag Larissa wrote:

Hallo! Ich stricke Schal für 6-monatiges Baby. Welche lange (ungefähr) hat der fertige Schal?

20.11.2022 - 12:54

DROPS Design answered:

Liebe Larissa, in die 2. Größe ist der Schal ca 47 cm lang. Viel Spaß beim stricken!

21.11.2022 kl. 09:15

country flag Larissa wrote:

Eine Frage, \r\nHabe ich richtig verstanden, nach dem falschen Knote man muß noch 42 cm stricken?

20.11.2022 - 11:08

DROPS Design answered:

Liebe Larissa, Sie stricken bis der Schal 40-42-46 (50-54) cm insgesamt misst (die Anleitung wird korrigiert). Viel Spaß beim stricken !

21.11.2022 kl. 09:11

country flag Annette Lassen wrote:

Der står tubestrik øverst på opskriften... skal man starte og slutte på alle pinde?? Synes ikke at billederne viser dette nemlig...

15.11.2022 - 10:08

DROPS Design answered:

Hej Annette, det tubestrikkede er kun til selve snoren under hagen. Se videoen nederst i opskriften hvordan man gør :)

16.11.2022 kl. 12:12

country flag Agnieszka wrote:

Błąd rękawiczki roz.2 6 oczek zamknąć anie 4 przed ściągaczem. 3 cm ściągacza a nie od dołu robótki

24.05.2022 - 18:58

DROPS Design answered:

Witaj Agnieszko, masz rację, dziękujemy za info. Wzór został już poprawiony i dodana została korekta. Pozdrawiamy!

25.05.2022 kl. 09:10

country flag Mette wrote:

Jeg vil kun strikke huen. Hvor meget garn skal der bruges til den?

28.03.2022 - 19:37

DROPS Design answered:

Hej Mette, jeg kan se at det ikke står med i opskriften, men du bør kunne klare dig med 1 nøgle i den mindste størrelse. Husk at det findes en video nederst i opskriften :)

30.03.2022 kl. 15:09

country flag Elin Hofvind wrote:

Hadde vært fint med et bilde av lua før montering så en ser st en har gjort rett eller feil.

20.02.2022 - 10:54

country flag Meike wrote:

Hi! Isn't there an error in the smallest size lengths for the English version? it's 5.5, 11, 15.5, 21, 25.5, and 31. that means the pieces are 5.5, 5.5, 4.5, 5.5, 4.5, and 5.5 cm long. But that means that the right part of the face becomes wider than the left part. Shouldn't it be 5.5, 5.5, 4.5, 4.5, 5.5, and 5.5? So the absolute lengths 5.5cm, then 11, then 15.5, then 20(!), and then 25.5 and 31? That way, the pieces with the slower in/decreases are the same size? Cheers!

09.11.2021 - 11:39

DROPS Design answered:

Dear Meike, you are right, it should be 20 cm instead of 21 cm - as in this lesson. Thanks for your feedback. Happy knitting!

09.11.2021 kl. 13:21

country flag Stephania wrote:

007 дивитись онлайн

03.10.2021 - 08:09

Přidejte komentář k návodu DROPS Baby 14-16

Rádi bychom věděli, co si o tomto modelu myslíte!

Pokud se chcete na něco zeptat, dbejte prosím na to, abyste ve formuláři níže vybrali správnou kategorii - díky tomu se dříve dozvíte, co potřebujete vědět. Povinná pole jsou označena *.